


English
11
until the maximum steam volume has been reached af-
ter approx. 30 seconds.
Note
Please note that here it is set to steam stage 3 (tiles/
stone), since the running-in period will otherwise be ex-
tended.
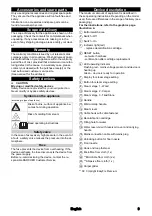
7. Place the device on a firm surface.
Illustration I
8. Insert the mains plug into a socket.
Illustration K
9. Press the On switch.
Illustration L
10. The LED operating indicator flashes red.
Illustration M
11. The LED operating indicator lights up constantly
green after approx. 30 seconds.
Illustration N
The device is ready for use.
Regulating the steam volume
The steam volume setting depends on the surface to be
cleaned.
Press the button with the direction arrows on the
handle repeatedly until the desired steam stage is
selected.
Illustration P
3 different steam stages are available:
Note
The maximum steam stage (Tiles/stone) is always se-
lected when the device is switched on.
Press the steam lever after setting the steam vol-
ume.
Illustration O
Refilling water
Note
The water level can be seen through the transparent
fresh water tank.
When topping up the water, the decalcification cartridge
remains secured in the device.
Open the water reservoir cover and fill the water res-
ervoir with max. 0.5 L tap water, directly at the de-
vice.
Illustration G
or
Remove the water reservoir, open the water reser-
voir cover and fill the water reservoir with max. 0.5 L
tap water, see chapter Filling water.
Illustration H
Interrupting operation
ATTENTION
Material damage due to condensate/moisture
See the chapter Storing the device to prevent material
damage during longer work breaks.
In order to save energy, we recommend that you switch
off the device for breaks in operation of longer than 20
minutes.
1. Press the OFF switch.
Illustration S
Switching off the device
1. Press the OFF switch.
Illustration S
The device is switched off.
2. Pull the mains plug out of the socket.
Illustration T
ATTENTION
Device damage due to water putrefaction
The water in the reservoir may putrefy if the device is
not put into operation for more than 2 months.
Drain the water reservoir before longer breaks in oper-
ation.
3. Drain the water reservoir.
Illustration U
Storing the device
ATTENTION
Material damage due to condensate/moisture
The floor covering can be damaged by moisture remain-
ing on the floor cleaning cloth or floor nozzle/device af-
ter cleaning.
Remove the floor cleaning cloth/carpet glider and dry
the floor nozzle/the device after finishing the floor clean-
ing work.
Do not place or store the device on heat-sensitive sur-
faces.
4. Remove the floor cleaning cloth or floor cleaning
cloth and carpet glider, see the chapter Floor nozzle
and carpet glider.
Illustration D
Illustration E
5. Remove moisture from the floor nozzle/device.
6. Wind the power cable around the upper and lower
cable hooks.
Illustration V
7. Store the device in vertical position on a solid base
or on the wall.
Illustration I
8. Store the device in a dry location that is protected
from frost.
Important application instructions
Cleaning the floor areas
We recommend sweeping the floor or vacuum cleaning
it before using the appliance. In this way the floor will be
cleared of dirt and loose particles before the wet clean-
ing.
Cleaning coated or painted surfaces
ATTENTION
Damaged surfaces
Steam can loosen wax, furniture polish, plastic coatings
or paint and edge band from edges.
Do not direct the steam at glued laminated edges as the
edge band may loosen.
Do not use the device for cleaning unsealed wood or
parquet floors.
Tiles/stone - maximum steam stage
Carpet - medium steam stage
Wood - minimum steam stage


