


10
English
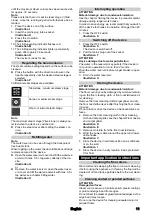
Initial Start-Up
ATTENTION
Device damage due to calcification
The decalcification cartridge only works properly if you
adjust the device to the local water hardness before op-
erating it for the first time.
Set the device to the local water hardness.
Set the device to the current water hardness before us-
ing it in an area with a different water hardness (e.g. af-
ter a move)
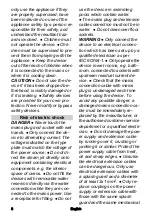
1. Insert the decalcification cartridge into the water res-
ervoir and press it firmly into place.
Illustration F
2. Set the water hardness, see chapter Setting the wa-
Note
When steaming for the first time after removing and
reinserting the decalcification cartridge, the steam
jet may be weak or irregular, and individual drops of
water may be expelled. The device requires a short
running-in period in which the decalcification car-
tridge fills with water. The steam volume that is ex-
pelled increases constantly until the maximum
steam volume has been reached after approx. 30
seconds.
Note
Please note that here it is set to steam stage 3 (tiles/
stone), since the running-in period will otherwise be
extended
.
Installation
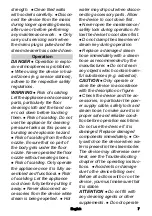
Installing the handle bar
1. Hold the basic device.
2. Fit the handle bar all the way to the end stop into the
basic device until it audibly latches into place. The
handle bar must sit tightly in the device.
Illustration B
Installing the floor nozzle
1. Hold the device by the handle.
2. Connect the lower section of the basic unit to the
floor nozzle until it audibly latches into place.
Illustration C
Operation
Unwinding the power cord
몇
WARNING
Risk of electric shock
If the power cable is not completely unwound, the dan-
ger exists of you straining and damaging the mains ca-
ble by overestimating the range of the cable.
Always completely unwind the power cable.
Note
The lower cable holder can be rotated by 360° for re-
moving the cable. The upper cable hook cannot be ro-
tated.
1. Turn the lower cable holder upwards.
2. Completely remove the power cable from the cable
hook.
3. Fasten the cable in the fastener of the upper or low-
er cable hook to prevent it from being run over dur-
ing cleaning work.
Illustration J
Filling water
The water reservoir can be filled at any time.
ATTENTION
Material damage through open reservoir cover or
incorrectly seated or loose water reservoir
Liquid can escape and damage the floor covering if the
water reservoir is not correctly closed or the water res-
ervoir is not correctly fitted in the device.
Take care to ensure that the water reservoir cover is
closed and the reservoir is seated tightly in the device
when the water reservoir is full.
ATTENTION
Damage to the device
Unsuitable water can block the nozzles.
Do not use condensation from the clothes dryer for fill-
ing.
Do not use collected rain water for filling.
Do not use cleaning agents or other additives (e.g.
scents) for filling.
Note
The decalcification cartridge must be installed in the wa-
ter reservoir when filling the water reservoir.
Filling the water reservoir directly on the device
1. Hold the device.
2. Open the water reservoir cover and fill the water res-
ervoir with max. 0.5 L tap water, directly at the de-
vice.
Illustration G
3. Close the reservoir cover.
Removing the water reservoir for filling
1. Hold the device.
2. Turn the lower cable hook upwards.
3. Pull the water reservoir vertically upwards by the
handle.
4. Open the water reservoir cover and fill the water res-
ervoir with max. 0.5 L tap water.
Illustration H
5. Close the water reservoir cover.
6. Insert the water reservoir and press downwards until
it locks into place.
Switching on the device
ATTENTION
Damage to the device and material damage through
tipping over
The device can fall over and be damaged if inadequate-
ly secured during work breaks or storage. Liquid can al-
so escape and damage the floor covering.
Position the device with the floor nozzle on a solid base
or the handle with the wall anti-slip handle in a vertical
position on a solid wall.
ATTENTION
Device damage due to incorrectly set water hard-
ness
The decalcification cartridge only works properly if the
device is adjusted to the local water hardness. The de-
vice may calcify if the water hardness is set incorrectly.
Adjust the device to the local water hardness before first
operation, see chapter Setting the water hardness.
Note
When steaming for the first time after removing and re-
inserting the decalcification cartridge, the steam jet may
be weak or irregular, and individual drops of water may
be expelled. The device requires a short running-in pe-
riod in which the decalcification cartridge fills with water.
The steam volume that is expelled increases constantly


