background image

  PRINT  OUTPUT 
1.DATA  No 
   START   001 
   END     015 
   SET     No 

PRINT  OUTPUT 
1.DATA  No 
   START   001 
   END     015 
   SET     No   

PRINT  OUTPUT 
1.DATA  No 
   START   001 
   END     015 
   SET     No   


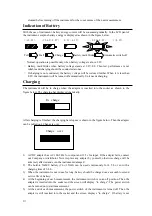
Preparation for Printing 


Communication 
cable  

KD11


Power 
source 

Printer 


PRINT OUTPUT Menu  

In the main menu, item 4 “Print Output” is entered. This menu sets data to be printed as 
shown in the figure below. Pressing “MENU” can return to the main menu. 


                                  Press 


Press 


  Make sure that power source of printer and KD11 adapter are reliable as wrong insertion will 

damage the instrument. 

★ 

Before printing, the baud rate of KD11 should be set to 9600. 

★ 

In printing, “Print Output” will blink on the screen. 

Regular Maintenance and Replacement of Impacter Snout   
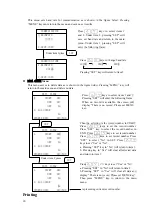
Press 

 △   ▽ 

keys to select final record number.

Press “SET” to enter the following frame. 


Press 

 △   ▽ 

  keys to select “Yes” or “No”.   

a.   In “No”, press “SET” key to return to the first frame
and reset the initial record number. 
b.  In “Yes”, press “SET” key for printing. After printing,
return to the first frame. 

SET 

Press 

  △       ▽  

keys to select initial record

number. Press “SET” to enter the following frame. 

When no record is available, the screen will display
“There is no record. Please set MENU key”. 

SET 

 17 


Summary of Contents for 3521

Page 1: ...521 Before any use read the manual carefully and understand correctly its content and warnings and precautions indicated therein Kanomax Instrument Shengyang Co Ltd Take good care of this manual for f...

Page 2: ...ignoring the mark Notes to the legend The mark denotes precautions including danger The Legend depicts the content of attention Left legend is for protection from high temperature The mark denotes pr...

Page 3: ...d humidity it can cause measurement error Don t use volatile solvents for wiping the body The surface stains can be removed with a soft cloth Stubborn stains can be removed with a soft cloth containin...

Page 4: ...Thank you for the purchase and the use of Kanomax products Please read the operational manual carefully and do observe relevant precautions for your correction operation of the precision instrument...

Page 5: ...tallation of Parts and Preparation for Testing 5 5 Measuring Method 11 6 Battery Indication 12 7 Changing 12 8 Setting the Menu 13 9 Printing 16 10 Regular Maintenance and Replacement of Impacter Snou...

Page 6: ...nt calculates the concentration value finally in terms of the change in frequency of the piezoelectric element after a certain quantity of air absorbed in a given time and dust particles are collected...

Page 7: ...Display screen Probe Impacter Display screen contrast adjuster Key Power switch Cleaning Communication interface Cleaning Adaptor interface Cell box fixed button Cell box Cleaning box fixed button Cle...

Page 8: ...dust exceeds 10 g cleaning will be blinking here the crystal must be cleaned e Concentration value Upon measurement the value will be blinked f Status of operation upon cleaning and starting for the...

Page 9: ...rystal Communication Protocol Standard RS232 Communication Baud Rate 4800bps 9600bps 19200bps set through the menu Number of Data Memory 500 Weight About 2 4kg Overall Dimension 65 w 180 l 150 h mm Po...

Page 10: ...Fixing the batteries box button Batteries box 2 Press fixing batteries box button to the bottom slide the batteries box horizontally along the groove as shown in the figure below 3 Installation of ba...

Page 11: ...After pulling the fixing cleaning button for some distance the foreside of the cleaning box will flip from the batteries box itself as shown in the figure below 3 When installing the cleaning box fir...

Page 12: ...hen the operation status shifts to blinking wait Waiting in about 10 seconds until the crystal frequency becomes steady wait is no longer blink Check the surplus frequency first a If there is too much...

Page 13: ...ponge The sponge erection plate Sponge pressure plate Cleaning Take out the sponge 1 Take care that the two pieces of sponge different in size and cleaning fluid should be dropped on the smaller spong...

Page 14: ...HAP PE N INSER T POSITIO N OF CLE ANING DEV ICE PLE AS E SH UT DOWN TH E HIG H VOLT AG E WHEN CLE AN IN G OTH ERW ISE EL EC TR OSH OCK WILL HAP P INSER T PO SITIO N OF CLE ANING DEV ICE INSER T PO SI...

Page 15: ...on angle 0 Setting method can be referred to Setting the Menu When the instrument is turned on the default measurement time of the instrument if 120s The user can set the measurement mode as required...

Page 16: ...nt you press START key measurement will stop and concentration will indicate This method can be adopted for emergency stop in the measuring process b If in the course of measurement you press MEAS CLN...

Page 17: ...below The charging bar displays dynamically In charge After charging is finished the charging bar stops as is shown in the figure below Then the adapter can be pulled out Change is over Charge over 1...

Page 18: ...he following figure indicates Press MENU key and return to the main menu The set result won t be saved SAMPLING TIME 1 120s 2 SAVE INFO Under item 1 press SAMPLING TIME 1 120s 2 SAVE INFO SAMPLING TIM...

Page 19: ...eds 2000 HZ in modes of 120s and 24s TIME ADJUSTMENT Menu This menu sets and time as is shown in the figure below Pressing MENU key can return to the main menu and save no set results TIME ADJUSTMENT...

Page 20: ...ilable the screen will display There is no record Please set MENU key 1 DATA CLEAR 1 START 001 END 015 SET No 2 ALL CLEAR No STORED DATA 015 500 Then the selection is the record number in START Press...

Page 21: ...s wrong insertion will damage the instrument Before printing the baud rate of KD11 should be set to 9600 In printing Print Output will blink on the screen Regular Maintenance and Replacement of Impact...

Page 22: ...ing out the knob upward slowly The needle of the proble is fitted with O ring which should not be damaged when the probe is taken out When cleaning the probe pour the cleaning agent into a beaker of 5...

Page 23: ...ise the probe can t be inserted into the socket Then squeeze the probe cap down to the socket and turn the cap to s side to lock the probe The installation method is shown in the figure below Clean wa...

Page 24: ...en leaving the factory an important snout 1 is attached with the instrument In measurement an operating environment impacter snout 2 should be substituted Impacter cap Impacter body 2 7 07 um cutting...

Page 25: ...contrast with a screw driver and tune the program knob Probe not inserted firmly Remove the probe and reinstall it Wait keeps blinking Turn off and wait for a while 2 minutes because of incomplete dr...

Page 26: ...ginning on the date of purchase In this period trouble is repaired free of charge except for those due to improper operation unauthorized modification or alteration by user as well as natural disaster...

Reviews: