cleaned before turning off the instrument for the convenience of the next measurement.
Indication of Battery
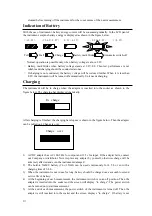
With the use of instrument, battery energy content will be consumed gradually. In the LCD pant of
the instrument, surplus battery energy is displayed as shown in the figure below.
(9.6V~9.2V)
(10.60~9.6V)
Full Half Charge
battery mark blinks
Automatic switch-off
(9.2V~8.8V)
(<8.8V)
(>10.0V)
※
Normal operation is possible only when battery voltage is above 9.2V.
※
Battery mark blinks when battery voltage stands at 9.2V-8.8. Then test performance is not
reliable and charging should be conducted at once.
※
If charging is not conducted, the battery voltage will be reduced further. When it is less than
8.8V, the instrument will be turned off automatically. So it needs charging.
Charging
The instrument will be in charge when the adaptor is inserted into the socket as shown in the
figure below. The charging bar displays dynamically.
In charge
After charging is finished, the charging bar stops as is shown in the figure below. Then the adapter
can be pulled out. Change is over.
Charge over
1) AC/DC adapter has AC 100-240v for output and 12.5v for input. If the adapter fails, contact
our Company or distributor. Never replace any adapter by yourself, otherwise charge will be
adversely affected and even the instrument damaged.
2) The built-in Ni-MU battery (9.6v-1.5AH) can be used continuously for 4.5 h or so with a
charging time of 5-8 h..
3) When the instrument is not in use for long, battery should be charged once a month to extend
service life of battery.
4) At the beginning of each measurement, the instrument switch is in an off position. Then the
adapter is inserted into the socket and the screen will display “in charge”. The power switch
can be turned on to start measurement.
5) At the end of each measurement, the power switch of the instrument is turned off. Then the
adapter is still inserted into the socket and the screen displays “in charge”. If battery is not
13


