background image


User Manual 

BW-50-070/10


Page 3 of 16  


1   KANMED Baby Warmer - Quick instruction 


Always leave the unit switched on so that it is ready for the next baby! 


Refer to the Users manual whenever in doubt. Se also the Baby Warmer Video “Handling Instructions” 
 
Filling the water mattress 

1.


Use the filling tube to fill the water mattress with warm water (about 35

0

C). 

2.


Fill to the level mark. Check by standing the water mattress upright. If the bed is to be tilted please read 
chapter 3 Water Mattress, in the users manual.  

3.


Add one complete bottle of KANMED anti algae, preferably via the filling tube. 

4.


There must be no air in the water mattress. Place the water mattress on a flat surface. Grip the open mattress 
nipple to lift the mattress up a bit and press all air bubbles out. Lower the nipple and close it. 


Inserting the Heating Pad and Nest 

1.


Place the water mattress on a flat surface to insert the heating pad. 

2.


Turn the water mattress upside down and insert the Heating Pad in the pocket with its printed text towards the 
water. 

3.


Turn the water mattress over again. 

4.


Insert the water mattress with heating pad into the nest pocket. Use the opening in the head end of the nest to 
assist in fitting the Nest to the water mattress. 


Preparing the bed 

1.


Ensure that the bed has holes in the bottom. 

2.


Place the Baby Warmer on the cot mattress. 

3.


Place the Baby Warmer in the KANMED Baby Bed or any other suitable bed.   

4.


Protect the Nest with a sheet that is soft but not too thick. 


Connecting the Control unit 

1.


Connect the Heating Pad at the back of the Control Unit. Don’t over tighten. 

2.


Connect the power cable at the back of the Control Unit and switch it on.  

3.


Hang the Control Unit in a safe place where it can be seen.  

4.


Press the start button on the front panel and observe that it starts at 37

0

C after a short self test.  


Placing the baby 

1.


Only when the desired temperature is reached, you can place the baby in the nest. 

2.


Position the lightly dressed baby (diaper, long arm T-shirt, bare legs and a cap on very small ones) on its back 
in the nest.  

3.


Adjust the nest size by pulling the string. Hide the cord under the mattress. 

4.


Cover the baby with suitable cover, such as 1-3 layers of cotton blankets. 


Temperature setting 

1.


All babies are individuals and their temperature must be controlled frequently until you are familiar with the 
baby’s reaction to the water temperature. Overheating is often caused by covering the baby too much. 

2.


37

0

C is a good starting temperature for slightly hypothermic babies and for babies weighing less than 1000g. 

3.


36.5

0

C is the most common temperature for babies weighing more than 1000g 

4.


As the baby’s weight increases, the temperature is primarily controlled by changing the amount of blankets that 
cover the Baby and secondly by changing the temperature in 0.5

0

C increments. 

5.


When the lightly dressed and covered baby is maintaining body temperature with a water temperature of about 
35.5 - 36

0

C, then the baby is most often ready for a standard cot that has no warming. 

 
Maintenance 

1.


Wash the nest at maximum 90

0

C. Preferably 60

0

C. Dry tumble it. KANMED recommends you to change the 

Baby Nest once a year.  

2.


Surface disinfect the water mattress and the heating pad 

3.


Change water every 3 months and add a new bottle of anti algae. 

4.


See the user’s manual for further maintenance instructions and periodical safety checks.


Summary of Contents for BABYWARMER

Page 1: ...User Manual Art No BW 50 070 10 2007 03 Caution Please read this manual carefully Incorrect use of patient warming equipment may cause patient injury Manufactured by KANMED AB Sweden Distributed by 0413 ...

Page 2: ...n 11 9 Trouble shooting 11 10 Safety systems available 12 11 Accessories Spare parts and technical documentation 13 12 Technical data 14 13 Warranty 15 14 Disposal 15 NOTE This manual is valid for all KANMED Baby Warmer of model KBW50 recognised by the blue silicone rubber edges on the control unit This user manual contains important safety information and must be read carefully and shall be saved...

Page 3: ...2 Connect the power cable at the back of the Control Unit and switch it on 3 Hang the Control Unit in a safe place where it can be seen 4 Press the start button on the front panel and observe that it starts at 370 C after a short self test Placing the baby 1 Only when the desired temperature is reached you can place the baby in the nest 2 Position the lightly dressed baby diaper long arm T shirt b...

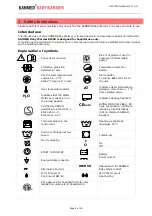
Page 4: ...led Temp lock in text Alarm button To silence T alarm for 10 minutes Over temperature alarm T Indicates water temperature deviation more than 1 o C from selected value H2O Indicates that the Water Mattress is missing or in the wrong position Indicates Heating Pad fault Certified by SEMKO according to EN 60 601 1 EN 60 601 1 2 EN 60 601 2 35 CE0413 Fullfills MDD 93 42 EEC EC Type examination certif...

Page 5: ...e of the Heating Pad is turned towards the Water Mattress Make sure that there are at least 2 holes in the bottom of the bed If feasible the connection cable to the Heating Pad can be thread through a suitably placed hole Always place the baby with its head towards the closed semicircular part of the KANMED Baby Nest Make sure that the adjusting string is placed outside the Baby Nest to prevent it...

Page 6: ...ad The design and construction of the Heating Pad has reduced magnetic and electrical fields to normal background levels and thereby making them harmless The voltage to the Heating Pad is SELV 24V DC Safe Extra Low Voltage See technical data for information about warming up times Explanation of the drawings on the Heating Pad Please make them available while reading this 1 Heating Pad BW 50 002 ma...

Page 7: ... Air pressure may build while filling Interrupt filling and release air if necessary 11 Remove air bubbles Very Important Place the Water Mattress on a flat surface and lift the filling hole 5 to 10 cm upwards Press the air bubbles towards the hole repeatedly until all major air bubbles are expelled 12 Lower the filling hole while pressing the Water Mattress so that no air enters and insert the pl...

Page 8: ... Only for indication Alarms Description and checks of the function of alarms is found in the technical section Stop the acoustic alarm by pressing the alarm button or switch the unit off by pressing the Start Stand By button Only T can be cancelled for 10 minutes by pressing the alarm button Try to rectify the cause for an alarm see section trouble shooting and switch on the unit again If the alar...

Page 9: ...ion of the KANMED Baby Warmer is not influenced by the incubator Try it for children in need of a soft warm support for instance children suffering from hydrocephalus fractures or headaches after delivery with a forceps or a suction device colicky pains etc NIDCAP Developmental Care and Kangaroo care In these treatment forms the sleeping and rest as well as positioning of the baby plays an essenti...

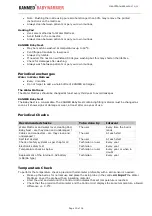
Page 10: ...illing material must be changed as soon as it shows signs of damage or wear at least after one year of use Periodical Checks Recommended checks To be done by Interval Water Mattress and water level Heating Pad Baby Nest are they clean and undamaged The user Every time the bed is made Cables and connectors are they clean and undamaged The user At each start Self test at start The user At each start...

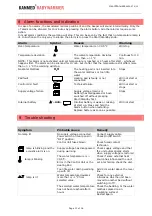
Page 11: ... stops Supply voltage failure Supply voltage mains or battery has disappeared or been switched off without pressing Start Standby first Stops Internal battery T H2O Internal battery is weak or missing at start up Press and hold the Alarm button when restarting Replace battery as soon as possible Will not start 9 Trouble shooting Symptom Probable cause Remedy No supply voltage connected Connect sup...

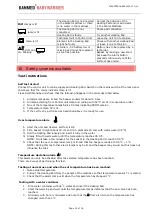
Page 12: ...amps blinks 5 times indicating PROM version 4 Temperature lamp 37 is lit 5 If the self test is performed as described above it is ready for use Over temperature alarm 1 Start the unit and observe self test is OK 2 Fill a bucket Height about 30 cm and min diameter 20 cm with warm water 38 o C 3 Roll the Heating Pad loosely and insert it fully in the water 4 Slowly fill with warm water until the tem...

Page 13: ...alue selected before supply voltage interruption Internal 1 5 V battery test This test may only be done by a qualified technician During this test the heating pad must be connected and the internal 1 5 Volt battery removed from its holder by opening the Control Unit 1 Press start and check that the red lamps for T H2O and blinks Press Start standby 2 Make a new start but keep the alarm button pres...

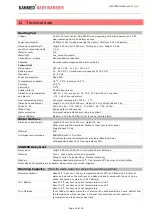
Page 14: ...nstalled according to section 2 Internal Battery Alkaline 1 5V size LR6 AA Only for power failure alarm Water Mattress Dimensions and Weight Length 600 mm With 270 mm Height 30 mm Other sizes might be available Please contact your local supplier Weight about 0 5 kg Material PVC Anti Algae recommended KANMED Bottle 119 ml fluid Poly Oxyethylene dimethylimino ethylene dimethyliminio ethelyenedichlor...

Page 15: ...d KANMED s responsibilities totally and are not allowed without the written consent of KANMED 13 Warranty KANMED warrants the purchaser that the Control Unit BW 50 Heating Pad BW 50 002 are free from defects in material and workmanship for a period of 12 month from the date of delivery The KANMED Baby Nest and associated parts are warranted to be free of defects at the time of delivery The sole ob...

Page 16: ...nual BW 50 070 10 Page 16 of 16 KANMED AB Gårdsfogdevägen 18B SE 168 66 BROMMA Stockholm Sweden Telephone 46 8 56 48 06 30 Telefax 46 8 56 48 06 39 E Mail info KANMED se Home page www KANMED se Distributed by ...

Reviews: