background image

40

Service and Repair Manual

Model 710/760

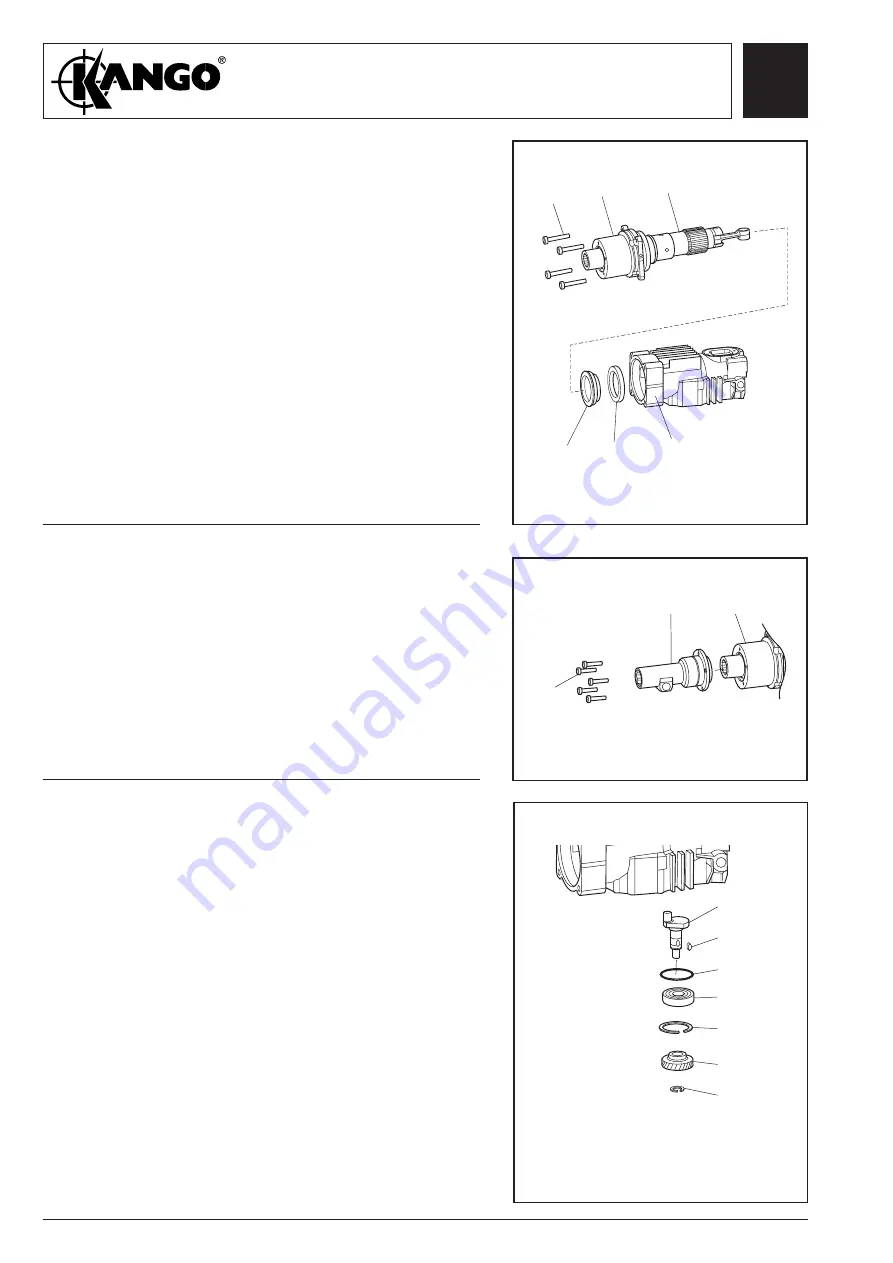
Fig. 76

Fig. 77

1.

Fit O-ring (101) to bearing housing (102).

2.

Press bearing (80) onto crown wheel (81).
Assemble them into top housing (79).

3.

Assemble bearing housing assembly to top
housing (79). Secure with four screws (103),

torque load to 15Nm.

Assembling
the bearing
housing

Assembling
the nosepiece

1.

Fit nosepiece (104) to bearing housing (102) and
secure with five screws (109) 

torque load to

10Nm

.

103

102

80

101

81

Service and Repair Manual

Model 760KV


/760SV

79

104

109

102

Fig. 78

Assembling
the crank

1. 

 Press bearing (62) onto crank (65).

2.

Fit crank key (64) in crank (65).

3.

Fit crank assembly to top housing ensuring crank
pin is fitted into the connecting bearing.

4.

Secure with circlip (61).

5.

Support crank (65) through access hole in top
housing, fit crank gear (60) and secure using (59).

65

64

63

62

61

60

59

Summary of Contents for 710 Series

Page 1: ......

Page 2: ... 10 SCREW 4 35 22 9170 7040 03 SCREW 1 8 16 31 9170 7040 02 SCREW 1 8 16 36 9170 0198 60 SCREW 4 35 50 9170 7040 04 SCREW 2 18 54 9170 7040 07 SCREW 3 27 710BV KV 86 9170 3290 60 SCREW 15 133 101 9170 3278 60 SCREW 10 89 710MV 87 9170 3290 60 SCREW 10 89 100 9170 3278 60 SCREW 10 89 760KV SV 103 9170 3290 60 SCREW 15 133 109 9170 3278 60 SCREW 10 89 760MV 115 9170 3290 60 SCREW 15 133 147 9170 703...

Page 3: ...4 two screws 17 two washers 18 and remove handle assembly Note It will be necessary to pull hard on the top of the handle assembly after removal of screws 17 to remove module 21 with the handle assembly 2 Disconnect RTR loom 26 from field loom 25 18 14 17 25 26 Fig 2 Fig 3 Removing the handle halves and speed control switch 1 Remove screw 2 and handle cushion 2 Remove pivot bolt 4 and pivot nut 3 ...

Page 4: ...rom lower handle support 13 13 15 15 Fig 7 Dismantling the top cover BV KV only 1 Remove retaining ring 111 and pull off cover 110 2 Remove handle locking knob 108 washer 107 bolt 105 Remove handle 104 Remove adaptors 106 3 Remove strap casting 109 and remove retaining ring 103 from top cover 102 Remove top cover 102 108 107 106 103 110 111 106 105 104 102 109 Dismantling the latch bar 1 Remove la...

Page 5: ...12 and remove bearing mount 39 bearing 40 and washer 41 2 Remove bearing 46 and sealing ring 45 112 39 40 41 43 45 46 Fig 11 Dismantling the motor housing 1 Remove two brushes 32 2 Withdraw baffle 42 field coil assembly 38 and two field location rubbers 37 from motor housing 35 3 Remove four screws 34 and two brush holders 33 42 30 34 38 37 33 34 33 32 29 31 35 Fig 8 Dismantling the top cover MV o...

Page 6: ...antling the gear box assembly 1 Remove blanking knob 72 2 Remove six screws 54 and separate the gearbox 112 BV KV 120 MV from the top housing 3 Remove gearbox foam insert 68 bearing 67 lower clutch bearing 58 remove O ring 55 and press out seal 47 4 Remove gasket 57 and two dowel pins 66 68 67 58 112 BV KV 120 MV 54 55 66 72 57 Dismantling the top housing Fig 14 1 Remove two rear handle plugs 53 R...

Page 7: ...rews 101 nosepiece 96 and the following items O ring 95 O ring 94 anvil sleeve 93 anvil seals 92 anvil 91 transfer ring 90 buffer ring 89 catcher housing 88 O ring 87 Fig 16 710KV 710BV DISMANTLING 86 85 84 83 81 79 78 77 82 101 96 95 94 93 92 91 710KV 91 710BV 90 89 88 87 Service and Repair Manual Model 710KV 710BV Fig 17 Dismantling the piston assembly 1 Remove gudgeon pin 76 from piston 77 2 Re...

Page 8: ... 115 buffer 114 chuck 113 latches 112 latch plate 111 latch spring 110 lock plate 109 lock chuck 108 113 112 111 110 109 108 118 117 116 115 114 99 Fig 20 Dismantling the driver assembly 1 Remove five screws 100 nosepiece 98 and the following items from driver 97 O ring 88 catcher 89 buffer ring 90 transfer ring 91 junk ring 92 seal 93 anvil 94 junk ring 95 O ring 96 100 98 97 96 95 94 93 92 91 90...

Page 9: ...e four screws 87 and transmitter housing 85 from top housing 73 2 Remove O ring 84 and striker 82 seal 81 and piston 80 from barrel 83 3 Remove shim 76 washer 75 and O ring 86 1 Remove gudgeon pin 79 from piston 80 2 Remove bearing 77 from connecting rod 125 Dismantling the piston assembly 87 80 79 125 77 86 85 84 83 82 81 80 76 75 73 ...

Page 10: ...3 Remove handle halves 5 and 6 and lower handle cover 13 4 Remove switch wires from handle half 6 5 Remove lower cord clamp 7 upper cord clamp 8 and foam slug 9 6 Remove cord 12 and cord protector 11 from handle 5 7 Remove speed control 10 switch 24 and terminal block 115 710KV BV 126 710MV from handle 5 8 Remove screw 27 retaining plate 28 and RTR loom 26 Removing the isolation module assembly 1 ...

Page 11: ... 118 and top cover 112 117 116 115 118 112 114 120 119 113 111110 Fig 29 Dismantling theswitch assembly MVonly 1 Remove two screws 147 and clamp plate 146 2 Removeknob 145 3 Remove nose cone end cap 139 and chuck cover 138 4 Removethefollowingitemsfromdriver 110 wireclip 137 buffer stop 136 buffer 135 chuck 134 latches 133 latch plate 132 latch spring 131 washer 130 Dismantling the latch bar KV SV...

Page 12: ... sealing ring 45 112 39 40 41 43 45 46 Fig 33 Dismantling the motor housing 1 Remove two brushes 32 2 Withdraw baffle 42 field coil assembly 38 and two field location rubbers 37 from motor housing 35 3 Remove four screws 34 and two brush holders 33 42 34 38 37 33 34 33 35 112 36 30 32 29 31 50 Dismantling the top cover MV only 1 Remove retaining ring 129 and pull off cover 128 2 Unscrew handle 125...

Page 13: ...owel pins 66 67 58 124 54 55 47 57 78 KV SV only 66 79 Fig 35 Dismantling the top housing 1 Remove two rear handle plugs 53 Remove two screws 50 two washers 112 KV SV 144 MV access cover 51 O ring 52 and breather assembly 116 KV SV 141 MV 73 53 50 121 SV KV 144 MV 126 SV KV 141 MV 51 52 53 Fig 36 Dismantling the crank assembly 1 Removecirclip 59 crankgear 60 crankcirclip 61 bearing 62 andO ring 63...

Page 14: ...b washer 70 remove clutch nut 68 and the following items from bevel pinion 77 disc spring 69 tab washer 70 friction disc 71 drive gear 72 bush 73 circlip 74 pinion 75 O ring 76 2 Remove pinion and bearing assembly from top housing 112 3 Remove bearing 75 from pinion 77 and O ring 76 from top housing 112 77 75 73 71 69 76 74 72 70 68 112 ...

Page 15: ...earing housing 102 from top housing 2 Remove O ring 101 from bearing housing 102 3 Remove circlip 97 and withdraw driver and barrel assembly 96 Remove circlip 99 and press off bearing 98 4 Remove seal 100 from bearing housing 102 103 Dismantling the driver assembly 1 Unscrew driver 96 from barrel 88 2 Remove the following items from the driver 96 catcher housing 90 O ring 89 buffer ring 91 recoil ...

Page 16: ...assembly 85 striker seal 86 and striker 87 2 Remove crown wheel 81 and crown wheel bearing 80 from the the top housing 73 Dismantling the piston assembly 1 Remove gudgeon pin 84 from piston 85 2 Remove bearing 82 from connecting rod 125 73 82 87 86 80 85 81 84 85 125 Service and Repair Manual Model 760KV 760SV ...

Page 17: ...ir Manual Model 760MV 101 Fig 44 Dismantling the bearing housing assembly 1 Remove four screws 115 and separate bearing housing 100 from the top housing 2 Remove the following items spring 96 washer 97 dry sliding bearing 98 O ring 99 3 Remove locking ring 95 from top housing 4 Remove drive sleeve assembly from barrel Remove circlip 91 from drive sleeve 94 washers 93 and spacer 92 115 100 99 95 94...

Page 18: ...ice and Repair Manual Model 710 760 Fig 46 Dismantling the piston assembly 1 Remove gudgeon pin 82 from piston 83 2 Remove bearing 80 from connecting rod 140 83 82 140 80 Service and Repair Manual Model 760MV ...

Page 19: ...al amount of grease is 120gm 9170 3071 70 60g and 9170 3043 20 60g Lubrication of the hammer is as shown on the grease chart ALL SCREWS SHOULD BE REFITTED WITH LOCKTITE 222 OR SIMILAR Smear Liberally coat Generously coat Pack 710MV 710KV 710SV Service and Repair Manual Model 710BV KV MV 45gm 40gm 20gm 9170 3043 23 45gm 40gm 710BV 710KV 9170 3071 70 9170 3043 23 9170 3071 70 20gm 9170 3043 23 ...

Page 20: ...t should be fitted The total amount of grease is 120gm 9160 3071 70 80g and 9170 3043 20 40g Lubrication of the hammer is as shown on the grease chart ALL SCREWS SHOULD BE REFITTED WITH LOCKTITE 222 OR SIMILAR Smear Liberally coat Generously coat Pack 760MV Service and Repair Manual Model 760KV SV MV 40gm 760KV 760BV 9170 3071 70 65gm 9170 3071 70 9170 3043 23 45gm 40gm 760KV 760BV ...

Page 21: ...r Test 110V 120V 220V 240V 760 1200 1400W ELECTRICAL TESTING ELECTRICAL PERFORMANCE TEST READINGS Electrical test Before assembly all electrical parts MUST be checked for safety and that they conform to specification A Armature shaft to lamination pack 1500 Volts min B Lamination pack to commutator 1200 Volts min C Armature shaft to commutator 3000 Volts min Testing the Armature Flash Testing Note...

Page 22: ...iece 101 96 95 94 93 92 91 710KV 91 710BV 90 89 88 87 85 Service and Repair Manual Model 710KV 710BV 710KV 710BV ASSEMBLY Fig 47 Fig 48 1 Fit bearing 74 into connecting rod 114 2 Position connecting rod 114 to piston 77 and fit gudgeon pin 76 to secure Assembling the piston 1 Assemble the following items to the transmitter housing 85 O ring 84 barrel 83 washer 82 shim 81 striker 79 striker seal 78...

Page 23: ...er housing 85 4 Fit barrel 83 and transmitter housing assembly 85 to top housing 73 and secure with four screws 87 torque load to 15Nm Assembling the barrel 710MV ASSEMBLY Service and Repair Manual Model 710KV BV MV 80 79 125 77 87 86 85 84 83 82 81 80 76 75 73 Fig 52 Assembling the top cover MV only 1 Fit top cover 101 to machine and secure with retaining ring 102 Slide the strap casting 107 onto...

Page 24: ...ing 91 buffer ring 90 catcher and O ring assembly 4 Fit driver assembly into nosepiece 98 5 Fit nosepiece assembly to transmitter housing and secure with five screws 100 torque load to 10Nm 85 97 96 95 94 93 92 91 90 89 88 98 Fig 54 1 Fit the following items to driver 97 lock chuck 108 balls 99 lock plate 109 latch spring 110 latch plate 111 latches 112 chuck 113 buffer 114 buffer stop 115 circlip...

Page 25: ...to the connecting rod bearing 4 Secure with circlip 61 5 Support crank 65 through access cover hole in top housing fit crank gear 60 and secure using 59 710BV KV MV ASSEMBLY 63 53 73 53 65 64 62 61 60 59 Service and Repair Manual Model 710BV KV MV Fig 57 1 Fit O ring 52 to access cover 51 2 Fit breather assembly 113 BV KV 124 MV to cover 51 3 Fit cover 51 to top housing 73 and secure with two scre...

Page 26: ... screws 54 torque load to 3Nm 4 Fit blanking knob 72 68 67 58 54 55 72 57 47 112 KV BV 120 MV Fig 60 1 Position two brush holders and secure with four screws 34 2 Fit field location rubbers 37 to motor housing 35 and fit field coil assembly 38 and baffle 42 Assembling the motor housing 42 34 38 37 33 34 33 35 1 Fit sealing ring 45 and bearing 46 to the armature 43 2 Fit washer 41 bearing 40 and be...

Page 27: ...ews 31 torque load to 1 8Nm Fitting the motor Fig 61 Service and Repair Manual Model 850K 850S 1 Fit top cover 102 to machine and secure with retaining ring 103 Slide strap casting 109 onto the transmitter housing 2 Position adapters 106 onto strap casting 109 Fit handle 104 onto the adapters secure together using bolt 105 washer 107 and locking knob 108 3 Fit cover 110 and retaining ring 111 Asse...

Page 28: ...5 710KV BV 126 710MV 1 Route RTR loom 26 through lower handle cover 13 and position grommet 16 2 Secure with retaining plate 28 and screw 27 torque load to 0 7Nm 3 Fit pivot isolators 15 Assembling the lower handle Fig 64 1 Fit handle half 5 to lower handle assembly 2 Fit lower cord clamp 8 and terminal block 126 to handle 5 3 Fit cable and cord protector 11 12 4 Fit switch 24 and speed control 10...

Page 29: ... barrel 90 2 Fit striker 85 striker seal 84 and piston assembly 83 inside barrel 90 3 Position barrel assembly into top housing 79 Fig 69 Assembling the bearing housing 1 Fit the following items to the bearing housing 100 O ring 99 dry sliding bearing 98 2 Assemble the following to the drive sleeve 94 washer 93 spacer 92 washer 93 circlip 91 3 Fit drive sleeve assembly to top housing 79 Fit lockin...

Page 30: ...108 106 104 108 107 105 103 102 Service and Repair Manual Model 760MV Fig 71 1 Press seal 113 into nosepiece 114 Assembling seal to nosepiece Fig 72 Assembling thedriver 1 Fit driver assembly 110 to bearing housing Assemble washer 97 and spring 96 to spline end ofdriver 110 2 Locate bearing housing assembly 100 110 into top housing 79 ensuring that splines locate into top housing 3 Secure with 4 s...

Page 31: ...o driver 96 junk ring 95 anvil seals 94 anvil 93 recoil transfer ring 92 buffer ring 91 catcher housing 90 O ring 89 3 Screw driver assembly into barrel 88 torque load to 60Nm 85 84 125 82 Service and Repair Manual Model 760KV 760SV 94 96 95 93 760SV 90 93 760KV 92 91 89 88 Fig 75 Assembling the barrel 1 Press seal 100 into bearing housing 102 2 Fit striker 87 striker seal 86 and piston assembly 8...

Page 32: ...bling the nosepiece 1 Fit nosepiece 104 to bearing housing 102 and secure with five screws 109 torque load to 10Nm 103 102 80 101 81 Service and Repair Manual Model 760KV 760SV 79 104 109 102 Fig 78 Assembling the crank 1 Press bearing 62 onto crank 65 2 Fitcrankkey 64 incrank 65 3 Fit crank assembly to top housing ensuring crank pin is fitted into the connecting bearing 4 Securewithcirclip 61 5 S...

Page 33: ...sembly 126 KV SV 141 MV to cover 51 3 Fit cover 51 to top housing 79 and secure using two screws 50 and two washers 121 KV SV 144 MV torque load to 2Nm 4 Fit two rear handle plugs 53 Assembling the top housing cover 79 53 50 121 SV KV 144 MV 126 SV KV 141 MV 51 52 53 Fig 80 Fig 79 1 Press bearing 75 onto bevel pinion 77 2 Fit O ring 76 to top housing 112 3 Fit pinion 77 and bearing 75 securing wit...

Page 34: ... 1 8Nm Fitting the motor Fig 83 Assembling the motor armature 1 Fit sealing ring 45 and bearing 46 to the armature 43 2 Fit washer 41 bearing 40 and bearing mounting 39 on the armature 3 Fit assembled armature into gearbox 112 112 39 40 41 43 45 46 112 36 30 32 29 31 50 Fig 82 Assembling themotor housing 1 Position two brush holders and secure with four screws 34 2 Fit field location rubbers 37 to...

Page 35: ...15 118 112 114 120 119 113 111110 Service and Repair Manual Model 760KV SV MV Fig 86 Assembling the latch bar 1 Fit latch bar 105 spring cover 106 latch spring 107 and secure with latch retainer 108 104 108 107 106 105 Fig 87 Assemblingthe topcover MV only 1 Fit top cover 116 to top housing and fit retaining ring 118 2 Fit strap casting 127 screw 123 gauge clamp 122 and secure using clamping wheel...

Page 36: ...ingthe switchassembly MVonly 1 Fit knob 145 and secure using clamp plate 146 andtwoscrews 147 Torqueloadto0 7Nm 146 145 147 Assemblingthe chuckassembly MVonly 1 Fit the following items onto driver 110 washer 130 latch spring 131 latch plate 132 latches 133 chuck 134 buffer 135 buffer stop 136 wireclip 137 2 Fit chuck cover 138 and nose cone end cap 139 110 130 131 132 133 134 137 138 139 Fig 88 13...

Page 37: ...1 8Nm 6 Fit cushion grip 1 and secure with one screw 2 torqueto1 25Nm 2 3 9 8 4 7 2 5 6 2 1 24 10 12 26 28 27 11 123 760KV SV 143 760MV 1 Route RTR loom 26 through lower handle cover 13 and position grommet 2 Secure with retaining plate 28 and screw 27 torque load to 0 7Nm 3 Fit pivot isolators 15 Assembling the lower handle Fig 91 1 Fit upper handle cover 23 and secure with two screws 22 torque l...

Page 38: ...pidly to 4000 volts between the main casting and one of the pins of the plug on the power supply cord Apply test to both live and neutral pins 2 The full voltage of 4000 volts should be maintained without breakdown or flashover for a few seconds 3 If the armature has been tested remove the carbon brushes before carrying out the test thus avoiding over stressing the armature insulation system 4 The...

Reviews: