background image

8

102463_RevB


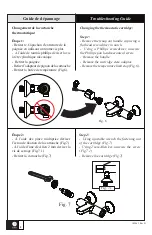
Changement de la cartouche 

thermostatique:

Étape 1:

- Retirer le Capuchon d’extrémité de la 

poignée en utilisant un tournevis plat.

-  A l’aide de tournis phillips déviser la vis 

à tête cylindrique mécanique.

-  Retirer la poignée.

- Retirer l’adapteur de pignon de la cartouche

- Retirer la butée de température (Fig.6).

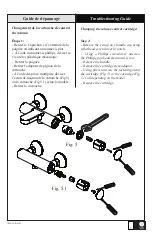
Changing the thermostatic cartridge:

Step 1:

- Remove the (snap on) handle cap using a 

flat head screwdriver in notch.

-  Using a Phillips screwdriver, unscrew  

the Phillips pan head mecanical screw.

-  Remove the handle.

-  Remove the cartridge stem adaptor.

- Remove the temperature limit stop (Fig.6).

Fig. 6

Fig. 7.1

Fig. 7

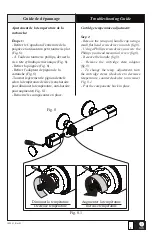
Étape 2:

- À l’aide des pince multiprise déviser 

l’écrou de fixation de la cartouche (Fig.7)

- À l’aide d’une clé Allen 2 mm déviser la 

vis de serrage (Fig.7.1)

- Retirer la cartouche (Fig.7)

Step 2:

-  Using ajustable wrench the fastening nut 

of the cartridge (Fig. 7)

-  Using 2 mm Allen key, unscrew the  screw 

(Fig.7.1)

-  Remove the cartridge (Fig.7)

Guide de dépannage

Troubleshooting Guide

Summary of Contents for BF1216

Page 1: ...tructions after you have finished the installation it contains useful information regarding service and warranty Num ro de s rie Serial number BF1216 Valve Thermostatique Externe External Thermostatic...

Page 2: ...button giding pin 2 13 102446 XXX Capuchon d extr mit de la poign e Decorative handle cap 2 14 102453 Vis Phillips t te cylindrique m canique M4 x 25mm Phillips Cheese head mechanical scre M4 x 25mm...

Page 3: ...n externe de la poign e Handle button giding pin 2 13 102446 XXX Capuchon d extr mit de la poign e Decorative handle cap 2 14 102431 Vis Phillips t te cylindrique m canique M4 x 10mm Phillips Pan head...

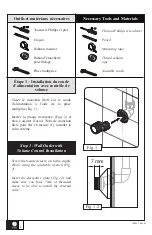
Page 4: ...mm Fig 1 2 Step 1 Wall Outlet with Volume Control Installation Screw the treaded sleeve on to the supply elbow using the ajustable wrench Fig 1 Insert the decorative plate Fig 1 2 and make sure you ha...

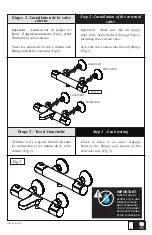
Page 5: ...lushed through before installing the external valve Screw the valve unions into the wall fittings Fig 2 Fig 2 CHAUD HOT FROID COLD CHAUD HOT FROID COLD V rifier s il n y a pas de fuite d eau entre les...

Page 6: ...iffusion du jet qui s en coule n est pas uniforme Solution D visser l a rateur l aide d une pi ce de monnaie et rincer l a rateur fig 4 Before any operation turn off the water and turn the faucet on t...

Page 7: ...e fixation de la cartouche Fig 5 ou la cartouche Fig 5 1 selon le mod le Retirer la cartouche Changing the volume control cartridge Step 1 Remove the snap on handle cap using a flat head screwdriver i...

Page 8: ...using a flat head screwdriver in notch Using a Phillips screwdriver unscrew the Phillips pan head mecanical screw Remove the handle Remove the cartridge stem adaptor Remove the temperature limit stop...

Page 9: ...pour augmenter Fig 8 1 Remettre les composantes en place Cartridge temperature adjustment Step 1 Remove the snap on handle cap using a small flat head screwdriver in notch fig 8 Using a Phillips screw...

Page 10: ...a totalit de la surface Rincer compl tement avec de l eau imm diatement apr s l application du nettoyant Un nettoyage r gulier pr vient l accumulation de salet et souillures tenaces Maintenance and Cl...

Page 11: ...vous n h sitez pas nous contacter Cette garantie est offerte exclusivement en lieu et place de toute autre garantie y compris les garanties de qualit marchande ou d aptitude de produit pour une appli...

Page 12: ...Imprim en Chine Printed in China 102463_RevB...

Reviews: