Error code
Cause
Solution
08A
No ionisation
measurement during
ignition.
A flame is visible during ignition
1. Check if the ionisation pen is completely unobstructed by looking into the fireplace.
2. Check if the plug in the technical box is correctly connected.
See Wiring diagram on page 86.
3. Check the connection with the ionisation pen and whether there are damages
to the ionisation cable.
4. Measure the ionisation signal.
No flame is visible during ignition, but there was a spark at the ignition pen.
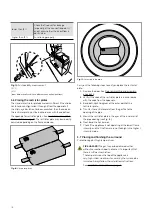
1. Remove the door from the fireplace (see 7.1.3 and 7.1.4)
2. Carefully check if there no decorative elements are obstructing the pen and if the spark
correctly ignites the
burner.
3. Ignite the gas fire without the door once and check if gas is emanating from the burner.
In case no gas emanates from the burner: check for gas supply up to the technical box
(measure pre-pressure).
4. In the presence of pre-pressure, check whether the cables running from the automatic
burner relay to the gas valve unit are damaged and/or disconnected.
5. In case of an excessive gas pressure level (>55mbar) the gas valve cannot be opened for
safety reasons.
The energy company or installer should fix this problem.
6. In case of no result: exchange gas regulator.
No flame is visible during ignition and no spark is visible at the ignition pen.
1. Check whether the ignition pen is obstructed in the fireplace.
2. Check if the plug connection is correct inside the technical unit.
See Wiring diagram on page 86.
3. Check if there is sufficient 24V D/C power supply.
4. Check the ignition cable for damages and check the connection
with the burner.
5. Check the HDIMS supply for the ignition transformer. If the 135 V is supplied: replace
the ignitiontransformer, if there is no 135 V: replace the HDIMS.
15A
Gas valve problem
1. Check the cover wiring.
2. In case of correct wiring: exchange gas regulator.
29A
Problem with
regulating the gas
valve, no flame during
ignition
1. Check whether the gas valve is open.
2. Measure the gas pressure at the gas valve intake. This must be > 20 mbar
or with a G30(B/P) > 40 mbar.
3. Measure the burner pressure with the measurement nipple behind the gas valve.
4. Check the gas valve wiring and connection.
5. Change gas valve settings, parameter TP01 or TP02.
6. Check/replace the gas valve.
33F
Low voltage gas valve Replace automatic burner relay
34F
Insufficient voltage
1. Measure mains voltage (>220VAC)
2. Measure outgoing transformer voltage 24 VDC and 12 VDC.
3. If the outgoing voltage is lower than 20 VDC or 10 VDC, replace the transformer.
4. If the outgoing voltage is correct, check the wiring for short-circuits.
35F
Problem with the
electrical driver
Replace automatic burner relay
50F
Gas valve wiring
problem
Check the wiring and power plug connection.
Repair if necessary.
51A
Failure of ionisation
signal during while
fire is alight.
1. Check whether the ionisation pen is obstructed in the fireplace.
2. Check whether the flame remains nicely in the ionisation pen. In case the flame
becomes transparent, recirculation is occurring.
3. Check flue duct configuration.
32
Summary of Contents for G Series
Page 1: ...Installation instructions BALANCED FLUE GAS FIRES DON T COMPROMISE EN...
Page 2: ......
Page 4: ...4...
Page 43: ...1 4 6 7 5 2 3 43...
Page 45: ...1 3 2 5 4 6 7 8 8 7 45...
Page 47: ...1 9 4 7 3 8 5 6 2 10 47...
Page 49: ...5 1 2 3 7 4 6 8 10 9 9 49...
Page 51: ...4 5 3 6 1 1 51...
Page 52: ...7 2 7 7 2 2 8 52...
Page 54: ...4 5 2 1 1 3 54...
Page 55: ...9 8 6 7 1 55...
Page 57: ...5 6 7 8 3 2 2 1 57...
Page 58: ...9 4 4 8 58...
Page 60: ...5 2 9 6 2 1 4 3 60...
Page 61: ...7 7 10 11 8 61...
Page 63: ...1 7 7 3 4 6 2 7 63...
Page 64: ...2 4 4 5 5 8 64...
Page 66: ...7 4 5 6 1 8 9 66...
Page 67: ...3 3 11 2 10 10 12 67...
Page 69: ...1 2 6 6 8 8 9 7 7 4 With gas type G30 log 4 to be placed at extreme right 3 4 5 11 69...
Page 72: ...10 2 1 9 11 3 3 4 5 5 7 6 72...
Page 73: ...13 12 12 12 8 73...
Page 76: ...3 1 6 5 4 2 13 76...
Page 77: ...14 7 10 11 8 12 12 Other side Divide 15 cryptonite and 16 ash 77...
Page 80: ...3 4 5 7 1 3 4 5 6 1 4 5 1 3 4 1 3 2 1 2 3 1 3 1 2 4 5 1 6 2 6 7 14 12 11 11 3 80...
Page 81: ...3 4 5 7 8 1 3 4 7 9 10 8 3 4 5 6 7 8 1 3 4 5 6 7 8 1 3 4 5 6 7 1 9 10 8 15 13 81...
Page 84: ...4 3 5 2 3 4 5 1 2 3 4 5 1 1 2 3 4 1 1 2 1 1 1 2 1 1 1 1 1 2 3 4 5 6 6 1 1 1 14 11 84...
Page 94: ...94...
Page 95: ...95...
Page 96: ...Gelo rveldweg 21 5951 DH Belfeld info kalfire nl KALFIRE COM DON T COMPROMISE REF V01 2019 EN...

