


12
1034790D / January 2001
KTD-400 Controller Keypad Installation and Operation Manual
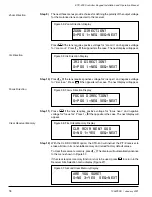
Clear Keypad Memory
Monitor Access
Camera Site Access
System Size
Step 2)
The CLEAR MEMORY option will erase all data in the controller keypad’s
nonvolatile memory and reload factory default values. To clear the controller
keypad’s memory, press
1
. The display will automatically advance to the menu
shown in Figure 11. If the CLEAR MEMORY function is not to be used, press
0
and go to Step 4.
Step 3)
This menu offers a safety check. If a
3
is entered, the controller keypad’s
memory will be reloaded with factory default values. If a
0
is entered, there will
be no change. The display will automatically advance to the next menu.
Step 4)
This menu is used to set the system size. Use the numerical keys to enter the
largest camera number, largest monitor number, largest multiplexer number, and
largest VCR number in the system (maximum entries are, cameras-511, moni-
tors-64, multiplexers-64, VCRs-64). The
keys can be used to switch
between columns. Once all entries are made, the display will automatically
advance to the next menu. NOTE: Multiplexer and VCR entries can be 00, which
means there are no units in the system (display will skip subsequent menus).
Step 5)
This menu is used to deny or permit the controller keypad’s access to certain
camera sites. Press
0
to deny access or
1
to permit access. After each
selection, the next camera number will appear. The
keys can be used to
move between cameras. When done, press
seq
to advance to the next menu (see
note next page).
Figure 10: Clear Memory Display
CLEAR MEMORY?
0=NO 1=YES SEQ=EXIT
Figure 11: Second Clear Memory Display
ARE YOU SURE?
0=NO 3=YES SEQ=EXIT
Figure 12: System Size Display
SYST SIZE (CAMERAS)
511 64 64 64 SEQ=NXT
Figure 13: Camera Site Access Display
CAMERA 000 ACC=YES
0=NO 1=YES SEQ=NEXT
Figure 14: Monitor Access Display
MONITOR 01 ACC=YES
0=NO 1=YES SEQ=NEXT


