background image

E N G L I S H

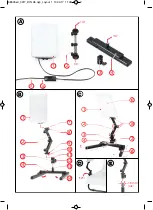
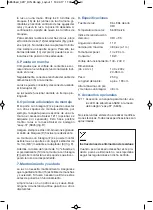
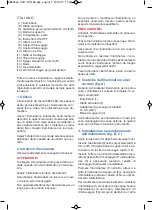
(1)  Lighting unit
(2)  Hinged bracket
(3)  Adapter for 16 mm (5/8”) standard spigot
(4)  Foot
(5)  Mains lead
(6)  ON/OFF switch
(7)  Slide-in foot  
(8)  Lock ring
(9)  Lock ring

(10)  Slide-in foot
(11)  Mounting shoe
(12)  Fastening screw
(13)  16 mm (5/8”) standard spigot
(14)  Bars
(15)  Illuminated area
(16)  Blocking screws for detent joints

Prior to using your light, please read these in-
structions carefully. Keep them safe to have
them at hand at any time. If you pass the light
on to somebody else, always include these in-
structions.

1. Intended use

The 5850 LED Desktop Light is intended to be
used exclusively for the illumination of photo
and video shots. It is not intended for household
lighting.

Use the light only as described in these instruc-
tions. Any other use has to be considered as not
as intended and can result in material damage
or physical injury. This light is not a toy.

Kaiser Fototechnik takes no responsibility for
damages caused by not intended or incorrect
use.

2. Safety instructions 

Please observe the following safety instructions:

WARNING!

Disconnect the light from the mains when not in
use or before cleaning.

Keep the light away from children.

Do not put the light into operation, if housing,
cable or plug is damaged.

Do not look directly into the light for a longer pe-
riod of time, when it is switched on.

Do not disassemble or modify the light. Repairs
must only be carried out by qualified persons. 

CAUTION!

Only use the light with parts designed for it.

Keep the light away from water and other liq -
uids and from combustible materials.

Make sure that the light is not covered during
operation.

Do not use or store the light at places with ex-
tremely high air humidity or at extremely hot
plac es. Keep the light away from long-standing
direct solar radiation.

Let the light cool down before boxing it. 

3. Check light and scope of supply

(fig. A) 

When unpacking the light for the first time,
please check if the scope of supply is complete.
It comprises:

- Lighting unit (1)
- Hinged bracket (2)
- Adapter (3) for 16 mm (5/8”) standard spigot
- Foot (4)

Check also, if the light and the mains lead are
damaged by extraneous causes. Is this the
case, do not take the device into operation.

4.  Setting up and positioning the

light (fig. B, C)

Unfold the two bars (14) of the foot (4).    

Fit the adapter (3) on the 16 mm (5/8”) standard
spigot (13) of the foot (4) and secure it with the
fastening screw (12).

Push the slide-in foot (10) of the hinged bracket
(2) into the mounting shoe (11) of the adapter (3)
and secure this link by rotating the lock ring (9)
towards the adapter.    

Now push the light (1) into the other slide-in foot
(7) of the hinged bracket (2) and secure the light
by rotating the lock ring (8) towards the light.  

For changing the height position or tilting the
light (1) please proceed as follows: Hold the
light with one hand. Loosen the 3 blocking
screws (16) of the detent joints with the other
hand by rotating them anti-clockwise and move
the light into the desired position. Now tighten
the blocking screws again. 

To change the direction of the light beam loosen
the fastening screw (12) on the adapter (3) and
rotate it on the foot (4). Do not forget to tighten
the screw again. 

5850bed_0317_DIN A5.qxp_Layout 1  13.03.17  11:09  Seite 5

Summary of Contents for 5850

Page 1: ... manejo Istruzioni per l uso Kaiser Desktop Leuchte LED LED Desktop Light Éclairage LED de table Luz LED de sobremesa Illuminatore da tavolo LED 5850 Powered by T E C H N O L O G Y KELVIN 5600 KELVIN DAYLIGHT 480 LUX 1m 5850bed_0317_DIN A5 qxp_Layout 1 13 03 17 11 09 Seite 1 ...

Page 2: ...1 4 A 1 4 5 6 4 2 1 4 3 5 6 6 1 16 1 1 B 1 C 7 2 1 3 2 2 1 0 0 D 8 9 1 1 1 1 4 3 E 4 2 1 1 1 1 4 1 121 4 2 3 D 1 1 1 1 1 1 1 E 5 8 16 mm 8 5850bed_0317_DIN A5 qxp_Layout 1 13 03 17 11 09 Seite 2 ...

Page 3: ...ängere Zeit direkt in die Leuchte wenn diese eingeschaltet ist Die Leuchte darf nicht auseinander oder umge baut werden Eine Instandsetzung der Leuchte darf nur von Fachkräften durchgeführt werden VORSICHT Verwenden Sie die Leuchte nur mit Ausrüs tungsteilen die dafür vorgesehen sind Halten Sie Wasser und andere Flüssigkeiten sowie brennbare Stoffe von der Leuchte fern Achten Sie darauf dass die L...

Page 4: ... Leuchte dann am Kaiser Aufnahmetisch easy fit 5845 montiert wer den Abb D Fixieren Sie solche Verbindungen immer indem Sie den Konterring 9 in Richtung Aufsteck schuh drehen Mit Hilfe des Adapters 3 kann der Gelenkarm 2 auch auf Stativen und Halterungen mit 16 mm 5 8 Normzapfen befestigt werden Abb E Das im Aufsteckfuß 10 des Gelenkarms 2 in tegrierte Stativgewinde 1 4 ermöglicht zudem noch die B...

Page 5: ...ther liq uids and from combustible materials Make sure that the light is not covered during operation Do not use or store the light at places with ex tremely high air humidity or at extremely hot places Keep the light away from long standing direct solar radiation Let the light cool down before boxing it 3 Check light and scope of supply fig A When unpacking the light for the first time please chec...

Page 6: ...in foot 10 of the hinged bracket 2 allows for attaching the light on suitable stands and fix tures with corresponding threads 7 Maintenance and care The light is maintenance free Make sure that the front screen 15 is free of stains and dirt If necessary remove these before operation Clean the light with a soft dry cloth On no ac count use petrol or other solvents 8 Specifications Light source 96 Hi...

Page 7: ...rectement vers la source lu mineuse pendant une longue durée quand le projecteur est allumé Ne démontez ou modifiez pas le panneau LED Toute réparation doit être effectuée uniquement par un personnel qualifié PRUDENCE N utilisez le panneau LED qu avec des acces soires adaptés à celui ci Gardez le panneau LED à l abri de l eau et de tout autre liquide ou matériau combustible Assurez vous que le pan...

Page 8: ...assemblage en verrouillant la vis de serrage prévue à cet effet 9 La rotule orientable 2 peut également être at tachée sur tous types de support avec spigot 16 mm 5 8 via l adaptateur 3 fig E De plus le filetage 1 4 se trouvant sur la griffe flash mâle 10 de la rotule orientable 2 permet le raccord du panneau sur tous types de sup port et fixations avec le filetage correspondant 7 Entretien Le pan...

Page 9: ...o cuando esté co nectada No desmonte o modifique la luz Las reparacio nes se deben llevar a cabo solo por personas calificadas PRECAUCIÓN Use la luz únicamente con los componentes diseñados para ella Mantenga la luz lejos de agua y otros líquidos así como de materiales combustibles Asegúrese que la luz no está cubierta durante su funcionamiento No use o almacene la luz en lugares con hume dad del ...

Page 10: ...ura con bisagra 2 se puede montar asimismo en soportes con spigot estándar de 16 mm 5 8 mediante el adaptador 3 fig E Además la rosca de trípode de 1 4 situada en el pie deslizante 10 de la montura con bisagra 2 permite montar la luz en soportes que incor poren la rosca correspondiente 7 Mantenimiento y cuidado La luz no necesita mantenimiento Asegúrese que la pantalla frontal 15 esté libre de man...

Page 11: ...e sempre eseguite da personale qualificato PRECAUZIONE Utilizzare l illuminatore solamente con gli acces sori specifici Tenere l illuminatore lontano da acqua e altri li quidi e da materiali combustibili Assicurarsi che l illuminatore non sia coperto durante l uso Non utilizzare o lasciare l illuminatore in am bienti con una notevole umidità o estremamente caldi Tenere l illuminatore lontano da lu...

Page 12: ...ette di inserire l illuminatore a un treppiedi adatto e fissarlo con le viti in cor rispondenza 7 Manutenzione e cura Questo illuminatore è esente da manutenzione Assicurarsi che lo schermo frontale 15 sia esente da impurità e sporco Se necessario to glierle prima di operare Pulire l illuminatore con un soffice panno asci utto In nessun caso usare petrolio o altri sol venti 8 Caratteristiche Sorge...

Reviews: