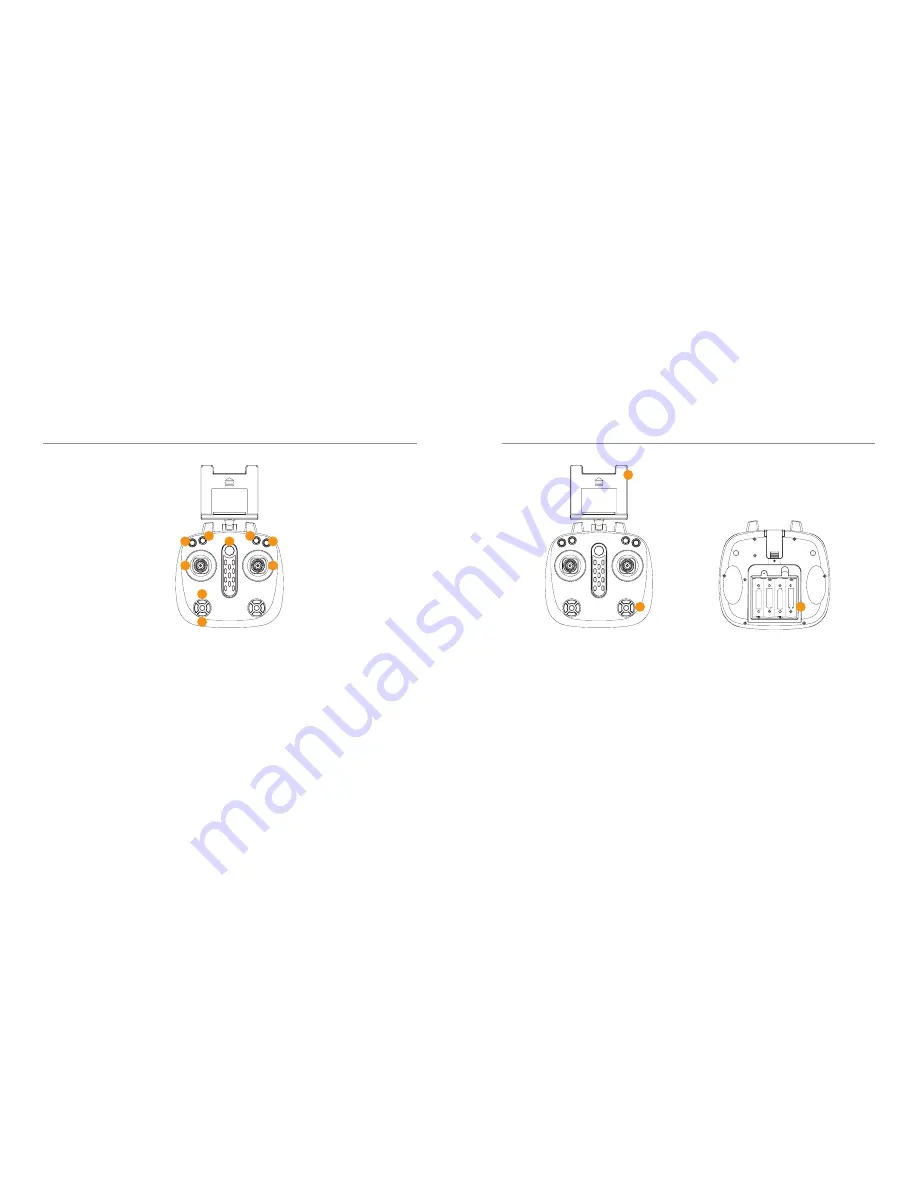
background image

CONTROLLER DIAGRAM

CONTROLLER DIAGRAM

09 - ENG

10 - ENG

1

4

10

12

11

7

8

2

3

5

6

9

1. Speed

Drone SPEED LEVELS

2. Return Home

RETURN TO POINT OF ORIGIN

3. Take Off & Landing

BEGIN / END FLIGHT

10. Headless Mode 

RELATIVE FORWARD MOVEMENT

4. GPS Mode

TURN ON / OFF 

5. Throttle Control

INCREASE / DECREASE THRUST

6. Directional Control

FLIGHT MANOUVERING

12. Battery

4x AA BATTERIES (NOT INCLUDED)

7. Camera Tilt

ADJUSTS CAMERA ANGLE UP 

8. Camera Tilt

ADJUST CAMERA ANGLE DOWN

9. Power 

Trail ON / OFF

11. Smartphone Holder 

MOUNT YOUR SMARTPHONE

Summary of Contents for TRAIL

Page 1: ...Complete User Guide Visit kaiserbaas com for more information ...

Page 2: ...uct Diagrams Battery Charging Setup Installation Transmitter Calibration Remote Flight Operation Flight Modes Smartphone Flight Operation App Diagram Combo Mode Operation Intelligent Flight Modes FAQ Specifications Support 01 05 06 07 11 12 14 15 17 19 22 23 26 27 31 32 ...

Page 3: ...w or hail Flying near electrical hazards such as power lines or towers Flying in or near fire floods tsunamis ice avalanche landslide earthquake etc Damage s or injuries incurred due to users under the influence of drugs or alcohol suffering dizziness fatigue nausea and any other condition physical or mental that could impair the Pilot s ability to fly responsibly and within the boundaries of the ...

Page 4: ...plement WARNING There is a high risk of it igniting SAFETY PRECAUTIONS 04 ENG Do not ever leave the battery near an open flame or heat source Do not immerse the battery in water Do not charge the battery in direct sunlight Never leave a charging battery unattended Only remove the battery from its supplied charger when the charging cycle is complete Do not reverse charge or over charge the battery ...

Page 5: ...regulations surrounding the flying of their UAV This list serves as a guide only Australia casa gov au New Zealand caa govt nz UK caa co uk home Ireland iaa ie Scotland transportstyrelsen se en aviation France ecologique solidaire gouv fr PRODUCT FEATURES 06 ENG The Trail Drone makes the perfect travel companion for capturing all your adventures in HD The compact foldable design allows you to take...

Page 6: ...TECT ROTOR BLADES 3 Rotor Blades STABILISE THE Drone 4 Foldable Arms COMPACT THE Drone 5 720P Camera Module VIDEO PHOTO CAPTURE 6 Indication Lights BLINK RED GREEN 7 Battery PRESS PULL TO OPEN 8 MicroSD Card VIDEO PHOTO STORAGE 9 Landing Feet ALLOW FOR SOFT LANDING PRODUCT DIAGRAM 08 ENG 8 7 9 ...

Page 7: ... Landing BEGIN END FLIGHT 10 Headless Mode RELATIVE FORWARD MOVEMENT 4 GPS Mode TURN ON OFF 5 Throttle Control INCREASE DECREASE THRUST 6 Directional Control FLIGHT MANOUVERING 12 Battery 4x AA BATTERIES NOT INCLUDED 7 Camera Tilt ADJUSTS CAMERA ANGLE UP 8 Camera Tilt ADJUST CAMERA ANGLE DOWN 9 Power Trail ON OFF 11 Smartphone Holder MOUNT YOUR SMARTPHONE ...

Page 8: ...o fly with Rotor Blades attached If you need to replace them please refer to the following guide Disassembly Use the provided screwdriver to untighten the screw in an anti clockwise direction Remove the Rotor Blade by pulling up and off the motor axis bar Assembly Insert the Rotor Blade onto the motor axis bar Only install the Rotor Blades to the corresponding clockwise anti clockwise motor A lett...

Page 9: ...ll flash indicating it is ready to pair to a Remote Control Transmitter 3 Turn on the Remote Control Transmitter 4 Using the Left Throttle Yaw Stick move it to the maximum UP position and return it back to the zero position you will hear a beep The Drone is now paired to the Remote Control Transmitter Calibration It is important that you calibrate the gyroscope and compass every time before flying...

Page 10: ...k the GPS Trail on the remote controller and ensure that it is on Compass Calibration Press and hold the Compass calibration button for 4 seconds The LED lights under the Drone will start flashing quickly Wait until the LED lights are pulsing Now hold the Drone straight and horizontally rotate 360 in clockwise direction for 3 times continuously Then hold the Drone vertically with the camera facing...

Page 11: ...LIGHT OPERATION 18 ENG The Rotor Blades will start to spin indicating it is ready to fly Press the Take Off Landing button once or push the Throttle Yaw Left Stick slightly UP to fly The Trail Drone features Auto Hover releasing the Throttle Yaw stick will keep the Drone at the same altitude Pushing the Throttle Yaw Left Stick UP or DOWN will ascend or descend the Drone Flying Indoors If you are f...

Page 12: ...can operate in This is only recommended for pilots with experience flying the Drone Headless Mode allows you to control the Drone relative to its direction from the take off location This means you can fly the Drone without worrying which direction it is facing Before you use Headless Mode ensure the Drone s Direction Heading is facing away from the pilot operator FLIGHT MODES 20 ENG Headless Mode...

Page 13: ...ludes Follow me Waypoint Orbit mode etc How to connect To control the Drone with the smartphone you must take Trail Drone outdoor and ensure that it receives GPS signal 1 Turn on the Drone The indication lights at the bottom of the Drone will start to blink 2 Make sure the Remote Controller is off 3 Open your phone and go into the WiFi settings turn the WiFi on if it is off 4 Wait for few seconds ...

Page 14: ...SHOWS Drone POSITION 19 19 APP DIAGRAM 24 ENG 10 Intelligent Flight Modes WAYPOINT FOLLOW ME ORBIT 11 Drone Control JOYSTICK CONTROL 12 Return to Home RETURN TO POINT OF ORIGIN 13 Unlock Start ARM THE Drone 14 Auto Take Off Landing BEGIN END FLIGHT 15 VR Mode FIRST PERSON VIEW 16 Photo PHOTO CAPTURE MODE 17 Video RECORD 18 Gallery PREVIEW YOUR MEDIA 19 Throttle Control INCREASE DECREASE THRUST 20 ...

Page 15: ...onnected to the Drone More number of satellites will increase the stability and position accuracy of Drone 1 Tap on the Lock icon 13 to unlock the Drone 2 Once the rotor starts spinning tap on the take off landing button 14 to take off 3 Press the controller icon 11 to display Throttle control and Directional controls on the screen COMBO MODE OPERATION 26 ENG Using the Remote Controller Smartphone...

Page 16: ...n this mode Drone can automatically follow the person holding the smartphone controller To use the Follow Me Mode the Drone must be connected with the smartphone it should have a minimum altitude of 5m and a maximum altitude of 50m For better videos an altitude between 10 30m is recommended Note that the Follow me performance is subject to the GPS accuracy on the smartphone device To activate Foll...

Page 17: ... Tap on the Intelligent Flight mode icon 10 and select Orbit mode 6 Set the point of interest Fig 4 on the Orbit menu and tap on the mode activate button Fig 5 to begin the Orbit flight mode You can set the altitude of flight by tapping on the point of interest Fig 4 ORBIT 4 5 The Drone will now move from its current position to the point of interest and start orbiting around the point You can tak...

Page 18: ...Why is the Drone is shaking and not stable in flight Please check to ensure the Rotor Blades are not damaged Check that all the motors are spinning The Drone is out of control and is difficult to fly How can I make it easier Prior to every flight we recommend you calibrate the Drone Refer to the calibration section SPECIFICATIONS SUPPORT 32 ENG Support Having trouble with your Drone Don t worry ou...

Page 19: ......

Reviews: