background image

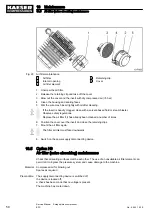
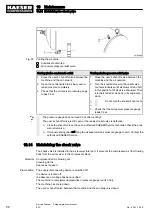
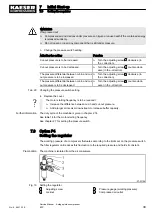
Fig. 22 Air filter maintenance

1

Air filter

2

Inlet air opening

3

Air filter element

4

Retaining clip

5

Cover

1. Unscrew the air filter.
2. Release the retaining clip and take off the cover.
3. Blow out the cover and the insert with dry compressed air (<5 bar).
4. Clean the housing and sealing faces.
5. Wet the wire mesh insert lightly with oil after cleaning.

If the insert is heavily clogged, clean with a solvent-based fluid or steam blaster.

Observe safety regulations.
Replace the air filter if it has already been cleaned a number of times.

6. Position the cover over the insert and close the retaining clips.
7. Mount the air filter again.

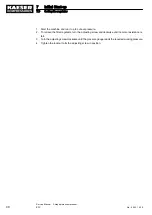
The filter air inlet must face downwards.

8. Switch on the power supply disconnecting device.

10.5  Option H9

Air filter (noise absorbing) maintenance

Check that all sealing surfaces match each other. The use of an unsuitable air filter element can

permit dirt to ingress the pressure system and cause damage to the machine.

Material Compressed air for blowing out

Spares as required

Precondition The supply disconnecting device is switched off,

the device is locked off,

a check has been made that no voltage is present.
The machine has cooled down.

10 Maintenance

10.5 Air filter (noise absorbing) maintenance

50

Service Manual    2-stage piston compressor  
EPC  

No.: 9_9431_02 E

Summary of Contents for EPC Series

Page 1: ...Service Manual 2 stage piston compressor EPC No 9_9431_02 E Manufacturer KAESER KOMPRESSOREN GmbH 96410 Coburg PO Box 2143 GERMANY Tel 49 0 9561 6400 Fax 49 0 9561 640130 http www kaeser com...

Page 2: ...Original instructions KKW PEPC 1 04 en SBA KOLBEN ANLAGE 2 STUFIG STERN DREIECK...

Page 3: ...le 10 3 Safety and Responsibility 3 1 Basic Information 12 3 2 Specified Use 12 3 3 Improper use 12 3 4 User s responsibilities 12 3 4 1 Observe statutory and universally accepted regulations 12 3 4 2...

Page 4: ...Oil level monitor 31 6 6 2 Options 33 6 6 3 Connecting the ECO Drain automatic condensate drain 33 7 Initial Start up 7 1 Safety 35 7 2 Instructions to be observed before commissioning or recommission...

Page 5: ...0 17 Solenoid valve maintenance 63 10 17 1 Cleaning the solenoid valve 64 10 17 2 Changing the solenoid valve 64 10 17 3 Cleaning the dirt trap 65 10 18 Filter pressure reducer cleaning 66 10 19 Cylin...

Page 6: ...Contents iv Service Manual 2 stage piston compressor EPC No 9_9431_02 E...

Page 7: ...guard 49 Fig 22 Air filter maintenance 50 Fig 23 Air Filter noise absorbing Maintenance 51 Fig 24 Air filter with plastic casing 52 Fig 25 Checking the oil level 53 Fig 26 Changing the compressor oil...

Page 8: ...List of Illustrations vi Service Manual 2 stage piston compressor EPC No 9_9431_02 E...

Page 9: ...V 3 50Hz 8 Tab 19 Connection details for oil level monitoring 9 Tab 20 Network impedance 9 Tab 21 Machine duty cycle 10 Tab 22 Inspection intervals according to Ordinance on Industrial Safety and Heal...

Page 10: ...List of Tables viii Service Manual 2 stage piston compressor EPC No 9_9431_02 E...

Page 11: ...icable directives Missing documents can be requested from KAESER Make sure all documents are complete and observe the instructions contained in them Make sure you give the data from the nameplate when...

Page 12: ...elp you to avoid dangerous situations This symbol is is placed by lists of actions comprising one stage of a task In lists of actions with several stages the sequence of actions is numbered This symbo...

Page 13: ...list of possible options Enter options here as a reference Option Option code Available Oil level monitor C5 Low pressure warning C9 Adjustable machine mountings H1 Silenced air filter H9 Air filter w...

Page 14: ...000 820 2 Tab 5 Compressor block specification 2 5 Ambient Conditions Installation Maximum altitude AMSL m 1000 Permissible ambient tem perature C 5 35 Higher altitudes are permissible only after cons...

Page 15: ...switch setting 2 8 Pressure Air receiver relief valve activating pressure Maximum working pres sure bar 15 Activating pressure bar 16 Tab 9 Air receiver relief valve activating pressure Cylinder or co...

Page 16: ...Tab 12 Sound pressure level 2 10 Motor power and speed Read off the enclosure protection rating from the motor nameplate and enter in the table Rated power kW Synchronous speed min 1 50 Hz Synchronous...

Page 17: ...oodstuffs Standard oil for all applications ex cept in connection with foodstuffs Specifically for ma chines in applica tions where the compressed air may come into contact with food stuff Special oil...

Page 18: ...nts in chapter 2 13 are also to be observed See electrical diagram in 13 3 2 12 1 1 Power supply specifications The following conductor cross sections copper multicore and fusing industrial fuses slow...

Page 19: ...e are intended for operation with a public power supply with a network impedance at the transfer point house connection of maximum Zmax Ohm The operator must ensure that the machines are only connecte...

Page 20: ...time under load time at standstill Calculating the duty cycle Duty cycle time under load time under load standstill time x 100 Example 12 minutes 20 minutes x 100 60 The following values are valid for...

Page 21: ...Duty cycle Cycle time min EPC 1000 2 500 70 4 30 Tab 21 Machine duty cycle 2 Technical Specification 2 14 Machine duty cycle No 9_9431_02 E Service Manual 2 stage piston compressor EPC 11...

Page 22: ...ted in this service manual Operate the machine only within its performance limits and under the permitted ambient condi tions Do not use compressed air for breathing purposes unless it is specifically...

Page 23: ...ervice manual applicable to installation and maintenance are fully conversant with the safety concepts and regulations of electrical and compressed air engineering are able to recognise the possible d...

Page 24: ...0 Competent person e g KAESER Service Techni cian Every 5 years after installation or the last inspection if PS x V 1000 Approved supervisory body Strength test Every 10 years after installation or th...

Page 25: ...s or otherwise isolate the machine from the distribution network to ensure that no compressed air can flow back into the machine De pressurise all pressurised components and enclosures Do not carry ou...

Page 26: ...ng and lubricating fluids Keep suitable fire extinguishing agents ready for use Use only KAESER approved operating materials Unsuitable spare parts Use only spare parts approved by the manufacturer fo...

Page 27: ...amaging contaminants Inlet air free of explosive or chemically unstable gases or vapours inlet air free of acid alkaline forming substances particularly ammonia chlorine or hydrogen sulphide Do not po...

Page 28: ...ing any work on electrical equipment Switch off the mains disconnecting device lock it in the off position and check that the machine is free of voltage 2 Hot surface Risk of burns caused by contact w...

Page 29: ...ing Suitable extinguishing agents Foam Carbon dioxide Sand or earth Unsuitable or unsafe extinguishing agents Strong jet of water 1 Keep calm 2 Give the alarm 3 Switch off the power supply disconnecti...

Page 30: ...incorrect maintenance incorrect repair Correct maintenance and repair includes the use of original spare parts and operating materials Obtain confirmation from KAESER that your specific operating con...

Page 31: ...1 1 Main components Fig 2 List of main components 1 Compressor block 2 Drive motor 3 Air receiver 4 Pressure switch 5 Star delta starter 4 Design and Function 4 1 Outline of the machine No 9_9431_02...

Page 32: ...h a filter into the compression chamber of the block The air is drawn in during the downward stroke of the piston It is compressed during the upward stroke The compressed air flows through the cooler...

Page 33: ...o low 4 2 3 Option H1 Adjustable machine mountings These mounts allow the machine to be anchored firmly to the floor Fig 5 Adjustable machine mountings 1 Adjustable machine mountings 2 Threaded joint...

Page 34: ...Air filter element 4 2 6 Option K5 K6 ECO DRAIN automatic condensate drain The condensate accumulating in the air receiver is removed by an automatic drain Fig 8 Condensate drain 1 Condensate drain 4...

Page 35: ...ting modes LOAD The compressor block delivers compressed air The compressor motor runs under full load STANDSTILL No air is compressed A check valve prevents compressed air flowing back into the compr...

Page 36: ...preset at the factory Check valve The check valve prevents the flow of compressed air from the air receiver back to the compressor block when the machine is stopped Enclosures and covers Enclosures a...

Page 37: ...ture and humidity clean inlet air with no damaging contaminants inlet air free of explosive or chemically unstable gases or vapours inlet air free of acid alkaline forming substances particularly ammo...

Page 38: ...sure that the volume of air flowing into the machine room is at least equivalent to that being removed from it by the machine and exhaust fan 2 Make sure that the machine and exhaust fan can only oper...

Page 39: ...he compressed air system to ensure that no compressed air can flow back into the machine 2 Vent all pressurized components and chambers completely 3 The pressure gauge on the machine must read 0 bar W...

Page 40: ...network 6 5 Connecting the Power Supply Precondition The machine is disconnected from all power supply phases The disconnecting device is locked in the off position A check has been made that no volt...

Page 41: ...to the power supply 6 6 Options The options available for your machine are described below 6 6 1 Option C5 Oil level monitor The oil level monitor does not relieve the user of the obligation to visual...

Page 42: ...the switching point by moving the sensing contact slightly along an arrow The setting can be fine adjusted to the length of the arrow Moving towards the arrow head lowers the oil level point at which...

Page 43: ...6 6 2 1 Option H1 Anchoring the machine Fig 16 Securing the adjustable machine mounts 1 Adjustable machine mountings 2 Threaded joint Use appropriate fixing bolts to anchor the machine Further informa...

Page 44: ...shock Danger of fatal injury caused by contact with live components Switch off and lock out the power supply disconnecting device and verify the absence of voltage 2 The user is to make the connectio...

Page 45: ...present Working on pressure systems 1 Close shut off valves or otherwise isolate the machine from the compressed air system to ensure that no compressed air can flow back into the machine 2 Vent all...

Page 46: ...Does the power supply conform to the specifications on the nameplate 2 1 Are the power supply cable conductor diameters and fuse ratings ade quate 2 12 Have all electrical connections been checked fo...

Page 47: ...hase rotation should be measured with a phase sequence meter Alterna tively start the machine very briefly and observe the direction of rotation of the motor cooling fan 1 Check the direction of phase...

Page 48: ...t the factory A pressure adjustment is possible to suit individual operating conditions The pressure setting can only be adjusted if a pressure switch is fitted and under pressure Maximum pressure dif...

Page 49: ...irection Tab 29 Changing the pressure switch setting 4 Replace the cover The motor starting frequency is to be reduced Increase the difference between cut in and cut out pressure Add a larger air rece...

Page 50: ...anticlockwise until no more resistance is felt 3 Turn the adjusting screw clockwise until the pressure gauge reads the required working pressure 4 Tighten the locknut to fix the adjusting screw in pos...

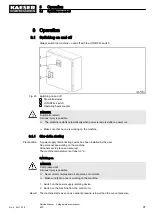
Page 51: ...pply disconnecting device has been installed by the user No personnel are working on the machine All panels are in place and secured The machine temperature is at least 3 C Switching on DANGER Compres...

Page 52: ...f 1 Switch off the machine from the control unit 2 Switch off and lock out the power supply disconnecting device 8 Operation 8 1 Switching on and off 42 Service Manual 2 stage piston compressor EPC No...

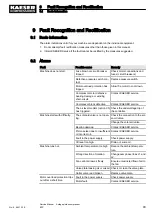
Page 53: ...s triggered Check the undervoltage trip of the controller Machine starts with difficulty The solenoid valve is not open ing Check the connection to the sol enoid valve Change the solenoid valve Bearin...

Page 54: ...The solenoid valve loses air while the machine is running The solenoid valve does not close Power to the solenoid valve is interrupted Clean replace the solenoid valve Check power supply The machine...

Page 55: ...ctive Clean or renew the crankcase vent Piston rings worn or broken Contact KAESER service Piston rings already worn or damaged after only a short op erating period Dirty oil Fit finer air inlet filte...

Page 56: ...nto the machine 2 Vent all pressurized components and chambers completely 3 The pressure gauge on the machine must read 0 bar Working on the drive system 1 Switch off and lock out the power supply dis...

Page 57: ...id valve 10 15 2 10 17 2 Variable see table 33 Change the compressor oil 10 10 h operating hours not applicable for Option C5 not applicable for Options K5 K6 and K7 Only with option P4 Tab 31 Regular...

Page 58: ...ilter element Up to 3000 h Have cylinder head and valves checked Up to 12 000 h Have the machine generally overhauled up to 12 000 h every three years at the latest Have motor bearings checked up to 3...

Page 59: ...t The air cooler or fan guard can t be cleaned thoroughly Have stubborn clogging removed by an authorized KAESER Service Technician 10 4 Air filter maintenance The air filter insert is made of fibre m...

Page 60: ...e cover over the insert and close the retaining clips 7 Mount the air filter again The filter air inlet must face downwards 8 Switch on the power supply disconnecting device 10 5 Option H9 Air filter...

Page 61: ...mpressed air at not more than 5 bar to blow dirt from the air filter element from inside to outside 4 Clean the housing and sealing faces 5 Replace the filter element 6 Position the cover and close th...

Page 62: ...ve the cover 2 Withdraw the filter element 3 Use dry compressed air at not more than 5 bar to blow dirt from the air filter element from inside to outside 4 Clean the housing and sealing faces 5 Repla...

Page 63: ...h a different type of oil to that already used in the machine The type of compressor oil used is listed in table 15 1 Remove the crankcase vent from the oil filler 2 Top up to bring the oil to the cor...

Page 64: ...il sight glass 3 Oil drain plug Draining the oil 1 Remove the crankcase vent from the oil filler 2 Position the oil receptacle 3 Remove the drain plug and allow oil to drain into the receptacle 4 Repl...

Page 65: ...nder head relief valve B Pressure relief valve in the collecting pipe C Air cooler relief valve WARNING The pressure relief valve may blow off at any time Excessive noise is caused when the pressure r...

Page 66: ...knurled knob on the pressure relief valve anticlockwise until air blows off 2 Then turn the knurled knob back to its original position 3 Open the user s shut off valve between the machine and the air...

Page 67: ...d air network must be vented Generally the machine can be vented by means of the shut off valve on the condensate outlet or the pressure relief valve on the air receiver Normally the machine is vented...

Page 68: ...user s shut off valve is still open or the receiver relief valve is defective Close the shut off valve or have an authorised KAESER Service technician check the pres sure relief valve If manual venti...

Page 69: ...noid valve maintenance The machine must be isolated from the compressed air network and completely vented before un dertaking any work on the pressure system Material Compressed air for blowing out Cl...

Page 70: ...the connecting socket from the valve 2 Undo the screw and carefully remove the coil 3 Clean the armature and piston Change the spring if damaged or worn 4 Reassemble the valve 5 Open the user s shut o...

Page 71: ...he user s shut off valve between the machine and the air network 7 Start the machine and visually check for leaks 10 16 Option K5 K6 ECO Drain automatic condensate drain The condensate accumulating in...

Page 72: ...flow Collect condensate in a suitable container and dispose of it in accordance with applicable environmental regulations 10 16 2 Exchanging the service module Precondition The power supply isolator i...

Page 73: ...into the quick release coupling at the service module 4 Place the hook of the control module into the service module eye and press until the snap fastener can be heard to click into place 5 Fit the d...

Page 74: ...the screw and carefully remove the coil 3 Clean the solenoid core If the spring and O ring are damaged or worn they must be replaced 4 Reassemble the valve 10 17 2 Changing the solenoid valve Fig 37...

Page 75: ...valve Material Compressed air for blowing out Precondition The power supply disconnecting device is switched off The disconnecting device is locked in the off position A check has been made that no vo...

Page 76: ...ordance with appli cable environmental regulations Cleaning the filter element Fig 39 Filter pressure reducer cleaning 1 Condensate drain tap 2 Enclosure 3 Label cleaning agent 4 Filter element 1 Unsc...

Page 77: ...ed off the device is locked off the absence of voltage has been verified The machine is fully vented the pressure gauge on the air receiver reads 0 bar The user s shut off valve between the machine an...

Page 78: ...on in cylinder head and valves Severe coking Have a KAESER Service Technician renew the cylinder head and valves 10 Maintenance 10 19 Cylinder head and valves 68 Service Manual 2 stage piston compress...

Page 79: ...aintenance and service work carried out in the list Date Maintenance task carried out Operating hours Signature Tab 36 Logged maintenance tasks 10 Maintenance 10 20 Document maintenance and service wo...

Page 80: ...damage the ma chine or impair its proper function Personal injury may result from machine damage Use only original KAESER parts and operating fluids materials Have an authorised KAESER Service Techni...

Page 81: ...for operation of the compressed air system the security of genuine KAESER spare parts increased legal certainty as all regulations are kept to Why not sign a KAESER AIR SERVICE maintenance agreement R...

Page 82: ...esent Machine fully vented no pressure 1 Allow the machine to cool down completely 2 Spray the valves and cylinder bore with Shell Ensis 20 preserving oil The preserving oil does not need to be remove...

Page 83: ...ethod of transport Precondition Transport only by fork truck or lifting gear with personnel trained in the safe transport of goods Make sure the danger zone is clear 12 4 2 Transporting with a forklif...

Page 84: ...refully 12 5 Disposal When disposing of a machine drain out all liquids and remove dirty filters Precondition The machine is decommissioned 1 Completely drain the oil from the machine 2 Remove old fil...

Page 85: ...13 Annex 13 1 Pipeline and instrument flow diagram P I diagram 13 Annex 13 1 Pipeline and instrument flow diagram P I diagram No 9_9431_02 E Service Manual 2 stage piston compressor EPC 75...

Page 86: ...13 Annex 13 1 Pipeline and instrument flow diagram P I diagram 76 Service Manual 2 stage piston compressor EPC No 9_9431_02 E...
Page 87: ...13 Annex 13 1 Pipeline and instrument flow diagram P I diagram No 9_9431_02 E Service Manual 2 stage piston compressor EPC 77...

Page 88: ...13 2 Dimensional Drawing 13 Annex 13 2 Dimensional Drawing 78 Service Manual 2 stage piston compressor EPC No 9_9431_02 E...
Page 89: ...13 Annex 13 2 Dimensional Drawing No 9_9431_02 E Service Manual 2 stage piston compressor EPC 79...

Page 90: ...13 Annex 13 2 Dimensional Drawing 80 Service Manual 2 stage piston compressor EPC No 9_9431_02 E...
Page 91: ...13 Annex 13 2 Dimensional Drawing No 9_9431_02 E Service Manual 2 stage piston compressor EPC 81...

Page 92: ...13 Annex 13 2 Dimensional Drawing 82 Service Manual 2 stage piston compressor EPC No 9_9431_02 E...
Page 93: ...13 Annex 13 2 Dimensional Drawing No 9_9431_02 E Service Manual 2 stage piston compressor EPC 83...

Page 94: ...13 3 Electrical Diagram 13 Annex 13 3 Electrical Diagram 84 Service Manual 2 stage piston compressor EPC No 9_9431_02 E...
Page 95: ...13 Annex 13 3 Electrical Diagram No 9_9431_02 E Service Manual 2 stage piston compressor EPC 85...

Page 96: ...13 Annex 13 3 Electrical Diagram 86 Service Manual 2 stage piston compressor EPC No 9_9431_02 E...

Page 97: ...13 Annex 13 3 Electrical Diagram No 9_9431_02 E Service Manual 2 stage piston compressor EPC 87...

Page 98: ...13 Annex 13 3 Electrical Diagram 88 Service Manual 2 stage piston compressor EPC No 9_9431_02 E...
Page 99: ...13 Annex 13 3 Electrical Diagram No 9_9431_02 E Service Manual 2 stage piston compressor EPC 89...

Page 100: ...13 Annex 13 3 Electrical Diagram 90 Service Manual 2 stage piston compressor EPC No 9_9431_02 E...

Page 101: ...13 Annex 13 3 Electrical Diagram No 9_9431_02 E Service Manual 2 stage piston compressor EPC 91...

Page 102: ...13 Annex 13 3 Electrical Diagram 92 Service Manual 2 stage piston compressor EPC No 9_9431_02 E...

Page 103: ...13 Annex 13 3 Electrical Diagram No 9_9431_02 E Service Manual 2 stage piston compressor EPC 93...

Page 104: ...13 Annex 13 3 Electrical Diagram 94 Service Manual 2 stage piston compressor EPC No 9_9431_02 E...
Page 105: ...13 Annex 13 3 Electrical Diagram No 9_9431_02 E Service Manual 2 stage piston compressor EPC 95...

Page 106: ...13 Annex 13 3 Electrical Diagram 96 Service Manual 2 stage piston compressor EPC No 9_9431_02 E...

Page 107: ...13 Annex 13 3 Electrical Diagram No 9_9431_02 E Service Manual 2 stage piston compressor EPC 97...

Page 108: ...13 Annex 13 3 Electrical Diagram 98 Service Manual 2 stage piston compressor EPC No 9_9431_02 E...
Page 109: ...13 Annex 13 3 Electrical Diagram No 9_9431_02 E Service Manual 2 stage piston compressor EPC 99...

Page 110: ...13 Annex 13 3 Electrical Diagram 100 Service Manual 2 stage piston compressor EPC No 9_9431_02 E...
Reviews: