8
EXIT
PHASE
CHROMA
BRIGHT CONTRAST
MENU
VOLUME/SELECT
–
+
< MENU >
‰
SHARPNESS
: 00
COLOR TEMP.
: 6500
COLOR SYSTEM
: AUTO
ASPECT RATIO
: 4–3
RGB/COMPONENT
: RGB
COMPO. LEVEL
: 00
BLUE CHECK
: OFF
Front panel
Function
Contents
button
displayed
+
Increase (to max. value)
3
Forward the setting value
–
Decrease (to min. value)
2
Reverse the setting value
VOLUME/
SELECT (–)
VOLUME/
SELECT (+)
Front panel
Function
Contents
button
displayed
PHASE (
)
∞
Forward selection mark (
3
)
CHROMA ( )
5
Reverse selection mark (
3
)
Front panel
Function
Contents
button
displayed
MENU
EXIT
Quit (or Release) the <MENU>
screen
1
2
3
4
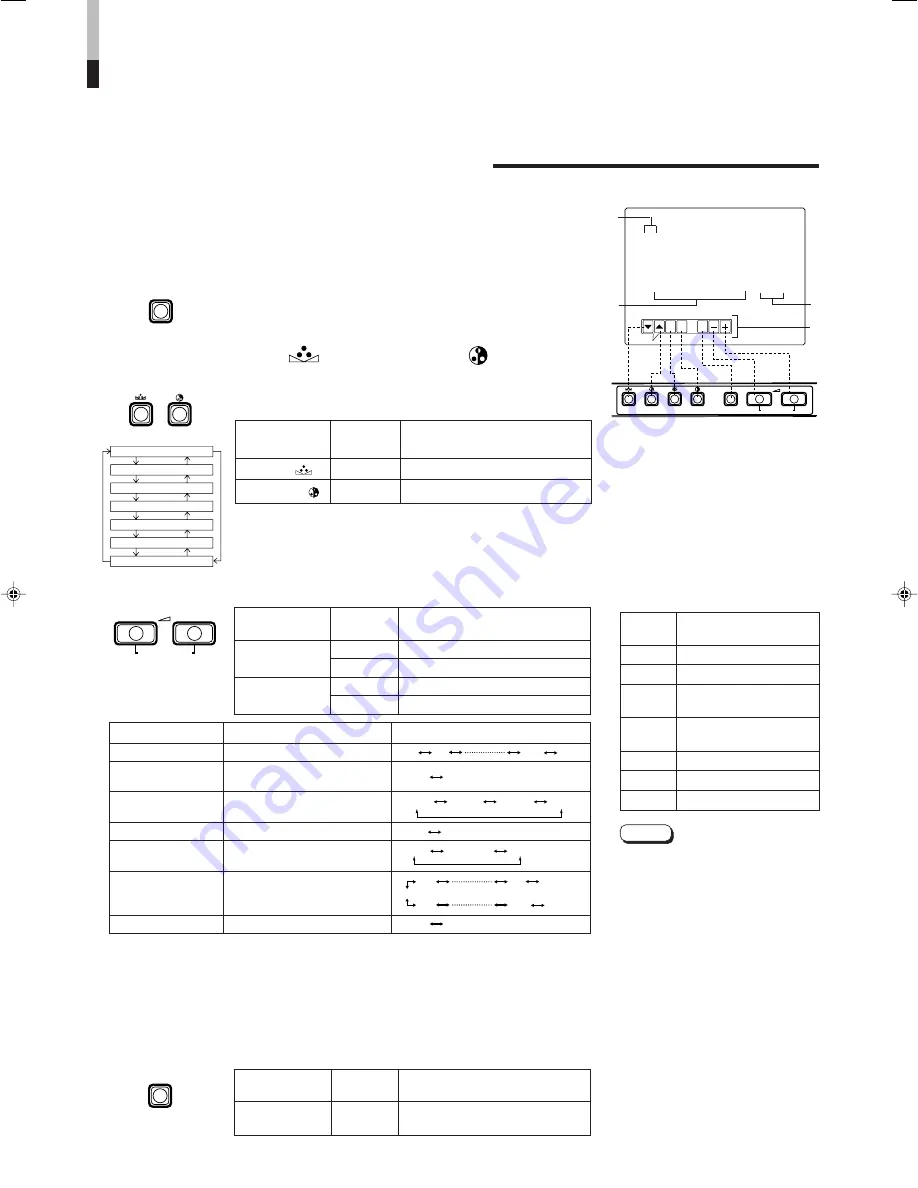
HOW TO USE THE MENU FUNCTIONS
• SHARPNESS
• ASPECT RATIO
• BLUE CHECK
• COLOR TEMP.
• RGB/COMPONENT
• COLOR SYSTEM
• COMPO. LEVEL
You can set the following menu items.
Set them depending on your needs.
1. Press the MENU button.
The <MENU> screen is displayed.
* The screen automatically disappears when no operation is
performed after about 5 minutes.
MENU
2. Press the PHASE (
) or CHROMA (
) button
to select MENU items.
A selection mark (
3
) is put next to the selected item.
PHASE
CHROMA
SHARPNESS
COLOR TEMP.
COLOR SYSTEM
ASPECT RATIO
RGB/COMPONENT
COMPO. LEVEL
BLUE CHECK
3. Press the VOLUME/SELECT button to set.
4. If you want to set the other menu items, repeat
procedures 2 and 3.
5. Press the MENU button to quit.
1
Selection mark (
3
): Indicates the
menu item you select.
2
Menu item: Menu items you can
select.
3
Setting display: Indicates the current
settings (value).
4
Function display: The functions of
the front panel buttons (7 buttons on
the left) correspond to the function
displayed.
Notes:
●
When the screen aspect ratio is set to
16 - 9 (16:9) in ASPECT RATIO, the
picture will be vertically reduced.
●
When REMOTE is displayed in the
ASPECT RATIO or RGB COMPONENT
status, it is not possible to set these items
because ASPECT REMOTE or INPUT
REMOTE in the <SET-UP MENU> is set to
valid. Use the external control function or
set ASPECT REMOTE or INPUT REMOTE
to invalid (OFF) to make setting possible.
●
The BLUE CHECK function is not
memorized. After the power is turned off
and on again, BLUE CHECK is automati-
cally set to OFF. Refer to page 9 for more
information about the BLUE CHECK
function.
●
When selecting COMPONENT or SDI,
adjust CHROMA GAIN (COLOR) in the
COMPO. LEVEL item first, then input a
standard signal from the device used with
the monitor and adjust CHROMA GAIN
with BLUE CHECK. Refer to page 9 for
more information about initializing
COMPO. LEVEL.
<MENU> screen
<Front panel button>
Function
Contents
displayed
∞
Forward the menu item.
5
Reverse the menu item.
–
Lower the adjustment
value. (to the minimum)
+
Raise the adjustment
value. (to the maximum)
3
Forward the setting value.
2
Reverse the setting value.
EXIT
Exits the <MENU> screen.
DISPLAY AND SELECTION IN THE <MENU>
SCREEN MODE (SETTING)
MENU
VOLUME/SELECT
–
+
Menu items
Purpose
Setting range
SHARPNESS
Picture sharpness
COLOR TEMP.
Color temperature of
white balance
COLOR
Color system
SYSTEM
ASPECT RATIO
Aspect ratio
RGB/COMPONENT
Input RGB/COMPONENT/SDI
signal system
COMPO. LEVEL
Component or SDI level
BLUE CHECK
Blue check ON/OFF
00 +1 +39 +40
9300 6500
AUTO NTSC AUTO PAL
4 – 3 16 – 9
RGB COMPO. SDI
+01 +9 +10
–01 –39 –40
0
OFF ON
* In normal use, leave the COLOR SYSTEM setting to AUTO.
If the receiving condition is not good in AUTO position, set it to the exclusive mode corresponding to the
receiving color system (NTSC or PAL).
* COMPO. LEVEL can be set for component input and SDI input independently.
Summary of Contents for TM-1650SDU - Color Monitor
Page 19: ...19 ...


