background image

G-2

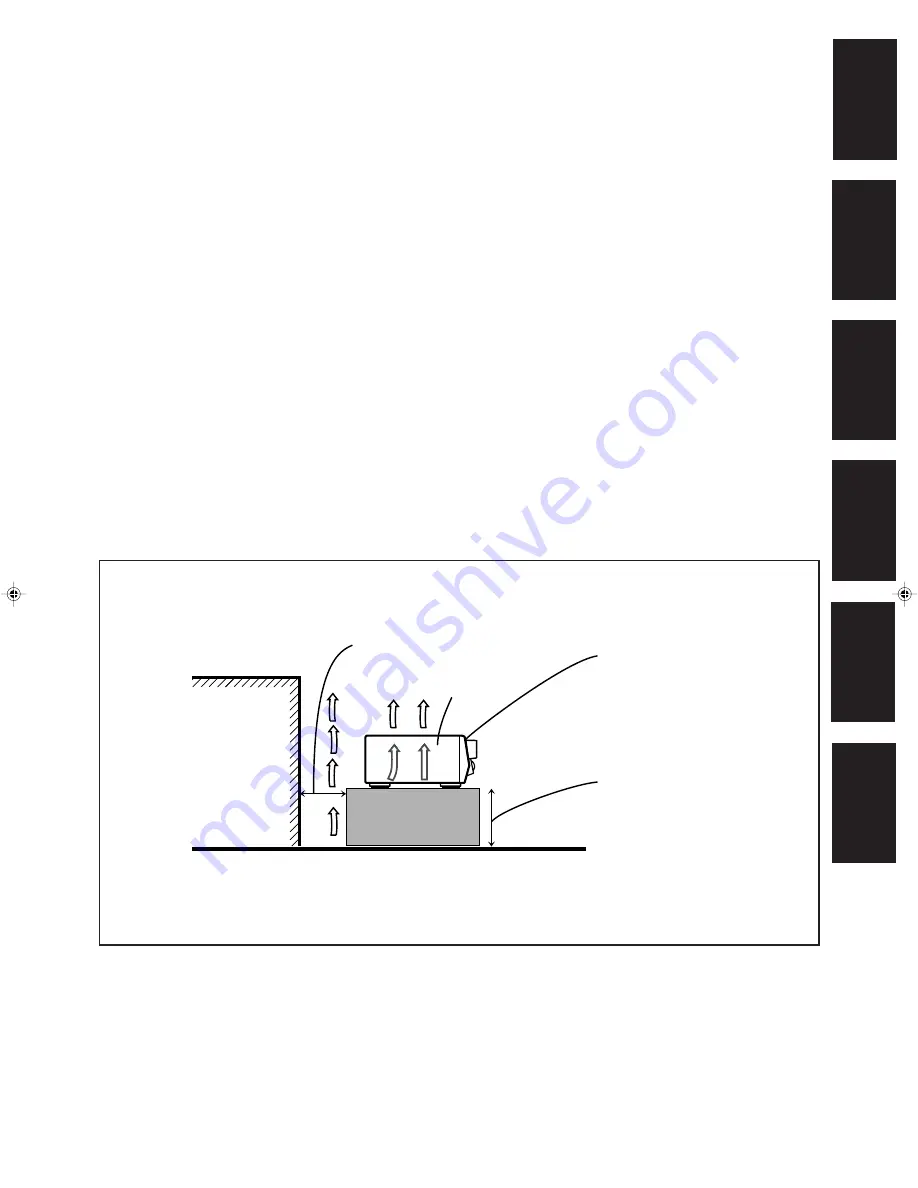
Caution: Proper Ventilation
To avoide risk of electric shock and fire and to protect from damage.
Locate the apparatus as follows:
Front:

No obstructions open spacing.

Sides:

No obstructions in 10 cm from the sides.

Top:

No obstructions in 10 cm from the top.

Back:

No obstructions in 15 cm from the back

Bottom:

No obstructions, place on the level surface.

In addition, maintain the best possible air circulation as illustrated.

Achtung: Angemessene Ventilation
Stellen Sie das Gerät zur Verhütung von elektrischem Schlag und
Feuer und zum Schutz gegen Beschädigung wie folgt auf:
Vorderseite: Offener Platz ohne Hindernisse.
Seiten:

Keine Hindernisse innerhalb 10 cm von den Seiten.

Oberseite:

Keine Hindernisse innerhalb 10 cm von der Oberseite.

Rückseite:

Keine Hindernisse innerhalb 15 cm von der Rückseite.

Unterseite:

Keine Hindernisse.  Auf eine ebene Oberfläche stellen.

Zusätzlich die bestmögliche Luftzirkulation wie gezeigt erhalten.

Attention: Ventilation Correcte
Pour éviter les chocs électriques, l’incendie et tout autre dégât.
Disposer l’appareil en tenant compte des impératifs suivants
Avant:

Rien ne doit gêner le dégagement

Flancs:

Laisser 10 cm de dégagement latéral

Dessus:

Laisser 10 cm de dégagement supérieur

Arrière:

Laisser 15 cm de dégagement arrière

Dessous:

Rien ne doit obstruer par dessous; poser l’appareil sur
une surface plate.

Veiller également à ce que l’air circule le mieux possible comme
illustré.

Voorzichtig: Zorg Voor Goede Ventilatie
Om gevaar voor brand of een elektrische schok te voorkomen, dient u
bij opstelling van het apparaat op de volgende punten te letten:
Voorkant:

Voldoende ruimte vrij houden.

Zijkanten:

Minstens 10 cm aan weerszijden vrij houden.

Bovenkant:

Niets bovenop plaatsen; 10 cm speling geven.

Achterkant:

Minstens 15 cm ruimte achteraan vrij houden.

Onderkant:

Opstellen op een egaal horizontaal oppervlak.

Bovendien moet er rondom voldoende luchtdoorstroming zijn, zoals in
de afbeelding aangegeven.

Precaución: Ventilación Adecuada
Para evitar el riesgo de choque eléctrico e incendio y para proteger el
aparato contra daños.
Ubique el aparato de la siguiente manera:
Frente:

Espacio abierto sin obstrucciones

Lados:

10 cm sin obstrucciones a los lados

Parte superior: 10 cm sin obstrucciones en la parte superior
Parte trasera:

15 cm sin obstrucciones en la parte trasera

Fondo:

Sin obstrucciones, colóquelo sobre una superficie
nivelada

Además, mantenga la mejor circulación de aire posible como se
ilustra.

Attenzione: Problemi di Ventilazione
Per evitare il rischio di folgorazioni ed incendi e proteggere l’unità da
danni, installarla nel modo seguente.
Davanti:

Nessun ostacolo, spazio libero

Lati:

Nessun ostacolo per almeno 10 cm

Sopra:

Nessun ostacolo per almeno 10 cm

Retro:

Nessun ostacolo per almeno 15 cm

Fondo:

Libero ed in piano

Inoltre, mantenere il più possibile la circolazione dell’aria.

Wall or obstructions
Wand oder Hindernisse
Mur, ou obstruction
Wand of meubilair
Pared u obstrucciones
Parete o ostacol

Spacing 15 cm or more
Abstand von 15 cm oder mehr
Dégagement de 15 cm ou plus
Minstens 15 cm tussenruimte
Espacio de 15 cm o más
15 cm di distanza o più

Stand height 15 cm or more
Standhöhe 15 cm oder mehr
Hauteur du socle: 15 cm ou plus
Standard op minstens 15 cm van de vloer
Allura del soporte 15 cm o más
Altezza del tavolino 15 cm p plù

Front
Vorderseite
Avant
Voorkant
Frente
Davanti

RX-668RBK

Floor
Boden
Plancher
Vloer
Piso
Pavimento

English

Deutsch

Français

Nederlands

Italiano

Español

RX-668R[E]SAFETY/1

99.1.28, 1:10 PM

2

Summary of Contents for RX-668RBK

Page 1: ...AM DVD CD VCR VOLUME VCR CH TV VOL TV CH 10 SET EXIT CD DISC SOUND CONTROL TV VCR AUDIO SURROUND TEST DELAY EFFECT CENTER REAR L ENTER RETURN MENU REAR R 100 8 DISPLAY TAPE MD AUDIO VIDEO CONTROL RECEIVER AUDIO VIDEO RECEIVER MIT STEUEREINHEIT AMPLI TUNER DE COMMANDE AUDIO VIDEO GEINTEGREERDE AUDIO VIDEO VERSTERKER RECEPTOR DE CONTROL DE AUDIO VÍDEO RICEVITORE DI CONTROLLO AUDIO VIDEO RX 668R AUDI...

Page 2: ... le courant Le commutateur STANDBY ON ne coupe jamais complètement la ligne de secteur quelle que soit sa position Le courant peut être télécommandé Voorzichtig STANDBY ON schakelaar Om de stroomtoevoer geheel uit te schakelen trekt u de stekker uit het stopkontakt Anders zal er altijd een geringe hoeveelheid stroom naar het apparaat lopen ongeacht de stand van de STANDBY ON schakelaar U kunt het ...

Page 3: ...en Zijkanten Minstens 10 cm aan weerszijden vrij houden Bovenkant Niets bovenop plaatsen 10 cm speling geven Achterkant Minstens 15 cm ruimte achteraan vrij houden Onderkant Opstellen op een egaal horizontaal oppervlak Bovendien moet er rondom voldoende luchtdoorstroming zijn zoals in de afbeelding aangegeven Precaución Ventilación Adecuada Para evitar el riesgo de choque eléctrico e incendio y pa...

Page 4: ...Disc Information 31 Operating JVC s Audio Video Components 33 Troubleshooting 35 Specifications 36 Parts Identification 2 Getting Started 3 Before Installation 3 Checking the Supplied Accessories 3 Connecting the FM and AM MW LW Antennas 3 Connecting the Speakers 4 Connecting Audio Video Components 5 Connecting the Power Cord 7 Putting Batteries in the Remote Control 7 Basic Operations 8 Turning t...

Page 5: ... MD IMPORTANT To use the Cursor control buttons w on the front panel What these buttons actually do depends on which function you are trying to adjust Before using these buttons select the function by pressing one of the buttons marked with Remote Control 1 SOUND CONTROL button 19 33 2 ON SCREEN operation buttons 23 SET EXIT 3 10 keys for selecting preset channel 13 10 keys for adjusting sound 19 ...

Page 6: ... receiver or remove screws covers or cabinet Do not expose the receiver to rain or moisture Checking the Supplied Accessories Check to be sure you have all of the following items which are supplied with the receiver The number in the parentheses indicates quantity of the pieces supplied Remote Control 1 Batteries 2 AM MW LW Loop Antenna 1 FM Antenna 1 If anything is missing contact your dealer imm...

Page 7: ...eaker terminals Turn the loop until you have the best reception Notes Make sure the antenna conductors do not touch any other terminals connecting cords and power cord This could cause poor reception If reception is poor connect an outdoor single vinyl covered wire to the AM EXT terminal Keep the AM MW LW loop antenna connected Connecting the Speakers You can connect the following speakers Two pai...

Page 8: ...tput To audio output AUDIO PHONO TAPE MD CD TV SOUND OUT REC IN PLAY L R Note You can connect either a cassette deck or an MD recorder to the TAPE MD jacks When connecting an MD recorder to the TAPE MD jacks change the source name which will be shown on the display when selected as the source to MD See page 11 for details AUDIO PHONO TAPE MD CD TV SOUND OUT REC IN PLAY L R TV TV as the sound sourc...

Page 9: ...annot view the playback picture from the DVD player on the TV DVD player When you connect the DVD player with stereo output jacks VIDEO LEFT RIGHT VIDEO S VIDEO MONITOR OUT OUT REC IN PLAY OUT REC IN PLAY DVD VCR L R LEFT FRONT CENTER REAR RIGHT SUBWOOFER DVD DVD Å ı Ç DVD player Å To front left right channel audio output or to audio mixed output if necessary ı To composite video output Ç To S vid...

Page 10: ... cord always grasp the plug so as not to damage the cord Putting Batteries in the Remote Control Before using the remote control put two supplied batteries first When using the remote control aim the remote control directly at the remote sensor on the receiver 1 On the back of the remote control remove the battery cover as illustrated 2 Insert batteries Make sure to observe the proper polarity to ...

Page 11: ...using the analog discrete output mode 5 1CH reproduction on the DVD player To enjoy the DVD MULTI playback see page 22 DVD Select the DVD player for viewing the stereo digital video disc VCR Select the video component connected to the VCR jacks TV SOUND Select the TV sound CD Select the CD player PHONO Select the turntable TAPE MD Select the cassette deck or the MD recorder FM AM Select an FM or A...

Page 12: ...s SPEAKERS 1 and SPEAKERS 2 to set them in the OFF position Note When only one set of the speakers is connected to either the FRONT SPEAKERS 1 or 2 terminals do not activate both pairs of the speakers If you do no sound comes out of the front speakers MASTER VOLUME Listening only with headphones 1 Connect a pair of headphones to the PHONES jack on the front panel 2 Press SPEAKERS 1 and SPEAKERS 2 ...

Page 13: ...ses the left channel output from R 21 to L 21 INPUT ATT Reinforcing the Bass With this Bass Boost function you can boost the bass level Before you start remember There is a time limit in doing the following steps If the setting is canceled before you finish start from step 1 again On the front panel ONLY 1 Press ADJUST so that the cursor control fi buttons work for adjusting the sound 2 Press curs...

Page 14: ...efore you finish start from step 1 again You can adjust the delay time only when you have connected the rear speakers and have set REAR SPK to YES see above TAPE MD SOURCE NAME TAPE MD SOURCE NAME Changing the Source Name When you have connected an MD recorder to the TAPE MD jacks on the rear panel Change the source name shown on the display when you select the MD recorder as the source On the fro...

Page 15: ...LEEP 20 10 30 40 50 60 70 80 90 Canceled 00 Storing the Basic Settings and Adjustments One Touch Operation JVC s One Touch Operation function is used to assign and store different sound settings for each different playing source By using this function you don t have to change the settings every time you change the source The stored settings for the newly selected source are automatically recalled ...

Page 16: ... cursor control to select a channel number while the channel number position is flashing Note You can use the 10 keys on the remote control to select the preset number When using the 10 keys be sure that they are activated for the tuner not for the CD and others See page 33 4 Press MEMORY again while the selected channel number is flashing on the display The selected channel number stops flashing ...

Page 17: ...nal is sent RT Radio Text While searching RT appears and then text messages the station sends will be displayed NO RT appears if no signal is sent Frequency Station frequency non RDS service Notes When pressing DISPLAY on the remote control make sure that you have selected FM station using the remote control If not the DISPLAY button does not work for tuner operation Pressing FM AM activates the r...

Page 18: ...e alternate on the display The receiver searches 30 preset FM stations stops when it finds the one you have selected and tunes in that station To continue searching after the first stop Press PTY SEARCH again while the indications on the display are flashing If no program is found NOTFOUND appears on the display PTY codes FM AM PTY PTY SEARCH PTY TRAVEL AFFAIRS ROCK M MUSIC RELIGION M O R M MIDDLE...

Page 19: ...asting the program you have selected the receiver automatically switches to the station The indicator of received PTY code starts flashing When the program is over the receiver goes back to the previously selected source but still remains in EON standby mode The indicator of received PTY code stops flashing and remains lit If the FM station you are listening to is broadcasting the program you have...

Page 20: ... front speakers and rear speakers are connected to this receiver regardless of the center speaker connection On the other hand 3 Stereo can be used when the rear speakers are not connected center speaker must be connected JVC Theater Surround In order to reproduce a more realistic sound field in your listening room while playing soundtracks of video software bearing the mark DOLBY SURROUND JVC The...

Page 21: ...r Front speaker Rear speaker Rear speaker Each time you press SURROUND the DSP modes change as follows DOLBY PRO LOGIC THEATER LIVE CLUB DANCE CLUB HALL PAVILION 3D ACTION OFF DSP mode is canceled TV Front speaker Front speaker Center speaker Each time you press SURROUND the DSP modes change as follows DOLBY 3 Stereo 3D THEATER LIVE CLUB DANCE CLUB HALL PAVILION 3D ACTION OFF DSP mode is canceled ...

Page 22: ... 3D PHONIC mode becomes stronger Adjusting DAP Modes Before you start remember Make sure that you have set the speaker information correctly see page 11 There is a time limit in doing the following steps If the setting is canceled before you finish start from step 1 again You can only adjust the rear speaker output level when you have connected the rear speakers and have set REAR SPK to YES See pa...

Page 23: ...cting PRO LOGIC the PRO LOGIC indicator also lights up on the display When selecting THEATER the DSP PRO LOGIC and THEATER indicators also light up on the display 3 Press TEST to check the speaker output balance TEST TONE L starts flashing on the display and a test tone comes out of the speakers in the following order Notes You can adjust the speaker output levels without outputting the test tone ...

Page 24: ...Each time you press the button the effect level changes as follows As the number increases JVC Theater Surround becomes stronger Activating the DSP Modes Once you have finished adjustments for the DSP modes you can use the same adjustments every time you want to use these modes On the front panel 1 Press SURROUND repeatedly until the DSP mode you want appears on the display Each time you press the...

Page 25: ... 10 dB Pressing REAR R increases the output level up to 10 dB Activating the DVD MULTI Playback Mode You can adjust the DVD MULTI playback mode while playing back a DVD using the analog discrete output mode on the DVD player Once you made adjustments the receiver memorizes the adjustments until you change them You also need to set the DVD player to the analog discrete output mode Before you start ...

Page 26: ...ONTROL menu appears 4 Press fi to move to BAL Balance 5 Press to adjust the balance 6 When you finish press ON SCREEN EXIT repeatedly until the menu disappears from the TV ON SCREEN SLEEP ONE TOUCH OPERATION TV VIDEO 3 2 1 6 5 4 9 8 7 P 10 0 TV SOUND REC PAUSE TEXT DISPLAY RM SR668RU REMOTE CONTROL MUTING DVD MULTI I PTY PTY SEARCH PTY PHONO FM AM DVD CD VCR VOLUME VCR CH TV VOL TV CH 10 SET EXIT ...

Page 27: ...e MAIN MENU appears on the TV 3 Press fi to move to MODE 4 Press to select the DSP mode you want to adjust In this example THEATER is selected 5 Press fi to move to SOUND CONTROL then press The SOUND CONTROL menu appears 6 Press fi to move to SURROUND LEVEL then press The SURROUND LEVEL menu appears 7 Press fi to move to the item you want to set or adjust then press On these adjustment menus you c...

Page 28: ...perations 2 Press any one of fi The MAIN MENU appears on the TV 3 Press fi to move to SOUND CONTROL then press The SOUND CONTROL menu appears 4 Press fi to move to TONE CONTROL then press The TONE CONTROL menu appears 5 Press fi to adjust the tone as you want Select the frequency ranges 100 Hz bass and 10 kHz treble fi Adjust the frequency levels 6 When you finish press ON SCREEN EXIT repeatedly u...

Page 29: ...Press any one of fi The MAIN MENU appears on the TV 3 Press fi to move to TUNER CONTROL then press The TUNER CONTROL menu appears 4 Press fi to move to the item you want to set or adjust then press On the TUNER CONTROL menu you can do the following PRESET CH Select a preset channel station BAND Select the band FREQUENCY Tune in a station manually FM MODE Select the FM reception mode PRESET MEMORY ...

Page 30: ...lected component begins playing immediately In both cases the previously selected source continues playing without sound for a few seconds COMPU LINK 3 SYNCHRO Turntable CD player Cassette deck or MD recorder Automatic Power On Off Standby only possible with the COMPU LINK 3 connection Both the CD player and cassette deck or MD recorder turn on and off standby along with the receiver When you turn...

Page 31: ...d below Displaying the Disc Information on the TV screen Disc information such as its performer and disc title and track titles only when a CD Text is selected is shown on the TV screen Disc Search Only for CD Player This remote control system can allow you to search discs by the performer disc title and music genre With this disc search you can easily find the disc you want to play Disc Title Inp...

Page 32: ... will be used to start play PLAY to go to the next screen ENTER and to determine the selection ENTER To exit from the Disc information screen Press ON SCREEN EXIT again Notes The on screen display will disappear in the following case if no operation is done for about 10 minutes if you do any operation other than explained in this section To control the MD recorder using the TEXT COMPU LINK remote ...

Page 33: ...ress fi until they appear Going back to the DISC TITLE SEARCH screen Press ON SCREEN EXIT Searching a Disc Only for the CD player Search a disc by its performer 1 Press TEXT DISPLAY while CD is selected as the source The Disc Information screen appears on the TV 2 Press fi to move to SEARCH then press ON SCREEN SET The DISC SEARCH screen appears 3 Press fi to move to PERFORMER then press ON SCREEN...

Page 34: ... CD Player with the disc memory function You can use the disc memory function through this receiver The disc information its performer disc title and music genre of normal audio CDs will be stored into the memory built in the CD player For the disc memory function refer to the manual supplied with your CD player The performer disc title and music genre information are usually recorded in a CD Text...

Page 35: ...he song title referring to steps 3 and 4 of For the CD Player with the disc memory function to the left You can enter up to 32 characters for the song title 6 Press fi to move to the song title you have just entered then press ON SCREEN SET The song title is stored into the memory and the Disc Information screen appears again 4 Repeat step 3 until you finish putting a name up to 32 characters to t...

Page 36: ...ot be used for operating your target source CD player After pressing CD you can perform the following operations on the CD player 3 Starts playing 4 4 4 4 4 Returns to the beginning of the current or previous track Skips to the beginning of the next track 7 Stops playing 8 Pauses playing To release it press 3 1 10 10 Selects a track number directly For track number 5 press 5 For track number 15 pr...

Page 37: ...E Pauses recording temporarily To release it press 3 Note To operate the cassette deck or MD recorder using the COMPU LINK remote control system set the source name correctly See page 11 MD recorder After pressing TAPE MD you can perform the following operations on the MD recorder 3 Starts playing 4 Returns to the beginning of the current or previous track Skips to the beginning of the next track ...

Page 38: ...s away from the turntable Rotate the MASTER VOLUME control counterclockwise three or four times then press STANDBY ON on the front panel If OVERLOAD does not disappear unplug the AC power cord then plug it back again Press STANDBY ON on the front panel then check the speaker wiring If OVERLOAD does not disappear unplug the AC power cord then plug it back again If speaker wiring is not short circui...

Page 39: ...ortion IEC268 3 DIN At Surround operation Front Channels 55 watts per channel min RMS driven into 4 ohms at 1 kHz with no more than 0 8 total harmonic distortion Center channel 55 watts min RMS driven into 4 ohms at 1 kHz with no more than 0 8 total harmonic distortion Rear channels 55 watts per channel min RMS driven into 4 ohms at 1 kHz with no more than 0 8 total harmonic distortion Total Harmo...

Page 40: ...VICTOR COMPANY OF JAPAN LIMITED EN GE FR NL SP IT J VC 0299JTMMDWJEM ...

Reviews: