background image

6

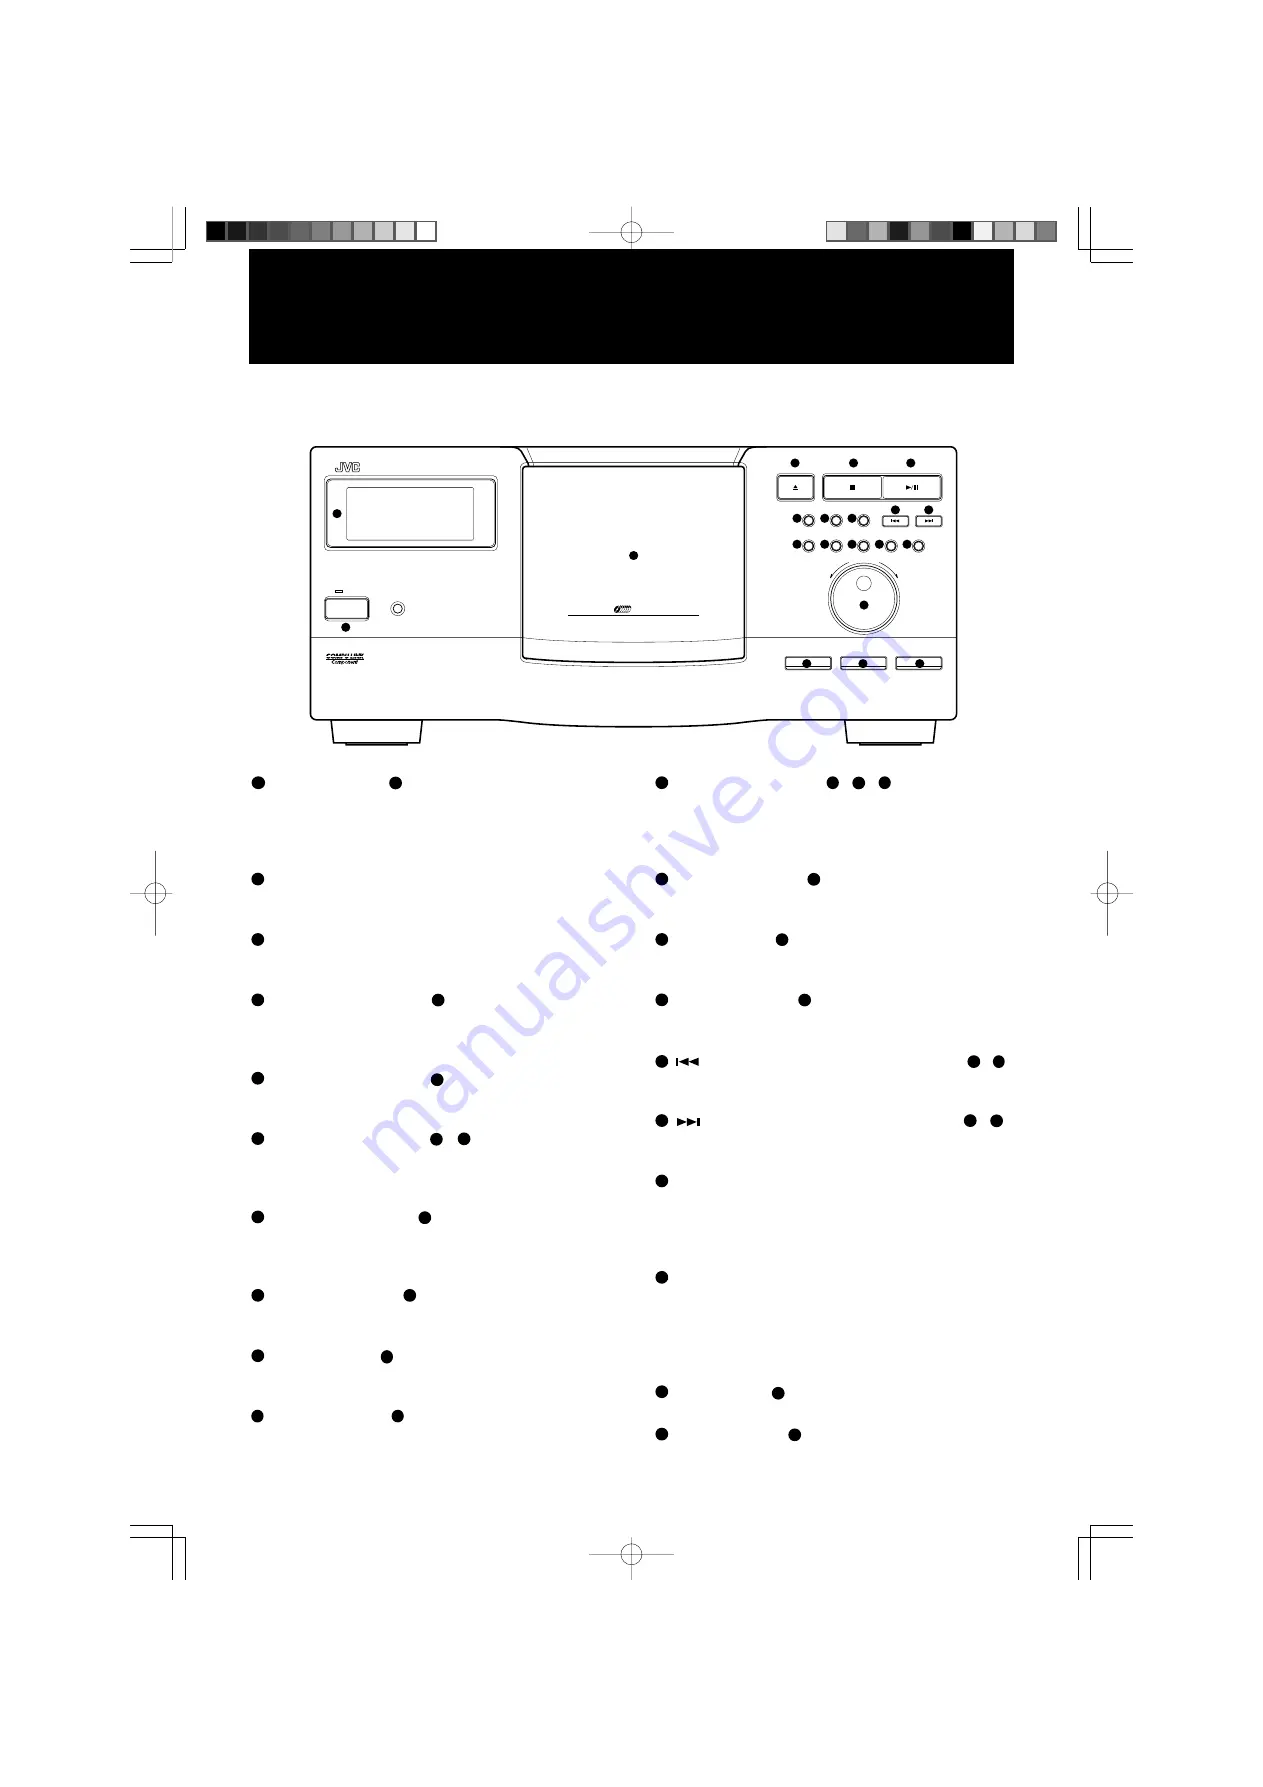
CONTROL PANEL AND REMOTE CONTROL

Alphabetic letters in brackets following button names indicate their
counterparts on the remote control.

1

POWER button [

a

]

Turns the power on and off. The STANDBY indicator above
lights when the power is turned off and the unit is in the standby
state; it goes out when the power is turned on. (To turn off the
unit completely, unplug the power cord from the wall socket.)

2

Display

Shows the current operation status (see next page for more
information).

3

Disc storage

Holds up to 200 discs in slots of a carousel, which rotates inside
the disc storage.

4

OPEN/CLOSE button [

e

]

Opens or closes the disc storage door. The disc in the play
position will be retracted into its carousel slot when the door is
opened using this button.

5

STOP/CLEAR button [

p

]

Stops playing the disc. Pressing the button in the PROGRAM
mode clears all program steps if the unit is stopped.

6

PLAY/PAUSE button [

q

r

]

Retrieves a disc from its carousel slot, places it in the play
position, and starts playing the disc; or interrupts the playing
temporarily, or restarts the interrupted playing.

7

EXCHANGE button [

i

]

Opens the disc storage door without retracting the disc currently
in the play position, and permits to change discs in the slots
positioned in the front.

8

RANDOM button [

f

]

Selects or deselects the RANDOM playback function (see the
description of playback modes).

9

INTRO button [

g

]

Selects or deselects the INTRO playback function (see the
description of playback modes).

10

REPEAT button [

h

]

Selects or deselects the REPEAT or REPEAT 1 playback
function (see the description of playback modes).

11

PLAY MODE button [

b

c

d

]

Selects in turn a mode of playing successive discs continuously
(CONTINUE), one disc only (ONE DISC), or according to a
program (PROGRAM). Refer to the description of each
playback mode for details.

12

MEMORY button [

o

]

Enters specified disc and track numbers as a program step in
the PROGRAM mode.

13

CALL button [

m

]

Displays the programmed steps for review or deletion in the
PROGRAM mode.

14

CANCEL button [

n

]

Deletes the currently displayed program step (disc and track
numbers) in the PROGRAM mode.

15

 (track skip/search backward) button [

s

u

]

Skip tracks or search for a track backward. Holding down this
button causes playback to fast reverse.

16

 (track skip/search forward) button [

t

v

]

Skip tracks or search for a track forward.  Holding down this
button causes playback to fast forward.

17

DISC/TRACK jog dial

Used to select a disc or track — the DISC or TRACK button
located below the dial determines the dial function. “JOG” and
“DISC” or “TRACK” will be shown on the display when the
function is selected.

18

DISC EJECT button

Raises the disc in the load/unload position of the disc storage
when the door is open.
Pressing this button when the door is closed retrieves the disc
from the play position and brings it to the load/unload position.
The disc will then be popped up when the door is opened.

19

DISC button [

j

]

Selects the DISC/TRACK jog dial function for discs.

20

TRACK button [

k

]

Selects the DISC/TRACK jog dial function for tracks.

Control panel

POWER

STANDBY

XL-MC2000  COMPACT DISC AUTOMATIC CHANGER

PLAY/PAUSE

STOP/CLEAR

REPEAT

PLAY MODE

MEMORY

DISC/TRACK

EXCHANGE

RANDOM

INTRO

CALL

CANCEL

TRACK

OPEN/CLOSE

DISC

DOWN

UP

DISC EJECT

200

ENHANCED COMPULINK CONTROL SYSTEM

OPTICAL DIGITAL OUTPUT

'

1

2

3

4

5

6

7

8

9

10

11

12

17

18

19

20

13

14

15

16

5

Summary of Contents for MC2000 - XL CD Changer

Page 1: ...cated on the rear bottom or side of the cabinet Retain this information for future reference INSTRUCTIONS POWER STANDBY XL MC2000 COMPACT DISC AUTOMATIC CHANGER PLAY PAUSE STOP CLEAR REPEAT PLAY MODE MEMORY DISC TRACK EXCHANGE RANDOM INTRO CALL CANCEL TRACK OPEN CLOSE DISC DOWN UP DISC EJECT 200 ENHANCED COMPULINK CONTROL SYSTEM OPTICAL DIGITAL OUTPUT CALL RANDOM INTRO REPEAT TRACK DISC EXCHANGE P...

Page 2: ... OR BACK NO USER SERVICEABLE PARTS INSIDE REFER SERVICING TO QUALIFIED SERVICE PERSONNEL RISK OF ELECTRIC SHOCK DO NOT OPEN CAUTION WARNING TO REDUCE THE RISK OF FIRE OR ELECTRIC SHOCK DO NOT EXPOSE THIS APPLIANCE TO RAIN OR MOISTURE Caution POWER switch For U S A Disconnect the mains plug to shut the power off completely ThePOWER switch in any position does not disconnect the mains line The power...

Page 3: ......

Page 4: ... Installing batteries in the remote control 4 Control Panel and Remote Control 5 Control panel 5 Display 6 Remote control 6 Basic Operation 7 Turning the power on 7 Loading compact discs 7 Unloading changing discs 7 Playing discs 8 CONTINUE Mode Playback 9 Basic mode 9 Playing discs in random order 9 Playing a track repeatedly 9 Playing only the beginning of each disc s first track 9 ONE DISC Mode...

Page 5: ...ff if a problem occurs If an unusual condition arises turn the power off immediately If the condition persists whenever the power is turned on consult your JVC dealer Do not pull the AC power cord Do not pull the cable when unplugging the AC cord from the wall socket or this component hold and pull the plug body Set the sound volume carefully Be careful in setting the sound volume on your amplifie...

Page 6: ...optical fiber cable DIGITAL OUT OPTICAL Optical fiber cable not supplied To digital input jack of the MD CD R amplifier receiver Be sure to pull off the caps before you make any connections as shown above Place the caps in a safe place System control connections If you are connecting the unit to a JVC audio component using the CompuLink 3 remote control system connect the units with the accessory ...

Page 7: ... used for an extended period of time Do not expose the remote control to heat flame or direct sunlight Replacing the batteries The service life of batteries normally lasts for about one year though it is dependent on the use of the remote control it is shortened in low temperatures too Replace the batteries any time if the controllable range is reduced max range 7 meters or 23 feet and 30 degrees ...

Page 8: ... of playback modes 11 PLAY MODE button b c d Selects in turn a mode of playing successive discs continuously CONTINUE one disc only ONE DISC or according to a program PROGRAM Refer to the description of each playback mode for details 12 MEMORY button o Enters specified disc and track numbers as a program step in the PROGRAM mode 13 CALL button m Displays the programmed steps for review or deletion...

Page 9: ...he interrupted playing s search reverse button Search through a track in reverse t search forward button Searches through a track forward u track skip backward button Skips tracks backward v track skip forward button Skips tracks forward w 1 DISC disc skip backward button Skips discs backward x 1 DISC disc skip forward button Skips discs forward Display The information shown on the display of the ...

Page 10: ...e your hand from the storage opening before pressing the OPEN CLOSE button Unloading changing discs 1 Press the OPEN CLOSE button to eject a disc in the playback position for unloading or changing 2 To unload or change discs in other slots press the DISC button and specify the slot number using the jog dial The specified disc will be brought to the load unload position Then press the DISC EJECT bu...

Page 11: ...ally Once disc playback is started in order to specify a track number to be played the PLAY PAUSE button or the button on the remote control must be pressed within five seconds Remote control or PLAY PAUSE Skipping to the different track in the same disc during playback Proceed to steps 3 and 4 Press or buttons to skip tracks respectively Skipping to the begining of the different disc during playb...

Page 12: ...function is on Press the REPEAT button once to cancel the function clearing the indication from the display NOTE The REPEAT function is not available in the CON TINUE mode as all discs are already being played back continuously Playing only the beginning of each disc s first track To scan the first tracks of all discs press the INTRO button to show INTRO on the display and the button The beginning...

Page 13: ...ped when the scan is completed Press the INTRO button again to cancel the function clearing the indication from the display PLAY MODE ONE DISC or Remote control 2 Select a disc you want to play Press the DISC button and then use the DISC TRACK jog dial The 1 DISC or 1DISC buttons as well as the numeric buttons on the remote control can also be used One disc can be selected and played entirely in t...

Page 14: ...play every step in the program once in random order press the RANDOM button showing RANDOM on the display Then start playing The playback will be stopped when all program steps have been played If the disc specified in the program is not in the disc storage the playback stops The playback starts again after you load the disc and press the PLAY PAUSE button or the button on the remote control Press...

Page 15: ...lly select the relevant source on the amplifier receiver Synchronized recording This function is effective when a JVC cassette deck or MD recorder is linked in the CompuLink system allowing simple synchronized recording NOTE Refer to the instruction manual of your cassette deck or MD recorder for the detail of the synchronized re cording Some functions are disabled in order to prevent the recordin...

Page 16: ...c can easily be damaged and the damaged disc disrupts sound reproduction and the player function Keep every disc in its case Be sure to keep every disc in its case whenever it is taken out of the player Placing one disc upon another without putting them in their cases will damage their recorded tracks Keep the label side clean Do not attempt to put adhesive tape or paper nor write anything even on...

Page 17: ...ched or warped Replace the disc with a new one A piece of paper or adhesive tape is stuck Remove it cleanly to the CD surface The audio cord is placed close to the AC Separate them powercord The remote controller does not The batteries are exhausted Replace the batteries properly work The remote control is not properly used Its maximum range is 7 meters 23 feet and 30 degrees away from the compone...

Page 18: ...ble parts inside Please refer to qualified service personnel for repairs NEED HELP ON HOW TO HOOK UP NEED ASSISTANCE ON HOW TO OPERATE NEED TO LOCATE A JVC SERVICE CENTER LIKE TO PURCHASE ACCESSORIES THANK YOU FOR PURCHASING THIS JVC PRODUCT WE WANT TO HELP YOU ACHIEVE A PERFECT EXPERIENCE Remember to retain your Bill of Sale for Warranty Service TOLL FREE 1 800 252 5722 http www jvc com 15 ...

Page 19: ... WARRANTY INFORMATION PACKAGED WITH EACH REFURBISHED PRODUCT Some states do not allow the exclusion of incidental or consequential damages or limitations on how long an implied warranty lasts so these limitations or exclusions may not apply to you This warranty gives you specific legal rights and you may also have other rights which vary from state to state THE DURATION OF ANY IMPLIED WARRANTIES I...

Page 20: ...EN 1999 Victor Company of Japan Limited 0806SKMSANJEIN VICTOR COMPANY OF JAPAN LIMITED ...

Reviews: