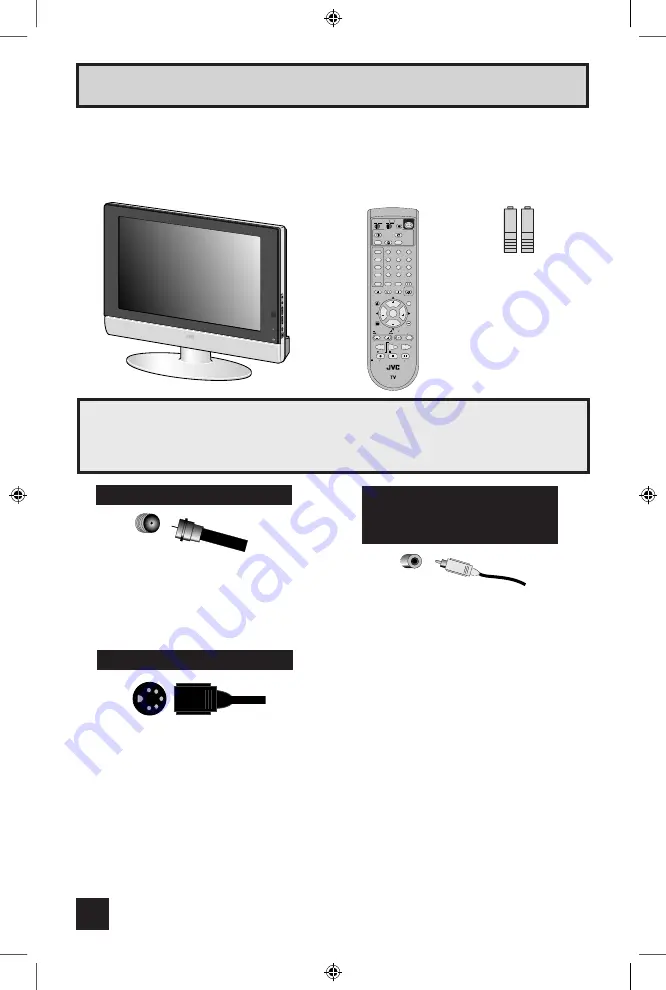
background image

2 piles AA

1 Téléviseur

1 Télécommande

Servent à raccorder une antenne 
externe ou un système de 
câblovision à votre téléviseur.

Sert à réaliser les connexions 
vidéo avec les lecteurs de DVD, les 
caméscopes et les magnétoscopes 
S-Vidéo.

Avant de commencer à utiliser votre nouveau téléviseur, nous vous recommandons de lire 
ce guide en entier pour apprendre à connaître les nombreuses fonctions utiles de votre 
nouveau téléviseur. Toutefois, si vous êtes impatient de commencer à utiliser votre téléviseur 
immédiatement, un guide de configuration rapide suit sur les quelques prochaines pages.

Configuration rapide


Déballage de votre téléviseur

Merci d’avoir acheté un téléviseur à écran plat et affichage à cristaux liquides JVC. Avant de 
commencer l’installation de votre nouveau téléviseur, assurez-vous d’avoir toutes les pièces 
suivantes. Outre ce guide, le carton de votre téléviseur doit comprendre :

Lorsque vous aurez déballé votre téléviseur, l’étape suivante consiste à le raccorder à votre 
antenne/câble ou antenne parabolique, et à raccorder les appareils audio/vidéo que vous 
désirez utiliser avec votre téléviseur. Pour réaliser ces connexions, vous utiliserez des fiches 
telles que celles illustrées ci-après.

Câbles Coaxiaux

8

Câble S-Vidéo

Servent à raccorder des 
appareils audio/vidéo tels que 
magnétoscopes, lecteurs de DVD, 
amplificateurs stéréophoniques, 
consoles de jeux, etc.

Câbles de Composants

Câbles Composites

Câbles Audio

����� �

�����

������

������

����

������

�������

����� �

����� �

����������

�������

���

�������

������

�����

������

����� ����� ������� �����

�����

�� ���� ��� ���

������

����

����

����

�������

���

��� �������

���� ����

��� ���

����� �� ���

��

����

���

�����

���� �����

����� �����

����

��

��

���

���

��

����� ������

�����

��

��

��

����

����

��

����

�����

����� �

��

��

���

��

��

���

��

�����

LT-32WX84 Fre

1/21/04, 2:38 PM

8

Summary of Contents for LT-32WX84

Page 1: ...es receipt or invoice to the inside cover of this guide Keep this user s guide in a convenient place for future reference Keep the carton and original packaging for future use LCT1594 001A 0104TNH II VP Model Number Serial Number Illustration of LT 32WX84 and RM C13G For Model LT 32WX84 LCD Flat Television Users Guide LT 32WX84 Eng 1 21 04 2 41 PM 1 ...

Page 2: ...ect both the power plug from the AC outlet and antenna for your safety To prevent electric shock do not use this polarized plug with an extension cord receptacle or other outlet unless the blades can be fully inserted to prevent blade exposure CAUTION To reduce the risk of electric shock Do not remove cover or back No user serviceable parts inside Refer servicing to qualified service personnel The...

Page 3: ...power cord from being walked on or pinched particularly at plugs convenience receptacles and the point where they exit from the apparatus 11 Only use attachments accessories specified by the manufacturer 12 Use only with a cart stand tripod bracket or table specified by the manufacturer or sold with the apparatus When a cart is used use caution when moving the cart apparatus combination to avoid i...

Page 4: ...ch as vases shall be placed on the apparatus 16 Avoid improper installation and never position the unit where good ventilation is impossible When installing this TV distance recommendations must be maintained between the set and the wall as well as inside a tightly enclosed area or piece of furniture Keep to the minimum distance guidelines shown for safe operation 17 Cautions for installation Do n...

Page 5: ...clean If you wish to wipe down the television first unplug it Then wipe gently with a soft cloth slightly moistened with water You can add a few drops of mild liquid detergent to the water to help remove spots of oily dirt DO NOT allow liquid to enter the TV through the ventilation slots DO NOT use strong or abrasive cleaners on the TV DO NOT spray liquids or cleaners directly on the TV s surface ...

Page 6: ...w the TV to tilt up or down The TV may fall causing injuries Hold the bottom of the stand with your hand and tilt the TV up or down How to move the cabinet Speaker panel note Do not press hard on the speaker area at the bottom front panel of the TV Doing so can cause a dent to occur on the plastic grid 6 LT 32WX84 Eng 1 21 04 2 41 PM 6 ...

Page 7: ...l Noise Clear 43 Color Management 43 Reset 43 Sound Settings 44 Adjust Sound Settings 44 MTS Multi channel Sound 44 Reset 44 Set Clock 45 On Off Timer 46 Multi Screen Function 47 Split 47 Index 48 Freeze 48 Swap 48 Select 48 Power 49 Number Buttons 49 100 Button 49 Input 49 Digital In 49 Channel 49 Volume 49 Return TV 50 Sound 50 Video Status 51 Natural Cinema 51 TheaterPro D6500K 51 Muting 51 Sle...

Page 8: ...nk you for your purchase of a JVC LCD Flat Television Before you begin setting up your new television please check to make sure you have all of the following items In addition to this guide your television box should include Once you have unpacked your television the next step is to connect it to your antenna cable or satellite system and to connect the audio video devices you want to use with you...

Page 9: ...lease refer to the proper diagrams for your specific TV and remote These will help assist you in understanding how to connect your television to another device as well as use the remote to set up your television Rear Panel Diagram Side Panel Diagram 9 LT 32WX84 Eng 1 21 04 2 41 PM 9 ...

Page 10: ...ol RM C13G 10 Notes This television model has three video inputs therefore the INPUT 4 V4 button on your remote control will have no effect For information on remote control buttons see pages 47 55 LT 32WX84 Eng 1 21 04 2 41 PM 10 ...

Page 11: ...the bottom of the stand with one hand use your other hand to hold the middle of the top of the TV and slowly tilt the TV up or down As a safety measure the stand is constructed so that it requires a certain amount of force to tilt the TV Cable Holder A cable holder which keeps your connection cables tidy is attached on the back of the stand Gently squeeze the left and right of the cable holder and...

Page 12: ...forward and back through the available channels To move rapidly through the channels using JVC s Hyperscan feature press and hold CH or CH The channels will zip by at a rate of five channels per second The right and left buttons will turn the volume up or down These buttons are also marked with four arrows and are used with JVC s onscreen menu system To use the onscreen menus press the MENU button...

Page 13: ...operator To connect a DVD player see Diagram 3 A DVD player is optional If you have a satellite television system please refer to the satellite TV manual Remove the terminal cover There are connection terminals behind the covers on the left and right in the back of the TV Remove these two covers before connecting an antenna or other devices The covers can be removed by removing the hooks When repl...

Page 14: ... LEFT AUDIO INPUT on the rear of the TV Use the S Video connection if possible for superior picture quality Your VCR must be turned on to view premium cable channels Diagram 2 Note If you do not have a cable box connect the cable wire from the wall outlet into the back of the TV Diagram 1 LT 32WX84 Eng 1 21 04 2 41 PM 14 ...

Page 15: ... manual for your DVD player for more information Be careful not to confuse the red DVD cable with the red audio cable It is best to complete one set of connections DVD or audio output before starting the other to avoid accidentally switching the cables You may also connect the DVD player to Input 1 Diagram 3 15 LT 32WX84 Eng 1 21 04 2 42 PM 15 ...

Page 16: ...o the RIGHT AUDIO IN on the back of the TV Note If your camcorder is a mono sound model it will have only one AUDIO OUT Connect it to the LEFT AUDIO IN on the back of the TV You can connect a camcorder to you televison by using the input jacks located on the back of the television 16 Connecting to a Camcorder Headphone Connection You can connect a pair of headphones to the television using the hea...

Page 17: ...l for more information You can use AUDIO OUTPUT for your home theater system Connecting to an External Amplifier For the VIDEO OUTPUT and S VIDEO OUTPUT No signal will output through the S VIDEO OUTPUT when you are not viewing images coming from the S VIDEO INPUT In this case use the VIDEO OUTPUT instead of the S VIDEO OUTPUT No signal will output through the VIDEO OUTPUT or S VIDEO OUTPUT when yo...

Page 18: ...ure signals Set the DTV decode digital out terminal output setting to 1080i 720p or 480p For detailed information refer to the DTV decoder instruction manual If you can not display the picture because your DTV decoder does not have a digital out terminal output setting use the component video input or the S Video input or video input Refer to page 15 In this case the picture will be displayed as a...

Page 19: ... Y VIDEO INPUT 1 on the back of your television 4 Connect a Blue Component Cable from the AV Receiver s PB MONITOR OUT into the Pb VIDEO INPUT 1 on the back of your television 5 Connect a Red Component Cable from the AV Receiver s PR MONITOR OUT into the Pr VIDEO INPUT 1 on the back of your television Notes Please refer to your AV Receiver instruction manual for more information on connecting your...

Page 20: ...g the clock The auto tuner setup of which channels you wish to receive We recommend you complete the interactive plug in items before you start using your television Step 4 The Interactive Plug In Menu Quick Setup Plug In Menu 20 After the JVC INTERACTIVE PLUG IN MENU has been displayed the TV automatically switches to the LANGUAGE settings You can choose to view your onscreen menus in three langu...

Page 21: ... have this in your area you will have to set the clock manually See manual clock set below To set the clock using the XDS signal To choose AUTO To TIME ZONE To select your time zone Atlantic Eastern Central Mountain Pacific Alaska or Hawaii To move to D S T Daylight Savings Time To turn D S T ON or OFF To NEXT To Auto Tuner Setup Notes The Daylight Savings Time feature automatically adjusts your T...

Page 22: ...ick setup is now complete You can now begin watching your television or you can continue on in this guide for more information on programming your remote control or using the JVC onscreen menu system to customize your television viewing experience Notes Noise muting will not work during Auto Tuner Setup Skip appears only for interactive plug in menu The interactive plug in menu setting does not ap...

Page 23: ... operation 1 Find the cable box or satellite brand from the list of codes shown below 2 Slide the 2 way selector switch to CATV 3 Press and hold down the DISPLAY button then enter the first code number listed with the 10 key pad 4 Release the DISPLAY button and confirm the operation of the cable box satellite receiver If your cable or satellite box does not respond to the first code try the others...

Page 24: ...Y button then enter the first code number listed with the 10 key pad 4 Release the DISPLAY button and confirm the operation of the VCR If your VCR does not respond to the first code try the others listed If it does not respond to any of the codes try the search codes function on page 26 After you program your remote some VCR buttons may not work properly If so use the VCR s remote To record hold d...

Page 25: ...o DVD 3 Press and hold down the DISPLAY button then enter the first code number listed with the 10 key pad 4 Release the DISPLAY button and confirm the operation of the DVD player If your DVD player does not respond to the first code try the others listed If it does not respond to any of the codes try the search codes function on page 26 After you program your remote some DVD buttons may not work ...

Page 26: ...ith your equipment 6 Press RETURN TV to exit VCR DVD Search Codes Function 1 Slide the first 2 way selector switch to TV and the other 2 way selector switch to VCR or DVD 2 Press and hold down the VCR or DVD POWER button then press the RETURN TV button for more than three seconds 3 Release the RETURN TV button then release the VCR or DVD POWER button 4 Press the VCR or DVD POWER button and see if ...

Page 27: ...most frequently are π Up and Down arrows mean press the CH or CH buttons Pressing the CH or CH buttons let you Move vertically in a main menu screen Move through a submenu screen Move to the next letter number or other choice in a submenu Back up to correct an error Scan through TV channels when not in a menu screen Left and right arrows mean press the VOLUME or VOLUME buttons to move left or righ...

Page 28: ...en are highlighted in a different color To move to a different feature use the π arrows to move up or down the list When you press the up arrow at the top of the list or the down arrow at the bottom the next menu screen will appear Use the arrows to select an option from the highlighted feature Pressing MENU on the remote control will close the onscreen menu system and return you to normal televis...

Page 29: ... the picture is being displayed on the screen When the Menu button on the TV front panel is pressed the FRONT PANEL CONTROL menu between INITIAL SETUP 04 and PICTURE ADJUST 01 will appear 29 INITIAL SETUP 04 PICTURE ADJUST 01 PICTURE ADJUST 02 SOUND ADJUST CLOCK TIMERS INITIAL SETUP 03 INITIAL SETUP 02 INITIAL SETUP 01 LT 32WX84 Eng 1 21 04 2 42 PM 29 ...

Page 30: ...nauthorized viewers from watching any or all 181 channels Press the MENU button π To CHANNEL SUMMARY To operate The Channel summary screen will now be displayed with the channels set to scan marked with an You can delete channels from the scan by removing the If any channels were missed during auto tuner setup and you wish to add them you may by placing an next to the channel number π To the SCAN ...

Page 31: ... the three V Chip formats appear in the next six pages along with descriptions of the rating categories To access the rating categories Press the MENU button π To V CHIP To operate Lock icon will appear Press ZERO to access the V Chip menu To turn V Chip ON or OFF V Chip must be turned ON for rating settings to operate π To move to SET US TV RATINGS SET MOVIE RATINGS or SET CANADIAN RATINGS see fo...

Page 32: ...ogramming which does not contain a rating signal Programming on television stations which do not broadcast rating signals will be placed in the Unrated Programming category Examples of Unrated programs Emergency Bulletins Locally Originated Programming News Political Programs Public Service Announcements Religious Programs Sports Weather Some Commercials Note TV programs or movies that do not have...

Page 33: ...ted violence and some suggestive sexual dialog or situations It is recommended that parents watch these programs first or with their children TV 14 Parents Strongly Cautioned Programs contain some material that may be unsuitable for children under the age of 14 including possible intense violence sexual situations strong coarse language or intensely suggestive dialog Parents are cautioned against ...

Page 34: ... lock on the top row everything in that column is automatically locked π To the TV 14 Column Press the OK button to lock Press the MENU button when finished Note If you want to change the setup move the cursor to the top column and change the lock icon to by pressing OK again You may then select individual categories to block Directions to set US V Chip Ratings Press the MENU button π To V CHIP To...

Page 35: ...ren under 13 are cautioned that the content of movies with this rating may include more explicit sexual language and violence content than movies rated PG R Restricted These films contain material that is explicit in nature and is not recommended for unsupervised children under the age of 17 NC 17 No One Under 17 These movies contain content which most parents would feel is too adult for their chi...

Page 36: ...ll be infrequent and limited to portrayals that are clearly imaginary comedic or unrealistic in nature C8 Programming Intended for Children 8 and Over Violence Guidelines Any realistic depictions of violence will be infrequent discreet of low intensity and will show the consequences of the acts There will be no offensive language nudity or sexual content G General Audience Programming will contain...

Page 37: ...r down and keep it hidden from potential viewers If you forget the lock code a new code may be set using the steps listed above Notes When a viewer attempts to watch a blocked channel this message appears The channel will remain blocked until the correct lock code is entered see above for information on setting your lock code Initial Setup 37 Set Lock Code Auto Demo This function lets you preview ...

Page 38: ...hen finished Closed caption subtitles are usually found on closed caption channel CC1 Some programs may include additional text information which is usually found on text channel T1 The other channels are available for future use Closed captioning may not work correctly if the signal being received is weak or if you are playing a video tape Most broadcasts containing closed captioning will display...

Page 39: ...er setup or when you operate channel summary Noise Muting This allows you to lock the keys on the front of the TV so that a child may not accidentally change your viewing preferences Press the MENU button π To FRONT PANEL LOCK To turn ON or OFF Press the MENU button when finished Front Panel Lock You can turn off this feature in the following ways Unplug the power cord and plug it back in Do this ...

Page 40: ... button π To POSITION ADJUSTMENT To enter π To adjust the position Press the MENU button to finish Notes To reset the adjustment to the center press the OK button When the arrow disappears while you are adjusting the position the position is at it s maximum limit If you select regular size with aspect or Multi Screen position adjustment option is not seen When you change the screen size perform th...

Page 41: ... is being input to the DIGITAL IN terminal This option adjusts the position when a 480p picture signal is being displayed on the screen There are two types of 480p picture signals 640x480 and 720x480 If the displayed picture is slightly shifted the position can be adjusted by selecting either SIZE1 or SIZE2 Press the MENU button π To DIGITAL IN To enter To select SIZE1 or SIZE2 Press the MENU butt...

Page 42: ...on lets you make all the colors in the TV picture appear either more vivid or subtle PICTURE Picture allows you to adjust the levels of black and white on the TV screen giving you a darker or brighter picture overall BRIGHT You can adjust the overall brightness of the TV picture with the Bright control DETAIL The Detail feature adjusts the level of fine detail displayed in the picture ENERGY SAVER...

Page 43: ... enter The onscreen menu disappears for a moment and then the settings are reset to the default setting for all the picture adjustments Press the MENU button when finished Color Temperature You can decide how strong or dull the colors appear on the TV screen Press the MENU button π To COLOR TEMPERATURE To enter To set LOW or HIGH Press the MENU button when finished Color Management This TV support...

Page 44: ...de as described on page 49 These settings allow you to change and adjust the sound on your television BASS You can increase or decrease the level of low frequency sound in the TV s audio with the bass adjustment TREBLE Use treble to adjust the level of high frequency sound in your TV s audio BALANCE Adjust the level of sound between the TV s left and right speakers with the balance setting Press t...

Page 45: ... When you set the clock automatically choose AUTO by pressing the or arrows π To TIME ZONE To select your time zone π To D S T daylight savings time To turn D S T ON or OFF Press OK to finish Press the MENU button when finished When you set the clock manually choose MANUAL by pressing the or arrows π To move to the hour To set the hour π To move to minutes To set the minutes Press OK to start cloc...

Page 46: ...V will turn off Set the OFF TIME the same way as ON TIME To accept OFF TIME and move to CHANNEL To select channel To ON VOLUME To set the volume level To move to MODE Choose ONCE or EVERYDAY To ON OFF TIMER Choose YES to accept the timer setting choose NO if you don t wish to accept Press the OK button to finish Press the MENU button to exit the menu The on off time cannot be set to locked or guar...

Page 47: ...ith locked channels or channels blocked by V Chip ratings limits A grey screen will display instead With split screen the picture from the component terminal and HDCP terminal will not be displayed The aspect of MAIN CHANNEL PICTURE becomes 16 9 when you input the picture of 480p 720p and 1080i from the component terminal and HDCP terminal After you press the SELECT button and select SPLIT SCREEN ...

Page 48: ...tion advice Button Functions 48 This allows you to quickly look at up to 12 channels at a time so that you can decide which one to watch Notes Only RF input signal will be displayed You can watch the channel added in channel summary See page 30 Index You can exchange the channel or input displayed in the split screen window for the main screen image by pressing the SWAP button Note This function w...

Page 49: ... direct 10 key pad You can also access the FRONT CONTROL PANEL screen by using the MENU button on the front of the TV instead of the remote control It appears between INITIAL SETUP and PICTURE ADJUST screen and it has INPUT and ASPECT menus Choose INPUT or ASPECT by pressing MENU on the front panel and choose input or aspect by using the CHANNEL buttons OPERATE Input Digital In Use this button to ...

Page 50: ...n works only with the Channel buttons Pressing any number key will cancel return Button Functions 50 Return TV By pressing the sound button you can change the A H S Advanced Hyper Surround BBE and A H B Active Hyper Bass mode A H S Adds a more spacious surround sound Music gives basic effect and movie for more effect BBE BBE high definition audio adds natural clear and extraordinary sound quality ...

Page 51: ...e blurring at the edges of these programs press NATURAL CINEMA and set it to AUTO Natural Cinema helps correct conversion errors that occur when film which is shot at 24 frames per second is broadcast at the television rate of 30 frames per second Press the NATURAL CINEMA button Notes The natural cinema mode is automatically set to AUTO in the following cases Turning on or off Changing the channel...

Page 52: ...on The screen to the right shows the following information The current channel or AV input Channel 05 The current time 12 20 pm Sleep timer status minutes remaining The Sleep Timer is off On off timer status Set to turn on everyday at 7 00 PM off at 10 00 PM Each Press of the DISPLAY button changes the display mode Display Full screen shown above Time Shows the current time only Channel Shows the ...

Page 53: ...ill be centered within the boundaries of the 16 9 screen Button Functions 53 Aspect Aspect Ratios PANORAMA With this ratio a normal 4 3 aspect picture is stretched to fit the dimensions of the 16 9 aspect screen CINEMA This ratio zooms in on the center part of a 4 3 aspect picture blowing it up to fill the 16 9 screen FULL This is the ratio to use when watching 16 9 High Definition broadcasts HD P...

Page 54: ...his button allows you to go back in the menu to change a selection or correct a mistake This button confirms your selection when you are in one of the onscreen menus When you change the aspect ratios it is different from their broadcast or recorded program Aspect Ratios Continued Press the ASPECT button By pressing the ASPECT button you can change the size NTSC 480i 480p HDCP 480p HD HDCP 1080i 72...

Page 55: ...erate the basic functions of your DVD player These functions include play rewind fast forward stop still pause previous next tray open close power on and power off Move the selector switch to DVD to operate The remote is preset with the code 000 to control JVC brand DVD players For any other manufacturer s brand DVD player please see the code chart and instructions on page 25 You can use this remo...

Page 56: ...Troubleshooting 56 LT 32WX84 Eng 1 21 04 2 42 PM 56 ...

Page 57: ...ce will require clear access to the Television by the service technician WHAT IS NOT COVERED This limited warranty provided by JVC does not cover 1 Products which have been subject to abuse accident alteration modification tampering negligence misuse faulty installation lack of reasonable care or if repaired or serviced by anyone other than a service facility authorized by JVC to render such servi...

Page 58: ...e exclusion of incidental or consequential damages or limitations on how long the warranty lasts so these exclusions or limitations may not apply to you This warranty gives you specific legal rights and you may also have other rights which vary state to state JVC COMPANY OF AMERICA 1700 Valley Road DIVISION OF JVC AMERICAS CORP Wayne New Jersey 07470 http www jvc com REFURBISHED PRODUCTS CARRY A S...

Page 59: ... call our Customer Relations Department at 1 800 537 5722 or visit our website at www JVC com Remember to retain your Bill of Sale for Warranty Service Don t service the television yourself Caution To prevent electrical shock do not open the cabinet There are no user serviceable parts inside Please refer to qualified service personnel for repairs Accessories To purchase accessories for your JVC pr...

Page 60: ...ange without notice Specifications JVC COMPANY OF AMERICA Division of JVC Americas Corp 1700 Valley Road Wayne New Jersey 07470 JVC CANADA INC 21 Finchdene Square Scarborough Ontario Canada M1X 1A7 LT 32WX84 Eng 1 21 04 2 42 PM 60 ...

Page 61: ...r de ce guide Rangez ce manuel dans un lieu où vous pourrez le retrouver rapidement pour vous y référer Gardez le carton et l emballage d origine pour une utilisation ultérieure LCT1594 001A 0104TNH II VP Numéro de modèle Numéro de série Illustration du modèle LT 32WX84 and RM C13G Pour Le Modèle LT 32WX84 Manuel d instructions du téléviseur à écran plat et affichage à cristaux liquides LT 32WX84 ...

Page 62: ...d vous n utilisez pas ce téléviseur pendant un longue période déconnectez le du secteur et de l antenne Pour éviter une électrocution n utilisez pas cette fiche polarisée avec un prolongateur ou tout autre alimentation sauf si les lames peuvent être entierement insérées sans être visibles ATTENTION Pour diminuer les risques d électrocution Ne pas retirer le capot ou le panneau arrière Aucune pièce...

Page 63: ...êchez le cordon d être piétiné ou pincé surtout aux fiches prises de courant et au point de leur sortie de l appareil 11 Utilisez uniquement les accessoires précisés par le fabricant 12 Utilisez uniquement avec un chariot base trépied support ou table précisé par le fabricant ou vendu avec l appareil Lorsqu un chariot est utilisé soyez prudent en déplaçant le chariot appareil combiné pour éviter t...

Page 64: ...eil 16 Évitez une installation inappropriée et ne positionnez jamais là où il est impossible d assurer une bonne ventilation Lors de l installation de ce téléviseur conformez vous aux recommandations de distance entre l appareil et le mur ainsi qu à l intérieur d un meuble ou d un endroit restreint Observez les lignes directrices de distance minimum montrées ci après pour un fonctionnement sûr 17 ...

Page 65: ...x N appliquez pas d alcool de solvants organiques tels que l acétone ni de solvants acides ou alcalins sur l écran Ceux ci enlèveront la couche protectrice et causeront des décolorations Ne poussez ou ne frappez pas l écran Ceci pourrait rayer la surface de l écran et causer des distorsions d image Par exemple Soins du boîtier Un léger époussetage à l aide d un essuie meubles doux et ne provoquant...

Page 66: ...s le bas Le téléviseur peut tomber et causer des blessures Tenez le bas du support avec votre main et inclinez le téléviseur vers le haut ou vers le bas Déplacement du téléviseur Remarque sur le panneau des haut parleurs N exercez pas une trop grande pression sur la partie haut parleur du panneau avant inférieur du téléviseur ce qui pourrait déformer la grille plastique 6 LT 32WX84 Fre 1 21 04 2 3...

Page 67: ...s réglages du son 44 MTS multi channel sound 44 Retour 44 Réglage de l horloge 45 Minuterie on off 46 Fonction multi screen 47 Split 47 Index 48 Freeze 48 Swap 48 Select 48 Power 49 Number Buttons Boutons de numéro 49 100 Bouton 100 49 Input Entrée 49 Digital In 49 Channel Canal 49 Volume 49 Return TV 50 Sound Son 50 Video Status Statut vidéo 51 Natural Cinema Cinéma naturel 51 TheaterPro D6500K 5...

Page 68: ...éviseur Merci d avoir acheté un téléviseur à écran plat et affichage à cristaux liquides JVC Avant de commencer l installation de votre nouveau téléviseur assurez vous d avoir toutes les pièces suivantes Outre ce guide le carton de votre téléviseur doit comprendre Lorsque vous aurez déballé votre téléviseur l étape suivante consiste à le raccorder à votre antenne câble ou antenne parabolique et à ...

Page 69: ...éléviseur et votre télécommande précis Ceci vous aidera à comprendre la manière de raccorder votre téléviseur à un autre appareil ainsi qu à utiliser la télécommande pour configurer votre téléviseur Schéma du panneau arrière Schéma du panneau latéral 9 Configuration rapide Modèle de téléviseur LT 32WX84 Fre 1 21 04 2 38 PM 9 ...

Page 70: ...s entrées vidéo Le bouton INPUT 4 V4 de votre télécommande n aura donc aucun effet Reportez vous aux pages 47 à 55 pour avoir des renseignements sur les boutons de la télécommande Configuration rapide Télécommande de téléviseur LT 32WX84 Fre 1 21 04 2 38 PM 10 ...

Page 71: ...une main la partie inférieure du support utilisez l autre main pour tenir le centre de la partie supérieure du téléviseur et inclinez lentement le téléviseur vers le haut ou le bas Comme mesure de sécurité le support est fabriqué de façon à ce qu on ne puisse incliner le téléviseur sans l exercice d une certaine quantité de force Porte câbles Un porte câbles qui garde vos câbles de connexion ensem...

Page 72: ...ur avancer rapidement à travers les canaux à l aide de la fonction Hyperscan de JVC enfoncez et tenez CH ou CH Les canaux défileront au rythme de cinq canaux par seconde Les boutons droit et gauche augmenteront ou baisseront le volume Ces boutons sont également marqués de quatre flèches et ils s utilisent également avec le système JVC de menus à l écran Appuyez sur le bouton MENU pour utiliser les...

Page 73: ...e DVD reportez vous au Schéma no 3 Un lecteur de DVD est facultatif Si vous avez une antenne parabolique veuillez vous reporter à son manuel d instructions Retirez le couvercle de bornes Il y a des bornes de connexion derrière les couvercles à gauche et à droite à l arrière du téléviseur Retirez ces deux couvercles avant de raccorder une antenne ou d autres dispositifs On peut retirer les couvercl...

Page 74: ...le la connexion S Vidéo en vue d une qualité supérieure d image Vous ne pourrez pas voir les canaux de câble de qualité supérieure si votre magnétoscope n est pas en marche Schéma no 2 Remarque Si vous n avez pas de boîte de câble raccordez le fil de câble provenant de la prise murale à l arrière du téléviseur Schéma no 1 Configuration rapide Connexions LT 32WX84 Fre 1 21 04 2 38 PM 14 ...

Page 75: ... l utilisateur de votre lecteur de DVD Veillez à ne pas confondre le câble de DVD rouge avec le câble audio rouge Il est préférable de réaliser une série de connexions DVD ou sortie audio avant d entreprendre l autre pour éviter de mélanger accidentellement les câbles Vous pouvez également raccorder le lecteur de DVD à l entrée 1 Schéma no 3 15 Configuration rapide Connexions LT 32WX84 Fre 1 21 04...

Page 76: ...seur Remarque Si votre caméscope est un modèle monophonique il n aura qu une SORTIE AUDIO Raccordez la à L ENTRÉE AUDIO GAUCHE à l arrière du téléviseur 16 Connexion à un caméscope Configuration rapide Connexions Raccordement d un casque d écoute Vous pouvez raccorder un casque d écoute au téléviseur en utilisant le jack de casque d écoute situé sur le côté du téléviseur 1 Branchez un jack de casq...

Page 77: ...teur Vous pouvez utiliser la SORTIE AUDIO pour votre système de cinéma domestique Connexion à un amplificateur externe Configuration rapide Connexions Pour la SORTIE VIDÉO et la SORTIE S VIDÉO Aucun signal ne sera émis par la SORTIE S VIDÉO lorsque vous ne regardez pas des images provenant de l ENTRÉE S VIDÉO Dans ce cas utilisez la SORTIE VIDÉO plutôt que la SORTIE S VIDÉO Aucun signal ne sera ém...

Page 78: ...et 480p Mettez le réglage de sortie de borne Digital Out du décodeur DTV à la position 1080i 720p ou 480p Pour obtenir des informations détaillées reportez vous au manuel d instructions du décodeur DTV Si vous ne pouvez pas afficher l image parce que votre décodeur DTV n a pas de réglage de sortie de borne Digital Out utilisez l entrée vidéo de composant ou l entrée S Vidéo ou l entrée vidéo Repor...

Page 79: ...téléviseur 4 Raccordez un câble de composant bleu depuis la sortie moniteur PB du récepteur AV à l entrée INPUT 1 vidéo Pb à l arrière de votre téléviseur 5 Raccordez un câble de composant rouge depuis la sortie moniteur PR du récepteur AV à l entrée INPUT 1 vidéo Pr à l arrière de votre téléviseur Remarques Veuillez vous reporter au manuel d instructions de votre récepteur AV pour de plus amples ...

Page 80: ...églage de l horloge Réglage de l auto tuner des canaux que vous désirez recevoir Nous vous recommandons d effectuer toutes les sélections du plug in menu interactif avant de commencer à utiliser votre téléviseur Étape 4 Le plug in menu interactif Configuration rapide Plug in menu 20 Après l affichage de JVC PLUG IN MENU INTERACTIF le téléviseur passe automatiquement aux réglages de langue Vous pou...

Page 81: ... de poste PBS dans votre région vous devrez régler l horloge manuellement Reportez vous à la section réglage manuel de l horloge ci après Pour régler l horloge à l aide du signal XDS Pour choisir AUTO Vers TIME ZONE Pour sélectionner votre fuseau horaire Atlantique Est Centre Rocheuses Pacifique Alaska ou Hawai Pour aller sur D S T Heure Avancée Pour ON activer ou OFF inactiver D S T Vers SUIVANTE...

Page 82: ...ouvez commencer à regarder la télévision ou vous pouvez continuer la lecture de ce guide pour plus de renseignements sur la programmation de votre télécommande ou l utilisation du système de menus à l écran JVC pour particulier votre expérience d écoute Remarques L atténuation du bruit ne fonctionnera pas durant auto tuner setup SAUTER L ÉTAPE apparaît uniquement pour le Plug In Menu interactif Le...

Page 83: ...la boîte de câble ou de l antenne parabolique dans la liste des codes indiqués ci dessous 2 Faites glisser l interrupteur sélecteur à deux voies sur la position CATV 3 Enfoncez et tenez le bouton DISPLAY puis introduisez le premier numéro de code répertorié à l aide du clavier à 10 touches 4 Relâchez le bouton DISPLAY et assurez vous que la boîte de câble le récepteur satellite fonctionne Si votre...

Page 84: ...roduisez le premier numéro de code répertorié à l aide du clavier à 10 touches 4 Relâchez le bouton DISPLAY et assurez vous que le magnétoscope fonctionne Si votre magnétoscope ne répond pas au premier code essayez les autres codes répertoriés S il ne répond à aucun code essayez la fonction de codes de recherche décrite à la page 26 Après que vous ayez programmé votre télécommande il se peut que c...

Page 85: ...ion DVD 3 Enfoncez et tenez le bouton DISPLAY puis introduisez le premier numéro de code répertorié à l aide du clavier à 10 touches 4 Relâchez le bouton DISPLAY et assurez vous que le lecteur de DVD fonctionne Si votre lecteur de DVD ne répond pas au premier code essayez les autres codes répertoriés S il ne répond à aucun code essayez la fonction de codes de recherche décrite à la page 26 Après q...

Page 86: ...pour quitter cette fonction Fonction de codes de recherche pour le magnétoscope lecteur de DVD 1 Faites glisser le premier interrupteur sélecteur à deux voies sur la position TV et l autre interrupteur sélecteur à deux voies sur la position VCR ou DVD 2 Enfoncez et tenez le bouton POWER du magnétoscope ou du lecteur DVD puis appuyez sur le bouton RETURN TV pendant plus de trois secondes 3 Relâchez...

Page 87: ...uyer sur les boutons CH ou CH Une pression des boutons CH ou CH vous permet De vous déplacer verticalement dans un écran de menu principal De vous déplacer à travers un écran de sous menu De passer à la lettre au chiffre ou autre choix suivant dans un sous menu De revenir en arrière pour corriger une erreur De balayer les canaux de télévision hors d un écran de menu Les flèches gauche et droite si...

Page 88: ...lief dans une couleur différente Pour passer à une fonction différente utilisez les flèches π pour faire défiler vers le haut ou vers le bas la liste Lorsque vous appuyez sur la flèche montant en haut de la liste ou sur la flèche descendante en fin de liste l écran de menu suivant apparaît Utilisez les flèches pour sélectionner une option à partir de la fonction mise en relief Une pression du bout...

Page 89: ...t affichée sur l écran Lorsqu on appuie sur le bouton Menu sur le panneau avant du téléviseur le menu CONTRÔLE PANNEAU AVANT apparaît entre CONFIG INITIALE 04 et AJUSTER IMAGE 01 29 CONFIGURATION INITIALE 04 AJUSTER IMAGE 01 AJUSTER IMAGE 02 AJUSTER SON MINUTER HORLOGE CONFIGURATION INITIALE 03 CONFIGURATION INITIALE 02 CONFIGURATION INITIALE 01 LT 32WX84 Fre 1 21 04 2 38 PM 29 ...

Page 90: ...garder l un quelconque des 181 canaux Appuyer sur le bouton MENU π Vers SOMMAIRE CANAUX Pour activer L écran sommaire canaux sera maintenant affiché avec les canaux à balayer marqués d un Vous pouvez supprimer des canaux du balayage en retirant le Si des canaux ont été oubliés durant la procédure auto tuner setup et que vous désirez les ajouter vous pouvez le faire en plaçant un à côté du numéro d...

Page 91: ... les six pages qui suivent accompagnées des descriptions des catégories de cotes Pour accéder aux catégories de cotes Appuyez sur le bouton MENU π Vers V CHIP Pour activer l icône de verrouillage apparaîtra Appuyez sur ZÙRO pour accéder au menu puce V Pour ON activer ou OFF inactiver la puce V la puce V doit être activée sans quoi les réglages de cote ne fonctionneront pas π Pour passer à FIXER CO...

Page 92: ...tion non cotée désigne tout programme qui ne contient pas de signal de cote Les programmes des postes de télévision qui ne transmettent pas les signaux de cote seront dans la catégorie programmation non cotée Exemples de programmes non cotés Bulletins d urgence Programmes d origine Locale Informations Programmes Politiques Annonces des Services Publics Programmes Religieux Sports Météo Certaines R...

Page 93: ...mitée et des dialogues ou des suggestions sexuellement suggestives Il est recommandé aux parents de regarder ces programmes en premier puis avec leurs enfants TV 14 signifie parents fortement mis en garde Les programmes contiennent un matériel qui peut ne pas convenir aux enfants de moins de 14 ans notamment la possibilité de violence intense de situations sexuelles de langage grossier et choquant...

Page 94: ...e colonne est verrouillé automatiquement π Vers la colonne TV 14 Appuyez sur le bouton OK pour verrouiller Appuyez sur le bouton MENU lorsque vous avez terminé Remarque Si vous désirez modifier la configuration déplacez le curseur jusqu à la colonne supérieure et changez l icône de verrouillage à en appuyant à nouveau sur OK Vous pouvez alors sélectionner des catégories individuelles à verrouiller...

Page 95: ...nsi cotés peut comprendre un contenu sexuel un langage et une violence plus explicite que les films cotés PG R restreint Ces films contiennent du matériel de nature explicite et ils ne sont pas recommandés pour les enfants de moins de 17 ans sans surveillance NC 17 personne de moins de 18 ans Ces films sont considérés comme étant ce que la plupart des parents jugeraient trop adulte pour l écoute d...

Page 96: ...ène réaliste de violence Les descriptions de comportements agressifs seront rares et limitées à des représentations de nature clairement fictive comique ou irréaliste 8ans Général Déconseillé aux jeunes enfants Directives de violence toute description réaliste de violence sera rare discrète ou peu intensive et montrera les conséquences des actes Il n y aura ni langage choquant ni nudité ni contenu...

Page 97: ... Écrivez le numéro de votre code de verrouillage et gardez le caché des spectateurs éventuels Si vous oubliez votre code de verrouillage vous pouvez définir un nouveau code en suivant les étapes décrites ci dessus Remarques Lorsqu un spectateur tente de voir un canal bloqué le message suivant apparaît Le canal demeurera bloqué jusqu à l introduction du code correct voir ci dessus pour informations...

Page 98: ...ous titres se trouvent habituellement sur le canal de sous titres CC1 Certains programmes peuvent comprendre des informations de texte supplémentaires qui se trouvent habituellement sur le canal de texte T1 Les autres canaux sont disponibles pour usage futur Il se peut que les sous titres ne fonctionnent pas adéquatement si le signal reçu est faible ou si vous lisez une bande vidéo La plupart des ...

Page 99: ...léviseur appuyez sur le bouton power pendant plus de trois secondes Cette fonction demeurera activée Configuration initiale 39 L affichage XDS ID procure les lettres d identification du canal le nom du réseau et même un nom de programme Les informations XDS ID sont fournies par le télédiffuseur Appuyez sur le bouton MENU π Vers XDS ID Pour ON activer ou OFF inactiver Appuyez sur le bouton MENU lor...

Page 100: ... sur le bouton MENU π Vers RÉGLAGE POSITION Pour exécuter π Pour ajuster la position Appuyez sur le bouton MENU pour terminer Remarque Appuyez sur le bouton OK pour ramener l ajustement au centre Lorsque la flèche disparaît pendant que vous ajustez la position ceci signifie que la position est à sa limite maximale Si vous choisissez la taille régulière avec aspect ou Multi Screen l option position...

Page 101: ...al d image 480p a été entré à la borne DIGITAL IN Cette option permet d ajuster la position lorsqu un signal d image 480p a été affiché à l écran Il existe deux types de signaux d image 480p 640x480 et 720x480 Si l image affichée est légèrement décalée sa position pourra être ajustée en choisissant soit TAILLE 1 ou TAILLE 2 Appuyez sur le bouton MENU π Vers DIGITAL IN Pour exécuter Pour choisir TA...

Page 102: ... de couleur vous permet de rendre toutes les couleurs de l image plus vives ou plus subtiles IMAGE Le fonction image vous permet de régler les niveaux de noir et de blanc dans l image vous donnant ainsi une image globale plus sombre ou plus claire CLARTÉ La fonction clarté vous permet de régler le degré de luminosité globale de l image DÉTAIL La fonction détail vous permet d ajuster le niveau de d...

Page 103: ...s les réglages reviennent aux réglages implicites pour tous les ajustements de l image Appuyez sur le bouton MENU lorsque vous avez terminé Température couleur Grace à température des couleurs vous pouvez décider l intensité élevée ou faible des couleurs apparaissant sur l écran de télévision Appuyez sur le bouton MENU π Vers TEMP COULEUR Pour exécuter Pour avoir une intensité BASSE ou HAUTE Appuy...

Page 104: ... de votre téléviseur BASSE La fonction de réglage du niveau de basse vous permet d augmenter ou de diminuer le niveau des sons à basse fréquence dans l audio de votre téléviseur AIGU La fonction de réglage du niveau d aigu vous permet d augmenter ou de diminuer le niveau des sons à haute fréquence dans l audio de votre téléviseur BALANCE Vous pouvez régler l équilibre des sorties sonores entre les...

Page 105: ...rloge automatiquement choisissez AUTO en appuyant sur les touches ou π Vers TIME ZONE Pour sélectionner votre fuseau horaire π Pour D S T Pour ON activer ou OFF inactiver D S T Appuyez sur OK pour terminer Appuyez sur le bouton MENU lorsque vous avez terminé Lorsque vous réglez l horloge manuellement choisissez MANUEL en appuyant sur les touches ou π Pour passer à l heure Pour régler l heure π Pou...

Page 106: ... à HEURE FIN l heure à laquelle le téléviseur s éteindra Réglez l HEURE FIN de la même manière que l HEURE DÉBUT Pour accepter HEURE FIN et passer à CANAL Pour sélectionner le canal Vers VOLUME MARCHE Pour régler le niveau sonore Pour passer à MODE Choisissez UNE FOIS ou PAR JOUR Vers MINUT ON OFF Choisissez OUI pour accepter le réglage de minuterie choisissez NON si vous ne voulez pas l accepter ...

Page 107: ...tion image sur image n affichera pas les programmes ou les canaux verrouillés par les limites de codes de puce V Un écran gris apparaîtra en remplacement Avec l écran split l image des prises composantes et HDCP ne sont pas affichées Le format de l image MAIN CHANNEL PICTURE devient 16 9 si vous entrez une image de résolution 480p 720p et 1080i à partir des prises composantes et HDCP près avoir ap...

Page 108: ...s différents de boîtes de câble en usage actuellement si vous éprouvez de la difficulté à utiliser la fonction Écran multiple 2 syntonisateurs avec votre boîte de câble nous vous recommandons de contacter votre câblodiffuseur pour obtenir des conseils de raccordement Fonctions des boutons 48 Index Vous pouvez échanger le canal ou l entrée affiché dans la fenêtre split screen contre l image de l éc...

Page 109: ...avé numérique à 10 touches Vous pouvez également accéder à l écran PANNEAU DE CONTRÔLE AVANT en utilisant le bouton MENU sur l avant du téléviseur plutôt que la télécommande Il apparaît entre CONFIGURATION INITIALE et l écran RÉGLAGE DE L IMAGE et on y trouve les menus ENTRÉE et ASPECT Choisissez ENTRÉE ou ASPECT en appuyant sur MENU sur le panneau avant et choisissez input ou aspect en utilisant ...

Page 110: ...pression de toute autre touche numérique annulera return Fonctions des boutons 50 Return TV Une pression du bouton Son vous permet de changer le mode A H S hyperquadriphonie avancée BBE et A H B hypergraves actifs A H S Ajoute un son ambiophonique plus vaste La musique donne un effet de base et de film pour plus d effet BBE L audio BBE haute définition ajoute une qualité sonore naturelle claire et...

Page 111: ...s programmes sont flous appuyez sur le bouton NATURAL CINEMA et réglez le sur AUTO La fonction Cinéma naturel vous aide à corriger les erreurs de conversion qui se produisent lorsqu un film pris en 24 images par seconde est diffusé à un code télévisé de 30 images par seconde Appuyez sur le bouton NATURAL CINEMA Remarques Le mode cinéma naturel est réglé automatiquement sur AUTO dans les cas suivan...

Page 112: ...ran sur la droite indique les informations suivantes Le canal ou l entrée AV canal 05 courant L heure courante 12h20 Le statut de la minuterie sommeil les minutes restantes la minuterie sommeil est inhibée Le statut de la minuterie on off réglé pour se mettre en marche tous les jours à 19 h et s arrêter à 22 h Chaque pression du bouton DISPLAY change le mode d affichage Affichage Plein écran montr...

Page 113: ... 3 sera centrée dans les limites de l écran 16 9 Fonctions des boutons 53 Aspect Format d image Formats d image PANORAMA Avec ce format une image normale de format 4 3 est étirée pour correspondre à un écran de format 16 9 CINÉMA Ce format agrandit le centre de l image de format 4 3 le gonflant pour le faire correspondre à un écran de format 16 9 PLEIN C est le format d image utilisé pour regarder...

Page 114: ...e sous titres texte Le bouton Back vous permet de revenir en arrière dans le menu pour modifier un choix ou pour corriger une erreur Ce bouton confirme votre choix lorsque vous êtes dans l un des menus à l écran Lorsque vous changez le format d image il est différent de sa diffusion ou du programme enregistré Formats d image suite Appuyez sur le bouton ASPECT Vous pouvez modifier le format en appu...

Page 115: ... pour activer les fonctions de base de votre lecteur de DVD Ces fonctions comprennent lecture rembobinage avance rapide arrêt image fixe pause image précédente suivante ouverture fermeture du plateau mise sous et hors tension Mettez l interrupteur sélecteur à la position DVD pour faire fonctionner La télécommande est préréglée avec le code 000 pour commander les lecteurs de DVD de marque JVC Pour ...

Page 116: ...Guide de dépannage 56 LT 32WX84 Fre 1 21 04 2 39 PM 56 ...

Page 117: ...pédiez le assuré au centre de service agréé le plus proche accompagné d une copie de la facture et d une lettre d explication concernant le problème Appelez le numéro sans frais indiqué ci dessus pour connaître l adresse CE QUI N EST PAS COUVERT 1 Les produits qui ont fait l objet d usage abusif accident altération modification manipulation négligence utilisation erronée installation erronée absen...

Page 118: ... durée de la garantie il se peut donc qu elles ne s appliquent pas à vous Cette garantie vous donne des droits précis et vous pouvez également avoir d autres droits qui varient d un état à l autre Si vous avez des questions concernant votre produit JVC veuillez vous mettre en contact avec notre Service clientèle JVC COMPANY OF AMERICA 1700 Valley Road DIVISION OF JVC AMERICAS CORP Wayne New Jersey...

Page 119: ...00 252 5722 ou visitez notre site Web à www JVC com N oubliez pas de conserver votre facture pour vous prévaloir du service sous couvert de garantie Ne réparez pas le téléviseur vous même Mise en garde Pour prévenir les secousses électriques n ouvrez pas le boîtier Il n existe à l intérieur aucune pièce susceptible d être entretenue par l utilisateur Veuillez confier les réparations à des technici...

Page 120: ...fication sans prévais Spécifications JVC COMPANY OF AMERICA Division of JVC Americas Corp 1700 Valley Road Wayne New Jersey 07470 JVC CANADA INC 21 Finchdene Square Scarborough Ontario Canada M1X 1A7 LT 32WX84 Fre 1 21 04 2 39 PM 60 ...

Reviews: