47
Displaying a computer screen
This TV can be used as a computer screen.
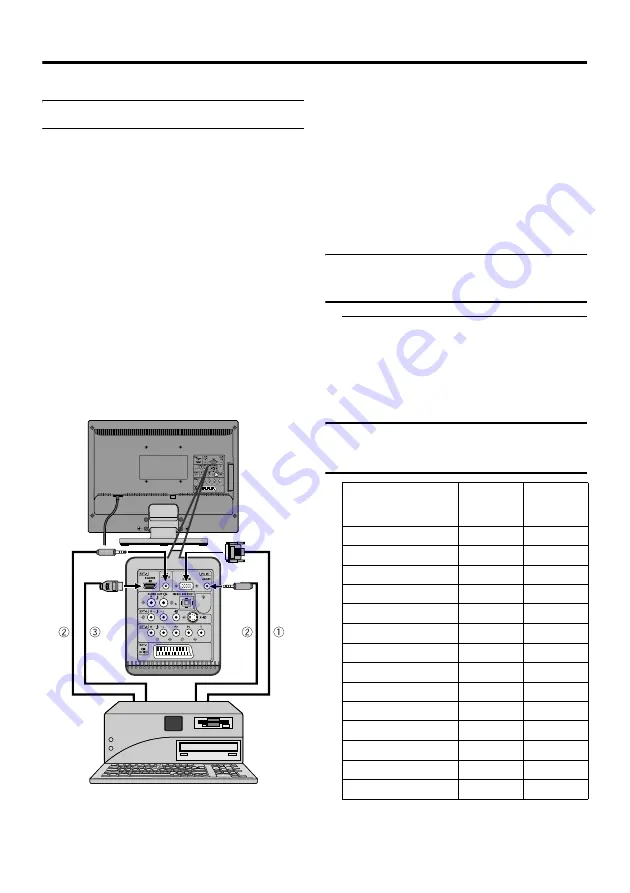
Connecting to the computer
D-SUB connection
Use a D-SUB cable to connect the TV’s PC
IN D-SUB terminal to the computer’s
analogue RGB output terminal.
If you want to listen to the sound from the
computer, use an audio cable to connect the
TV’s PC IN AUDIO terminal to the
computer’s sound output terminal.
DVI connection
For better picture quality, you can
alternatively use a DVI-to-HDMI adaptor
cable to connect the TV’s HDMI terminal to
the computer’s DVI output terminal.
If you want to listen to the sound from the
computer, use an audio cable to connect the
TV’s DVI AUDIO IN terminal to the
computer’s sound output terminal.
1
D-SUB cable
2
Audio cable
3
DVI-to-HDMI adaptor cable
• Remember to install the Ferrite core on
the audio cable. See “Using the Ferrite
cores” on page 8.
• Refer to the computer manual for a
detailed explanation of the connections at
the computer side.
• Ensure that the connectors are facing the
correct way when connecting.
• After connecting the D-SUB cable,
tighten the two screws to fix the connector
in place.
Watching images from a
computer
After starting the computer, press the
AV button to choose “PC”
“PC” is after EXT-4.
You can listen to the sound when the
sound from the computer is connected to
the PC IN AUDIO terminal.
Table of signals for each type
of computer
OR
Resolution
Vertical
frequency
(Hz)
Horizontal
frequency
(kHz)
720
×
400 (VGA70)
70.08
31.47
640
×
480 (VGA)
60
31.5
640
×
480 (VGA)
67
35
640
×
480 (VGA)
75
37.5
640
×
480 (VGA)
72.81
37.86
800
×
600 (SVGA)
56.25
35.16
800
×
600 (SVGA)
60.32
37.9
800
×
600 (SVGA)
75
46.9
800
×
600 (SVGA)
72.19
48.08
1024
×
768 (XGA)
60
48.4
1024
×
768 (XGA)
70
56.5
1024
×
768 (XGA)
75
60
1360
×
768 (WXGA)
60
47.7
1440
×
900 (WXGA+) 60
55.5
Summary of Contents for LT-19DK8WJ
Page 50: ...50 Additional preparation ...


