background image


26


HDD RECORDING/PLAYBACK (cont.)


Special effect playback


While playing back a recorded programme, you can use 
the following special effect playback.


Searching for a particular scene—Variable Speed 
Search


You can change search speed.
• You cannot hear playback sounds during search except 

1.5 times speed search.


On the remote control
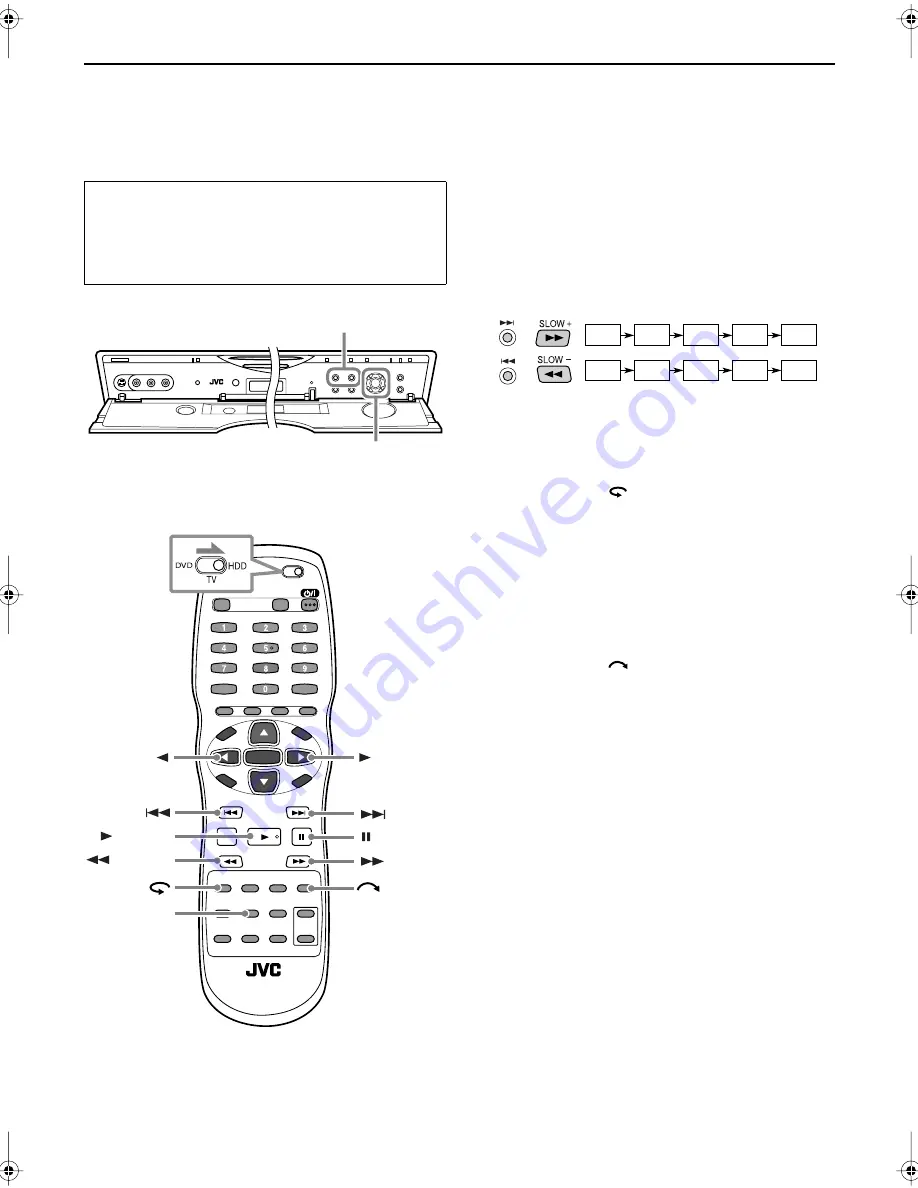
While playing, press 


¡


 (SLOW +) or 


1


 (SLOW –).

On the unit
While playing, press 


¢


 or 


4


.


• Each time you press the button, playback speed 

changes as follows:


To resume normal playback,


 press 


3


 (


SELECT


).


Going back to a previous scene quickly and play it 
back—One Touch Replay


While playing, press 

 on the remote control.


The HDD goes back to a scene of about 7 second before, 
and starts replay from it.
• Each time you press the button, the HDD goes back to 

a previous scene of about 7 seconds before. For 
example, if you press the button three times, the HDD 
will go back to the scene of about 21 seconds before.


Skipping forward quickly—Quick Skip


While playing, press 

 on the remote control.


The HDD skips forward (about 30 seconds at a time) and 
resumes playback.
This will be convenient when you want to skip a 
commercial in a recording.
• Each time you press the button, the HDD skips the 

recorded portion of about 30 seconds that follows. For 
example, if you press the button three times, the HDD 
will skip the following portion of about 1 minute and 
30 seconds.

• When using the buttons on the unit, make sure that 

the HDD lamp on the unit is lit. If not, press 


DVD/

HDD


 so that the HDD lamp lights.

• When using the remote control, slide the 


DVD/TV/

HDD


 selector to the right (


HDD


), then press 


ENTER


.

4

 / 

¢

2

 / 

3

DISPLAY

SELECT

SLOW –

SLOW +

+ x1.5

+ x3

+ x5

+ x15

+ x60

– x1

– x3

– x5

– x15

– x60

:

:

or

or

Summary of Contents for LET0239-001A

Page 1: ...ings 9 Installing the Unit 11 Initial Settings 13 Watching TV 21 HDD Recording Playback 23 Editing HDD Navigation 34 Timer Recording 40 Basic DVD Operations 47 Advanced DVD Operations 51 MP3 JPEG Operations 61 Changing the Initial Settings 66 External Component Operations 82 Additional Information 88 H D D D V D INSTRUCTIONS TV tuner is built in this product ...

Page 2: ...o the mains supply If this product is not supplied fitted with a mains plug then follow the instructions given below IMPORTANT DO NOT make any connection to the terminal which is marked with the letter E or by the safety earth symbol or coloured green or green and yellow The wires in the mains lead on this product are coloured in accordance with the following code Blue Neutral Brown Live As these ...

Page 3: ...unt of power 15 W is always consumed while the power cord is connected to the wall outlet When unplugging the unit from the wall outlet always pull the plug not the power cord Do not handle the power cord with wet hands Precautions for the HDD 1 Before using the unit Whenthepowerison theHDDisconstantlyrotating at a high speed This requires you to note the following DO NOT impart vibration or shock...

Page 4: ... to play back these discs noise may generate causing damage to the speakers DVD RW discs written in the VR format DVD ROM DVD RAM DVD Audio CD ROM Photo CD SACD In addition the unit does not play Unfinalized discs Discs of irregular shape or discs with tape seals or paste on either the label side or playback side Playing back these discs may damage the unit Digital audio formats The unit supports ...

Page 5: ...the beginning of a scene or song 50 ADVANCED DVD OPERATIONS 51 Playing from a specific point 51 Locating a desired scene item from the disc menu 51 Specifying a desired title 52 Locating a desired position in the current title or track Time Search 52 Changing the playback order 53 Playing in a specific order Program Play 53 Playing at random Random Play 54 Playing repeatedly Repeat Play 54 Changin...

Page 6: ...utton and lamp 46 w Remote sensor 9 e Display window Shows the clock time or while the unit is turned off r 4 reverse forward search buttons 26 27 29 49 50 t PR programme buttons 21 23 y Menu operation buttons ENTER and cursor 2 3 5 buttons u MENU button 48 51 HDD PROGRAMME button 40 42 44 45 i TOP MENU button 48 51 HDD NAVIGATION button 29 33 How to open and close the front panel To close push up...

Page 7: ...Repeat indicators 54 63 65 and A B ANGLE indicator 56 Disc play mode indicators 53 54 PROGRAM and RANDOM Main display When the unit is turned off on standby the clock time appears ANTENNA L 1 VIDEOSIGNAL SELECTOR VIDEO OUT AUDIO OUT L 2 OUT IN OUT DVD DVD HDD SAT CONTROL AV COMPULINK IN OPTICAL COAXIAL DVD DIGITAL OUT LEFT RIGHT IN Y C COMP RGB S VIDEO VIDEO PCM STREAM VCDVD TITLE GROUP TRACK CHAP...

Page 8: ...an also work for TV volume adjustment when no menu is shown on the TV 0 RETURN button 30 34 40 42 51 REC button 22 23 Quick Short Review button 22 50 DISPLAY button 22 EDIT button 34 39 LIVE button 21 23 TV VIDEO button 24 standby on button TV AV button 9 10 Number buttons 21 23 50 MUTING button 10 MEMORY button 31 GROUP TITLE button 52 62 65 SET UP button 66 75 HDD PROGRAMME button 40 42 45 MENU ...

Page 9: ...problems must be considered and the local rules or laws governing the disposal of the used up batteries must be followed strictly Remote sensor Point the top of the remote control toward the remote sensor as directly as possible If you operate it from a diagonal position the operating range approx 5 m may become shorter Controlling the TV using remote control Your remote control can operate the ba...

Page 10: ...TANT Although the supplied remote control is compatible with JVC products as well as many other models it may not work with your equipment or in some instances may have limited function capability MUTING HDD TV PR VOL Number TV AV ENTER TVs Codes JVC AIWA BEIJING CCE CHANGHONG DAEWOO FERGUSON FINLUX FUNAI GRANDIENTE GRUNDIG HITACHI ITT JINXING KONKA LG GOLDSTAR MAGNAVOX MITSUBISHI MIVAR NEC NOBLEX...

Page 11: ...V only accommodates the composite video signal set the selector to COMP RGB If your TV accommodates Y C signals set the selector to Y C If your TV accommodates RGB signals set the selector to COMP RGB NOTES This selector only works for the output signals through the built in DVD player For setting the HDD output input signals see Changing the HDD TV tuner settings on pages 66 and 68 This selector ...

Page 12: ...o use the unit for a long time before cleaning the unit before moving the unit Do not connect or disconnect the power cord with wet hands pull the power cord when disconnecting it as this may damage the cord and cause fire electric shock or other accidents Caution Do not alter twist or pull the power cord or put anything heavy on it which may cause fire electric shock or other accidents If the cor...

Page 13: ...d try again from the beginning Auto Setup may fail or stored information may be incorrect if received signals are weak If you press any button on the unit or on the remote control while Auto Setup is in progress it will be cancelled Before starting make sure of the following The TV aerial cable is connected firmly to the unit The AC power cord is plugged in An appropriate input AV mode is selected...

Page 14: ...ally If a power failure occurs or if you turn off the power while TV Linked Setup is in progress TV Linked Setup will be interrupted If this happens turn off the power and try again from the beginning Clock time setting may fail if received signals are weak The characters available for station names ID are A Z 0 9 and space Downloaded station names may differ from the ones listed on pages 73 and 7...

Page 15: ...heck if the Guide Program numbers have been set correctly perform the VIDEO PLUS Timer programming see page 40 If the Guide Program numbers have not been set correctly the unit will record a TV programme of an unexpected station The unit is equipped with Just Clock which automatically adjusts the clock time at a regular interval by reading data from PDC signals To use this function see Just Clock ...

Page 16: ... NOTE When the Timer Programming or HDD Setup menu screen see pages 40 42 and 66 is shown on the TV you cannot change the playback source from the HDD deck to the DVD player Before performing any operations Turn on the TV and select an appropriate input AV mode During the following periods the unit will not accept any button operation If the unit is plugged in For about 30 seconds The illumination...

Page 17: ...ontroller Fix securely using the adhesive strip attached on the back of the satellite controller 3 Make connections Be sure to connect the L 2 IN connector on the rear to the 21 pin SCART connector on the satellite receiver NOTE When connecting your satellite receiver refer to its instruction manual 4 Connect the satellite controller to the unit Connect the satellite controller to the SAT CONTROL ...

Page 18: ...ress ENTER 4 Select the Sat Control Set screen 5 Enter the satellite receiver s brand NOTE If the unit is playing or recording you cannot set the brand code 6 Select a programme position number for the satellite receiver for a test 3 7 2 5 6 Press 5 or to move to SAT CONTROL SET then press ENTER or 3 Press the appropriate number buttons to enter the brand code from the list on page 19 then press E...

Page 19: ... be used with some types of the satellite receivers If this is your case leave the satellite tuner turned on and select an appropriate programme position number on the satellite receiver before the scheduled start time for a timer recording comes You can also use the timer equipped with your satellite receiver If the satellite receiver s programme position number has changed to the same one as you...

Page 20: ... OUTPUT selection screen appears 5 Select the type of the digital signal to be emitted through the DIGITAL OUT connectors on the rear Press 5 or to move to the type you want then press ENTER When connecting to a recording device such as an MD recorder and a DAT deck select PCM ONLY When connecting to a Dolby Digital decoder select DOLBY DIGITAL PCM When connecting to a DTS MPEG Multichannel and DO...

Page 21: ...nd the actual on air scene 3 Choose a programme On the remote control Press HDD TV PR repeatedly or the number buttons On the unit Press PR repeatedly You can also select the external components L 1 L 2 or SAT F 1 Examples How to use the number buttons To select programme position 5 press 5 To select programme position 10 press 1 then 0 To select the external components press AUX 0 then PR NOTES W...

Page 22: ...llowing cases When you turn off the power including a power failure When you perform a recording When you change the LIVE MEMORY setting see page 67 When you change the built in TV tuner settings see pages 70 to 74 To show the current clock time in the display window while watching on air scenes in real time Press DISPLAY on the remote control Each time you press the button the channel number and ...

Page 23: ...te control Press HDD TV PR repeatedly or the number buttons On the unit Press PR repeatedly You can also select the external components L 1 L 2 or SAT F 1 Examples How to use the number buttons To select programme position 5 press 5 To select programme position 10 press 1 then 0 To select the external components press AUX 0 then PR NOTES When you change the programme positions it takes a few secon...

Page 24: ...ate in the display window When LIVE MEMORY is set to OFF see page 67 When O S D is set to ON see page 67 the following screen also appears on the TV screen NOTES The capacity of the HDD is 80 Gbytes MPEG2 format is used for the HDD recording format the same one used for DVD Video discs bps is used to represent how much data can be recorded per second The larger this value is the better the picture...

Page 25: ...reen see page 29 or some demonstration programmes for the first time you start playback NOTES When the entire programme has been played playback stops and on air programme is shown on the TV When the programme reaches its end while searching picture will pauses at the end To stop playback temporarily Playback Pause Press 8 on the remote control To resume normal playback press 3 SELECT To stop play...

Page 26: ...he button the HDD goes back to a previous scene of about 7 seconds before For example if you press the button three times the HDD will go back to the scene of about 21 seconds before Skipping forward quickly Quick Skip While playing press on the remote control The HDD skips forward about 30 seconds at a time and resumes playback This will be convenient when you want to skip a commercial in a recor...

Page 27: ... 15 9 30 9 45 10 00 and 10 15 Freezing the picture and advance it frame by frame Still Picture Frame by Frame Playback You can show the still picture and advance or reverse it frame by frame You cannot hear playback sounds during Still Picture and Frame by Frame Playback 1 Press 8 to freeze the picture on the TV 2 Press SLOW or 1 SLOW repeatedly to advance or reverse the still picture To resume no...

Page 28: ...urrent recording also appear When playing Live Memory during playback 1 Time scale for temporary recording 2 Current scene being recorded 3 Current time 4 Current programme position number 5 Time scale for Live Memory 6 Current playback point 7 Live Memory Playback indicator 8 Current playback time When playing Live Memory during recording 1 Current scene being recorded 2 Live Memory Recording ind...

Page 29: ... to enter the TITLE screen 1 Viewing window Shows currently received TV programme 2 Guidance for operations 3 Scroll bar Appears to indicate when more than nine programmes or play lists are registered To show hidden programmes or play lists press 3 2 5 repeatedly 4 Recording information for the programme indicated by the arrow 5 Thumbnail Index still picture of each programme 6 Thumbnail marks Ind...

Page 30: ...TER NOTE You cannot select RESUME for newly recorded programme with icon To stop playback Press 7 CLEAR When you select Repeat Play REPEAT pressing 3 SELECT cancels the repeat and resumes normal playback When using the buttons on the unit make sure that the HDD lamp on the unit is lit If not press DVD HDD so that the HDD lamp lights When using the remote control slide the DVD TV HDD selector to th...

Page 31: ...Press 7 CLEAR When using the buttons on the unit make sure that the HDD lamp on the unit is lit If not press DVD HDD so that the HDD lamp lights When using the remote control slide the DVD TV HDD selector to the right HDD then press ENTER HDD Navigation does not work during Automatic Satellite Recording see page 46 2 4 1 3 1 Press HDD NAVIGATION Press 3 or 2 to move to REC LIST or PLAY LIST then p...

Page 32: ...e of the playback modes see the table below then press ENTER NOTE You cannot select RESUME for newly recorded programme with icon To stop playback Press 7 CLEAR When you select Repeat Play REPEAT pressing 3 SELECT cancels the repeat and resumes normal playback When using the buttons on the unit make sure that the HDD lamp on the unit is lit If not press DVD HDD so that the HDD lamp lights When usi...

Page 33: ... to move to one of the playback modes see the table below then press ENTER NOTE You cannot select RESUME for newly recorded programme with icon To stop playback Press 7 CLEAR When you select Repeat Play REPEAT pressing 3 SELECT cancels the repeat and resumes normal playback When using the buttons on the unit make sure that the HDD lamp on the unit is lit If not press DVD HDD so that the HDD lamp l...

Page 34: ...ake modifications to a list see page 39 DELETE To delete a list see page 39 CREATE To create a new list by editing the recorded programmes see page 37 To go back to the previous screen while editing HDD Navigation press RETURN Modifying recorded programmes To use your favourite scene for the thumbnail 1 Show the EDIT screen NOTES If the HDD is full or 100 programmes are already stored you cannot d...

Page 35: ...on screen 1 Press EDIT 2 Press ENTER after making sure that is pointing at MODIFY under REC LIST 3 Press 3 2 5 to move to a thumbnail you want then press ENTER 2 Enter the category selection screen 3 Select a new category Press 3 2 5 to move to a new category you want then press ENTER The thumbnail is grouped into the selected category and the main modification screen appears again 4 Finish the pr...

Page 36: ...rrect character then press ENTER 4 Save the title Press 3 2 5 to move to SAVE then press ENTER If you want to cancel the procedure move to CANCEL then press ENTER 5 Finish the procedure Press EDIT To delete an unnecessary programme 1 Show the EDIT screen 2 Enter the REC LIST DELETE screen 3 Select an unnecessary programme 4 Perform the deletion 5 Delete more unnecessary programmes Repeat steps 3 a...

Page 37: ...mation message appears 2 Press 2 to move to DIVIDE then press ENTER If you want to cancel the division press 3 3 3 3 to move to CANCEL then press ENTER 5 Finish the procedure Press EDIT Making play lists A play list is a collection of the scenes selected from recorded programmes A play list can be freely edited and played back without changing original programmes recorded A play list includes info...

Page 38: ... you have just deleted it press 3 2 5 to move to RETRY then press ENTER To move a scene 1 Press 3 2 5 to move to MOVE then press ENTER 2 Press 5 to move to a scene number you want to move from in the right list on the screen then press ENTER 3 Press 5 to move to the position you want to move to in the right list on the screen then press ENTER The listed scenes are automatically renumbered To cance...

Page 39: ...teps 3 and 4 of To change or newly assign the title on page 36 Press EDIT to finish To change the scene Refer to steps 5 To modify a scene to 7 of To create a play list on page 38 and on this page To delete a play list 1 Show the PLAY LIST DELETE screen 1 Press EDIT 2 Press 3 3 3 3 2 2 2 2 5 5 5 5 to move to DELETE under PLAY LIST then press ENTER PLAY LIST DELETE screen appears 2 Select an unnece...

Page 40: ... cancelled To delete all entered numbers at a time press 3 2 5 to move to DELETE ALL then press ENTER 4 Confirm the PLUSCODE number NOTES If the number you entered is invalid PLUSCODE NO ERROR CONFIRM PLUSCODE NO THEN RETRY appears on the TV Enter a valid PLUSCODE number If SET GUIDE PROG THEN RETRY appears on the TV set Guide Program numbers see page 69 manually Make sure that the clock built in ...

Page 41: ...ER 2 Press ENTER again after making sure that is pointing at EXIT The recording timer is automatically activated For a satellite programme leave the satellite receiver turned on To continue timer programming for other programmes press 2 to move the arrow to CONTINUE then press ENTER NOTES If PROGRAMME OVERLAPPED appears in step p erase the unnecessary programme by referring to page 45 About 1 minu...

Page 42: ...move to STOP then press ENTER 4 Press or 5 to select the desired time then press ENTER 5 Select the programme position number 1 Press or 5 to move to TV PROG then press ENTER If you want to timer record a satellite broadcast press the number button 0 to change TV PROG to SAT before pressing ENTER 2 Press or 5 to select the desired programme position number then press ENTER 3 Press to move the curs...

Page 43: ...g 1 Press to move to OK then press ENTER The confirmation screen appears 2 Press ENTER again after making sure that is pointing at EXIT The recording timer is automatically activated To continue timer programming for other programmes press 2 to move the arrow to CONTINUE then press ENTER NOTES If PROGRAMME OVERLAPPED appears on the TV screen erase the unnecessary programme by referring to page 45 ...

Page 44: ... some TV stations Programme Delivery Control PDC is a service designed to assure safe accurate timer recording With this system special code signals are transmitted together with the audio video signals These code signals control your video recorder for this unit the HDD deck and have precedence over the advertised times which you may have preset into the timer This means that your recorder will s...

Page 45: ... after making sure that the selected date is correct 3 Confirm the content or modify it by referring steps 4 to p of Express Timer programming on pages 42 and 43 Make sure that the clock built in this unit is set properly Turn on the TV and select an appropriate input AV mode When using the buttons on the unit make sure that the HDD lamp on the unit is lit If not press DVD HDD so that the HDD lamp...

Page 46: ...he lamp to the record button lights and the SAT timer button starts flashing when you activate Automatic Satellite Recording When using Automatic Satellite Recording you cannot set a different recording speed for each programme To do it use Automatic Satellite Recording separately for each programme With some satellite receivers connected this unit may not be able to be synchronized to start and s...

Page 47: ... 61 and 64 If a menu is shown on the TV screen When inserting a DVD Video SVCD or VCD the menu recorded in the disc will be shown on the TV Using the menu you can select a desired item to play For DVD Video Press 3 2 5 to move to select an item you want then press ENTER The unit starts playing back the selected item For SVCD VCD Press the number buttons to select an item you want The unit starts p...

Page 48: ...reater than moving pictures To play an SVCD VCD without activating PBC press 7 CLEAR to stop playback then press the number button s Playback starts with the selected track To activate PBC again press TOP MENU or MENU 8 5Mbps TITLE 33 TOTAL 1 25 58 CHAP 33 Transfer rate Current chapter number Current transport status Current title number Elapsed time Example for DVD Video About On screen guide ico...

Page 49: ...ge the RESUME setting from DISC RESUME to OFF or ON the unit cannot recall the interrupted position stored for the discs however the stored interrupted positions are never erased due to this setting change If you stop playback of a disc with an interrupted position stored in memory this new interrupted position is stored for the disc the previous interrupted position is overwritten in memory For a...

Page 50: ... function works only within the same title though it works between chapters This function may not work with some DVD Videos Locating the beginning of a scene or song For DVD Video During playback For SVCD VCD During playback without PBC For CD MP3 During playback or while in stop mode For JPEG While the JPEG CONTROL screen is shown To skip forward press To skip backward press 4 When using the remo...

Page 51: ...h PBC Some SVCD VCD discs support the PBC function PBC is an abbreviation of Playback Control Some SVCD VCD discs recorded with PBC have their own menus such as a list of the songs of the disc You can locate a specific scene by using the PBC menu See the instructions of each disc for its particular menus 1 Press 3 or TOP MENU Playback starts PBC appears in the display window then a disc menu appea...

Page 52: ... for entering time appears Screen example for DVD Video Screen example for Audio CD 3 Press the number buttons 0 to 9 to enter the desired time The specified time appears in the pull down menu Example for DVD Video To play back from 2 H 34 M 00 S Press 2 3 then 4 Example for Audio CD To play back from 23 M 40 S Press 2 3 then 4 You do not have to press 0 to enter the trailing zeros for the last tw...

Page 53: ...ble remains on the TV during Program Play Pressing ON SCREEN clears the PROGRAM table and brings up the status bar When all of the programmed tracks have finished playing the unit stops and the PROGRAM table appears again Notice that the program is not erased To stop Program Play and to check the program contents Press 7 CLEAR Playback stops and the PROGRAM table is shown If the PROGRAM table is n...

Page 54: ...ears 3 Press or 5 to select an option you want then press ENTER For DVD Video CHAPTER Current chapter repeat TITLE Current title repeat A B A B repeat only selectable during play see the following page OFF Repeat Play is cancelled For SVCD VCD CD TRACK Current track repeat ALL All track repeat A B A B repeat only selectable during play see the following page OFF Repeat Play is cancelled To start R...

Page 55: ...pull down menu disappears The repeat icon shows 5 Press ENTER at the end of the repeat part point B The repeat icon changes Theunitlocates A andstartsrepeatplaybackbetween A and B The A B indicator lights in the display window To quit A B repeat playback Press 3 or 2 to move to and press ENTER The A B repeat mode turns off then normal playback continues Pressing 7 CLEAR to stop playback will also ...

Page 56: ...sten to karaoke with or without the vocal At the beginning of the part where multiple audio tracks are recorded will appear on the TV except when the ON SCREEN GUIDE is set to OFF see page 79 1 During playback press AUDIO The audio selection window appears on the TV 2 Press or 5 or AUDIO to select the desired audio Each time you press the button the audio changes For DVD Video example For SVCD For...

Page 57: ...5 to adjust the effect level You can set the effect level from 1 to 5 separately for each mode The higher value enhances the effect To clear the 3D PHONIC window Press 3D PHONIC again To cancel the effect Select NONE in step 2 above Turning off the unit also cancels the effect NOTES The 3D PHONIC window disappears if no operation is made for about 10 seconds 3D PHONIC works correctly only when pla...

Page 58: ...the appearance of flesh tone is unnatural Available range 16 to 16 SHARPNESS Adjust this if the picture is indistinct Available range 0 to 3 Y DELAY Adjust this if the picture looks separately overlapped Available range 2 to 2 4 Press ENTER A window for setting parameters appears 5 Press or 5 to adjust the level of the parameter The higher value enhances the effect 6 Press ENTER Repeat steps 3 to ...

Page 59: ...s shown press or 5 then press ENTER When the pull down window is not shown press ENTER For detailed operations for each icon on the menu bar see the next page To clear the menu bar and status bar Press ON SCREEN again NOTES The menu icon currently selected is shown in green Some functions are not available during playback You cannot move to the associated icon when it is not available Precaution o...

Page 60: ...lay with the selected subtitle Angle selection See also page 56 During playback selects a desired scene angle in a multi angle part 1 Press or 5 to select a scene angle 2 Press ENTER to play with the selected scene angle Menu bar functions for SVCD VCD CD Time information Selects the time information shown in the display window and in the status bar Press ENTER to select the time information from ...

Page 61: ...t be used for MP3 discs The unit can play back only tracks with the following file extensions MP3 Mp3 mp3 and mP3 Time required for reading the disc contents may vary for different discs depending on the numbers of groups folders and tracks files recorded etc You cannot advance or reverse playback by pressing or 1 or by holding down or 4 during MP3 disc playback Operations using the MP3 CONTROL sc...

Page 62: ...t a file press or 5 when the cursor highlighted bar is in the Track column If there are unshown tracks they will appear in this column as you selecting files By pressing or 4 you can change the files without respect to the cursor highlighted bar position By pressing the number buttons you can select a file number up to 99 directly and start play from the selected file To start playing back a file ...

Page 63: ...JPEG files you can only play back files of the type selected by the MP3 JPEG setting in the PICTURE menu see page 77 NOTE For making your own JPEG disc using a CD R CD RW disc Select ISO 9660 as the disc format It is recommended to record your material at a 640 x 480 pixel resolution This unit supports the baseline JPEG format On screen display Display window TRACK 1 GROUP or ALL OFF No indication...

Page 64: ...e includes any 2 byte character the unit may not show the file name correctly If a picture has been saved at greater than 640 x 480 pixel resolution it may take some time to display the picture The unit does not support pixel size of more than 2400 pixels in horizontal resolution Make sure that the horizontal resolution of the picture pixel size is 2400 pixels or less Operations using the JPEG CON...

Page 65: ...art slide show from the selected file on the highlighted bar press 3 SELECT To show the selected file on the highlighted bar as a still image press ENTER To move to another file press or 4 NOTE If the selected file is unplayable a black screen appears To repeat the slide show 1 Before starting slide show or a still image press ON SCREEN once The pull down menu for Repeat Play appears 2 Press or 5 ...

Page 66: ...Press SETUP repeatedly until menu screens disappear When using the remote control slide the DVD TV HDD selector to the right HDD then press ENTER HDD SET UP LIVE MEMORY See page 67 AUDIO REC See page 67 JUMP TIME See page 67 FUNCTION SET UP FUNCTION See page 67 O S D DIRECT REC INPUT OUTPUT See page 68 L 1 OUTPUT L 1 INPUT L 2 SELECT L 2 INPUT F 1 INPUT FAMILY See page 68 INITIAL SET UP TUNER SET ...

Page 67: ...tors for HDD and TV tuner operations appear on the TV for a while when you operate the HDD deck NOTE When you use this unit as the playback component for editing dubbing to a VCR etc be sure to set O S D to OFF before starting DIRECT REC Setting options ON OFF When this function is set to ON you can easily start recording the programme that you are watching on the TV received by the TV itself not ...

Page 68: ...n you use the HDD deck as the recording device or use the satellite receiver connected to the L 2 IN connector SAT Select when you want to view a satellite programme on the TV without turning on this unit NOTE When power failure occurs or when this unit is unplugged this function is automatically reset to A V When a satellite receiver is not connected to the L 2 IN connector set this function to A...

Page 69: ...he station you want to record When you add a new station manually When you want to record a satellite programme using the VIDEO PLUS system Set the Guide Program numbers for all satellite broadcast stations which can be received on your satellite receiver Example When inputting Guide Program number 4 for CH4 1 Press SET UP 2 Press 3 or 2 to move to INITIAL SET UP then press 3 Press 3 or 2 to move ...

Page 70: ...either AUTO SET or T V LINK then press ENTER or 3 Auto Channel Setup starts If you have connected the unit to a TV offering T V Link via a 21 pin SCART cable select T V LINK As Auto Channel Setup progresses the mark on the AUTO SET screen moves from left to right When Auto Channel Setup is finished the confirmation screen appears after the message SCAN COMPLETED The stations the unit has located a...

Page 71: ... 73 For fine tuning adjustment press 3 repeatedly until begins flashing then press or 5 for fine tuning While tuning or appears 8 Press ENTER to store the new station The Confirmation screen appears 9 Repeat steps 5 to 9 to store other new stations 10 Press SET UP three times to finish the setting NOTE Guide programme numbers are not set when the stations are stored manually If you try to make a t...

Page 72: ...a programme position number in which a station you want to fine tune is stored then press ENTER The channel number under CH and station name under ID start flashing 3 Press ENTER again The Manual Channel Setup screen appears 4 Press 3 repeatedly until begins flashing 5 Press or 5 to fine tune the picture to obtain the best picture 6 Press ENTER The confirmation screen appears 7 Repeat steps 2 to 6...

Page 73: ...s step to assign a name up to 4 characters To correct a mis entry press 2 or 3 until the incorrect character starts flashing then press or 5 to enter the correct character 7 Press ENTER The confirmation screen appears 8 Repeat steps 2 to 7 to change other station names 9 Press SET UP three times to finish the setting TV station and ID list ENTER SET UP Station name ID Anglia TV ARD ARTE BBC Group ...

Page 74: ...ldbeck 30 34 28 32 56 Winter Hill 55 62 59 65 48 North East Bilsdale West Moor 33 26 29 23 35 Chatton 39 45 49 42 Pontop Pike 58 64 61 54 68 Scotland Angus 57 63 60 53 Black Hill 40 46 43 50 37 Sandale 22 Caldbeck 34 28 32 56 Creigkelly 31 27 24 21 48 Darvel 33 26 23 29 35 Durris 22 28 25 32 67 Eitshal 33 26 23 29 Keelylang Hill 40 46 43 50 Knock More 33 26 23 29 Rosemarkie 39 45 49 42 67 Rumster ...

Page 75: ... an item you want to change When using the remote control slide the DVD TV HDD selector to the left DVD then press ENTER 2 4 1 5 LANGUAGE See page 76 MENU LANGUAGE AUDIO LANGUAGE SUBTITLE PICTURE See page 77 MONITOR TYPE PICTURE SOURCE SCREEN SAVER MP3 JPEG AUDIO See page 78 DIGITAL AUDIO OUTPUT ANALOG DOWN MIX D RANGE CONTROL OUTPUT LEVEL OTHERS See page 79 RESUME ON SCREEN GUIDE AV COMPULINK MOD...

Page 76: ...uages and their abbreviations on page 92 AUDIO LANGUAGE You can select the default audio language to be reproduced if it is contained in a DVD Video disc Setting options ENGLISH SPANISH FRENCH CHINESE GERMAN ITALIAN JAPANESE and language code from AA to ZU NOTES If the disc does not have the selected language the disc s default language will be used For details about language codes see Table of la...

Page 77: ...ng on the disc even if you select 4 3 PS PICTURE SOURCE Setting options VIDEO NORMAL VIDEO ACTIVE FILM AUTO This mode selects whether the content in the disc is processed by field video source or by frame film source You can obtain optimal picture quality according to the source type to be played back by selecting an appropriate option VIDEO NORMAL Select when playing back a video source disc with...

Page 78: ...ecoder connected to the DVD HDD AUDIO OUT and L 1 IN OUT connectors on the rear STEREO Select when listening to conventional two channel stereo audio through an amplifier or receiver connected to the DVD HDD AUDIO OUT and L 1 IN OUT connectors on the rear You can also connect a MiniDisc recorder cassette deck etc to record through the DVD HDD AUDIO OUT and L 1 IN OUT connectors on the rear NOTE Th...

Page 79: ...VD 3 This function is provided for the future use Set this to DVD1 PARENTAL LOCK When this option is selected pressing ENTER on the remote control brings up the PARENTAL LOCK screen This allows you to restrict children from playing DVD Video discs See following pages for details about the parental lock setting NOTE You cannot select this item during play SELECT ENTER USE 5 TO SELECT USE ENTER TO C...

Page 80: ...ee Country Area code list for Parental Lock on page 91 3 Press ENTER moves down to SET LEVEL 4 Select the level 1 Press ENTER again The pull down menu appears In the pull down menu NONE and levels 8 to 1 are available 2 Press or 5 to move to select a desired level NONE does not restrict playback Level 1 is the strictest level Discs rated higher than the selected level are restricted 3 Press ENTER ...

Page 81: ... step becomes the new password If you want to keep the same password as before enter the same password 8 Press ENTER moves to EXIT 9 Press ENTER again The OTHERS menu screen appears NOTE If you enter the wrong password more than three times in step 4 above moves to EXIT automatically and 5 do not work Press ENTER to exit To temporarily release Parental Lock If the parental level is set to a strict...

Page 82: ...HDD 2 Press and hold 7 CLEAR until step 3 is finished 3 Press the number button 1 2 3 or 4 1 for A code 2 for B code 3 for C code and 4 for D code 2 Set the remote control code for the remote control 1 Press ENTER 2 Release 7 CLEAR On the unit 3 Show the code in the display window 1 If the DVD lamp on the unit is lit press DVD HDD so that the HDD lamp lights 2 Press STANDBY ON to turn off the unit...

Page 83: ...et to OFF see page 67 4 Start playback on the camcorder Refer to the instruction manuals supplied with the camcorder 5 Start recording on the HDD deck On the remote control Press and hold REC then press 3 On the unit Press record The lamp next to the record button lights NOTES Recording pause if used will be released in 5 minutes automatically Picture and sound may be distorted at the point where ...

Page 84: ... the instruction manual supplied with the VCR NOTES For Y C signal input output be sure to use a 21 pin SCART cable that is compatible with the Y C signal When you use the HDD deck as the playback component be sure to set O S D to OFF before starting see page 67 If the VCR is equipped with audio video VIDEO S VIDEO input connectors you can also connect it using those connectors ANTENNA L 1 VIDEO S...

Page 85: ...ss record The lamp next to the record button lights NOTE For Y C signal input output be sure to use a 21 pin SCART cable that is compatible with the Y C signal Precaution before editing onto the HDD The picture shown on the TV is a few seconds behind the scene currently recorded onto the HDD Therefore if you start recording at the desired scene on the TV you will miss the beginning of the scene by...

Page 86: ...dcast on the TV with its input AV mode correctly selected without turning on this unit To view a satellite programme while this unit is turned on press TV VIDEO with the DVD TV HDD selector set to the right HDD so that the VIDEO lamp inside the front panel goes off If you turn on this unit when the satellite receiver is turned off no picture appears on the TV If this happens perform one of the fol...

Page 87: ...ut connector on your amplifier NOTES You can connect this unit directly to the TV or through the Stereo System using the VIDEO OUT connectors VIDEO S VIDEO When using the DVD DIGITAL OUT connectors set DIGITAL AUDIO OUTPUT correctly to match with the connected component see page 78 You can use the output connectors on the rear to connect a recording device such as an MD recorder I I I I I I I I I ...

Page 88: ...eset the Guide Program number correctly The picture is not recorded properly from the external component Set INPUT OUTPUT correctly see page 68 Pictures recorded through the L 2 IN or INPUT F 1 connector do not have colour Set DIRECR REC to OFF see page 68 or record them using Video signals not using S Video signals Playback The playback picture does not appear The correct input AV mode is not sel...

Page 89: ...ck The screen turns black Only the baselined JPEG file can be played back On screen messages When one of the following messages appear on the TV follow the instructions shown on the screen to clear the message or to perform the required operations MESSAGE DESCRIPTION CANNOT DIVIDE DAILY WEEKLY PROGRAMME You are trying to divide a daily or weekly recorded programme CAN NOT MODIFY INDEX You cannot m...

Page 90: ...ogramming See page 45 PROGRAMME NOT COMPLETED PROGRAMME OVERLAPPED PLEASE CONFIRM AND MODIFY The timer programming you set is overlapping with another timer programming PROGRAMMING NOT COMPLETED EXIT Appears when you stop setting timer programming REMAINING CAPACITY IS SMALL DELETE UNWANTED PROGRAMME FROM HDD The remaining capacity of the HDD is short for the current recording TITLE MEMORY IS FULL...

Page 91: ...orea Democratic People s Republic of KR Korea Republic of KW Kuwait KY Cayman Islands KZ Kazakhstan LA Lao People s Democratic Republic LB Lebanon LC Saint Lucia LI Liechtenstein LK Sri Lanka LR Liberia LS Lesotho LT Lithuania LU Luxembourg LV Latvia LY Libyan Arab Jamahiriya MA Morocco MC Monaco MD Moldova Republic of MG Madagascar MH Marshall Islands ML Mali MM Myanmar MN Mongolia MO Macau MP No...

Page 92: ...BO Tibetan HY Armenian ML Malayalam SG Sangho TT Tatar BR Breton IA Interlingua MN Mongolian SH Serbo Croatian TW Twi CA Catalan IE Interlingue MO Moldavian SI Singhalese UK Ukrainian CO Corsican IK Inupiak MR Marathi SK Slovak UR Urdu CS Czech IN Indonesian MS Malay MAY SL Slovenian UZ Uzbek CY Welsh IS Icelandic MT Maltese SM Samoan VI Vietnamese DA Danish IW Hebrew MY Burmese SN Shona VO Volapu...

Page 93: ...ge compression and storage JPEG stands for Joint Photographic Experts Group There are three sub types of the JPEG format as follows Baseline JPEG used for digital cameras the web etc Progressive JPEG used for the web Lossless JPEG an old type rarely used now Linear PCM PCM stands for pulse code modulation Linear PCM is the usual method for digitally encoding audio without compression and is used f...

Page 94: ...al resolution 500 lines Output level RGB 0 700 mV 75Ω S video Y 1 0 Vp p 75Ω C 300 mV 75Ω Composite video 1 0 Vp p 75Ω Tuner Timer TV channel storage capacity 99 positions AUX position Tuning system Frequency synthesized tuner Channel coverage VHF 44 5 MHz 143 MHz 143 MHz 470 MHz UHF 470 MHz 862 MHz Memory backup time Approx 10 min General Power requirement AC 230 V 50 Hz Power consumption Power o...

Page 95: ... disc 61 MP3 JPEG 77 Multi angle 56 N NICAM broadcasts 22 O O S D 67 ON SCREEN GUIDE 79 Once Timer 43 One Touch Replay 26 50 On screen guide icons 48 OTHERS AV COMPULINK MODE 79 ON SCREEN GUIDE 79 PARENTAL LOCK 79 RESUME 79 OUTPUT LEVEL 78 P Parts identification 6 Pause Playback 25 Recording 83 PICTURE MONITOR TYPE 77 MP3 JPEG 77 PICTURE SOURCE 77 SCREEN SAVER 77 PICTURE SOURCE 77 Play list 30 37 ...

Page 96: ...ess it is specifically stated that it is designed for unattended operation or has a standby mode Switch off using the switch on the equipment and make sure that your family know how to do this Special arrangements may need to be made for infirm or handicapped people DON T use equipment such as personal stereos or radios so that you are distracted from the requirements of traffic safety It is illeg...

Reviews: