background image

Exit

ABC Radio

OPERATIONS

11

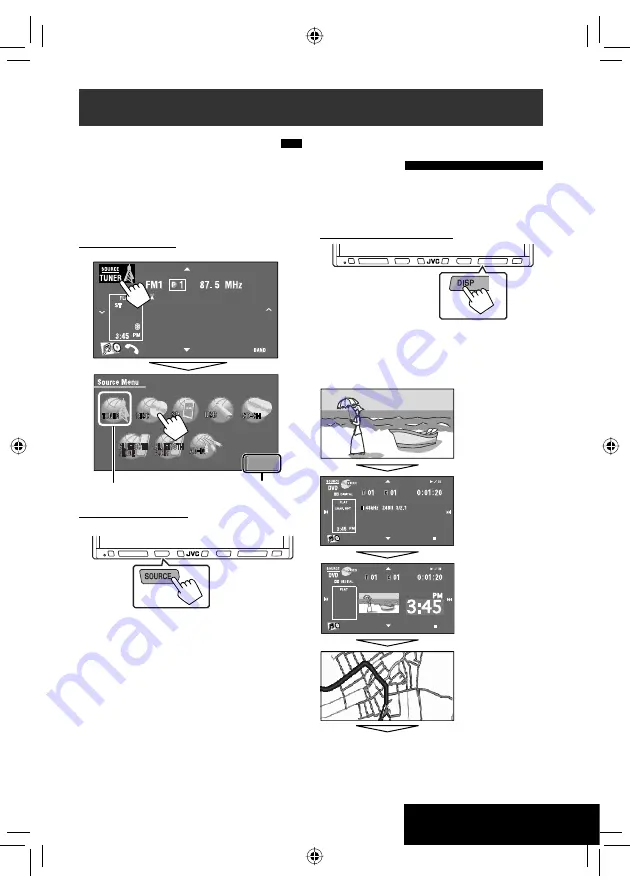
Changing the display 
information 

•  Available display information varies among the 

playback sources.

On the monitor panel only:

•  Each time you press DISP, the display changes to 

show the various information.

Ex.: When the playback source is a DVD video disc.

Selecting the playback source 

•  Available sources depend on the external 

components you have connected, media you have 
attached, and the <

Input

> settings you have made 

(

 page 56).

On the touch panel:

On the monitor panel:

“TUNER” 

=

 “DISC”(DVD/VCD/CD) 

=

 “SD“ 

=


“USB“ 

or

 “USB iPod“ 

=

 ”CD-CH”, “iPod”, 

or


“EXT-IN” 

=

 “Bluetooth PHONE” 

=

 “Bluetooth 

AUDIO” 

=

 “AV-IN” 

=


(back to the beginning)

•  You cannot select these sources if they are not ready.

Exit

Source information 
screen

Navigation screen*

Back to the beginning

Playback picture 
screen
(only for video 
sources)

Playback picture and 
clock time in large 
numbers

Common operations

* When <

Navigation

> is selected for <

AV Input

(

 page 56)

Current source

EN_KW-AVX814[UI]1.indb   11

EN_KW-AVX814[UI]1.indb   11

08.1.28   2:54:56 PM

08.1.28   2:54:56 PM

Summary of Contents for KW-AVX814

Page 1: ... refer to the separate manual INSTRUCTIONS LVT1794 010A UI For canceling the display demonstration see page 10 DVD RECEIVER WITH MONITOR KW AVX814 Cover_KW AVX814UI indd 2 Cover_KW AVX814UI indd 2 08 1 23 3 56 31 PM 08 1 23 3 56 31 PM ...

Page 2: ...es such as air bags it may obstruct visibility DO NOT operate the unit while driving If you need to operate the unit while driving be sure to look around carefully The driver must not watch the monitor while driving European Union only Cautions on the monitor The monitor built in this unit has been produced with high precision but it may have some ineffective dots This is inevitable and is not mal...

Page 3: ...isc types 4 Before operations 5 Basic operations Monitor panel touch panel 7 Basic operations Remote controller RM RK252 8 OPERATIONS Preparing for operations 10 Common operations 11 Listening to the radio 13 Disc operations 16 SD operations 30 USB operations 32 EXTERNAL DEVICES Bluetooth operations Cellular phone audio player 34 Listening to the CD changer 41 Listening to the iPod 43 Using other ...

Page 4: ...EG DivX MPEG1 MPEG2 MPEG4 1 IfyouinsertaDVDVideodiscofanincorrectRegionCode Regioncodeerror appearsonthescreen 2 DVD Rrecordedinmulti borderformatisalsoplayable exceptforduallayerdiscs DVD RWduallayerdiscsarenotplayable 3 Itispossibletoplaybackfinalized R RW Videoformatonly discs RWdoublelayerdiscsarenotplayable 4 ThisunitcanplaybackAACfilesencodedusingiTunes 5 ToreproduceDTSsound usethedigitalcon...

Page 5: ... The lights of the monitor panel buttons are turned off when no operation is done for about 10 seconds They are turned on again in the following cases When you touch the touch panel or move your hand nearby When you use the remote controller When a call SMS comes in for Bluetooth cellular phone Dependingonthe Illumination setting page 57 The lights of the monitor panel buttons are always turned on...

Page 6: ...nute 2 The monitor panel is released The attaching plate closes automatically about 10 seconds after the monitor panel is released Remove the monitor panel before this happens 3 Attaching Attaching plate Caution Hold the monitor panel securely so as not to drop it accidentally Fit the monitor panel onto the attaching plate until it is firmly locked Soft case supplied EN_KW AVX814 UI 1 indb 6 EN_KW...

Page 7: ...ay information You can also adjust the volume by moving your finger on the touch panel as illustrated Displays Source Menu screen page 11 Displays and erases AV Menu screen page 52 Displays Open Tilt menu below Ejects the disc and displays Open Tilt menu Hold Closes the monitor panel To detach the monitor panel Open Opens the monitor panel Eject Ejects the disc Close Closes the monitor panel Tilt ...

Page 8: ...e on screen bar Does not function as 7 Functions with other buttons see i and o 8 Changes the display information R03 LR03 AAA Installing the battery Insert the batteries into the remote controller by matching the polarity and correctly Caution Battery shall not be exposed to excessive heat such as sunshine fire or the like If the range or effectiveness of the remote controller decreases replace b...

Page 9: ...disc SD USB operations 5 DVD Selects the title DVD VR Selects the program Playlist SD USB other discs except VCD CD Selects the folders 4 Pressbriefly reverse skip forward skip Pressandhold reverse search forward search For FM AM operations 5 Selects the preset stations 4 Functions to search for stations Pressbriefly Auto Search Pressandhold Manual Search For Apple iPod operations USB iPod 5 Selec...

Page 10: ...cedure You can cancel the demonstration on the screen and set the clock Non available items will be shaded on the AV Menu screens Indication language In this manual English indications are used for purpose of explanation You can select the indication language page 54 Turn on the power Ÿ You can also use MENU on the monitor panel Cancel the demonstration Select Off Preparingforoperations Moves to t...

Page 11: ...ed and the Input settings you have made page 56 On the touch panel On the monitor panel TUNER DISC DVD VCD CD SD USB or USB iPod CD CH iPod or EXT IN Bluetooth PHONE Bluetooth AUDIO AV IN back to the beginning You cannot select these sources if they are not ready Exit Source information screen Navigation screen Back to the beginning Playback picture screen only for video sources Playback picture a...

Page 12: ...rack Chapter Repeat page 21 31 33 42 and 45 Displays Aspect menu page 54 Activates Voice Dialing function page 37 Displays Redial menu page 38 1 Short Cut window appears To erase the window press the button again 2 Press a Short Cut icon 3 The corresponding screen is displayed Using Short Cut Icons You can easily access some frequently used functions by using Short Cut icons EN_KW AVX814 UI 1 indb...

Page 13: ...ch Manual Search Hold either or until Manual Search appears on the screen then press it repeatedly The ST indicator lights up when receiving an FM stereo broadcast with sufficient signal strength Preset no Band Tuner indicator Assigned station name page 51 If no name is assigned No Name appears Sound mode page 50 EN_KW AVX814 UI 1 indb 13 EN_KW AVX814 UI 1 indb 13 08 1 28 2 54 57 PM 08 1 28 2 54 5...

Page 14: ... The MONO indicator lights up To restore stereo effect select Off FM station automatic presetting SSM Strong station Sequential Memory This function works only for FM bands You can preset six stations for each band 1 You can also use MENU on the monitor panel 2 3 Local FM stations with the strongest signals are searched and stored automatically in the FM band Hold EN_KW AVX814 UI 1 indb 14 EN_KW A...

Page 15: ...ou can also use MENU on the monitor panel 3 Select a preset number The station selected in step 1 is now stored in preset number 4 You can also display the Preset List by pressing 1 or holding 5 Hold Selecting a preset station On the remote 1 2 On the unit To select directly on the touch panel To select from the Preset List 1 You can also use MENU on the monitor panel 2 or Hold EN_KW AVX814 UI 1 i...

Page 16: ... operations will not be accepted Open the monitor panel Open Tilt menu is displayed By pressing and holding the button you can open the monitor panel and eject the disc Ÿ When playing back a multi channel encoded disc the multi channel signals are downmixed You can fully enjoy multi channel sound by connecting an amplifier or a decoder compatible with these multi channel sources also page 67 Cauti...

Page 17: ...uttons also work when they are not shown on the touch panel while watching the playback pictures on the screen Audio format DVD Video Title no Chapter no Playing time DVD VR Program no or Playlist no Chapter no Playing time Sampling frequency Bit rate Recorded signal channel no 3 8 Starts playback pauses 7 Stops playback 4 Press Selects chapter Hold Reverse forward search 3 5 Selects title program...

Page 18: ...nges to show the different information page 11 Disc type Sound mode page 50 Track no Playing time 3 8 Starts playback pauses 7 Stops playback 4 Press Selects track Hold Reverse forward search 3 The PBC indicator lights when PBC is in use Sound mode page 50 1 Searchspeed 1 2 2 Indicatesthebuttonpressed 3 Searchspeed x2 x10 5 Press Selects folder Hold Displays Folder Track Lists 01 01 Displays Folde...

Page 19: ...Audio format MP3 WMA WAV AAC Tag data appears only when it is recorded 5 6 3 8 Starts playback pauses 7 Stops playback 4 Press Selects track Hold Reverse forward search 7 Sound mode page 50 4 Indicatesthebuttonpressed 5 NoName appearsforconventionalCDsorifnotrecorded 6 Touchinganinformationbarscrollsthetextifallthetextisnotshown 7 Searchspeed x2 x10 5 Press Selects folder Hold Displays Folder Trac...

Page 20: ...g the playback picture 1 WhileadiscmenuisplayedbackforDVD KEY is automaticallydisplayed Onthediscmenu you canselecta menuitemdirectlybytouchingitonthescreen B For DVD VCD DivX menu operation playback 5 23 Selects the menu items ENTER Confirms the selection TOP MENU Displays the disc menu MENU Displays the disc menu RETURN Returns to the previous menu or displays the menu only for VCD with PBC C Fo...

Page 21: ...t folder Folder Randomly plays all tracks of current folder then tracks of next folders Disc All Randomly plays all tracks Folder Repeats all tracks of the current folder Track Repeats current track PBC not in use Disc All Randomly plays all tracks PBC not in use Track Repeats current track Disc All Randomly plays all tracks Track Repeats current track Folder Repeats all tracks of the current fold...

Page 22: ... folder 1 then a track 2 Selected track starts playing 1 Current folder list number total folder list number 2 Current track list number total track list number of the current folder 1 Presstomovetotheprevious nextpagesofthe lists 2 Seethefollowing You can browse Folder Track Lists by using the bar as illustrated Press Skips the List up or down Drag Scrolls the List up or down You can also display...

Page 23: ...e Select aspect ratio Select chapter Select title when not playing Select title during playback or pause Using menu driven features 1 2 Select an item you want to start playback 3 1 Searchspeed x2 x5 x10 x20 x60 2 Slowmotionspeed 1 32 1 16 1 8 1 4 1 2 3 Searchspeed x2 x10 You can change the following items using the on screen bar audio language subtitle language view angle etc pages 28 and 29 Also...

Page 24: ...r Select program when not playing Select program playlist during playback or pause Using Original Program Playlist screens page 28 1 For Original Program For Playlist 2 Select an item you want to start playback 3 To erase the screen 1 Searchspeed x2 x5 x10 x20 x60 2 Slowmotionspeed 1 32 1 16 1 8 1 4 1 2 3 Searchspeed x2 x10 You can change audio stream and subtitle on off using the on screen bar Al...

Page 25: ...ame folder Select folder While playing Reverse advance the scenes by 5 minutes For DivX6 Using menu driven features 1 2 Select an item you want to start playback 3 4 Searchspeed 1 2 3 5 Searchspeed 1 2 Current playback position twice 2nd press 2nd press 1st press 1st press 3rd press You can change audio stream and subtitle on off using the on screen bar DivX only EN_KW AVX814 UI 1 indb 25 EN_KW AV...

Page 26: ...e PBC press Stop playback Start playback pause if pressed during playback Reverse forward search 1 No sound can be heard Forward slow motion during pause 2 No sound can be heard Reverse slow motion does not work Press Select track Hold Reverse forward search 3 No sound can be heard Select aspect ratio Select track 1 Searchspeed x2 x5 x10 x20 x60 2 Slowmotionspeed 1 32 1 16 1 8 1 4 1 2 3 Searchspee...

Page 27: ...5 x10 x20 x60 5 Searchspeed x2 x10 Stop playback Start playback pause if pressed during playback Reverse forward search 6 Press Select track Hold Reverse forward search 7 Select folder Select track within the same folder Select folder 6 Searchspeed x2 x5 x10 x20 x60 7 Searchspeed x2 x10 twice EN_KW AVX814 UI 1 indb 27 EN_KW AVX814 UI 1 indb 27 08 1 28 2 55 05 PM 08 1 28 2 55 05 PM ...

Page 28: ...creen anytime while playing DVD VR with its data recorded 1 Display the Original Program Playlist screen 2 Select an item you want To erase the screen 1 Original Program Playlist number 2 Recording date 3 Recording source TV station the input terminal of the recording equipment etc 4 Start time of recording 5 Title of the program playlist 6 Highlight bar current selection 7 Creating date of playli...

Page 29: ...uage audio stream or audio channel Change or erase the subtitle language Change the view angle 1 page21 2 NotapplicableforDVD VR Above example is of DVD Video Items shown on the bar vary due to the disc type 1 Disc type 2 DVD Audio signal format VCD PBC 3 Playback mode 1 DVD Video C RPT Chapter repeat T RPT Title repeat DVD VR C RPT Chapter repeat PG RPT Program repeat DivX MPEG1 MPEG2 T RPT Track...

Page 30: ... operate the files on discs pages 18 to 27 All tracks in the SD card will be played repeatedly until you change the source Make sure all important data has been backed up Open the monitor panel Open Tilt menu is displayed Ÿ ThisunitcanplaybackAACfilesencodedusing iTunes ThisunitcannotplaybackFairPlay encrypted files Caution Do not release your finger quickly otherwise the SD card may pop up out fr...

Page 31: ...on the source information screen To cancel select Off File type Repeat Random Track Repeats current track Folder Repeats all tracks of the current folder Folder Randomly plays all tracks of current folder then tracks of next folders SD All Randomly plays all tracks Folder Repeats all files of the current folder Bypressing ShortCuticon youcanalsoturnonoroffTrackRepeat EN_KW AVX814 UI 1 indb 31 EN_K...

Page 32: ...backed up 1 ExceptforMPEG2filesrecordedbyJVCEverio camcorder extensioncode mod 2 ThisunitcanplaybackAACfilesencodedusing iTunes ThisunitcannotplaybackFairPlay encrypted files Caution Avoid using the USB device if it might hinder your safety driving Do not pull out and attach the USB device repeatedly while Now Reading is flashing on the monitor screen Do not start the car engine if a USB device is...

Page 33: ...track Folder Repeats all tracks of the current folder Folder Randomly plays all tracks of current folder then tracks of next folders USB All Randomly plays all tracks Track Repeats current track Folder Repeats all tracks of the current folder Folder Randomly plays all tracks of current folder then tracks of next folders USB All Randomly plays all tracks Folder Repeats all files of the current fold...

Page 34: ...evice through the unit Bluetooth PHONE and Bluetooth AUDIO for the first time you need to establish Bluetooth wireless connection between the unit and the device Once the connection is established it is registered in the unit even if you reset your unit Up to five devices can be registered in total Only one device can be connected at a time for each source Bluetooth PHONE and Bluetooth AUDIO Conne...

Page 35: ... supplied with the device to check the PIN code 6 Operate the Bluetooth device to connect while Connecting is displayed on the screen Now connection is established and you can use the device through the unit To connect a special device Special Device 1 Press on the touch panel or MENU on the monitor panel 2 Press Bluetooth 3 Press Special Device The unit displays the list of the preset devices 4 S...

Page 36: ...o end the call Hold the message displayed on the touch panel Hold any button on the monitor panel except ATT or VOL You can adjust the microphone volume page 60 1 Whenacellularphonewithaudiofunctionisconnected appears 2 ThisbuttonappearswhentheBluetoothAdapterisconnected 3 Thisadjustmentdoesnotaffectthevolumeleveloftheothersources Press SOURCE then press Bluetooth PHONE page 11 You can also use SO...

Page 37: ...eak the name you want to call When an SMS comes in If the cellular phone is compatible with SMS Short Message Service you can read the messages on the screen You cannot edit or send a message through the unit When Message Info is set to Auto The unit rings and the following screen is displayed to inform you of a message arrival page 60 To read the message press Yes The source is changed to Bluetoo...

Page 38: ...set Goes to Preset List You can preset the entered number by selecting a preset number page 39 Dial Calls the entered number You can also display Dial Menu screen by holding SOURCE on the monitor panel By pressing Short Cut icon you can easily activate Voice Dialing function You can also activate it by holding To redial previously dialed numbers 1 2 3 When using the remote controller you can displ...

Page 39: ...ts the volume of the incoming calls Makes a call to the preset numbers Presetting the phone numbers You can preset up to six phone numbers 1 Select the phone number you want to preset from Phonebook Redial Received Calls or Missed Calls 1 Press on the touch panel or MENU on the monitor panel 2 Press Bluetooth 3 Press Dial Menu then Ex Selecting Received Calls 2 Select a telephone number to store 3...

Page 40: ... controller for the Bluetooth audio operations Starts playback pauses Reverse forward skip Adjusts the volume Status of the device Signal strength Battery remainder only when the information comes from the device Sound mode page 50 1 The Bluetooth icon lights up when the adapter is connected Using the Bluetooth audio player Bluetooth Information If you wish to receive more information about Blueto...

Page 41: ... disc to start playing If you select an MP3 disc the Track list of the current folder appears You can select a track and start playing If you select a folder on the list you can start playing the first track of the folder 1 Current disc number 2 Current folder number total folder number 3 Current track number total track number of the current folder 1 Presstomovetotheprevious nextpagesofthe lists ...

Page 42: ...f the current disc All Randomly plays all tracks of all loaded discs Bypressing ShortCuticon youcanalsoturnonoroffTrackRepeat You can use the following buttons on the remote controller to operate the CD changer Selects disc Selects folder MP3 only Press Selects track Hold Reverse forward search 3 When one of the playback modes is selected the corresponding indicator lights up on the source informa...

Page 43: ...cted with the USB cable Press SOURCE then press USB iPod page 11 Playback starts automatically When you connect the iPod to the USB terminal USB iPod is selected as the source and playback starts automatically Ÿ Press 4 or to select a track video 2 2 Youcannotresumeplaybackforvideosources Sound mode page 50 Playback mode page 45 Track no Playing time ListeningtotheiPod 5 Press Moves to the previou...

Page 44: ...en desired item 2 Repeat step 2 until a desired track video is started playback 1 Current track video number total track video number 1 Presstomovetotheprevious nextpagesofthe list 2 YoucanalsoselectSearchModeandtracks videosbyusingthebar page22 Search modes For Music Playlists Artists Albums Songs Podcasts Genres Composers Audiobooks For Videos Video Playlists Movies Music Videos TV shows Video P...

Page 45: ...d 66 Selecting playback modes 1 You can also use MENU on the monitor panel 2 3 Repeat One Functions the same as Repeat One 1 All Functions the same as Repeat All Random Album Functions the same as Shuffle Albums Song Functions the same as Shuffle Songs 2 When the playback modes are selected the corresponding indicators light up alternately on the screen 1 Bypressing ShortCuticon youcanalso turnono...

Page 46: ...ck modes Operations are exactly the same as explained on page 45 for USB iPod Audiobooks is not displayed in step 3 Selecting a track from the player s menu 1 Press SEARCH to enter the player s menu SEARCH flashes on the screen during menu operations This mode will be canceled if no operations are done for about 5 seconds 2 Press 4 or to select the desired item Press Selects an item Hold Skips 10 ...

Page 47: ...peatedly Ÿ Turn on the connected component and start playing the source To display the operation buttons page 20 while watching the playback picture If no operations are done for about 5 seconds the operation buttons disappear Sound mode page 50 Assigned title page 51 Touch the screen center portion Touch the screen center portion EN_KW AVX814 UI 1 indb 47 EN_KW AVX814 UI 1 indb 47 08 1 28 2 55 17...

Page 48: ...he navigation screen Press DISP on the monitor panel repeatedly page 11 The aspect ratio of the navigation screen is fixed to Full regardless of the Aspect setting page 54 When Navigation is selected for AV Input page 56 You can use the source AV IN for listening to an audio source connected to the LINE IN jacks EN_KW AVX814 UI 1 indb 48 EN_KW AVX814 UI 1 indb 48 08 1 28 2 55 18 PM 08 1 28 2 55 18...

Page 49: ...not supplied Preparation Make sure External is selected for External Input page 56 Press SOURCE then press EXT IN page 11 You can also use SOURCE on the monitor panel Press it repeatedly Ÿ Turn on the connected component and start playing the source Assigned title page 51 Sound mode page 50 EN_KW AVX814 UI 1 indb 49 EN_KW AVX814 UI 1 indb 49 08 1 28 2 55 18 PM 08 1 28 2 55 18 PM ...

Page 50: ...d User3 1 Repeat steps and Ÿ then in step 2 Adjust 1 then store 2 Ex When storing into User2 Youcanalsomakeadjustmentsbymovingeach bardirectly By pressing Short Cut icon you can easily change the sound mode Move to other six sound modes For preset values of each sound mode page 68 EN_KW AVX814 UI 1 indb 50 EN_KW AVX814 UI 1 indb 50 08 1 28 2 55 18 PM 08 1 28 2 55 18 PM ...

Page 51: ...creen You can also use MENU on the monitor panel Assign a title You can enter up to 16 characters for available characters page 69 Store Confirm the entry 2 3 Move the cursor BS Erase the character before the cursor Del Erase the character on the cursor Cap Change the letter case upper lower A 0 Ä Change the character set Space Enter a space Finish the procedure Assigningtitlestothesources EN_KW A...

Page 52: ...ack Exit Setup Demonstration Wall Paper Color Scroll Dimmer Dimmer Time Set Blue Metal Auto Auto Once 7 6 Exit 52 Menuoperations The following steps are one of the fundamental procedures Some of the settings do not open the sub setting window but just selecting an option will change the setting The display indications may change according to change of the specifications Ex Changing the AV Input se...

Page 53: ...setting below Dimmer Time Set Sets the Dimmer On Off times Dimmer Level You can select the brightness for dimmer 01 bright 02 middle 03 dark Bright You can adjust brightness of the screen 15 darkest to 15 brightest Initial 00 Picture Adjust 2 You can adjust the following to make the screen clear and legible for watching the playback picture The setting will be stored one for DISC SD USB common and...

Page 54: ...erlands Svenska Dansk Руccĸий Português The characters you can enter for assigning the titles also change according to the language selected 69 NTSC PAL Select the color system of the external monitor connected NTSC PAL Turn off the power and turn it on again to make the new setting effective Clock Time Set Initial 1 00AM 10 Time Format Select either 12 hour system or 24 hour system 12 Hours 24 Ho...

Page 55: ...s back DivX MPEG1 MPEG2 files Not applicable to SD Audio Video Plays back audio files and DivX MPEG1 MPEG2 files Not applicable to SD DivX Regist Registration 3 This unit has its own Registration Code Once you have played back a file with which the Registration Code recorded this unit s Registration Code is overwritten for copyright protection iPod Artwork Off Cancels On Activates Artwork display ...

Page 56: ... view camera is connected to the CAMERA IN plug On Select when connecting the rear view camera to the CAMERA IN plug The picture from the camera is displayed as it is taken While the pictures through the camera are shown on the monitor no message will be displayed External Input 4 For connecting an external component to the CD changer jack on the rear Changer iPod 5 CD changer or iPod 41 46 Extern...

Page 57: ...turning on the unit 5 Normal Always lights Proximity Motion Lights up when your finger moves closer to the touch panel Touch Panel Lights up when your finger touches the touch panel Motion Sensitiv Change the sensitivity of the sensor for Illumination Off mode Low Mid High Initialize Initialize all settings you have made in AV Menu Press and hold Enter to initialize the settings then reset the uni...

Page 58: ...decrease when you change the source 12 to 12 Initial 00 Subwoofer Level Adjust the subwoofer output level Level 06 to 08 Initial 00 High Pass Filter Through Select when the subwoofer is not connected On Select when the subwoofer is connected Crossover Adjust the crossover frequency between the front rear speakers and the subwoofer 80Hz 120Hz 150Hz Amplifier Gain You can change the maximum volume l...

Page 59: ... Menu items Selectable settings reference page Dial Menu 4 Select the method to make a call 37 Message 5 You can read a message from the following message histories Unread Messages you have not read Read Messages you have read Unsent Messages you have not sent Sent Messages you have sent The number of messages in each history is also shown Open 34 Search 35 3 Selectableonlyfor BluetoothPHONE or Bl...

Page 60: ...atically with Off No Bluetooth device Last The last connected Bluetooth device Order The available registered Bluetooth device found first Auto Answer 2 Off The unit does not answer the calls automatically Answer the calls manually On The unit answers the incoming calls automatically Reject The unit rejects all incoming calls Message Info 2 Auto The unit informs you of the arrival of a message by ...

Page 61: ...cording surface When storing a disc into its case gently insert the disc around the center holder with the printed surface facing up Make sure to store discs into the cases after use To keep discs clean A dirty disc may not play correctly If a disc does become dirty wipe it with a soft cloth in a straight line from center to edge Do not use any solvent for example conventional record cleaner spray...

Page 62: ...d within 15 seconds the disc is automatically inserted again into the loading slot to protect it from dust Playing Recordable Rewritable discs This unit can recognize a total of 5 000 files and 250 folders a maximum of 999 files per folder Use only finalized discs This unit can play back multi session discs however unclosed sessions will be skipped while playing This unit can recognize a total of ...

Page 63: ...24 kHz 22 05 kHz 16 kHz for MPEG2 48 kHz 44 1 kHz 32 kHz 22 05 kHz for WMA 44 1 kHz for WAV 48 kHz 44 1 kHz for AAC This unit can show ID3 Tag Version 1 0 1 1 2 2 2 3 2 4 for MP3 This unit can also show WAV WMA Tag This unit can play back files recorded in VBR variable bit rate Files recorded in VBR have a discrepancy in elapsed time indication This unit cannot play back the following files MP3 fi...

Page 64: ... back some USB devices or some files due to their characteristics or recording conditions USB devices equipped with special functions such as data security functions cannot be used with the unit Do not use a USB device with 2 or more partitions Depending on the shape of the USB devices and connection ports some USB devices may not be attached properly or the connection might be loose When connecti...

Page 65: ...earch Loading The unit is updating the phone book and or SMS Please Wait The unit is preparing to use the Bluetooth function If the message does not disappear turn off and turn on the unit then connect the device again or reset the unit Reset08 Check the connection between the adapter and this unit Icons for phone types These icons indicate the phone type set on the device Cellular phone Household...

Page 66: ...ble or USB Audio and Video cable Notice When operating an iPod some operations may not be performed correctly or as intended In this case visit the following JVC web site For the USB connection http www jvc victor co jp english car For the inferface adapter connection http www jvc co jp english car support ks pd100 index html For the USB connection When iPod Artwork is set to On Do not press any k...

Page 67: ...20 24 bits Linear PCM 48 kHz 16 bits stereo Linear PCM 96 kHz Linear PCM 48 kHz 16 bits stereo Linear PCM with Dolby Digital Dolby Digital bitstream 48 kHz 16 bits stereo Linear PCM with DTS DTS bitstream with MPEG Audio MPEG bitstream 48 kHz 16 bits stereo Linear PCM Audio CD Video CD 44 1 kHz 16 bits stereo Linear PCM 48 kHz 16 bits stereo Linear PCM Audio CD with DTS DTS bitstream DivX MPEG wit...

Page 68: ...lician KY Kirghiz QU Quechua TI Tigrinya BA Bashkir GN Guarani LA Latin RM Rhaeto Romance TK Turkmen BE Byelorussian GU Gujarati LN Lingala RN Kirundi TL Tagalog BG Bulgarian HA Hausa LO Laothian RO Rumanian TN Setswana BH Bihari HI Hindi LT Lithuanian RW Kinyarwanda TO Tonga BI Bislama HR Croatian LV Latvian Lettish SA Sanskrit TR Turkish BN Bengali Bangla HU Hungarian MG Malagasy SD Sindhi TS Ts...

Page 69: ... by Victor Company of Japan Limited JVC is under license Other trademarks and trade names are those of their respective owners iPod and iTunes are trademarks of Apple Inc registered in the U S and other countries This product incorporates copyright protection technology that is protected by U S patents and other intellectual property rights Use of this copyright protection technology must be autho...

Page 70: ...move Reset the unit page 3 SD Loading Error appears on the monitor SD is not inserted fully Fully insert it into the slot to close the monitor panel No Signal appears Change the source Start the playback on the external component connected to VIDEO IN plug Check the cords and connections Signal input is too weak The buttons on the monitor panel do not work When the monitor panel is open only VOL a...

Page 71: ...lation Connection Manual No picture appears on the external monitor Connect the video cord correctly Select the correct input on the external monitor Eject Error or Loading Error appears on the screen Change the source by pressing SOURCE Region code error appears on the screen when you insert a DVD Video Region code is not correct page 4 DivX MPEG1 MPEG2 MP3 WMA WAV AAC Disc cannot be played back ...

Page 72: ...luetooth device The unit does not make pairing with the Bluetooth device Enter the same PIN code for both the unit and target device If the PIN code of the device is not indicated on its instructions try 0000 or 1234 Select the device name from Special Device then try to connect again pages 35 60 Echo or noise occurs Adjust the microphone unit position Phone sound quality is poor Reduce the distan...

Page 73: ...he connection Playback stops The headphones are disconnected during playback Restart playback No Files appears on the screen No tracks are stored Import tracks to the iPod Reset01 Reset07 appears on the screen Disconnect the adapter from both this unit and iPod Then connect them again Reset08 appears on the screen Check the connection between the adapter and this unit The iPod s controls do not wo...

Page 74: ...N VIDEO IN CAMERA IN USB input Antenna input Output VIDEO OUT Others CD changer DIGITAL OUT optical POSITION OUT FM AM TUNER Frequency Range FM 87 5 MHz to 108 0 MHz AM 531 kHz to 1 602 kHz FM Tuner Usable Sensitivity 11 3 dBf 1 0 μV 75 Ω 50 dB Quieting Sensitivity 16 3 dBf 1 8 μV 75 Ω Alternate Channel Selectivity 400 kHz 65 dB Frequency Response 40 Hz to 15 000 Hz Stereo Separation 35 dB AM Tune...

Page 75: ...RAL Power Requirement Operating Voltage DC 14 4 V 11 V to 16 V allowance Grounding System Negative ground Allowable Storage Temperature 10 C to 60 C Allowable Operating Temperature 0 C to 40 C Dimensions W H D Installation Size approx 170 mm 100 mm 160 mm Panel Size approx 171 mm 97 mm 22 mm Mass approx 2 8 kg Required space for installation and the monitor ejection 160 91 3 100 Designandspecifica...

Page 76: ...N 2008 Victor Company of Japan Limited Having TROUBLE with operation Please reset your unit Refer to page of How to reset your unit Rear_KW AVX814UI indd 2 Rear_KW AVX814UI indd 2 08 1 23 3 57 24 PM 08 1 23 3 57 24 PM ...

Reviews: