background image

4

*

6

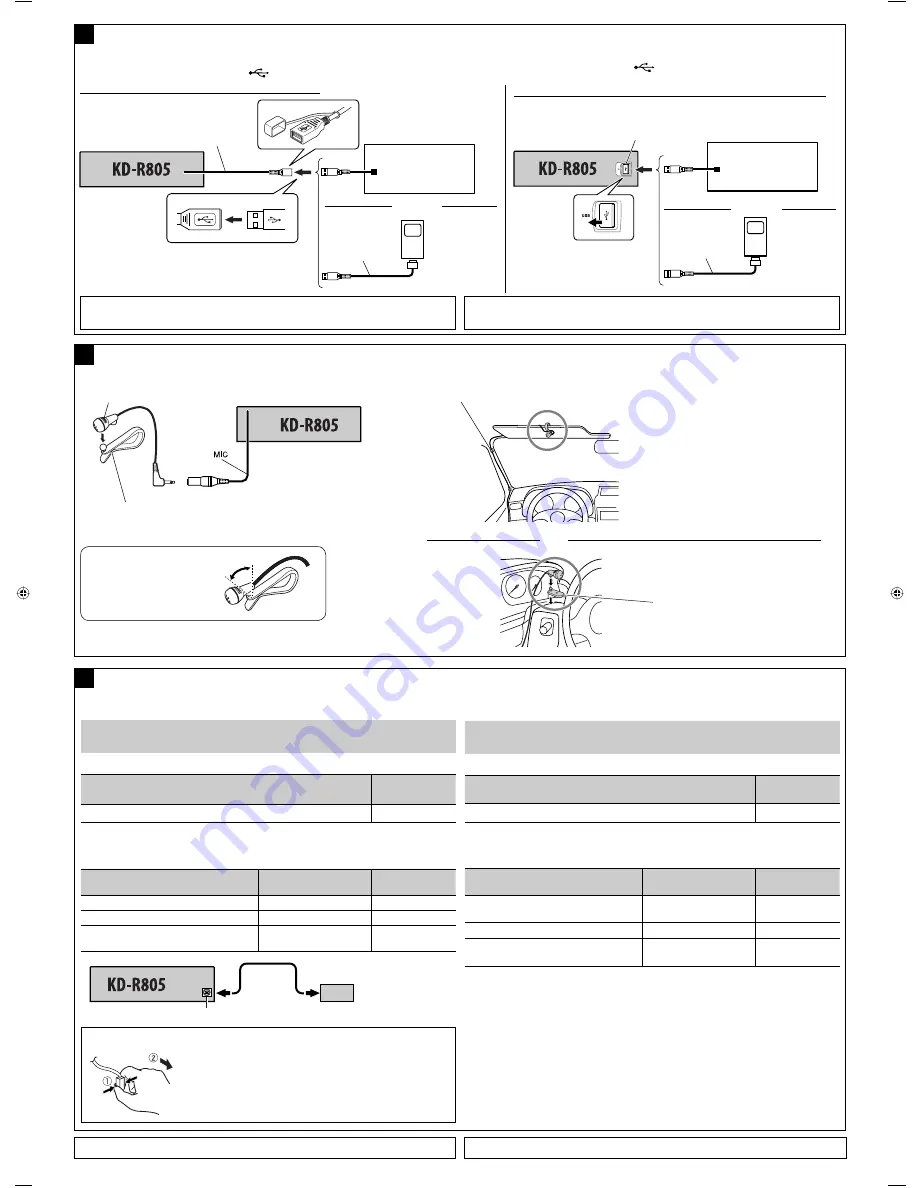
  To use these components, set the external input setting correctly (see page 29 of the INSTRUCTIONS).

*

6


„π°“√„™È Ë«πª√–°Õ∫‡À≈Ë“π’È „Àȵ—Èߧ˓°“√√—∫ —≠≠“≥Õÿª°√≥Ï¿“¬πÕ°„ÀÈ∂Ÿ°µÈÕß 

(

¥ŸÀπÈ“


29


§”·π–π”

)

When connecting the external components, refer also to the manuals supplied for the components and 
adapter.

CAUTION:

  Before connecting the external components, make sure that the unit is turned off.

You can connect the following JVC components to the CD changer jack.

JVC component

Model name

CD changer (CD-CH)

CH-X1500, etc.

You can also connect the following components through the various JVC adapters or system.

  Connection cords may need to be purchased separately.

Component

Adapter/System

Model name

iPod

Interface adapter for iPod

KS-PD100

Portable audio player with line output jacks

Line input adapter

KS-U57

Portable audio player with 3.5 mm


stereo mini 

jack

AUX input adapter

KS-U58


Connecting the external components to the CD changer jack / 

°“√µËÕÕÿª°√≥Ï¿“¬πÕ°‡¢È“°—∫™ËÕ߇ ’¬∫´’¥’‡™π‡®Õ√Ï

E

CD-CH

 / 

KS-PD100

 / 

KS-U57

 / 

KS-U58 

*

6

CD changer jack /

™ËÕ߇ ’¬∫´’¥’‡™π‡®Õ√Ï


To disconnect the connector

 / 

°“√∂Õ¥µ—«‡™◊ËÕ¡µËÕ

Hold the connector top tightly ( 

1

 ), then pull it out ( 

2

 ).

®—∫µ—«‡™◊ËÕ¡µËÕ„ÀÈ·πËπ 

1

 )

 ·≈È«¥÷ßÕÕ° 

2

 )


‡¡◊ËÕ‡™◊ËÕ¡µËÕÕÿª°√≥Ï¿“¬πÕ° „ÀÈ¥Ÿ¢ÈÕ¡Ÿ≈‡°’ˬ«°—∫Õÿª°√≥Ï¿“¬πÕ°·≈–Õ–·¥ª‡µÕ√Ï®“°§ŸË¡◊Õ∑’Ë„ÀÈ¡“¥È«¬

¢ÈÕ§«√√–«—ß

:


°ËÕπ®–‡™◊ËÕ¡µËÕ°—∫Õÿª°√≥Ï¿“¬πÕ° °√ÿ≥“µ√«® Õ∫„ÀÈ·πË„®«Ë“ªî¥‡§√◊ËÕßÕ¬ŸË

∑Ë“π “¡“√∂‡™◊ËÕ¡µËÕ Ë«πª√–°Õ∫ 

JVC

 µËÕ‰ªπ’ȇ¢È“°—∫™ËÕ߇ ’¬∫´’¥’‡™π‡®Õ√Ï

 Ë«πª√–°Õ∫

 JVC

™◊ËÕ√ÿËπ 

´’¥’‡™π‡®Õ√Ï


(CD-CH)

CH-X1500 

œ≈œ

 “¡“√∂‡™◊ËÕ¡µàÕÕÿª°√≥几√‘¡µàÕ‰ªπ’ȇ¢â“°—∫Õ–·¥ª‡µÕ√åµà“ßÊ À√◊Õ√–∫∫¢Õß 

JVC

 ‰¥â 


Õ“®µÈÕß´◊ÈÕ “¬‡™◊ËÕ¡µËյ˓ßÀ“°

 Ë«πª√–°Õ∫

Õ–·¥ª‡µÕ√å

/

√–∫∫ 

™◊ËÕ√ÿËπ

iPod

Õ‘π‡∑Õ√χø Õ–·¥ª‡µÕ√Ï ”À√—∫√ÿËπ 

iPod

KS-PD100

‡§√◊ËÕ߇≈Ëπ‡æ≈ß·∫∫æ°æ“ æ√ÈÕ¡¢—È«µËÕ 

Line Output


Õ–·¥ª‡µÕ√Ï 

Line Input

KS-U57

‡§√◊ËÕ߇≈Ëπ‡æ≈ß·∫∫æ°æ“ æ√ÈÕ¡™ËÕ߇ ’¬∫·∫∫ 

3.5 

¡¡.


Stereo Mini


Õ–·¥ª‡µÕ√Ï 

AUX Input

KS-U58

USB cable (approx. 1.2 m)

 “¬ 

USB


(

ª√–¡“≥ 

1.2 

‡¡µ√

)

USB device

Õÿª°√≥Ï


USB

C


Connecting the USB devices / 

°“√µËÕÕÿª°√≥Ï


USB

•  iPod is a trademark of Apple Inc., registered in the U.S. and other countries.
•  iPhone is a trademark of Apple Inc.

You can connect the iPod/iPhone to the USB terminal using the USB 2.0 cable (accessory of the iPod/
iPhone).
•  You cannot connect a computer to the USB (

) terminal of the unit.

 “¡“√∂µàÕ 

iPod/iPhone

 ‡¢â“°—∫¢—È«µàÕ 

USB

 ‚¥¬„™â “¬ 

USB 2.0

 ‰¥â 

(

Õÿª°√≥几√‘¡¢Õß 

iPod/iPhone) 

• 

∑Ë“π‰¡Ë “¡“√∂µËÕ‡§√◊ËÕߧա摫‡µÕ√Ï°—∫™ËÕßµËÕ


USB (

¢Õ߇§√◊ËÕ߉¥È


USB cable from the rear of the unit

 / 

 “¬ 

USB

 ®“°¥â“πÀ≈—ߢÕßµ—«‡§√◊ËÕß 

Apple iPod/iPhone
Apple iPod/iPhone

USB 2.0 cable

 “¬‡§‡∫‘≈

 USB 2.0

or / 

???TH????

Apple iPod/iPhone
Apple iPod/iPhone

USB 2.0 cable

 “¬‡§‡∫‘≈

 USB 2.0

USB device

Õÿª°√≥Ï


USB

or / 

À√◊Õ

or / 

À√◊Õ

USB input terminal on the control panel of the unit

 / 

¢—È«µàÕ 

USB

 ∫π·ºß§«∫§ÿ¡¢Õßµ—«‡§√◊ËÕß 

USB input terminal /

 ¢—È«µàÕ 

USB  

•  iPod


‡ªìπ‡§√◊ËÕßÀ¡“¬°“√§È“¢Õß


Apple Inc.


´÷Ëß®¥∑–‡∫’¬π°“√§È“„πª√–‡∑» À√—∞Õ‡¡√‘°“·≈–ª√–‡∑»Õ◊ËπÊ

•  iPhone 

‡ªìπ‡§√◊ËÕßÀ¡“¬°“√§â“¢Õß 

Apple Inc.


Connecting the microphone unit / 

°“√µàÕ™ÿ¥‰¡‚§√‚øπ 

Adjust the microphone angle

ª√—∫¡ÿ¡‰¡‚§√‚øπ 

Microphone

‰¡‚§√‚øπ 

Microphone clip

∑’ËÀπ’∫‰¡‚§√‚øπ 

Secure the microphone cord using cord cramps (not supplied) if necessary.

¬÷¥ “¬‰¡‚§√‚øπ‚¥¬„™â∑’Ë√—¥ “¬‰ø 

 ( 

‰¡à¡’„Àâ

)

 À“°®Ì“‡ªìπ 

1

2

D

Microphone clip

∑’ËÀπ’∫‰¡‚§√‚øπ 

or / 

À√◊Õ

THInstall2_KD-R805_006A_2.indd   4

THInstall2_KD-R805_006A_2.indd   4

2/12/09   2:09:33 PM

2/12/09   2:09:33 PM

Summary of Contents for KD-R805

Page 1: ...ENGLISH KD R805 CD RECEIVER KD R805 INSTRUCTIONS For canceling the display demonstration see page 4 For installation and connections refer to the separate manual ...

Page 2: ...ass 1M laser radiation when open Do not view directly with optical instruments 4 REPRODUCTION OF LABEL CAUTION LABEL PLACED OUTSIDE THE UNIT European Union only Warning If you need to operate the unit while driving be sure to look around carefully or you may be involved in a traffic accident For safety Do not raise the volume level too much as this will block outside sounds making driving dangerou...

Page 3: ...on then press to confirm the selection is used to indicate the available items settings operations in the SET UP menu Caution If the temperature inside the car is below 0 C the movement of animation and text scroll will be halted on the display to prevent the display from being blurred appears on the display When the temperature increases and the operating temperature is resumed these functions wi...

Page 4: ...2H hour then 24Hours or 12Hours To return to the previous menu press BACK To exit from the menu press DISP or MENU Changing the display information and pattern When the power is turned off Check the current clock time Ex When tuner is selected as the source Press and hold until the main menu is called up Repeat this procedure Audio level meter display see Level Meter on page 27 Source operation di...

Page 5: ...or the first time 14 Using the Bluetooth cellular phone 16 Using the Bluetooth audio player 18 EXTERNAL DEVICES Listening to the CD changer 19 Listening to the iPod iPhone 20 When connected with the USB input terminal 20 When connected with the interface adapter 21 Listening to the other external components 22 SETTINGS Selecting a preset sound mode 23 Menu operations 25 Creating your own color Use...

Page 6: ...M AM 4 CD 5 USB FRONT 5 iPod FRONT 5 BT FRONT 4 5 USB REAR 5 iPod REAR 5 BT REAR 4 5 CD CH 5 iPod 5 or EXT IN AUX IN 4 back to the beginning 4 Enter list operations Enter Menu setting Hold iPod FRONT iPod REAR Enter the main menu 5 Enter Call Menu screen Enter Quick Call preset method Hold See page 32 BT FRONT BT REAR Phone Answer incoming call End a call Hold 6 Loading slot 7 Display window 8 Eje...

Page 7: ...e same or equivalent type Battery shall not be exposed to excessive heat such as sunshine fire or the like If the effectiveness of the remote controller decreases replace the battery Before using the remote controller Aim the remote controller directly at the remote sensor on the unit DO NOT expose the remote sensor to bright light direct sunlight or artificial lighting Continuedonthenextpage r Re...

Page 8: ...e Answers calls if pressed briefly Rejects calls if pressed and held 7 Searches for stations if pressed briefly Fast forwards or reverses the track if pressed and held Changes the tracks if pressed briefly While listening to an iPod in menu selecting mode Connected with the interface adapter Selects an item if pressed briefly Then press D to confirm the selection Skips 10 items at a time if presse...

Page 9: ...s hard to receive activate monaural mode for better reception See also page 28 Tuner Stereo Mono Mono Reception improves but stereo effect will be lost The lights up on the display To restore the stereo effect repeat the same procedure to select Stereo Turn Press Storing stations in memory Automatic presetting FM SSM Strong station Sequential Memory You can preset up to 18 stations for FM 1 While ...

Page 10: ...reset number 4 3 Selecting preset station or Turn Press Prohibiting disc ejection To cancel the prohibition repeat the same procedure Disc operations 1 Turn on the power 2 Insert a disc All tracks will be played repeatedly until you change the source or eject the disc Stop playing and ejecting the disc No Disc appears Press SRC to listen to another playback source ...

Page 11: ... folders All Randomly plays all tracks To cancel repeat play or random play select Off To return to the previous menu press BACK Repeat Random Pressing or holding the following buttons allows you to Press Pause resume playback MP3 WMA Select folder Press Select track Hold Reverse fast forward track Selecting a track folder For MP3 WMA discs select the desired folder then the desired track by repea...

Page 12: ...1 Turn on the power 2 Connect a USB device All tracks will be played repeatedly until you change the source or disconnect a device USB memory If a USB device has been attached Playback starts from where it has been stopped previously If a different USB device is currently attached playback starts from the beginning Stop playing and detaching the USB device Straightly pull it out from the USB input...

Page 13: ...not work immediately after you turn on the power The detect time and response time may be very long for some USB devices such as Digital Audio Player HDD etc For more details about USB operations see pages 35 and 36 Using the Bluetooth devices Bluetooth is a short range wireless radio communication technology for the mobile device such as mobile phones portable PCs and other devices The Bluetooth ...

Page 14: ...one device for Bluetooth phone and one for Bluetooth audio can be connected at a time Turn Press Connecting a Bluetooth device for the first time Preparation Connect the supplied USB Bluetooth Adapter KS UBT1 to one of the USB input terminals of the unit Operate the device to turn on its Bluetooth function 1 Turn on the power 2 Connect the USB Bluetooth Adapter KS UBT1 Only one USB Bluetooth Adapt...

Page 15: ...de you have just entered for this unit Wait Pair appears then Pairing OK or Connected Device Name appears on the display when the connection is established Now you can use the device through the unit appears when Bluetooth connection is established Continuedonthenextpage Turn Press The device remains registered even after you disconnect the device Use Connect Phone or Connect Audio or activate Aut...

Page 16: ...32for Phonebook Select settings 3 Select the name phone number you want to call When the sound is stopped or interrupted during the use of a Bluetooth device turn off then turn on the unit If the sound is not yet restored connect the device again See Connecting a registered device on the left column How to enter phone number 1 Select a number Connecting a registered device 1 Select Connect Phone o...

Page 17: ...ing calls Switching conversation media the unit cellular phone During a phone call conversation Then continue your conversation using the other media Operations may be different according to the connected Bluetooth device 2 Move the entry position 3 Repeat steps 1 and 2 until you finish entering the phone number 4 Confirm the entry How to delete phone number Only when Manual Trans is selected for ...

Page 18: ...s Resume playback Press Pause playback Select group folder Press Reverse skip forward skip Hold Reverse search forward search Operationmaybedifferentaccordingtotheconnected device Selecting the playback modes You can use only one of the following playback modes at a time For Bluetooth devices that support AVRCP 1 3 1 Enter PLAYBACK MENU screen 2 3 Repeat Track Repeats current track All Repeats all...

Page 19: ...until the desired folder track is selected The selection always start from disc number first If another disc folder is selected playback starts from the 1st track of the selected disc folder Pressing or holding the following buttons allows you to MP3 Select folders Press Select track Hold Reverse fast forward track Selecting the playback modes 1 Enter PLAYBACK MENU screen 2 3 Repeat Track Repeats ...

Page 20: ...d iPhone devices are connected to both front and rear USB input terminals the unit only detects and charges the first connected device Disconnecting the iPod iPhone will stop playback Press SRC to listen to another playback source For details refer also to the manual supplied with your iPod iPhone Caution Avoid using the iPod iPhone if it might hinder your safety while driving Make sure all import...

Page 21: ...ble for some iPod Functionsonlyifyouselect All for Albums inthe mainmenu To return to the previous menu press BACK When connected with the interfaceadapter Preparation Make sure Changer is selected in the Source Select Ext Input setting see page 29 1 Select iPod Playback starts automatically 2 Select a song Selecting a track from the menu 1 Enter the main menu This mode will be canceled if no oper...

Page 22: ...ntrol panel Preparation Make sure Show is selected in the Source Select AUX Source setting see page 29 1 Select EXT IN or AUX IN 2 Turn on the connected component and start playing the source 3 Adjust the volume 4 Adjust the sound as you want see pages 23 and 24 Connecting an external component to the AUX input jack 3 5 mm stereo mini plug not supplied Portable audio player etc Pressing or holding...

Page 23: ...ader Bal balance Loud Volume Adjust settings or Turn Press Preset value setting for each sound mode Sound mode Preset value Low Mid High Freq Level Q Freq Level Q Freq Level Q User 50 Hz 00 Q1 0 1 0 kHz 00 Q1 0 10 0 kHz 00 Q1 0 Rock 100 Hz 03 Q1 0 1 0 kHz 00 Q1 0 10 0 kHz 02 Q1 4 Classic 100 Hz 01 Q1 0 1 0 kHz 00 Q1 0 10 0 kHz 03 Q1 4 Pops 100 Hz 02 Q1 0 1 0 kHz 01 Q1 0 10 0 kHz 02 Q1 4 Hip Hop 50...

Page 24: ... 1 Press 4 to adjust the frequency 2 Press 5 to adjust the level 3 Turn the control dial to adjust the Q slope Sound elements Range selectable items Low Mid High Frequency 50 Hz 100 Hz 200 Hz 0 5 kHz 1 0 kHz 2 0 kHz 5 0 kHz 10 0 kHz 15 0 kHz Level 6 to 6 6 to 6 6 to 6 Q Q0 7 Q1 0 Q1 4 Q2 0 Q0 7 Q1 0 Q1 4 Q2 0 Q0 7 Q1 0 Q1 4 Q2 0 5 Repeat steps 3 and 4 to adjust other frequency ranges 6 Store the a...

Page 25: ...ion is done for about 20 seconds 4 Cancels Clock Clock Display 1 On Off Clock time is shown on the display at all times when the power is turned off Cancels pressing DISP will show the clock time for about 5 seconds when the power is turned off Set Clock Adjust the hour then the minute 4 Initial 1 00AM 24H 12H 12Hours 24Hours Select the time display mode 4 EQ EQ Equalizer Select a preset sound mod...

Page 26: ...ad Bal 3 4 Fader Balance R6 F6 L6 R6 Fad fader Press 5 to adjust the front and rear speaker output balance Initial 0 Bal balance Press 4 to adjust the left and right speaker output balance Initial 0 Loud Loudness Loud1 Loud2 Loud3 Off Boost low and high frequencies to produce a well balanced sound at a low volume level Cancels Volume Adjust Level 5 Level 5 Initial Level 0 Preset the volume adjustm...

Page 27: ...ront rear speakers Beep Key touch tone On Off Activates the key touch tone Deactivates the key touch tone Amplifier Gain 5 High Power Low Power Vol 00 Vol 50 Vol 00 Vol 30 Select if the maximum power of each speaker is less than 50 W to prevent damaging the speaker Display Dimmer On Off Auto Time Set Dims the display and button illumination Cancels Dims the display when you turn on the headlights ...

Page 28: ...Contrast Level 01 Level 08 Adjust the display contrast to make the display indications clear and legible Initial Level 05 Bluetooth Device See pages 14 16 for settings Settings See pages 31 33 for settings Tuner IF Band Intermediate frequency band Auto Wide Increases the tuner selectivity to reduce interference noises between adjacent stations Stereo effect may be lost Subject to interference nois...

Page 29: ...e when a multiple drives device is connected to the USB input terminal FRONT REAR iPod 16 iPod Switch iPod iPhone control Headunit Mode iPod Mode Controls iPod playback through the unit Controls iPod playback through the iPod iPhone Audiobooks Speed control of Audiobooks Normal Faster Slower You can select the playback speed of the Audiobooks sound file in your iPod iPhone Initial selected item de...

Page 30: ...olor Color Select User 2 Enter User setting mode 3 Select Day Color or Night Color Turn Press Turn Press Ex When Day Color is selected 4 Select a primary color then adjust the level Repeat this procedure until you have adjust all the three primary colors If 00 is selected for all the primary colors nothing appear on the display 5 Confirm the settings 6 Exit from the setting Select User to show you...

Page 31: ...supplied USB Bluetooth Adapter KS UBT1 to one of the USB input terminals of the unit 1 Bluetooth Settings 2 Select a setting item Quick Call Ô Auto Connect Ô Auto Answer Ô Message Notice Ô MIC Setting Ô Ringing Tone Ô Phonebook Trans Ô Phonebook Select Ô Initialize Ô Information Ô back to the beginning IftheconnectedBluetoothphonedoesnotsupport TextMessagenotification viaBluetooth theunit willnotr...

Page 32: ...message by ringing and displaying Received Message The display illuminates in blue see Ring Color on page 26 Off The unit does not inform you of the arrival of a message MIC Setting Only for the device being connected for BT FRONT BT REAR Adjust the volume of the microphone connected to the unit Level 01 02 03 Ringing Tone You can preset the ringing source when a call Text Message comes in In Unit...

Page 33: ...aracter position 3 Repeat steps 1 and 2 until you finish entering the title 4 Store the title To erase the entire title In step 2 on the left column Available characters Upper case Lower case Numbers and symbols Title assignment Information JVC Device Name Shows the unit name JVC Address Shows address of USB Bluetooth Adapter JVC Software Ver Shows the software version Connected Phone Shows connec...

Page 34: ...dirty The files on the CD R CD RW are written using the Packet Write method There are improper recording conditions missing data etc or media conditions stained scratched warped etc Basic operations Turning on the power By pressing SRC on the unit you can also turn on the power If the source is ready playback also starts Turning off the power If you turn off the power while listening to a track pl...

Page 35: ...VBR have a discrepancy in the elapsed time display and do not show the actual elapsed time In particular this difference becomes noticeable after performing the search function This unit cannot play back the following files MP3 files encoded in MP3i and MP3 PRO format MP3 files encoded in an inappropriate format MP3 files encoded with Layer 1 2 WMA files encoded in lossless professional and voice ...

Page 36: ...ed some of the USB device connected through a USB card reader This unit may not play back files in a USB device properly when using a USB extension cord This unit cannot assure proper functions or supply power to all types of USB devices Bluetooth operations General While driving do not perform complicated operation such as dialing the numbers using phone book etc When you perform these operations...

Page 37: ...d classic iPod nano iPod nano 2nd Generation iPod nano 3rd Generation iPod nano 4th Generation 3 1 Itisnotpossibletobrowsevideofilesonthe Videos menu 2 iPod Mode isavailable seepage20 3 Itisnotpossibletochargethebatterythroughthis unit If the iPod does not play correctly please update your iPod software to the latest version For details about updating your iPod visit http www apple com When you tu...

Page 38: ...trademarks or trademarks of Microsoft Corporation in the United States and or other countries The Bluetooth word mark and logos are owned by the Bluetooth SIG Inc and any use of such marks by Victor Company of Japan Limited JVC is under license Other trademarks and trade names are those of their respective owners Made for iPod means that an electronic accessory has been designed to connect specifi...

Page 39: ...CD R CD RW cannot be skipped Insert a finalized CD R CD RW Finalize the CD R CD RW with the component which you used for recording Disc can neither be played back nor ejected No Eject appears on the display Unlock the disc see page 10 Eject the disc forcibly see page 3 Disc sound is sometimes interrupted Stop playback while driving on rough roads Change the disc Check the cords and connections Dis...

Page 40: ...not displayed e g album name This unit can only display letters capital A Z small a z numbers and a limited number of symbols see page 33 USB device Noise is generated The track played back is not an MP3 WMA WAV track Skip to another file Do not add the extension code mp3 wma or wav to non MP3 WMA WAV tracks Reading keeps flashing on the display Readout time varies depending on the USB device Do n...

Page 41: ...pears on the display search from the Bluetooth device again The unit does not make pairing with the Bluetooth device Enter the same PIN code for both the unit and target device Echo or noise occurs Adjust the microphone unit s position Phone sound quality is poor Reduce the distance between the unit and the Bluetooth cellular phone Move the car to a place where you can get a better signal receptio...

Page 42: ...on this unit or the iPod Playback stops The headphones are disconnected during playback Restart the playback operation Cannot Play appears on the display No tracks are stored Import tracks to the iPod Restricted appears on the display Check whether the connected iPod iPhone is compatible with this unit see page 37 Only when connecting with the interface adapter No Files appears on the display No t...

Page 43: ...he disc by the edges Do not touch its recording surface When storing a disc in its case gently insert the disc around the center holder with the printed surface facing up Make sure to store discs in cases after use Center holder To keep discs clean A dirty disc may not play correctly If a disc does become dirty wipe it with a soft cloth in a straight line from center to edge Do not use any solvent...

Page 44: ... Q2 0 Frequency Response 40 Hz to 20 000 Hz Signal to Noise Ratio 70 dB Line Out Level Impedance 2 5 V 20 kΩ load full scale Subwoofer Out Level Impedance 2 5 V 20 kΩ load full scale Output Impedance 1 kΩ Other Terminal USB input terminal USB cable AUX auxiliary input jack CD changer jack TUNER SECTION Frequency Range FM 87 5 MHz to 108 0 MHz AM 531 kHz to 1 602 kHz FM Tuner Usable Sensitivity 9 3...

Page 45: ...te Full Speed Full Speed Maximum 12 Mbps Low Speed Maximum 1 5 Mbps Compatible Device Mass storage class Compatible File System FAT 32 16 12 Playable Audio Format MP3 WMA WAV Max Current DC 5 V 500 mA BLUETOOTH Version Bluetooth 2 0 certified Power Class Class 2 Radio possible distance 10 m Service Area 10 m Profile HFP 1 5 OPP 1 1 A2DP 1 2 AVRCP 1 3 GENERAL Power Requirement Operating Voltage DC ...

Page 46: ...Having TROUBLE with operation Please reset your unit Refer to page of How to reset your unit ...

Page 47: ...an impedance of 4 Ω to 8 Ω If the maximum power is less than 50 W change Amplifier Gain setting to prevent the speakers from being damaged see page 27 of the INSTRUCTIONS To prevent short circuits cover the terminals of the UNUSED leads with insulating tape The heat sink becomes very hot after use Be careful not to touch it when removing this unit Heat sink ºËπ ÈÕπ K USB Bluetooth adapter Õÿª å Ÿ ...

Page 48: ...lace µ Õ Ë ß Ëπ π πµÏ µ µÈ ÀÈ Õ ÿµ πµÏÕÕ ËÕπ ô ßµ µíôß ËÕßπ ô ô π Ë 1 When you stand the unit be careful not to damage the fuse on the rear 2 Not supplied for this unit Flat head screws M5 8 mm 2 ŸÀ M5 8 2 Note When installing the unit on the mounting bracket make sure to use the 8 mm long screws If longer screws are used they could damage the unit À Àµ ËÕµ µ Èß ÿ ª Õ ß π Ëπ Õß È ÀÈ È Ÿ π 8 È È Ÿ ...

Page 49: ...ower cannot be turned on 3 Remote lead 4 Firmly attach the ground wire to the metallic body or to the chassis of the car to the place uncoated with paint if coated with paint remove the paint before attaching the wire Failure to do so may cause damage to the unit 5 Signal cord not supplied for this unit MIC microphone input terminal È µàÕ øπ see diagram Ÿ ºπ æ USB cable approx 1 2 m USB ª 1 2 µ se...

Page 50: ... È ËÕß π Õ Ï Ë πª Õ JVC ËÕ ÿËπ π Õ Ï CD CH CH X1500 œ œ ËÕ µàÕÕÿª å µàÕ ªπ È â Õ ª µÕ åµà ßÊ À Õ Õß JVC â Õ µÈÕß ÈÕ ËÕ µËÕµË ßÀ Ë πª Õ Õ ª µÕ å ËÕ ÿËπ iPod Õ π Õ Ï ø Õ ª µÕ Ï À ÿËπ iPod KS PD100 ËÕß Ëπ æ ß æ æ æ ÈÕ È µËÕ Line Output Õ ª µÕ Ï Line Input KS U57 ËÕß Ëπ æ ß æ æ æ ÈÕ ËÕß 3 5 Stereo Mini Õ ª µÕ Ï AUX Input KS U58 USB cable approx 1 2 m USB ª 1 2 µ USB device Õÿª Ï USB C Connecting the U...

Reviews: