background image

June 11, 2003 10:24 am

Page 17

— 17 —

Master Page: Right

TV Multi-brand Remote Control

Your remote control can operate the basic functions of your TV 
set. In addition to JVC TVs, other manufacturer's TVs can also be 
controlled.

A

Turn on TV

Turn on the TV using the Power button on the TV or its remote 
control.

B

Set TV brand code

A

Press and hold 

TV

.

B

Press the 

number keys

 to enter your unit’s brand code.

C

Press 

OK

, and release 

TV

. Check if the TV's power goes off as it 

should. If it does, try other operations (

 step 

2

).

Once you have set the remote control to operate the TV, you 
don't have to repeat this step until you replace your remote 
control's batteries. 

Some TV brands have more than one code. If the TV does not 
function with one code, try entering another.

C

Operate TV

First, press 

TV

 to set the remote control to TV mode, then press 

one of the following buttons: 

1

TV/VCR

TV PR +/–

^


(TV Muting), 

TV 

%

+/–

 (TV volume), and the 

number keys

.

For some brands, you must press 

OK

 after having pressed the 

number keys

 to enter a channel number.

IMPORTANT

Although the provided remote control unit is compatible with JVC 
televisions, as well as many other models, it may not work with 
your TV, or in some instances, may have limited function 
capability.  

Multi-brand Remote Control

For satellite receiver, cable box and DVD

Your remote control can operate the basic functions of your 
satellite receiver, cable box or DVD.

A

Turn on unit

Turn on the cable box, satellite receiver or DVD using the Power 
button on the unit or its remote control.

B

Set brand code

A

Press and hold 

CABLE/SAT/DVD

.

B

Press the 

number keys

 to enter your unit’s brand code.

C

Press 

OK

, and release 

CABLE/SAT/DVD

. Check if the unit's 

power goes off as it should. If it does, try other operations (


step 

2

).

Once you have set the remote control to operate the unit, you 
don't have to repeat this step until you replace your remote 
control's batteries. 

Some brands have more than one code. If the unit does not 
function with one code, try entering another. 

C

Operate unit

First, press 

CABLE/SAT/DVD

 to set the remote control to cable 

box, satellite receiver or DVD mode, then press one of the 
following buttons:

For satellite receiver and cable box . . .

1

TV PR +/–

number keys

.

For DVD. . .

1

4

8

9

5

3

w


e

 (

26

) keys.

For some brands, you must press 

OK

 after having pressed the 

number keys

 to enter a channel number.

To change the unit’s channels, press 

TV PR +/–

 or the 

number 

keys

. (The 

PR +/–

 button can be used to change the recorder’s 

channels only.)

IMPORTANT

Although the provided remote control unit is compatible with JVC 
satelite receiver and DVD, as well as many other models, it may 
not work with your unit, or in some instances, may have limited 
function capability. 

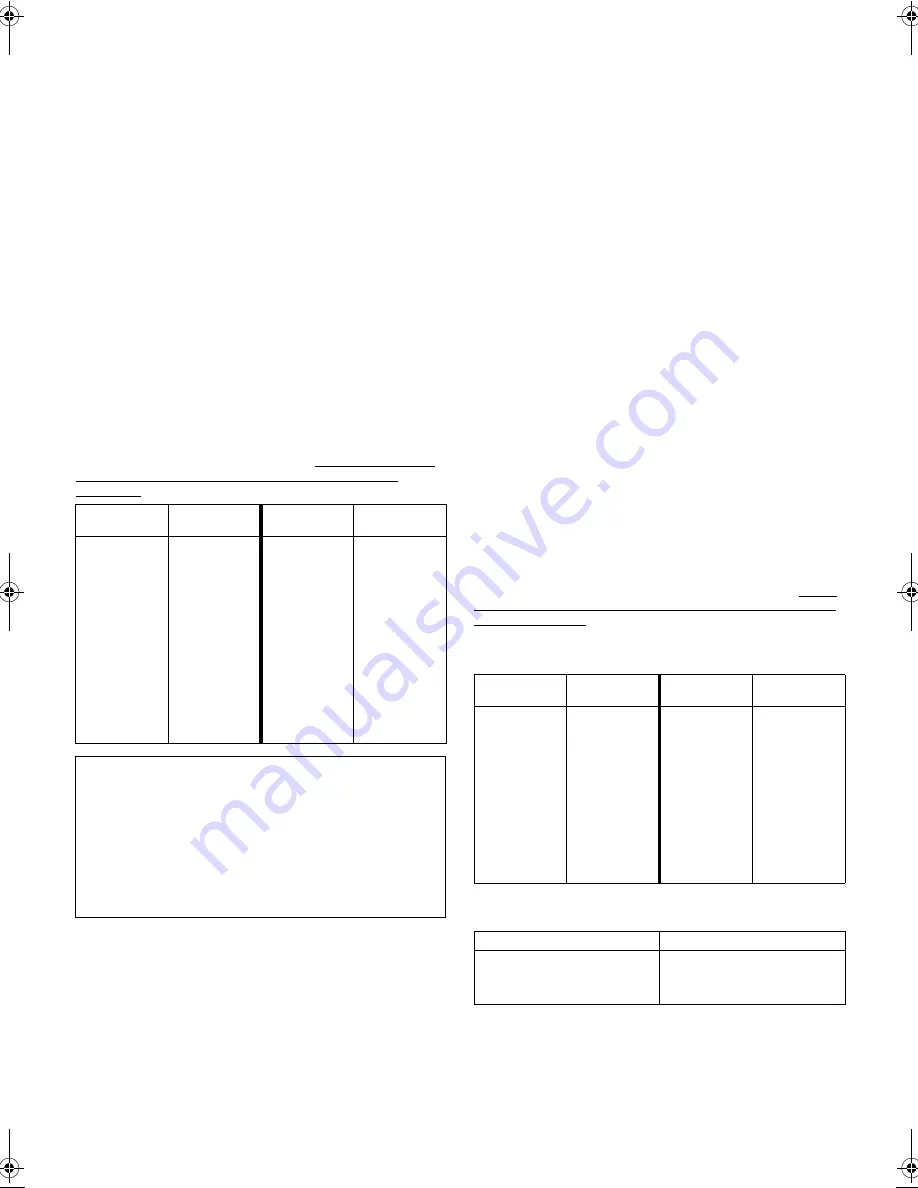
Cable Box or Satellite Receiver Multi-brand Code

DVD Multi-brand Code

TV BRAND 
NAME

CODE

TV BRAND 
NAME

CODE

JVC
AIWA
BEIJING
CCE 
CHANGHONG
DAEWOO
FERGUSON
FINLUX
FUNAI
GRADIENTE
GRUNDIG
HITACHI
ITT
JINXING
KONKA
LG/GOLDSTAR

01, 23, 24, 25
36
22
02
34
17, 37
27
30
32
15
19
10
28
38
40
18

MITSUBISHI
MIVER
NEC
NOBLEX
NOKIA
PANASONIC
PEONY
PHILICO
PHILIPS
SAMSUNG
SANYO
SHARP
SONY
TCL
THOMSON
TOSHIBA

03
29
20
22
31
04, 11
34, 38, 39
10, 17, 21
02, 42
12, 33, 34, 35
13, 16
06
07
41
26
08, 14

ATTENTION

The remote control can operate not only the video recorder but 
also some of your TV, cable box, satellite receiver and DVD.

To operate your video recorder, first press the 

VCR

 button to 

set the remote control to the Video mode.

To operate your TV, first press the 

TV

 button to set the remote 

control to the TV mode.

To operate your satellite receiver, cable box or DVD, first 
press the 

CABLE/SAT/DVD

 to set the remote control to the 

satellite receiver, cable box or DVD mode.

CABLE BOX 
BRAND NAME

CODE

CABLE BOX 
BRAND NAME

CODE

JVC
AMSTRAD
BT
CANAL+
CANAL SATELLITE
D-box
ECHOSTAR
FINLUX
GALAXIS
GRUNDIG
HIRSCHMANN
ITT
JERROLD

72, 73
60, 61, 62, 63, 92
72
81
81
85
51, 78, 79, 80, 82
68
69, 88
64, 65
64
68
01, 04, 06, 11,12, 
15, 28, 75

KATHREIN
LUXOR
MASPRO
NOKIA
PACE
PANASONIC
PFT
PHILIPS
PHONOTREND
SALORA
SKYMASTER
TPS
VIDEOWAY
WISI

70, 71
68
70
68, 87
67, 86, 92
13, 14, 74
69
66, 84
69
68
69
83
03, 09, 22, 76, 77
64

DVD BRAND NAME

CODE

JVC
PANASONIC
PHILIPS
TOSHIBA

55
58
56
57

HR-S5980AH.5980AJ_EN001B.fm  Page 17  Wednesday, June 11, 2003  10:24 AM

Summary of Contents for HR-S5980AH

Page 1: ...fied service personnel To prevent electric shock or fire hazard remove the power cord from the mains outlet prior to connecting or disconnecting any signal lead or aerial ATTENTION 1 This recorder can also receive SECAM colour television signals for recording and playback 2 Recordings made of SECAM television signals produce monochrome pictures if played back on another video recorder of SECAM sta...

Page 2: ... to the recorder during transport MOISTURE CONDENSATION Moisture in the air will condense on the recorder when you move it from a cold place to a warm place or under extremely humid conditions just as water droplets form on the surface of a glass filled with cold liquid Moisture condensation on the head drum will cause damage to the tape In conditions where condensation may occur keep the recorder...

Page 3: ... SEARCH STILL SLOW RECORD RECORD PAUSE AUDIO DUBBING AUDIO DUBBING PAUSE REVIEW SP 8 4 0 6 15dB NORM Cassette loading slot Display panel Timer indicator B E S T picture system display Audio level indicator Mode display L 1 F 1 S 1 or S 2 Channel display Clock display Infrared beam receiving window Instant REVIEW indicator Counter display Pause 9 Play 4 Record 7 S VIDEO S 2 VIDEO AUDIO input connec...

Page 4: ...nection allows you to make the most of the S VHS picture performance If your TV is equipped with a S video input connector A Perform RF Connection previously described B Connect the supplied S video cable between the S VIDEO OUT connector on the rear of the recorder and the S video input connector on the TV C Connect an audio cable between the AUDIO OUT connectors on the rear of the recorder and t...

Page 5: ...rt to place the pointer next to your desired language English or Chinese then press OK or PUSH JOG e The Clock Set screen appears B Set time Press PUSH JOG rt to set the time then press OK or PUSH JOG e Press and hold either button to delay or advance the time by 30 minutes C Set date Press PUSH JOG rt to set the date then press OK or PUSH JOG e Press and hold either button to change the date by 1...

Page 6: ...M and NTSC in Function settings 墌 15 If the cassette s record safety tab has been removed playback begins automatically 墌 8 If the record safety tab is intact the recorder check the tape information for Programme Navigation For details refer to Navigation 墌 14 B Start playback Press 4 Turn on the TV and select the VIDEO channel or AV mode Turn on the TV and select the VIDEO channel or AV mode MAIN...

Page 7: ...mes automatically and then stops C Stop playback Press 8 at any time to stop playback NOTES Pressing 4 3 5 or 9 also stops Repeat Playback Repeat Playback is not possible with a PAL tape recorded in EP mode Next function memory The Next Function Memory tells the recorder what to do after rewinding Before continuing ensure that the recorder is in the Stop mode a For Automatic Start Of Playback Afte...

Page 8: ...event accidental recording on a recorded cassette remove its safety tab To record on it later cover the hole with adhesive tape Basic Recording A Load a cassette Insert a cassette with the record safety tab intact The recorder power comes on automatically The recorder checks the tape information for Programme Navigation For details refer to Navigation 墌 14 Select the appropriate colour system 墌 15...

Page 9: ...g received will be displayed on the TV screen for a few seconds To listen to a stereo programme press AUDIO until a and s appears on the front display panel or HIFI L R appears on the screen To listen to a bilingual programme press AUDIO until a and s appears on the front display panel or HIFI L or HIFI R appears on the screen as required To listen to the Standard regular monaural audio while rece...

Page 10: ...xiliary channel L 1 or F 1 select L 1 or F 1 for the channel position to which the satellite receiver is connected Repeat steps 3 3 3 3 and 4 4 4 4 as necessary E Return to normal screen Press MENU on the remote control G CODETM SHOWVIEWTM Timer Programming With the G CODE system timer programming is greatly simplified because each TV programme has a corresponding code number which your recorder i...

Page 11: ...r DAILY number key 8 for daily serials Monday Friday Either WEEKLY or DAILY appears on the screen Pressing the button again makes the corresponding indication disappear You can programme this recorder to timer record as many as 8 programmes If you try to programme the recorder to record a ninth PROGRAM FULL appears on screen and FULL appears on the front display panel To record the extra programme...

Page 12: ...m overlap warning display does not appear even if some programs overlap each other In case of a power failure after programming the recorder s memory backup keeps your selections if the lithium battery is not exhausted Check cancel and replace programmes A Disengage timer mode Press then press 1 B Access Program Check screen Press C Access Program screen Press again to check more information Each ...

Page 13: ...ER is set to ON For timer programming of the satellite receiver refer to the instruction manual of the satellite receiver Auto Satellite Prog recording is not possible if your satellite receiver does not have a timer The REC LINK indicator blinks while Auto Satellite Prog recording is in progress Pressing the recorder s 1 button while Auto Satellite Prog recording is in progress turns off and reco...

Page 14: ...o the programme you want to edit B Access title edit screen Press the number key 1 The Title Edit screen appears C Enter programme title Press the number keys and PUSH JOG e to enter characters then press OK For details refer to Entering character on page 14 D Return to normal screen Press MENU Entering character Press the appropriate number key then press PUSH JOG e to enter each character Refer ...

Page 15: ... be recorded as MESECAM Select AUTO or MESECAM when recording SECAM signals When playing back a SECAM tape select AUTO or MESECAM The playback picture will always be monochrome 䡵 NTSC NTSC3 58 NTSC4 43 NTSC PAL This function is to record NTSC signals or playback a NTSC tape NTSC3 58 To record NTSC signals or playback a NTSC tape NTSC4 43 To record NTSC4 43 signals or playback a NTSC4 43 tape NTSC ...

Page 16: ...ee below You cannot activate the S VHS ET function while recording 墌 8 timer recording 墌 10 or Instant Timer Recording 墌 9 or the B E S T function 墌 see below is in progress The S VHS ET function does not work with S VHS cassettes To keep the highest quality recording and playback pictures over a long period of time S VHS recording on S VHS cassettes is recommended Use of high grade tapes is recom...

Page 17: ...nother C Operate unit First press CABLE SAT DVD to set the remote control to cable box satellite receiver or DVD mode then press one of the following buttons For satellite receiver and cable box 1 TV PR number keys For DVD 1 4 8 9 5 3 w e 26 keys For some brands you must press OK after having pressed the number keys to enter a channel number To change the unit s channels press TV PR or the number ...

Page 18: ... the Band Select screen appears again To set channels for other bands select another band and start Manual Channel Set again 墌 step 4 and 5 Delete a Channel A Access Tuner Set screen Perform steps 1 3 of Auto Channel Set on page 18 B Access Channel list Press PUSH JOG rt to place the pointer next to CH EDIT then press OK or PUSH JOG e C Select channel Press PUSH JOG rt until the channel you want t...

Page 19: ...ss OK or PUSH JOG e Repeat steps 3 and 4 as necessary E Return to normal screen Press MENU Editing from a camcorder NOTES All necessary cables can be obtained from your dealer You can also use another video recorder as the player instead of a camcorder When you select EDIT to dub tapes be sure to select AUTO or NORM when the B E S T function is set to OFF after you finish dubbing the tapes MENU EX...

Page 20: ...d L 1 for the rear panel VIDEO AUDIO input connectors or F 1 for the front panel VIDEO AUDIO input connectors C Select EDIT for picture control set mode Follow the Picture Control section on page 15 then select EDIT D Start source player Engage its Play mode E Set recording deck Engage its Record mode NOTES To edit both the player and the recorder must be of the same colour system Select the appro...

Page 21: ...nectors When using these connectors make sure to select the correct input mode in step 2 Audio dubbing cannot be performed on a cassette that has had its record safety tab removed When playing back an audio dubbed tape press AUDIO on the remote control to select the soundtrack you wish to hear 墌 8 Connecting Using a Stereo System These instructions enable you to connect your video recorder to your...

Page 22: ...olour signal and CCIR monochrome signal 625 lines 50 fields NTSC colour and EIA monochrome signals 525 lines 60 fields Recording system DA 4 Double Azimuth head helical scan system Signal to noise ratio 45 dB Horizontal resolution S VHS 400 lines VHS PAL MESECAM 250 lines VHS NTSC 220 lines Frequency range Normal audio 70 Hz to 10 000 Hz Hi Fi audio 20 Hz to 20 000 Hz Input Output RCA connectors I...

Page 23: ...nd there may be a loss of colour Information on Multi System Compatibility ATTENTION When this recorder is connected to a multi system TV the audio signal may not be heard or may be noisy if the colour system select switch of the TV is adjusted to the AUTO position In such a case set the TV s colour system select switch to the appropriate position which corresponds to the TV system you have select...

Page 24: ...recorded tape depending on the signal recorded PAL MESECAM NTSC 4 43 MHz NTSC 3 58 MHz PAL MESECAM SECAM NTSC SECAM PAL MESECAM NTSC 3 58 MHz NTSC 4 43 MHz PAL MESECAM NTSC Playback equipment HR S5980AH HR S5980AJ Recorded Tape Recording circuit Dubbed Tape ...

Page 25: ...not been correctly set If you re using the AV or S VIDEO connection the TV receiver is not set to the AV mode If you are using the RF OUT connection set the TV receiver to the VIDEO channel 墌 5 Perform Video Channel Set 墌 5 If you are using the AV or S VIDEO connection set the TV to its AV mode Noise appears during visual search This is normal Noise appears during normal playback The automatic tra...

Page 26: ...ecord Safety tab intact blinks for 10 seconds and the Timer mode is disengaged has been pressed when there are no programs in memory or the timer record information has been programmed incorrectly Check the programmed data and re program as necessary then press again The power shuts off and and won t stop blinking The end of the tape was reached during timer recording The programme may not have be...

Page 27: ... 27 Memo ...

Page 28: ... Registered Trademark owned by VICTOR COMPANY OF JAPAN LTD COPYRIGHT 2003 VICTOR COMPANY OF JAPAN LTD Printed in Malaysia 0603 AH PJ PJ EN HR S5980AH S5980AJ ...

Reviews: