background image

14

 EN

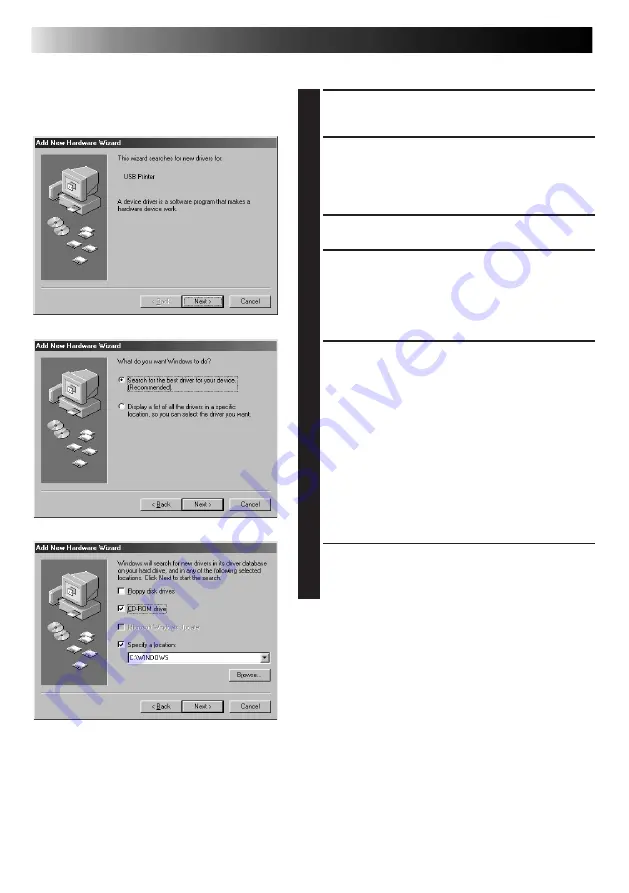
1

TURN ON THE POWER OF THE GV-
SP2

2

CONNECT THE GV-SP2 TO THE PC
USING THE USB CABLE

• Display the "Add New Hardware Wizard"

window.

3

LOAD THE CD-ROM

4

CLICK THE Next BUTTON

5

CLICK THE Next BUTTON

6

CONFIRM THAT "CD-ROM drive"
HAS BEEN CHECKED AND CLICK
THE Next BUTTON

INSTALLING THE SOFTWARE

Installing the USB Driver

Summary of Contents for GV-SP2

Page 1: ...GV SP2 DIGITAL SYSTEM PRINTER LYT0546 001A INSTRUCTIONS ENGLISH EN ...

Page 2: ... a while 3 To print again after the printer s power has been automatically turned off press the power button once and the power will come back on 4 To put the printer in power save mode back again repeat step 1 You are recommended to carefully read the cautions on page 3 before use When the equipment is installed in a cabinet or on a shelf make sure that it has sufficient space on all sides to all...

Page 3: ...nited Kingdom DO NOT cut off the mains plug from this equipment If the plug fitted is not suitable for the power points in your home or the cable is too short to reach a power point then obtain a proper safety approved extension lead adapter or consult your dealer BE SURE to replace the fuse only with an identical approved type as originally fitted and to replace the fuse cover If nonetheless the ...

Page 4: ...t switched on when it is unattended unless it is specifically stated that it is designed for unattended operation or has a standby mode Switch off using the switch on the equipment and make sure that your family knows how to do this Special arrangements may need to be made for infirm or handicapped people DON T use equipment such as personal stereos or radios so that you are distracted from the re...

Page 5: ... The thermal heads necessary for printing are located within the unit The heads can become extremely warm To prevent possible burns and injuries do not touch the thermal heads When the printer is used for extended periods the thermal heads experience wear and tear just like VCR heads As the thermal heads become worn print quality will gradually decrease When you notice a decline in quality it is p...

Page 6: ...TINGS ON THE PRINT DIALOG BOX 27 ERROR MESSAGES 28 SPECIFICATIONS 30 CONTENTS It should be noted that it may be unlawful to print from pre recorded tapes or discs without the consent of the owner of copyright in the video recording broadcast or cable program and in any literary dramatic musical or artistic work embodied therein PROVIDED ACCESSORIES Color Print Paper Sheet Set Standard Print Paper ...

Page 7: ...data Lights during printing 7 ERROR lamp Indicates that an error has occurred in the printer If this lamp lights or begins flashing check the message that is displayed on the video camera 8 Paper tray Insert papers here 9 Power cable Plugs into household electrical outlet Always press the STANDBY ON button and turn off power before unplugging the power plug from the electrical outlet 0 USB termina...

Page 8: ...d the tray page 9 Use the print sheets and ink cassette from the same kit 4 Connect an image source to the printer page 10 5 Plug the printer s power cable into an AC outlet and press the STANDBY ON button Power comes on and the STANDBY ON lamp lights This completes preparations Before printing thoroughly read the instruction manual for the connected video equipment and pages 13 through 27 of this...

Page 9: ... prints with the printed sides touching as the sheets may stick together Store print paper in its box on a level surface Failure to do so may cause the print paper to curl or bend which can result in a paper jam within the unit Before Printing Do not touch the printing side of the paper Insert the printing paper shiny side up the side with no printing on it in the paper tray A paper jam could resu...

Page 10: ...Do not turn the part marked with A 3 INSTALL INK CASSETTE Insert the ink cassette with the mark toward the left on the end going into the printer The mark points toward the power lamp Push it until you hear a click 4 CLOSE CASSETTE DOOR The door clicks when it is fully closed INSTALLATION OF INK CASSETTE A mark mark Ink sheet When removing ink cassette Push up the lock lever The ink cassette is un...

Page 11: ...o more than 25 sheets 3 Adjust partition panel B according to the paper size After inserting the paper push in C until it clicks into place NOTES Fan the paper to separate the individual sheets Be sure to thoroughly read the precautions listed on the paper tray Place the printing paper shiny side up the side with no printing on it in the paper tray A paper jam could result if the paper is inserted...

Page 12: ...nnector Refer to the instruction manual for the equipment when connecting it to the printer CABLE CONNECTION To printer output connector The 5 mark side facing up To PRINT DATA input connector AC adapter Printer The 3 mark side facing down Ferrite core Printer cable Plug the power cord into the AC outlet Carefully check the orientation of the 5 mark on the printer cable and connect it to the video...

Page 13: ... space If there is not enough space to lay the printer flat you may attach the printer vertically to the supplied stand USING THE STAND Attach so that holes A are aligned with parts B as shown Cover screw hole Front Stand surface A A B B ...

Page 14: ...as a pair of tweezers to grasp the paper and pull it out Be careful not to tear the paper In some cases the ink sheet will be adhering to the paper pull both out carefully If the ink sheet is stuck on the paper slowly peel the ink sheet from the paper and then slowly remove the ink cassette from the printer If the ink sheet is not damaged you can continue to use the ink cassette after taking up th...

Page 15: ... PC with Windows 98 installed 2 Be a USB compatible computer 3 Be warranted for USB operations by the computer manufacturer 4 Have 32 MB or more of RAM 256 color or better video and have an MMX 150 MHz or better CPU NOTE There are variations of the USB interface in various brands of personal computers Therefore JVC cannot guarantee that your computer will be compatible with this printer Windows 98...

Page 16: ... TO THE PC USING THE USB CABLE Display the Add New Hardware Wizard window 3 LOAD THE CD ROM 4 CLICK THE Next BUTTON 5 CLICK THE Next BUTTON 6 CONFIRM THAT CD ROM drive HAS BEEN CHECKED AND CLICK THE Next BUTTON INSTALLING THE SOFTWARE Installing the USB Driver ...

Page 17: ...EN 15 9 CLICK THE Next BUTTON ON THE Welcome WINDOW 10CLICK THE Finish BUTTON ON THE Setup Complete WINDOW 7 CLICK THE Next BUTTON 8 CLICK THE Finish BUTTON Installing the Printer Driver ...

Page 18: ...ble Check that the ink cassette is installed in the printer See page 8 You can tell the print status using the lamps on the printer Load the print paper Load the print paper in the paper tray and attach to the printer See page 9 Print the job The PRINT lamp will flash and the job will begin printing Create the data to be printed Create the data to be printed using application software ...

Page 19: ... the image file you want to print 3 MAKE PRINTER SETTINGS Selecting File Print will cause the Print window to appear Select JVC GV SP2 under the printer name item Various printer settings can be changed on the printer s setup window See page 18 4 PRINT THE IMAGE Click the OK button on the Print window Printing an Image Add text and process using commercially available software and then print ...

Page 20: ... and right reversed in the image being printed PRINTER DRIVER SETTINGS Printer driver settings are divided into several menus dialog boxes This section gives a brief description of these menus and the items found on them 6 Details This tab is used to select the port to which data is to be printed and the driver to be used It is also used to make spool settings 7 Color Management These settings let...

Page 21: ...ent Make this adjustment when the color appears darker or lighter in the printout than it does displayed on the screen Adjust the brightness of the entire image using the bar With 0 as the default this value can be adjusted between 100 to 100 Negative values result in a darker image while positive ones result in a brighter image This setting is effective when dealing with images that are too dark ...

Page 22: ... following driver TO JVC GV SP2 3 CLICKING ON Spool Settings WILL DISPLAY THE PRINTER S SPOOL SETTINGS SELECT Enable bi directional support for this printer IF YOU CANNOT PRINT Check the following if you cannot print Preparations Select My Computer Printers right click on JVC GV SP2 and select Properties 1 2 3 ...

Page 23: ...the instruction manual can be found in the file about GV SP2 on the harddisk Please read this file before installing the accompanying software For the latest information regarding this software please visit our website at http www jvc victor co jp PC PRINTER EDITION for Macintosh ...

Page 24: ...rademark of Apple Computer Connecting the USB Cable Attach the supplied ferrite core to the USB cable See below NOTE Check that the terminal of the USB cable matches that of the connected video hardware and connect The Ferrite Core When using an optional USB cable be sure to attach the ferrite core to the cable Use of the ferrite core reduces the noise that occurs when connecting the PC Stoppers 3...

Page 25: ...ICK Install IN THE Installer DIALOG BOX 7 CLICK Restart TO RESTART THE Macintosh Installation is complete when the GV SP2 Printer is displayed on the Chooser window on the Apple menu Installing the Software For details on the basic operation of the Macintosh please refer to the instruction manual supplied with the computer Preparations Start the Macintosh INSTALLING THE SOFTWARE Exit from any othe...

Page 26: ... ink cassette is installed in the printer See page 8 You can tell the print status using the lamps on the printer Print the job The PRINT lamp will flash and the job will begin printing PRINTING UNDER Macintosh Select the GV SP2 using the selector Make paper settings and create the data to be printed Make paper settings and create the data to be printed using application software ...

Page 27: ...Setup will cause the page setup window to appear Make settings for items such as the paper size etc See page 26 Selecting File Print will cause the print window to appear This window is for setting information such as the number of print copies and other options and can be used to adjust the image quality See page 27 4 PRINT THE IMAGE Click the Print button on the print window Printing an Image Ad...

Page 28: ...on ratio to be used during printing can be set Note however that the settable range for the reduction ratio may differ depending on the paper size and application software being used 3 Orientation Selects the page orientation Landscape Portrait 4 Multi image Select how many times you want the same scene to appear on a single page 1 image 4 images or 16 images 5 Mirror Image Select when you want to...

Page 29: ...justment when differences in brightness for the entire image are not clearly defined or when the image appears fuzzier in the printout than it does displayed on the screen Adjust the contrast of the entire image using the bar With 0 as the default this value can be adjusted between 100 to 100 Increasing the contrast makes the bright areas appear brighter and the dark areas appear darker while decr...

Page 30: ...te with a new one v This message appears when the paper size set on the PC does not match the type of ink cassette being used m Check that the paper size set on the PC matches the ink cassette v This message appears when a damaged ink cassette is inserted m Replace with a new ink cassette v This message appears if the paper size set on the PC does not match the printing paper m Check that the pape...

Page 31: ...has become impossible due to a faulty USB cable connection or for some other reason while sending an image to the printer m Check the USB cable connection and try printing again m To stop printing while printing is in progress click Stop v This message is displayed when the memory capacity of the PC is insufficient m Add more memory or close any other applications that may be running currently v T...

Page 32: ...m x 125 9 mm BORDER ON Standard Paper 80 sec Super Fine High Grade paper 105 sec PRINT DATA Input connector USB connector 5 C 35 C 35 80 20 C 60 C Level horizontal 5 262 W x 79 H x 253 5 D mm Approx 2 2 kg including paper tray Power Power consumption Print format Print quality Resolution Resolution Print medium Print speed Transmission and processing of video data is not included Connectors Operat...

Page 33: ...EN 31 MEMO ...

Page 34: ...32EN MEMO ...

Page 35: ...EN 33 MEMO ...

Page 36: ...GV SP2 COPYRIGHT 2000 VICTOR COMPANY OF JAPAN LTD E EK Printed in Japan 0300TYV ID VP EN VICTOR COMPANY OF JAPAN LIMITED ...

Reviews: