background image


13

Video Capture
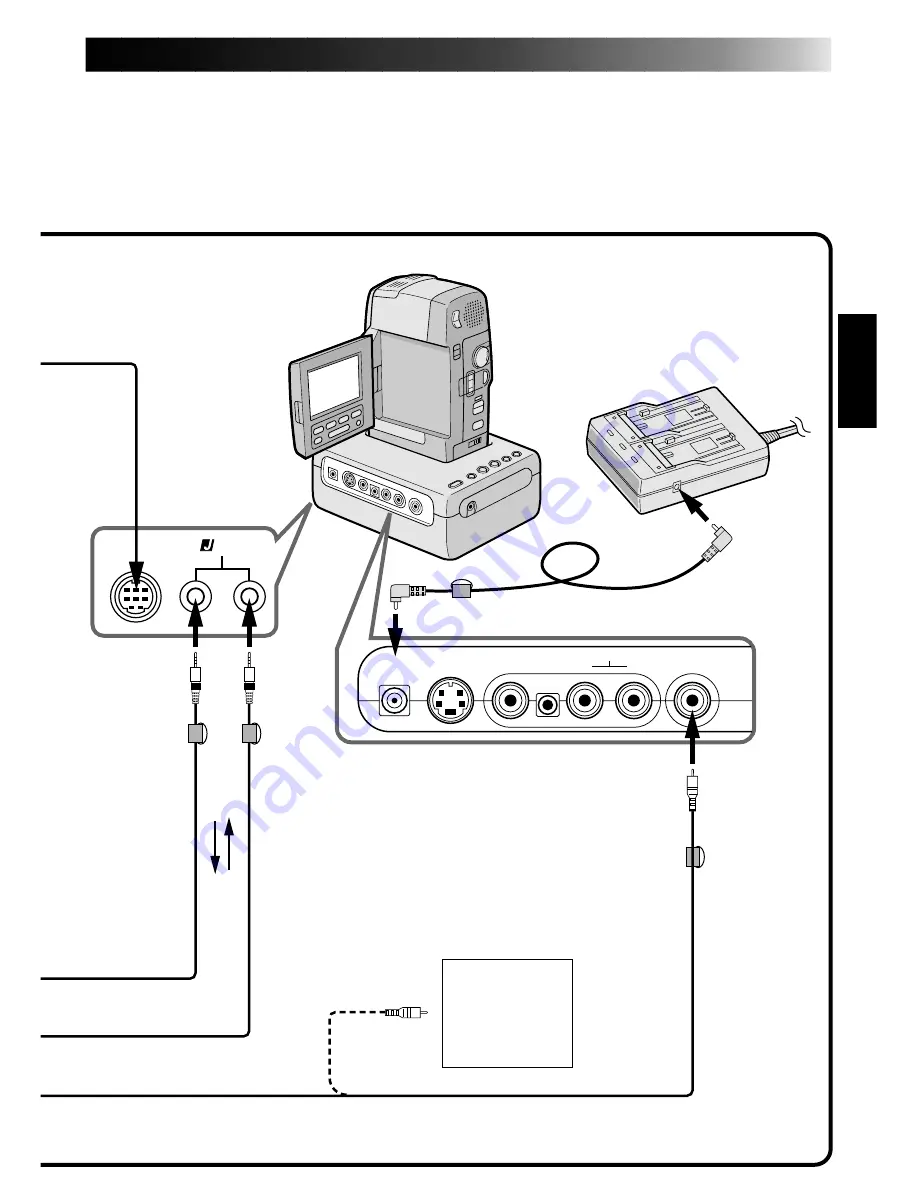
Docking Station

Digital
Camcorder

Core
filter

DC cable

Core filter

To DC
output
jack

Other units
with video
output jack

To JLIP
jack

3.5 mm diameter 4-
pole 
 cables (pro-
vided)

AC Adapter/Charger (optional)
AA-V80U

VIDEO cable (provided)

Core filter

To CAPTURE
INPUT
(EXT.)/
PRINTER
connector

JLIP

Summary of Contents for GV-DS1

Page 1: ...E A CAPTURE VIDEO JLIP ESTACION DE ANCLAJE DE CAPTURA DE VIDEO JLIP ENGLISH FRANÇAIS ESPAÑOL ENGLISH FRANÇAIS ESPAÑOL For Customer Use Enter below the Serial No of the GV DS1U JLIP VIDEO CAPTURE DOCKING STATION The serial number is located on the bottom of the JLIP VIDEO CAPTURE DOCKING STATION Model No GV DS1U Serial No ...

Page 2: ...se the AA V80U AC Adapter Charger optional or provided with the camcorder Declaration of Conformity Model Number GV DS1U Trade Name JVC Responsible party US JVC CORP Address 41 Slater Drive Elmwood Park N J 07407 Telephone Number 201 794 3900 This device complies with Part 15 of FCC Rules Operation is subject to the following two conditions 1 This device may not cause harmful interference and 2 th...

Page 3: ...nding or Polarization Your product may be equipped with a polarized alternating current line plug a plug having one blade wider than the other This plug will fit into the power outlet only one way This is a safety feature If you are unable to insert the plug fully into the outlet try reversing the plug If the plug should still fail to fit contact your electrician to replace your obsolete outlet Do...

Page 4: ...ing amplifiers that produce heat SERVICING 1 Servicing If your product is not operating correctly or exhibits a marked change in performance and you are unable to restore normal operation by following the detailed procedure in its operating instructions do not attempt to service it yourself as opening or removing covers may expose you to dangerous voltage or other hazards Refer all servicing to qu...

Page 5: ...a problem occurs contact your JVC dealer Failure to heed the following precautions may result in damage to the VIDEO CAPTURE DOCKING STATION 1 DO NOT place the VIDEO CAPTURE DOCKING STATION in an environment prone to extreme temperatures or humidity in direct sunlight in a dusty environment in an environment where strong magnetic fields are generated on a surface that is unstable or subject to vib...

Page 6: ...nvironment Keep it away from direct sunlight MAINTENANCE If the inside of the VIDEO CAPTURE DOCKING STATION is left in a dusty environment for a long time its use can lead to fire or malfunction Consult your JVC dealer on cleaning CAUTION Changes or modifications not approved by JVC could void user s authority to operate the equipment The Readme TXT file provides additional information for setup a...

Page 7: ...ing to PC Data Sharing With JLIP Player Soft ware Data can be imported from the JLIP Player Software Data from the Video Capture Software can also be exported to the Player Software for Program Playback or Assemble Editing JLIP Player Software Z pg 41 65 JLIP Control Facility With a JLIP compatible camcorder VCR or video printer GV PT1 GV PT2 all basic video operations can be executed on the compu...

Page 8: ...nits 18 HOW TO CLOSE THE PROGRAM 19 HOW THE DESKTOP WORKS 20 Main desktop window 20 Menu bar 21 VIDEO CAPTURE 24 Capturing video images 24 Step by step capture 25 Automatic capture 26 Program capture 26 Interval capture 28 PICTURE FORMAT SETTING 29 Selecting a picture format 29 ADDITIONAL OPERATIONS 30 Counter value change 30 Counter reset 30 Delete index image and full image 31 Change ID 31 SAVE ...

Page 9: ...OVIE PLAYER WINDOW BUTTONS AND DISPLAYS 48 BASIC OPERATIONS 50 VIDEO PRINTER WINDOW BUTTONS AND DISPLAYS 56 VIDEO PRINTER OPERATION GV PT1 58 Printing 58 Adjusting picture equalization 59 VIDEO PRINTER OPERATION GV PT2 60 Auto capture 60 ADVANCED OPERATIONS 62 Changing ID number 62 Connecting other device during operation 62 Changing the name of the device 63 Changing the device to use while conne...

Page 10: ...ed from video can be incorpo rated into business documents to spice up your presentations Create title indexes for your video collection Title index images can be captured from your favorite recordings in intervals of 30 minutes 1 hour 1 5 hours etc using the Interval Capture mode Print the captured index images on your PC printer using the compu ter s Print Screen facility then attach them to you...

Page 11: ...tputs the S VIDEO signal Also compatible with S1 and S2 connectors DC input jack Z p 13 Remote control sensor Receives the remote control signals for the attached Camcorder Edit jack Capture input EXT printer connector Z p 13 Connect with the video output stored image output of the optional video printer Even when a TV is not connected to the video printer this connection allows you to see the ima...

Page 12: ...he provided cables be sure to connect the terminals equipped with Core filters to the Video Capture Docking Station n When using the Video Capture Docking Station use the AA V80U AC Adapter Charger optional or provided with the camcorder Core filter PC connection cable provided To COM RS 232C port To Digital 8 pin connector Personal computer VCR Recording deck Image sources with JLIP and video out...

Page 13: ... Core filter DC cable Core filter To DC output jack Other units with video output jack To JLIP jack 3 5 mm diameter 4 pole cables pro vided AC Adapter Charger optional AA V80U VIDEO cable provided Core filter To CAPTURE INPUT EXT PRINTER connector JLIP ...

Page 14: ...MicrosoftT WindowsT 3 1 or WindowsT 95 CPU Intel DX4 or higher processor Minimum RAM requirement more than 8 MB Available Hard Disk space of at least 8 MB Colour display capable of at least 640 x 480 pixels 256 colours Recommended 1024 x 768 16 77 Mil colours 1 free serial transmission port compatible with 9600 bps transmission rate connectable to RS 232C with 9 pin serial connector Recommended co...

Page 15: ...pears on the screen JLIP Video Capture Setup was com pleted successfully appears 5 Click OK to complete installation WINDOWST 3 1 Refer to the WindowsT 3 1 manual of or your computer manual for details on basic WindowsT 3 1 operating procedures Installation Procedure To start the setup program 1 Launch WindowsT 3 1 Close any other applications that are running 2 Insert the JLIP Video Capture CD RO...

Page 16: ...sure to load the disk on which the image is stored Close any programs that are running You cannot run other programs simultaneously with the Video Capture software With WindowsT 3 1 open the group of application icons in the Program Manager and double click the application icon you want to launch With WindowsT 95 click the START button on the taskbar and the Program menu appears on the screen Move...

Page 17: ...COM Port COM1 through COM4 ports are available Check to see which COM port is connected to the JLIP Video Capture Docking Station and select it 4 Select Transfer Rate Normally select 38400 38400 may not be available on some computers When transmission errors take place during use switch to 19200 or 9600 Image data transmission will be slower at these speeds 5 Click OK The JLIP Initialization windo...

Page 18: ...in use Only one VCR and one Video Capture device can be selected 8 Click OK The main desktop window returns setting complete INITIALIZATION NOTE The Device Selection window automatically appears when JLIP initialization is complete However if you want to select equipment whose JLIP initialization has already been carried out select Device Change from Set up in the menu bar to call up the Device Se...

Page 19: ...f you try to close the program with no image saved the message The album has not been saved Save appears Please note that if you close without saving all unsaved captured data will be deleted 1Click Exit from File in the menu bar The program closes File New Album Open Album Save Album Open JLIP jlp File Save As JLIP jlp File Save Image As Exit Ctrl S Ctrl A ...

Page 20: ...rce JLIP button Z pages 41 through 65 The JLIP Video Capture software and JLIP Player software cannot run simultaneously When you want to run the JLIP Player software press this button to disable the JLIP Video Capture software You may then start the JLIP Player software To resume using the JLIP Video Capture software first select Close Serial from File on the JLIP Player Software s menu bar then ...

Page 21: ...ries are invalid depending on the program status Invalid commands appear lighter than valid commands File Edit Set up Window Help JLIP Video Capture New Album Open Album Save Album Open JLIP jlp File Save As JLIP jlp File Save Image As Exit Ctrl S Ctrl A INPUT MEMORY 02 00 02 17 21 03 00 07 01 19 04 00 37 05 06 Hatched like this when the counter time has been changed Z p 30 Index numbers are autom...

Page 22: ...or drive Z p 33 Closes the program Z p 19 An index image of the image data in the Video Capture Docking Station memory is transferred to your computer and displayed in the selected image box in the Step by Step capture mode The video source unit scans the selected counter value and transfers the index image to your computer in the automatic capture mode Z p 30 A full image of the image data in the...

Page 23: ...window appears to allow the computer to control the VCR VCR operation window VCR models operable on the VCR Operation Window compatible with JLIP 00 01 23 12F I VCR Capture Transfer Counter display PLAY button Forward Slow button PAUSE button STOP button REW Reverse Search button FF Forward Search button VCR POWER button Reverse Slow button Capture button Transfer button Help Contents About JLIP V...

Page 24: ... like Index image with a resolution of 80 x 60 pixels Full image with a resolution of 640 x 480 pixels 2 types of full size images Bitmap format Approx 900 kB JPEG format Approx 50 kB When storing images on a 2HD disk One image saved in the bitmap data format can be stored on one disk About 28 images saved in the JPEG format can be stored on one disk This is the case when using floppy disks format...

Page 25: ...press the CAPTURE button the full image 640 x 480 pixels is captured into the Video Capture module s memory The index image 80 x 60 pixels is simultaneously transferred to the computer 3 Index image data is transferred to the computer The message No 1 index image being transferred appears during data transfer 4 The message Transfer the full image appears Click Yes and the full image 640 x 480 pixe...

Page 26: ...ick Image Format from the Set up menu and select Field Picture in the Capture Mode Z p 29 1 From the menu bar click Set up Capture Mode Automatic The Automatic Transfer window appears 2 Select image to be transferred When you select Index Image only the index image 80 x 60 pixels is transferred to your computer When you select Index Full Image both the index image 80 x 60 pixels and full image 640...

Page 27: ...ecessary 8 Click Transfer button If you want to capture the full image 640 x 480 pixels after capturing the Index Image in step 2 click Index Full Image and then click the Trans fer button 1 The message Index No 1 being scanned appears while the video source unit is scanning the picture to be captured 2 The message No 1 index image being transferred appears and then No 1 full image being transferr...

Page 28: ...button at the desired image to start the capture function 1 The message No 1 index image being transferred appears while the index image is being transferred to the computer 2 When you select Index Full Image in step 2 the message No 1 full image being transferred appears while the full image is being transferred to the computer 3 The message Index No 2 being scanned appears while the video tape i...

Page 29: ...Group is a leading standard defining the compression and decompression of still color pictures The size of transferred image is smaller because the images are compressed This results in a shorter transfer time Bitmap 9 bmp Transfer time is longer when you use this format because there is no data compression The benefit is that picture quality is maintained with no deterioration Bitmap is a data fo...

Page 30: ...Change Counter Reset 1 Click the image display box of the index number you want to change The box is bordered in green 2 Open the menu bar and click Edit Modify The Modify Capture Point window appears 3 Enter a new counter value 4 Click OK The index image is surrounded by a hatching pattern indicating that a change is being made The counter value is changed to the value you just entered 5 Open the...

Page 31: ...maining index display box You can still run the program without re arranging the index 02 00 02 17 21 Edit Transfer the Index Image Transfer the Full Image Modify Delete Del Window Arrange Index VCR CHANGE ID You can change the Video Capture Unit s ID number 1 Open the menu bar and click Set up ID Change ID Change window appears 2 Enter a new ID number 3 Click OK This completes the ID number chang...

Page 32: ...e display area page 21 1 Open the menu bar and click File Save Album The Save Album window appears 2 Type the folder name and title You can save without entering any title 3 Click OK The file is saved OK c capture index001 c capture c Folder Title Untitled Cancel Save Album Enter folder name Enter title name Select directory Select drive File Save Image As Exit Ctrl S Ctrl A New Album Open Album S...

Page 33: ...tcards to newsletters and Internet homepages SAVE THE FULL IMAGE DATA 1 Click the image display box of the Index No to be saved The image display box is framed in green 2 Click File Save Image As on the menu bar The Save Image As Index No window appears 3 Click the name of the desired folder directory in the Select Directory box and enter the file name When saving the data to floppy disk enter the...

Page 34: ...LIP jlp File window is displayed 2 Double click the name of the desired folder directory in the Select Directory box If the data is stored on a floppy disk enter the drive name 3 Click on the file name to select it 4 Click OK The computer monitor displays Scene No counter number at Edit in Point and a blank image box 5 Open the menu bar and click Set up Capture Mode Automatic 6 Select the data you...

Page 35: ...ve As JLIP jlp File The Save As JLIP jlp File window is displayed 2 Enter the folder name directory and file name If you want to store the data on a floppy disk enter the drive name 3 Click OK The data converted to a JLIP Player software file is stored on the floppy disk in the selected drive JLIP Player software files can be used for video program editing or printed with the video printer Z p 58 ...

Page 36: ... to check the images on the computer v When video equipment is connected to the CAPTURE EXT IN PRINTER connector its video is displayed on the LCD screen of the GR DVM1 v The counter display in the VCR operation window turns blue v Is your video unit compatible with JLIP Only JLIP compatible units can be operated If you are using a JLIP compatible unit and it still won t work check to make sure th...

Page 37: ...e point where the recording begins v If you want to erase the file because of limited hard disk space start the program once then close it The video remaining in the JCPT folder will be cleared v Make sure that the IRQ Interrupt ReQuest is not being used by another device v COM port selection is wrong Confirm the COM port number and execute JLIP initialization again v In this case video capture is...

Page 38: ...nd turn off all units Replace batteries with new ones No Select when transfer is about to end Replace batteries when transfer is complete Since data may not have been transferred correctly check the data after replacing the batteries v Video unit is brought to STOP or ends playback during automatic capture m Check the auto capture setting v Full image data 640 x 480 pixels cannot be captured if yo...

Page 39: ...turn the Capture Docking Station off and then on again Images stored in memory will be lost m Do not use any other application while JLIP Video Capture and JLIP player are running as it may interfere with communication Do not click and move the mouse during data transfer v If your computer s energy saver battery voltage indication or screen saver is engaged the image data transmission may be inter...

Page 40: ...40 MEMO ...

Page 41: ...on for setup and information that is not included in the instruction manual Please read the file before installing the provided software program q You can find the latest information in English on the provided software program at our world wide web server at http www jvc victor co jp ...

Page 42: ...s possible to use the remote control unit provided with the GR DVM1 Also refer to the GR DVM1 s instructions on connection and operation with your brand of VCR NOTE Some VCR brands or models cannot be operated When connected with the Video Printer PC To COM port RS 232C PC connection cable provided Core Filter To digital connector 8 pin 3 5 mm diameter 4 pole cable provided S Video cable To video ...

Page 43: ... jack Core Filter Connect to TV To remote pause jack TV Connect to TV JVC Video unit Recording deck EDIT cable provided Connect this if the video unit has an S input jack 3 5 mm diameter 4 pole cable provided AC Power Adapter Charger optional Connect this if the video unit has a JLIP connector To S Video output jack To video output jack DC cord Video cable Core Filter n When using the Video Captur...

Page 44: ...free serial transmission port compatible with 9600 bps transmission rate connectable to RS 232C with 9 pin serial connector Recommended compatible with UART 16550A Mouse WindowsT compatible CD ROM drive Note An optional 9 pin serial conversion adapter is required for computers using serial communication port other than standard 9 pin MicrosoftT and WindowsT are either registered trademarks or trad...

Page 45: ...on appears on the screen MOVIE PLAYER Setup was completed successfully appears 5 Click OK to complete installation WINDOWST 3 1 Refer to the WindowsT 3 1 manual of or your computer manual for details on basic WindowsT 3 1 operating procedures Installation Procedure To start the setup program 1 Launch WindowsT 3 1 Close any other applications that are running 2 Insert the VIDEO MOVIE PLAYER CD ROM ...

Page 46: ...he device s on and set the camcorder s Power Dial to PLAY 2 ACCESS MOVIE PLAYER Double click the MOVIE PLAYER icon and the Serial Port Selection dialog box appears 3 SELECT SERIAL PORT Select the port number of the connector you are using to connect the computer to the Video Capture Docking Station If the connector number is A B A corresponds to 1 Click OK If the connection is correct the Device S...

Page 47: ...l COM ports are occupied by other applications the error message Error This application will close Check devices Confirm that power is ON appears Free a serial COM port to start up JLIP Player Software 4 SELECT DEVICE S Click on the name of the device you wish to control Clicking OK brings up the MOVIE PLAYER window It is possible to select a second device of a different type simultaneously but it...

Page 48: ...econds When minutes increase frames 00 and 01 frames are dropped and time count starts with frame 02 If minutes are multiples of 10 0 10 20 and 30 etc time count starts with frame 00 Time data for hours minutes seconds and frames 1 second approx 30 frames are recorded on the tape the moment that shooting starts 5 POWER button Control menu box Menu bar 1 COUNTER system 2 Tape counter display 3 ID n...

Page 49: ...otal elapsed time of all the programmed scenes 10 Camcorder s operation buttons Operate the camcorder To start Reverse Forward Slow motion Search first click the Pause button and then the Reverse Forward Slow button Functions your camcorder does not have cannot be performed by the above buttons Click File Open VCR Control Window on menubar to call up the VCR Control window You can control the vide...

Page 50: ...viously registered CUT IN OUT points slightly and try setting them again When connecting to a VHS C camcorder rewind the tape to its beginning and press COUNTER RESET on the camcorder The counters of DV format digital camcorders cannot be reset Operating camcorder 1 PREPARE CAMCORDER Set the camcorder s Power Dial to PLAY and insert a recorded tape into the camcorder 2 PLAYBACK ON TV MONITOR Click...

Page 51: ...hlighted 2 START PLAYBACK Click SCENE The camcorder searches the scene by going to a point prior to the CUT IN point and starts playback at the CUT IN point Playback stops after the CUT OUT point is passed MOVIE PLAYER FILE POWER PROGRAM PLAYBACK COUNTER Non Drop MEMO ID SCENE CUT IN CUT OUT STOP SCENE ELAPSED TIME ÀÀÀ 00 10 04 28F IN OUT OFF ON MODE STILL PLAY SEARCH SLOW FF REW 00 01 25 17F 06 0...

Page 52: ...g do no operation other than pressing STOP If other opera tions are done a malfunction may occur 3 STOP EDITING Stop the recording deck NOTES Also refer to the camcorder s instruction manual on dubbing There may be small margin between the CUT IN OUT points you input and the dubbed scenes ones Dubbing is impossible if the JLIP connector of the camcorder also serves as an Edit jack MOVIE PLAYER FIL...

Page 53: ...FLOPPY DISK DRIVE Click Ä in DRIVE 2 OPEN SUBDIRECTORY Click tape in the DIRECTORY 3 SAVE FILE Click OK NOTE If the MOVIE PLAYER window is closed before saving the file the file will not be saved So save the file before closing the MOVIE PLAYER window if you wish to keep it MOVIE PLAYER FILE POWER PROGRAM PLAYBACK COUNTER Drop MEMO ID SCENE CUT IN CUT OUT START SCENE ELAPSED TIME 00 10 04 28F IN O...

Page 54: ...ppear in the FILE NAME field Click on the file name you want and it appears in the field above 3 DETERMINE FILE NAME Click OK and the file will be read The MOVIE PLAYER window returns Open a program list FILE NAME MEMO DIRECTORY travel jlp CANCEL OK DRIVE c travel jlp c jlip tape Europe Tour Correcting the program counter data 1 DESIGNATE SCENE Double click on the scene you want to modify OR Click...

Page 55: ...erwrite it appears To overwrite the file click on OK MOVIE PLAYER FILE POWER PROGRAM PLAYBACK COUNTER Drop MEMO ID SCENE CUT IN CUT OUT START SCENE ELAPSED TIME 00 13 08 12F IN OUT OFF ON MODE STILL PLAY SEARCH SLOW FF REW 00 27 10 21F 06 File Video Printer Help Edit Modify Cut All Clear Copy Paste Set Function Ctrl E Ctrl X Del Ctrl C Ctrl V Edit 00 05 55 12F 00 12 10 12F 00 23 22 10F 00 10 37 12...

Page 56: ...E SPEED HIGH LOW À À 16 4 OFF STROBE SELECTED SAME MULTI PIX CONTENT Aperture Off OFF ON Title bar 9 STORE button 10 PRINT EQ equalization button 11 SELECT scene select button 12 CLOSE button 1 POWER button 2 POSITION button 3 ID number 8 PIX STABILIZER button 7 STROBE SPEED button 6 CONTENT button 5 MULTI PIX button 4 Message display Icon button ...

Page 57: ... Strobe Print mode the GV PT1 stores scenes at intervals of approximately 1 4 second and the GV PT2 at intervals of approximately 1 15 second LOW When printing in the Strobe Print mode scenes are stored at intervals of approximately 1 2 second 8 PIX STABILIZER button ON If the scene you want to print is jittery select ON to stabilize it OFF Usually set to OFF 9 STORE button Stores scenes and title...

Page 58: ...nt The selected scene is stored in memory and appears on the TV monitor 4 PRINT Insert print paper into the video printer and print Also refer to the video printer s instruction manual The following print styles are also available Printing the same scene 4 or 16 times on one sheet Multi Print Printing various scenes on the same print sheet Multi Print Printing a scene within a scene Inset Print St...

Page 59: ...FILE The MOVIE PLAYER window closes Quitting the Video Printer window 1 CLICK CLOSE The Video Printer window closes Move the indicator by clicking the button There are five BRIGHTENESS settings from 2 to 2 factory preset 0 Darken the image Brighten the image CONTRAST ON Automatically provides optimum light and shades when printing factory preset ON OFF Prints the stored scene with no adjustment AP...

Page 60: ...control unit provided with the GV PT2 To Print Captured Video Data with Video Printer Captured video data can be automatically scanned and printed You can print OFF 4 or 16 images on one sheet VIDEO PRINTER OPERATION GV PT2 cont Auto Capture 1 Select Video Printer Set up in the MOVIE PLAYER window Video Printer window appears 2 Select the number of scenes OFF 4 16 and select SAME or SELECTED for t...

Page 61: ...ext scene is automatically searched and stored in the video printer 6 Click PRINT to start printing NOTES To print only the cut in scene on the edited tape 1 Perform editing refer to pages 50 through 52 2 Print follow steps 1 through 5 above Select Auto Capture in step 4 Click START in step 5 The cut in point of Scene No 1 is automatically searched and stored in the video printer You cannot start ...

Page 62: ...ew ID number appears 3 ENTER NEW ID NUMBER 4 SET ID NUMBER Click OK The message The device ID will be changed appears Clicking OK again sets that ID number and brings up the MOVIE PLAYER window NOTES After step 4 perform the following Connecting other device during operation Do not enter ID number 0 because JLIP Player Software does not recognize ID 0 1 INITIALIZE Choose Initialize from File on th...

Page 63: ... of the device appears 3 ENTER NEW NAME 4 SET NEW NAME Click OK The message Device name will be changed appears Clicking OK again sets that device name and brings up the Name Change dialog box 5 RETURN TO MOVIE PLAYER WINDOW Click CLOSE Name Change Select the device to change 06 VCRCAMERA VCR VIDEO PRINTER CHANGE CHANGE CLOSE Name Change CANCEL OK VCRCAMERA 1 06 Enter new name up to 20 letters Cha...

Page 64: ...OFF ON MODE STILL PLAY SEARCH SLOW FF REW 00 00 01 20F 06 01 02 03 00 01 30 12F 00 07 15 21F 00 15 50 11F 00 03 27 14F 00 10 40 18F 00 20 33 10F File Video Printer Help Edit travel Europe Tour New Open Save Save As ID Change Device Change Name Change Pause Time Open VCR Control Window Close Serial Initialize Counter Reset Exit Ctrl N Ctrl O Ctrl S Ctrl A File Pause Time Correction OK CANCEL Type i...

Page 65: ... 42 43 m If device was turned off and on again during operation click OK All devices should function properly v The line where the name of the device to use appears is not clicked m Click on it and OK Z pg 47 v The video cassette is not loaded in the camcorder When the video cassette is removed during operation this message appears m Insert the video cassette into the camcorder v The value of the ...

Page 66: ...tput connector Audio Output 8 dB 1 kiloohm pin jack JLIP x 2 3 5 mm dia 4 pole mini head jack compatible with EIAJ RC 5325 plug Digital Mini DIN 8 pin Multi connector 34 pin Editing connector 3 5 mm dia 2 pole DC output 5 V DC Captured image sizes 640 x 480 pixels 80 x 60 pixels Operating temperatures 5 to 30 C Dimensions 113W x 61H x 145D mm Weight Approx 395 g Power supply 6 3 V DC E O E Design ...

Page 67: ...Z pg 21 29 48 Full image data Z pg 21 H Help Menu Z pg 23 49 I Index image Z pg 21 26 28 Index image data Z pg 21 Initialize Z pg 17 31 46 Input button Z pg 20 Install Z pg 15 45 Interval Capture Z pg 28 IRQ Z pg 37 J JPEG Z pg 29 M Main Window Z pg 20 Memory button Z pg 20 Menu bar Z pg 20 48 O Open JLIP jlp File Z pg 34 Open Album Z pg 33 Operate VCR Z pg 23 49 P Picture Format Z pg 29 Program C...

Page 68: ...1997 VICTOR COMPANY OF JAPAN LTD JVC COMPANY OF AMERICA DIVISION OF US JVC CORP 41 Slater Drive Elmwood Park N J 07407 JVC CANADA INC 21 Finchdene Square Scarborough Ontario M1X 1A7 U U C Printed in Japan 0397MKV UN YP ...

Reviews: