background image

1

ENGLISH

COPYING

S

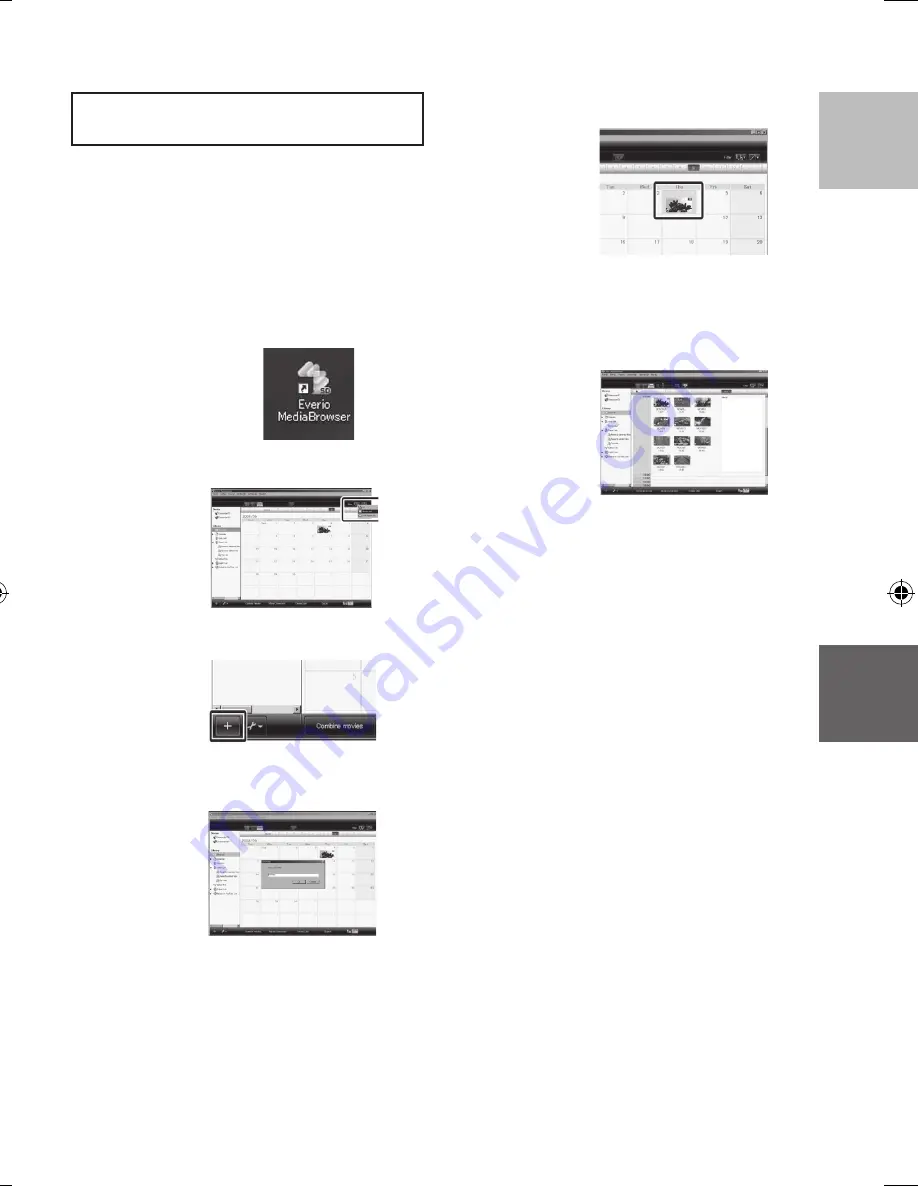
  Making User Lists to Arrange the 

Files

You can make a user list of a certain subject

(such as Travel, Athletic meet) and put the files

related to the subject into the user list.

Preparation:

Make backup on the PC.

1

Double-Click the icon and open the 

calendar.

2

Select [Movies only].

3

Click [+].

4

Input the name of the new user list 

and click [OK].

5

Double-click the recording date.

The files recorded on the day are 

displayed.

6

Drag the file and drop into the user 

list.

To add other files into the user list, repeat 

steps 

5

 and 

6

.

GZ-MS120US_IB_EN.indb   31

4/14/2009   2:06:19 PM

Summary of Contents for Everio GZ-MS120

Page 1: ...nes contenidas en las páginas 2 y 3 para garantizar un uso seguro de este producto Para futuras consultas Escriba a continuación el número de modelo situado en la base de la cámara digital con memoria y el número de serie situado en el compartimiento de la batería de la cámara digital Número de modelo Número de serie INSTRUCTIONS MANUAL DE INSTRUCCIONES LYT1994 001B M EN Please read the instructio...

Page 2: ...he ventilation holes If the ventilation holes are blocked by a newspaper or cloth etc the heat may not be able to get out No naked flame sources such as lighted candles should be placed on the apparatus When discarding batteries environmental problems must be considered and the local rules or laws governing the disposal of these batteries must be followed strictly The apparatus shall not be expose...

Page 3: ...wer supply cord or plug is damaged liquid has been spilled or objects have fallen into the apparatus the apparatus has been exposed to rain or moisture does not operate normally or has been dropped Remember that this camcorder is intended for private consumer use only Any commercial use without proper permission is prohibited Even if you record an event such as a show performance or exhibition for...

Page 4: ...rformance can not be guaranteed Do not remove the AC adapter the battery pack or the SD card when the lamp is blinking Insert the SD Card B A Slot B Slot A Firmly insert the card 1 Insert and remove the SD card only while the power is turned off Otherwise data on the card may be corrupted 2 Format an SD card when using it for the first time Press Power button to turn off the camcorder Grip Adjustm...

Page 5: ...in for at least 2 seconds Touch the sensors with your finger The sensors do not function if you touch them with your finger nail or with gloves on QUIT SET THE CITY DATE AND TIME CLOCK SETTING AREA SETTING SET FOR DAYLIGHT SAVING TIME CLOCK ADJUST Select the city closest to the area where you use the camcorder T AREA SETTING SET QUIT GMT JAN 1 2009 01 00AM Select ON or OFF U Select ON if daylight ...

Page 6: ... switch to select video mode Q 0 0 4 0 1 4 h 59 m REC The mode changes when you press the button Press the START STOP button to start recording and press it again to stop Start recording S Remaining space on the SD Card Record standby Video Quality Recording Select recording mode R REC The auto recording indicator appears ...

Page 7: ...ct Touch OK S J K 0 00 42 NOV 1 2009 04 55AM Q K J L Playback screen LTo perform operations such as forward search or reverse search Z p 22 LTo view files on TV Z p 25 Do not forget to make copies after recording To copy files onto DVD discs Z p 29 To dub files using a VCR DVD recorder Z p 34 To play back a created DVD disc Z p 28 To edit files on your computer Z p 29 CAUTION ...

Page 8: ...3 Manual Recording 24 Changing to Manual Recording Mode 24 Backlight Compensation 24 Manual Setting in Menu 24 USING WITH TV Watching Images on TV 25 Connecting with TV 25 Playback Operation 25 EDITING Managing Files 26 Capturing a Still Image from a Video 26 Deleting Files 26 COPYING Copying Files 27 Using a DVD Burner 27 Creating a DVD using a PC 29 Dubbing Files to VCR DVD Recorder 34 Using wit...

Page 9: ...ies Be sure to use the JVC BN VF808U VF815U VF823U battery packs If the camcorder is subjected to electrostatic discharge turn off the power before using it again If a malfunction occurs stop using the camcorder immediately and contact www jvc com or by phone at 1 800 252 5722 Recorded data may be erased while the camcorder is being repaired or inspected Back up all data before requesting repairs ...

Page 10: ... use any other cables AP V14U is not mentioned in the GUIDEBOOK in the supplied CD ROM Attaching the Core Filter The core filter reduces interference caused when connecting to other devices Connect the end of the cable with the core filter to the camcorder Release the stopper 3 cm 1 3 16 To be connected to the camcorder Wind twice USB cable Wind Once AC Adapter Wind twice ...

Page 11: ...hole with the tripod stud and the mounting socket with the screw and then rotate the camcorder clockwise to mount it to the tripod NOTE Do not use a tripod on unsteady or unlevel surfaces It could tip over causing serious damage to the camcorder Bottom of the camcorder ...

Page 12: ...12 Index DC D C DC B A NOTE The LCD monitor can rotate 270 Be careful not to cover 4 5 and 6 during shooting GETTING STARTED ...

Page 13: ...NFO Button Z p 21 SD Card Slot EXPORT Button Z p 35 AV Connector Z p 25 34 START STOP Button Z p 19 SNAPSHOT Button Z p 20 0 Zoom Lever W 7 T Z p 21 Speaker Volume Control VOL Z p 22 1 Speaker 2 DC Connector 3 USB Connector 2 Z p 27 30 4 Lens 5 LED Light Z p 21 6 Stereo Microphone 7 Grip Strap 8 Belt Strap 9 Fasten Stud Hole Tripod Mounting Socket Battery Release Button BATT Z p 16 ...

Page 14: ...ht Compensation Indicator Z p 24 1 Brightness Control Indicator Photometry Area Control Indicator 2 Shutter Speed During Video Recording Only Mode Indicator Export Mode Indicator Counter Upload Mode Indicator Video Quality B ULTRA FINE C FINE D NORMAL E ECONOMY Remaining Time MREC Appears during recording MQ Appears during record standby mode Digital Image Stabilizer DIS Indicator Appears when DIS...

Page 15: ...FINE D NORMAL E ECONOMY Counter Playback Mode F Playback Q Pause K Forward Search J Reverse Search G Forward Slow Motion E Reverse Slow Motion The number on the left shows speed Battery Indicator Date Time Z p 16 Volume Level Indicator During Still Image Playback 4 55 PM NOV 1 2009 Mode Indicator Folder File Number Slide Show Playback Indicator Battery Indicator Date Time Z p 16 ...

Page 16: ... 2 hr 45 min BN VF815U 2 hr 40 min 5 hr 25 min BN VF823U 3 hr 40 min 8 hr 10 min LTo detach the battery pack NOTE You can also use the camcorder with just the AC adapter The actual recording time may shorten depending on the recording environment such as when recording scenes with fast moving Please do not pull or bend the AC adapter plug and cable This may damage the AC adapter Necessary Settings...

Page 17: ...T NOV 1 2009 04 55PM 7 Select ON if daylight saving time is effective SET QUIT SET DAYLIGHT SAVING TIME NOV 1 2009 04 55 PM SET FOR DAYLIGHT SAVING TIME DAYLIGHT SAVING TIME DST OFF 8 Set the date and time Select the item by using the touch sensor and select to set SAVE QUIT CLOCK SETTING GMT 5 00 DATE TIME PM 04 55 1 2009 NOV 9 Select SAVE To reset the setting select QUIT Setting the clock to loc...

Page 18: ...er 2 Firmly insert the card with its clipped edge first 3 Close the SD card cover LTo remove an SD card Push the SD card once After the card comes out a little pull it out NOTE Insert and remove the SD card only while the power is turned off Otherwise data on the card may be corrupted Do not touch the terminal on the reverse side of the label R Change the recording medium The camcorder is programm...

Page 19: ...ing mode is automatically selected when you turn the camcorder s power off and then on again If the camcorder is not operated for 5 minutes while the power is on it turns itself off automatically to conserve power To turn the camcorder on again when using the battery pack close the LCD monitor and open it again When using the AC adapter perform any operation such as zooming After recording video f...

Page 20: ...tabilizer does not function during still image recording If the camcorder is not operated for 5 minutes while the power is on it turns itself off automatically to conserve power To turn on the camcorder again when using the battery pack close the LCD monitor and open it again When using the AC adapter perform any operation such as zooming LTo view the last recorded image Select A after shooting Se...

Page 21: ...sufficient light conditions OFF Deactivates this function Checking the Remaining Battery Power Preparation Attach the battery pack Select the recording mode mode Press INFO three times or INFO and then select mode Press INFO INFO DIRECT DVD BATTERY CONDITION MAX TIME min 100 50 0 QUIT LTo quit the screen Select QUIT or press INFO NOTE The recordable time display should only be used as a guide It i...

Page 22: ...hen playback is stopped LTo change the number of thumbnails Move the zoom lever to T or W Slide the mode switch to select video mode LOperations during Video Playback On screen buttons N Return to the first scene of the file O Go to the first scene of the next file L Return to the index scene J Reverse search during playback E Frame by frame playback in reverse direction during pause F Playback Q ...

Page 23: ...CK NOV 01 2009 04 55PM 1 2 LOperations during Still Image Playback On screen buttons P Change playback order of slide show in reverse direction F Change playback order of slide show in forward direction L Return to the index screen N Display the previous file F Start the slide show Q End the slide show O Display the next file LTo move to the previous or next page Touch or for over a second LTo del...

Page 24: ...not displayed Change the setting when the LCD monitor is in the normal position Manual Setting in Menu In the manual recording mode 1 Touch MENU 2 Select MANUAL SETTING VIDEO LIGHT VIDEO QUALITY REGISTER EVENT SET QUIT USE DETAIL SETTINGS BASED M MANUAL SETTING n D B 1 3 Select the desired menu VIDEO SCENE SELECT SHUTTER SPEED FOCUS SET QUIT THE BRIGHTNESS OF THE ADJUST BRIGHTNESS 9 1 4 Select the...

Page 25: ...tion Turn off all units Playback Operation After the connection with TV is completed 1 Turn on the camcorder and the TV 2 Set the TV to its VIDEO mode 3 Only when connecting the camcorder to the VCR DVD recorder Turn on the VCD DVD recorder and set the VCR DVD recorder to its AUX input mode 4 Start playback on the camcorder Z p 22 23 LTo display the camcorder s on screen display on TV Set DISPLAY ...

Page 26: ...n 16 9 or 640 x 480 if the video was recorded in 4 3 The image can be elongated in the horizontal or vertical directions depending on the quality of the source video file The continuous shooting function cannot be used to capture images You cannot capture video during playback Deleting Files Protected files cannot be deleted To delete them release the protection first Once files are deleted they c...

Page 27: ...recorded on the disc up until that time Dual layer discs cannot be used Regarding finalization after copying The disc is automatically finalized so that it can be played on other devices After finalizing the disc is a play only disc so no more files can be added Connection with a DVD Burner Preparation Turn on the camcorder first then turn on the DVD burner NOTE Refer also to the optional DVD burn...

Page 28: ...ED appears touch OK When INSERT NEXT DISC PRESS STOP TO EXIT CREATE appears change the disc Remaining files are copied on the second disc To cancel copying select STOP Copying Video Files that Have Never Been Copied Files that have never been copied to the DVD discs are automatically selected and copied 1 Open the LCD monitor to turn on the camcorder 2 Press DIRECT DVD INFO DIRECT DVD 3 Select EXE...

Page 29: ...ntel Pentium M 1 4 GHz or higher Intel Core Duo 1 5 GHz or higher RAM At least 512 MB LTo check the PC specification Right click on Computer or My Computer in the Start menu and select Properties NOTE Make sure your PC has a recordable DVD drive If your system does not meet the requirements it is recommended to copy files using the DVD burner Macintosh users may use the software included with thei...

Page 30: ...IDEO STILL BACK UP Everio MediaBrowser starts on the PC 3 Click All volume in camcorder and click Next 4 Click Start Backup starts LTo disconnect the camcorder from the PC 1 Right click the icon Safety Remove Hardware on the task bar and select Safely remove USB Mass Storage Device 2 Follow the on screen instructions and make sure that the device can be safely removed 3 Disconnect the USB cable an...

Page 31: ... subject into the user list Preparation Make backup on the PC 1 Double Click the icon and open the calendar 2 Select Movies only 3 Click 4 Input the name of the new user list and click OK 5 Double click the recording date The files recorded on the day are displayed 6 Drag the file and drop into the user list To add other files into the user list repeat steps 5 and 6 ...

Page 32: ...s displayed then go to step 4 3 Drag the file and drop into the part at the bottom and click Next 4 Input the disc name select the top menu style and click Next 5 Click Start NOTE For detail on operating Everio MediaBrowser click Help and refer to MediaBrowser Help Adobe Reader must be installed to read MediaBrowser Help Adobe Reader can be loaded from Adobe s web site http www adobe com For assis...

Page 33: ...r country refer to the JVC Worldwide Service Network at http www jvc victor co jp english worldmap index e html about this software please have the following information ready Product Name Model Problem Error Message PC Manufacturer Model Desktop Laptop CPU OS Memory MB Available Hard Disk Space GB Please note that it may take some time to respond to your questions depending on their subject matte...

Page 34: ...conds at the first and the last scene 4 At the point you want to start dubbing start recording on the VCR DVD recorder Refer to the VCR DVD recorder s instruction manual L To stop dubbing Stop recording on the VCR DVD recorder then press START STOP again L To hide the date or icons on the screen Change the settings in DISPLAY ON TV Dubbing Files to a VCR DVD Recorder Preparation Create a playlist ...

Page 35: ... Press EXPORT EXPORT 2 Select the file and select EXPORT SETTINGS LIB LIB LIB DONE CHECK 1 3 To check the content of the file select CHECK 3 Select DONE L To cancel the export setting Select the file and press LIB again L To quit the screen 1 Select DONE 2 Select YES Transferring the Files to PC Preparation Install iTunes on a PC http www apple com itunes 1 Connect the camcorder to the PC with the...

Page 36: ...remaining time is displayed on the LCD monitor NOTE The upload mode turns off each time recording is finished Uploading Files For details on uploading fi les refer to the operation guide of MediaBrowser in the CD ROM 1 Connect the camcorder to the PC with the USB cable 2 Select UPLOAD USB MENU CREATE DVD UPLOAD EXPORT TO LIBRARY SET QUIT EASY UPLOAD TO VIDEO PLAYBACK ON PC L Cannot upload the file...

Page 37: ... a long time The battery heats up during charging When playing back a video the image stops momentarily or the sound is interrupted at junctions between scenes LCD monitor momentarily become red or black when sunlight is recorded Black spots or red green or blue spots appear on the LCD monitor The LCD monitor contains 99 99 effective pixels but 0 01 of fewer pixels may be ineffective Trouble Actio...

Page 38: ...such as video in the camcorder it takes time for the camcorder to respond It is recommended that you copy all files from the camcorder onto your computer and erase the files from the camcorder The lamp does not flash during battery pack charging Check the remaining battery pack charge When the battery pack is fully charged the lamp does not flash When recharging in either a hot or cold environment...

Page 39: ...ELETION ERROR MEMORY CARD ERROR Turn off the camcorder and turn it on again Remove and re insert the SD card MultiMediaCard cannot be used Remove any dirt from the SD card terminals Insert the SD card before switching the power on If the problem persists backup all data and then perform formatting All data is deleted CANNOT TAKE MORE STILL IMAGES AT THE MOMENT Stop video recording and then record ...

Page 40: ...nally measured LCD panel TFT active matrix system LED Light Within 1 5 m recommended shooting distance LConnectors AV output Video output 1 0 V p p 75 Ω Audio output 300 mV rms 1 kΩ USB Mini USB type A and type B USB 2 0 compliant LAC adapter Power requirement AC 110 V to 240 Vd 50 Hz 60 Hz Output DC 11 V 1 A LStill image Format JPEG Image size 1 mode 832 x 624 Image quality 2 modes FINE STANDARD ...

Page 41: ... GB 32 GB 4 3 832 x 624 FINE 970 1950 3950 7590 9999 9999 9999 9999 832 x 624 STANDARD 1450 2920 5930 9999 9999 9999 9999 9999 640 x 480 FINE 1450 2920 5930 9999 9999 9999 9999 9999 640 x 480 STANDARD 2080 4180 8480 9999 9999 9999 9999 9999 16 9 640 x 360 FINE 1820 3660 7420 9999 9999 9999 9999 9999 640 x 360 STANDARD 2420 4880 9890 9999 9999 9999 9999 9999 The recordable time and the number of st...

Page 42: ...tures can prevent complete charging store in a cool dry place Extended exposure to high temperatures will increase natural discharge and shorten service life fully charge and then fully discharge the battery every 6 months when storing the battery pack over a long period time remove from charger or powered unit when not in use as some machines use current even when switched off ATTENTION The batte...

Page 43: ...rely When using the camcorder with a tripod attach the camcorder to the tripod securely If the camcorder drops you may be injured and the camcorder may be damaged When a child uses the unit there must be parental guidance Declaration of Conformity Model Number GZ MS120AU BU RU Trade Name JVC Responsible party JVC AMERICAS CORP Address 1700 Valley Road Wayne N J 07470 Telephone Number 973 317 5000 ...

Page 44: ...rary Mode 35 F Finalize 27 I iTunes 35 L Language Setting 17 LCD Monitor 14 42 LED Light 21 M Manual Recording 24 Menu Settings 37 N Number of Images 41 O On screen Recording Control 19 On screen Zoom Control 21 P Portable Media Player 35 Q Quick Review 19 20 R Recordable Time 41 Recording Medium 42 Remaining Battery Power 21 Remaining Recording Time 21 S Speaker volume 22 SD Card 18 U Uploading F...

Page 45: ...MEMO ...

Page 46: ... podrá salir No deberá ser colocada en el aparato ninguna fuente de llama sin protección tales como velas encendidas Cuando descarte las pilas deberá considerar los problemas ambientales y respetar estrictamente las normas locales o leyes vigentes para la eliminación de estas pilas La unidad no deberá ser expuesta a goteos ni salpicaduras No use esta unidad en un cuarto de baño o en lugares con ag...

Page 47: ...lguna manera por ejemplo si el cable o enchufe de alimentación está dañado si ocurrió derrame de líquidos o caída de objetos dentro del aparato si el aparato fue expuesto a la lluvia o humedad si no funciona normalmente o sufrió caídas Recuerde que esta cámara debe usarse únicamente para fines privados Está prohibido cualquier uso comercial sin la autorización correspondiente Aunque grabe aconteci...

Page 48: ...ar la seguridad ni el rendimiento Cuando esta luz parpadea no extraiga el adaptador de CA la batería ni la tarjeta SD 1 Introduzca y retire la tarjeta SD sólo mientras el aparato se encuentre desconectado En caso contrario la información de la tarjeta se podría corrumpir 2 Formatee una tarjeta SD cuando la utilice por primera vez B A Introduzca firmemente la tarjeta Pulse el botón Power para apaga...

Page 49: ...gar la cámara y vuelva a pulsarlo durante al menos 2 segundos Toque los sensores con el dedo Los sensores no funcionan si los toca con la uña o con guantes puestos SALIR AJUSTE CONF LA HORA CIUDAD Y HORA CONF RELOJ CONF AREA CONF PARA HORARIO DE VERANO AJUS RELOJ Seleccione la ciudad más cercana a la zona donde vaya a usar la videocámara T CONF ÁREA AJUSTE SALIR GMT JAN 1 2009 01 00 Seleccione ON ...

Page 50: ...leccionar el modo vídeo Q 0 0 4 0 1 4 h 59 m REC El modo cambia al pulsar el botón Pulse el botón START STOP para iniciar la grabación y vuelva a pulsarlo para detenerla Inicie la grabación S Espacio restante en la Tarjeta SD Espera de grabación Calidad de vídeo Grabación Seleccione el modo de grabación R REC Aparece el indicador de grabación automática ...

Page 51: ...peraciones como búsqueda hacia adelante o búsqueda hacia atrás Z p 22 LPara visualizar archivos en un televisor Z p 25 No olvide realizar copias tras la grabación Para copiar archivos en discos DVD Z p 29 Para doblar archivos usando una grabadora de VCR DVD Z p 34 Para reproducir un disco creado Z p 28 Para editar archivos en el equipo Z p 29 PRECAUCIÓN DIGEST REPRODUCCIÓN VÍDEO NOV 01 2009 04 55P...

Page 52: ... manual 24 Compensación de contraluz 24 Ajuste manual en el menú 24 USO CON EL TELEVISOR Visualización de archivos en un televisor 25 Conexión con el televisor 25 Operación de reproducción 25 EDICIÓN Gestión de archivos 26 Captura de una imagen fija de un vídeo 26 Eliminación de archivos 26 COPIA Copia de archivos 27 Uso de una grabadora de DVD 27 Creación de un DVD mediante un PC 29 Copia de arch...

Page 53: ...e de utilizar baterías JVC BN VF808U VF815U VF823U Si se produce un problema al utilizar la tarjeta de memoria SD lleve la tarjeta junto con la videocámara al servicio técnico Si falta alguno de los dos no podrá diagnosticarse la causa de la falla y la videocámara no podrá ser reparada Si se produce un fallo de funcionamiento deje de usar inmediatamente la videocámara y contacte www jvc com o por ...

Page 54: ...n otro cable El modelo AP V14U no se menciona en el MANUAL del CD ROM suministrado Colocar el Filtro de Núcleo Los datos grabados se podrían borrar mientras la videocámara se repara o se inspecciona Haga copias de seguridad de todos los datos antes de solicitar una reparación o inspección Libere el retén 3 cm Cable USB Enrósquelo una vez Adaptador de CA Enrósquelo dos veces Conectar a la videocáma...

Page 55: ... con el perno del trípode y el zócalo de fijación con el tornillo a continuación gire la videocámara a la derecha para montarla en el trípode NOTA No utilice el trípode en superficies inestables o desniveladas La videocámara podría caer y sufrir una avería grave Parte inferior de la videocámara ...

Page 56: ...12 Índice DC D C DC B A NOTA La pantalla LCD puede girar 270 Procure no tapar 4 5 y 6 durante la filmación GETTING STARTED ...

Page 57: ...jeta SD Botón EXPORT Z p 35 Conector AV Z p 25 34 Botón START STOP Z p 19 Botón SNAPSHOT Z p 20 0 Palanca del zoom W 7 T Z p 21 Control de volumen del altavoz VOL Z p 22 1 Altavoz 2 Conector de CC 3 Conector USB 2 Z p 27 30 4 Objetivo 5 Luz LED Z p 21 6 Micrófono estéreo 7 Elastómero para Cinturón 8 Correa para Cinturón 9 Apretar Orificio para Perno Zócalo de fijación del trípode Botón de liberaci...

Page 58: ... de brillo Indicador de control de área de fotometría 2 Velocidad de obturación Sólo durante la grabación de vídeo Indicador de modo Indicador de modo EXPORT Contador Indicador de modo de carga Calidad de vídeo B ULTRAFINA C FINA D NORMAL E ECONÓMICA Tiempo restante MREC Aparece durante la grabación MQ Aparece durante el modo de espera de grabación Indicador de Estabilizador de imagen digital DIS ...

Page 59: ...Modo de reproducción F Reproducción Q Pausa K Búsqueda hacia adelante J Búsqueda hacia atrás G Cámara lenta hacia adelante E Cámara lenta hacia atrás El número de la izquierda indica la velocidad Indicador de batería Fecha hora Z p 16 Indicador de nivel de volumen Durante la reproducción de imágenes fijas 4 55 PM NOV 1 2009 Indicador de modo Número de carpeta o archivo Indicador de reproducción au...

Page 60: ...50 min 2 hr 45 min BN VF815U 2 hr 40 min 5 hr 25 min BN VF823U 3 hr 40 min 8 hr 10 min LPara extraer la batería NOTA La videocámara también se puede usar con sólo el adaptador de CA El tiempo de grabación real puede reducirse en función del entorno de grabación como cuando se graban escenas de movimiento rápido No estire ni doble el enchufe o el cable del adaptador de CA Se podría dañar el adaptad...

Page 61: ...OV 1 2009 04 55PM 7 Seleccione ON si el horario de verano está activado CONF HORARIO DE VERANO NOV 1 2009 04 55 PM CONF PARA HORARIO DE VERANO HORARIO DE VERANO OFF AJUSTE SALIR 8 Ajuste la fecha y la hora Seleccione el artículo utilizando el sensor táctil y seleccione para configurar GUARD SALIR CONF RELOJ GMT 0 00 FECHA HORA PM 04 55 1 2009 NOV 9 Seleccione GUARD Para reiniciar el ajuste selecci...

Page 62: ...SD Preparativos Pulse el botón Power para apagar la videocámara 1 Abra la tapa de la tarjeta SD 2 Inserte firmemente la tarjeta por su lado recortado 3 Cierre la tapa de la tarjeta SD LPara remover una tarjeta SD Pulse la tarjeta SD una vez Cuando la tarjeta se expulse parcialmente extráigala NOTA Presione la tarjeta SD una vez Cuando la tarjeta se expulse parcialmente extráigala No toque el termi...

Page 63: ...elecciona automáticamente al apagar la videocámara y volver a encenderla Si no se realiza ninguna operación durante 5 minutos cuando la videocámara está encendida ésta se apaga automáticamente para ahorrar energía Para volver a encender la videocámara cuando se utiliza la batería cierre la pantalla de LCD y ábrala de nuevo Cuando utilice la cámara con el adaptador de CA realice cualquier operación...

Page 64: ...en digital no funciona durante la grabación de imágenes fijas Si no se realiza ninguna operación durante 5 minutos cuando la videocámara está encendida ésta se apaga automáticamente para ahorrar energía Para volver a encender la videocámara cuando se utiliza la batería cierre la pantalla de LCD y ábrala de nuevo Cuando utilice la videocámara con el adaptador de CA realice cualquier operación como ...

Page 65: ...FF Desactiva esta función Comprobación de la carga restante de la batería Preparativos Coloque el paquete de pilas Seleccione el modo de grabación Modo Pulse INFO tres veces o INFO y luego seleccione Modo Pulse INFO INFO DIRECT DVD ESTADO DE LA BATERÍA TIEMPO MÁX min 100 50 0 SALIR LPara salir de la pantalla Seleccione SALIR o pulse INFO NOTA El tiempo de grabación restante sólo debe utilizarse a ...

Page 66: ...ra cambiar el número de miniaturas 6 miniaturas 20 miniaturas Mueva la palanca del zoom hacia W Deslice el interruptor de modo para seleccionar el modo vídeo LOperaciones durante la reproducción de vídeo botones en pantalla N Volver a la primera escena del archivo O Ir a la primera escena del siguiente archivo L Volver a la pantalla de índice J Búsqueda hacia atrás durante la reproducción E Reprod...

Page 67: ...ja LOperaciones durante la reproducción de imágenes fijas botones en pantalla P Cambiar el orden de la reproducción automática hacia atrás F Cambiar el orden de la reproducción automática hacia adelante L Volver a la pantalla de índice N Ver el archivo anterior F Iniciar la reproducción automática Q Finalizar la reproducción automática O Ver el archivo siguiente LPara pasar a la página anterior o ...

Page 68: ...one la pantalla LCD al revés no se muestra Cambie el ajuste cuando la pantalla LCD se encuentre en la posición normal Ajuste manual en el menú En el modo de grabación manual 1 Toque MENU 2 Seleccione AJUSTE MANUAL VÍDEO ILUMINACIÓN CALIDAD DE VÍDEO REGISTRAR EVENTO AJUSTE SALIR USE CONFIG DETALLADA BASADA M AJUSTE MANUAL n D B 1 3 Seleccione el menú que desee VÍDEO SELECC ESCENA VELOCIDAD OBTURACI...

Page 69: ... unidades Operación de reproducción Una vez realizada la conexión con el televisor 1 Encienda la videocámara y el televisor 2 Ajuste el televisor en el modo de vídeo 3 Sólo cuando se conecta la videocámara a la grabadora de vídeo DVD Encienda la grabadora de vídeo DVD y ajuste la grabadora de vídeo DVD en el modo de entrada AUX 4 Inicie la reproducción en la videocámara Z p 22 23 LPara ver en el t...

Page 70: ...eo se ha grabado en 4 3 La imagen se puede alargar en sentido horizontal o vertical dependiendo de la calidad del archivo de vídeo de origen La función de toma continua no se puede utilizar para capturar imágenes No es posible capturar vídeo durante la reproducción Eliminación de archivos Los archivos protegidos no se pueden eliminar Para eliminarlos primero debe anular la protección Una vez elimi...

Page 71: ... RW de 12 cm En cuanto a los discos DVD R sólo pueden utilizarse discos DVD R vírgenes En cuanto a los discos DVD RW pueden emplearse también discos DVD RW usados pero es necesario formatearlos antes de grabar Al formatear un disco se elimina todo el contenido grabado en el disco hasta ese momento No pueden utilizarse discos de doble capa En cuanto a la finalización después de la copia El disco se...

Page 72: ...K Si aparece INSERTAR SIGUIENTE DISCO PULSAR CANCELAR PARA ABANDONAR LA CREACIÓN cambie de disco Los archivos restantes se copiarán en el segundo disco Para cancelar la copia seleccione CANCELAR Copia de archivos de vídeo que nunca se han copiado Los archivos que nunca se han copiado en un disco DVD se seleccionan y copian automáticamente 1 Abra la pantalla LCD para encender la videocámara 2 Pulse...

Page 73: ... 5 GHz o superior RAM 512 MB como mínimo LPara comprobar las especificaciones del PC Haga clic con el botón secundario del ratón en Equipo o Mi PC en el menú Inicio y seleccione Propiedades NOTA Asegúrese de que el PC tenga una unidad de DVD grabable Si el sistema no cumple los requisitios se recomienda copiar los archivos con la grabadora de DVD Z p 41 Usuarios de Macintosh pueden utilizar el sof...

Page 74: ... volumen en la videocamara y en Proximo 4 Haga clic en Comienzo Se inicia la copia de seguridad LPara desconectar la videocámara del PC 1 Haga clic con el botón secundario del ratón en el icono Quitar hardware de forma segura en la barra de tareas y seleccione Quitar dispositivo de almacenamiento masivo USB de forma segura 2 Siga las instrucciones en pantalla y asegúrese de que el dispositivo se p...

Page 75: ...sonalizada Preparativos Realice una copia de seguridad en el PC 1 Haga clic en el icono y abra el calendario 2 Seleccione Solo filmes 3 Haga clic en 4 Escriba el nombre de la nueva lista personalizada y haga clic en Aceptar 5 Haga doble clic en la fecha de grabación Se muestran los archivos grabados en esa fecha 6 Arrastre y suelte los archivos en la lista personalizada Para agregar más archivos a...

Page 76: ...rastre y suelte el archivo en la parte inferior y haga clic en Proximo 4 Arrastre y suelte el archivo en la parte inferior y haga clic en Proximo 5 Haga clic en Comienzo NOTA Para obtener información detallada sobre el funcionamiento de Everio MediaBrowser haga clic en Ayuda y consulte Ayuda de MediaBrowser Adobe Reader debe estar instalado para poder leer Ayuda de MediaBrowser Adobe Reader puede ...

Page 77: ...más cercana de su país consulte la Red de servicios internacionales JVC en http www jvc victor co jp english worldmap index e html para hacer consultas sobre este software tenga a mano la siguiente información Nombre del producto modelo problema mensaje de error PC fabricante modelo sobremesa portátil CPU sistema operativo memoria MB espacio disponible en el disco duro GB Tenga en cuenta que puede...

Page 78: ...ena 4 En el punto donde desee iniciar la copia inicie la grabación en la grabadora de vídeo DVD Consulte el manual de instrucciones de la grabadora de vídeo DVD L Para detener la copia Deje de grabar en la grabadora VCR DVD y luego pulse de nuevo START STOP L Para ocultar la fecha o los iconos de la pantalla Cambie los ajustes de VER EN TV Copia de archivos en una grabadora de vídeo DVD Preparativ...

Page 79: ...e el modo de grabación 1 Pulse EXPORT EXPORT 2 Seleccione el archivo y elija CONF EXPORT LIB LIB LIB SALIR CHECK 1 3 Para comprobar el contenido del archivo seleccione CHECK EXPORT Transferencia de los archivos al PC Preparativos Instalar iTunes en un PC http www apple com itunes 1 Conecte la videocámara al PC con el cable USB 2 Seleccione INSCR EN LIBRARY FÁCIL INSCRIP DE VÍDEO MENÚ USB CREAR DVD...

Page 80: ...estra en la pantalla LCD NOTA El modo de carga se desactiva cada vez que termina la grabación Carga de archivos Para obtener más información sobre cómo cargar archivos consulte la guía de funcionamiento de MediaBrowser que aparece en el CD ROM 1 Conecte la videocámara al PC con el cable USB 2 Seleccione CARGAR MENÚ USB CREAR DVD CARGAR INSCR EN LIBRARY AJUSTE SALIR CARGA FÁCIL A SITIOS DE REPRODUC...

Page 81: ...a batería se calienta durante la carga Cuando se reproduce un vídeo la imagen se detiene momentáneamente o el sonido se interrumpe en las uniones entre escenas La pantalla LCD se muestra roja o negra momentáneamente cuando se graba la luz solar Aparecen puntos negros rojos verdes o azules en la pantalla LCD La pantalla LCD tiene un porcentaje de píxeles efectivos del 99 99 pero puede que un 0 01 o...

Page 82: ...la cámara contiene muchos archivos de vídeo por ejemplo tardará bastante tiempo en responder Es recomendable que copie todos los archivos de la videocámara al ordenador y que una vez completada esta operación borre los archivos de la videocámara La luz no parpadea durante la carga de la batería Compruebe la carga restante de la batería Si la batería ya está totalmente cargada la luz no parpadea Si...

Page 83: ... vuélvala a encender Extraiga la tarjeta SD y vuelva a insertarla No se pueden utilizar tarjetas MultiMediaCard Elimine la suciedad de los terminales de la tarjeta SD Introduzca la tarjeta SD antes de conectarlo a la alimentación eléctrica Si el problema persiste realice una copia de seguridad de todos los datos y a continuación formatee la unidad se borrarán todos los datos NO SE PUEDEN TOMAR MÁS...

Page 84: ... medida diagonal de 2 7 panel LCD sistema de matriz activa TFT Luz LED Dentro de 1 5 m distancia de filmación recomendada LConectores Salida AV Salida de vídeo 1 0 V p p 75 Ω Salida de audio 300 mV rms 1 kΩ USB Mini USB tipo A y B compatible con USB 2 0 LAdaptador de CA Requisito de alimentación eléctrica CC 110 V a 240 Vd 50 Hz 60 Hz Salida CC 11 V 1 A LImagen fija Formato JPEG Tamaño de imagen 1...

Page 85: ...6 GB 32 GB 4 3 832 x 624 FINA 970 1950 3950 7590 9999 9999 9999 9999 832 x 624 ESTÁNDAR 1450 2920 5930 9999 9999 9999 9999 9999 640 x 480 FINA 1450 2920 5930 9999 9999 9999 9999 9999 640 x 480 ESTÁNDAR 2080 4180 8480 9999 9999 9999 9999 9999 16 9 640 x 360 FINA 1820 3660 7420 9999 9999 9999 9999 9999 640 x 360 ESTÁNDAR 2420 4880 9890 9999 9999 9999 9999 9999 El tiempo de grabación y el número de i...

Page 86: ...idas pueden impedir la carga completa guárdela en lugar fresco y seco La exposición prolongada a temperaturas elevadas aumentará la descarga natural y reducirá el periodo de vida útil se debe cargar totalmente y luego descargar totalmente la batería cada seis meses cuando se guarde durante un periodo de tiempo prolongado cuando no se utilice se debe retirar del cargador o dispositivo eléctrico ya ...

Page 87: ...mara dentro Para evitar que la unidad se caiga Ajuste bien la correa de mano Si utiliza la cámara con un trípode fije bien la cámara en el trípode Si se le cae la cámara puede herirse usted y dañarse la cámara Si un niño utiliza la unidad un adulto deberá guiarle Declaración de conformidad Número de modelo GZ MS120AU BU RU Nombre comercial JVC Parte responsable JVC AMERICAS CORP Dirección 1700 Val...

Page 88: ...enús 37 Control de grabación en pantalla 19 Control de zoom en pantalla 21 Copia de seguridad en DVD 27 E Eliminación de archivos 26 F Finalización 27 G Grabación manual 24 Grabadora de DVD 27 I iTunes 35 L Luz LED 21 N Número de imágenes 41 P Pantalla LCD 14 42 R Reproducción de copia 34 Reproducción de extracto 22 Reproductor multimedia portátil 35 Revisión rápida 19 20 S Soporte de grabación 42...

Reviews: