background image

Dubbing Files to a VHS Tape by Connecting

to a VCR

You can dub videos in standard quality by connecting to a VCR.

0

Refer also to the instruction manuals of the TV and VCR.

1

Remove the AC adapter and battery pack from this unit.

2

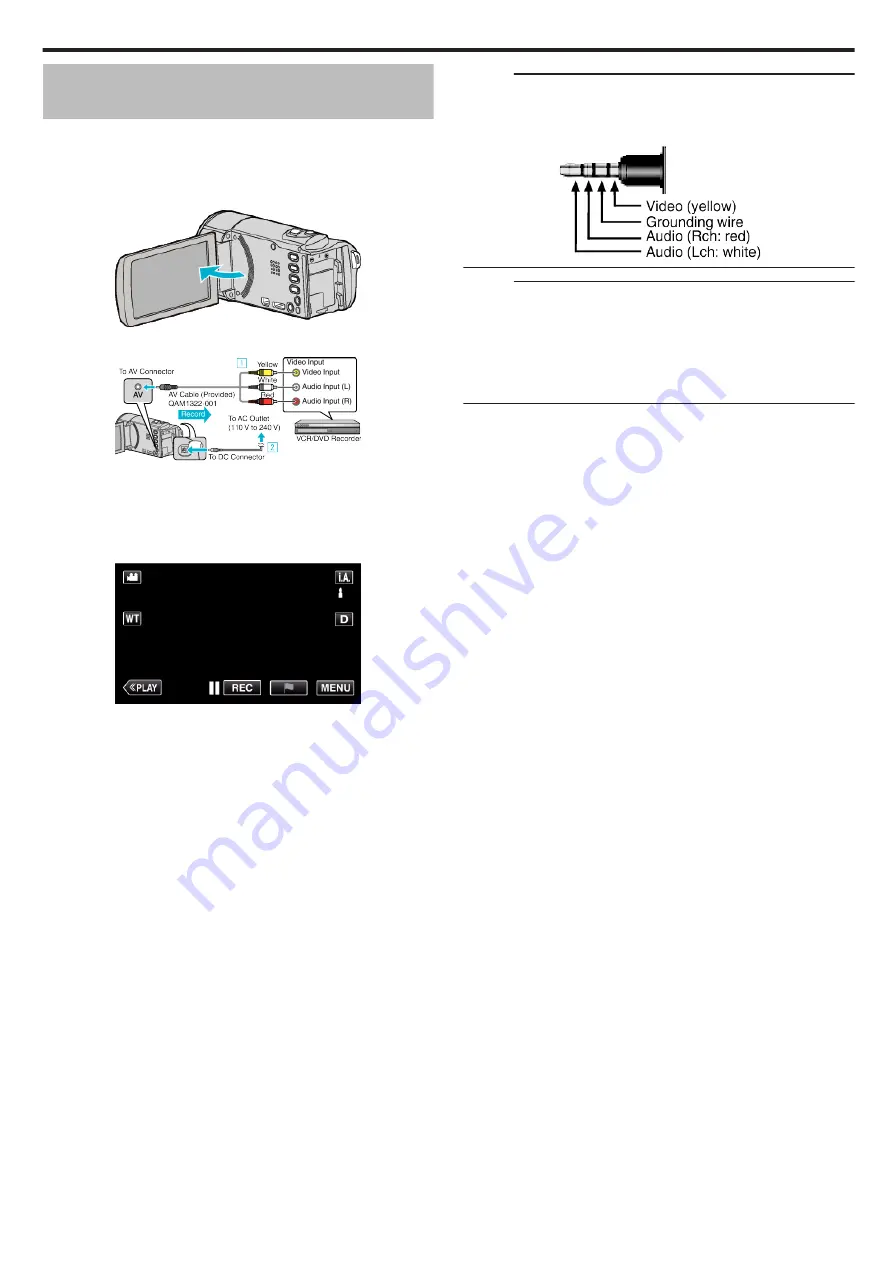
Open the LCD monitor.

.

3

Connect to a VCR/DVD recorder.

.

Connect using the provided AV cable.

Connect the AC adapter to this unit.

0

This unit powers on automatically when the AC adapter is connected.

0

Be sure to use the supplied AC adapter.

4

Tap “<<PLAY” to select the playback mode.

.

5

Prepare the TV/VCR for recording.

0

Switch to a compatible external input.

0

Insert a video tape.

6

Prepare this unit for playback.

0

Set “VIDEO OUTPUT” in the “CONNECTION SETTINGS” menu to

the aspect ratio (“4:3” or “16:9”) of the connecting TV.

“ VIDEO OUTPUT ” (

A

 p. 244)

7

Start recording.

0

Start playback on this unit and press the record button on the

recorder.

“Playing Back Videos” (

A

 p. 65)

0

After playback is complete, stop the recording.

Memo : 

0

AV cable (P/N: QAM1322-001)

Wiring specifications (for video/audio) of the 4-pole mini plug are described

in the following.

For purchasing, consult your nearest JVC service center.

.

Memo : 

0

When there are many videos to dub, you can create a playlist in advance

and play it back so that all your favorite videos can be dubbed at once.

“Creating Playlists with Selected Files” (

A

 p. 87)

“ PLAYBACK PLAYLIST ” (

A

 p. 73)

0

To include the recording date and time during dubbing, set “DISPLAY

DATE/TIME” in the “PLAYBACK SETTING” menu to “ON”. Or, set

“DISPLAY ON TV” in the “CONNECTION SETTINGS” menu to “ON”.

Copying

109

Summary of Contents for Everio GZ-E305

Page 1: ...CAMCORDER LYT2536 021A Detailed User Guide GZ E305 GZ E308 GZ EX315 GZ EX355 ...

Page 2: ... for a Specific Video Still Image by Date 77 Connecting to and Viewing on TV 78 Connecting via the HDMI Mini Connector 79 Connecting via the AV Connector 80 Playing Back a DVD or Blu ray Disc Created on this Unit 81 Digest Playback on a Blu ray or DVD Player 81 Editing Deleting Unwanted Files 82 Deleting the Currently Displayed File 82 Deleting Selected Files 82 Protecting Files 83 Protecting Rele...

Page 3: ...168 Setting the Password DIRECT MONITORING 174 Enabling the MAC Address Filter TV MONITORING 175 Registering the MAC Address TV MONITORING 175 Checking the MAC Address of this Camera 176 Protecting the Network Settings with a Password 176 Initializing the Wi Fi Settings 177 Changing the Panning Speed 178 Using Smartphone Applications 179 Indications on the Screen 179 Using the Markings 180 Using t...

Page 4: ...people around you Squatting and Shooting at Eye Level Staying low is a common position to take when shooting small children By recording from the eye level of the child you can capture all his cute expressions clearly o Getting Ready A Kneel down with your left knee while keeping your right foot on the ground B Place the elbow of your right arm which is holding the camcorder on your right knee C H...

Page 5: ... Tree and Preparing the Dinner The decoration of tree and preparation of dinner are part of the joy of Christmas Be sure to record these happy family times o Decorating the tree A tree is the most important thing to bring out the mood of Christmas Simply the scene of all family members engaging in the decorating of a fir tree with various colorful ornaments is full of the feeling of happiness o Pr...

Page 6: ...e able to shoot more appropriately o Finding out the route of entrance The highlight of a wedding reception is the entrance of the bride and groom Find out which door they will enter from and the route they will take from the person in charge of the wedding hall in advance Set up the tripod at a place where you can follow the couple using zoom without having to move around o Number of times and ti...

Page 7: ...close friend who has a camcorder at home Set the borrowed camcorder on a tripod to focus on taking close up shots of the bride and groom In this way the other camcorder can be moved around to record other scenes enabling an interesting video with changing scenes to be created through editing and compilation As most people own at least a digital camera nowadays even if you are really unable to find...

Page 8: ...rge the battery pack while sleeping so that you can record with full battery power the next day o Power Plug Adapter The shape of the power plug varies according to countries Be sure to check the shape of the power plug beforehand and bring the appropriate power plug adapter Charging the Battery Pack Overseas A p 23 o Battery Charger Recording cannot be performed when an AC adapter is connected to...

Page 9: ...und in the Beginner s Guide on this website on how to use panning effectively In addition you may also like to take a shot of the signs or monuments that can often be found at the tourist spots Showing Everyone Having a Good Time When taking a video it is rather dull to shoot only the scenery or historical sites Talk about your feelings while recording the breath taking scenery of an attraction so...

Page 10: ... with no waving of hands nor laughter are not only dull when you view them later but also put the capability of the audio recording function of the camcorder to a waste When recording induce more reactions by enthusiastically waving your hands or shouting out Is it fun and the like Capturing the Best Moment in a Video as a Still Image Shots with the eyes closed are often taken by accident To reduc...

Page 11: ...tion as expected or if the brightness correction is insufficient you can increase the brightness by using backlight compensation in the Manual mode Setting Details A p 36 o Without backlight compensation o With backlight compensation Useful Shooting Techniques 11 ...

Page 12: ... Cable QAM1322 001 0 Connects this unit to a TV to play back recorded images on the TV 0 Consult your nearest JVC service center if you need to purchase the AV cable USB Cable Type A Mini Type B 0 Connects this unit to a computer CD ROM GZ EX355 GZ EX315 0 For installing the provided software on a computer Basic User Guide 0 Read well and keep in a safe place where it can be accessed easily when n...

Page 13: ...rformed during recording or playback Remove the battery when the unit is to be used for a long time Performance of the battery may drop if it is left attached to the unit Rechargeable Batteries 0 When using the battery in a low temperature environment 10 C or below the operating time may be shortened or it may not function properly When using this unit outdoors in the winter weather warm the batte...

Page 14: ...Insert an SD card 0 Insert with the label facing outward Warning 0 Make sure not to insert the SD card in the wrong direction It may cause damage to the unit and SD card 0 Turn off the power of this unit before inserting or removing an SD card 0 Do not touch the metal contact area when inserting the SD card Memo 0 When SEAMLESS RECORDING is set to ON recordings can still be made to the SD card wit...

Page 15: ...n be recorded on one SD card It is recommended to confirm the video operation of the SD card before usage 0 To protect the data do not touch the terminals of the SD card 0 UHS I SDHC SDXC cards can be used in the same manner as standard SDHC SDXC cards UHS Speed Class is not supported When your computer cannot recognize the SDXC card Confirm and update the OS of your computer Windows XP 0 Make sur...

Page 16: ...h excessive force 0 Do not operate the touch screen using an object with a sharp tip 0 Pressing two or more places at a time may cause a malfunction 0 Perform TOUCH SCREEN ADJUST if the reactive area of the screen is misaligned with the touched area Adjust by lightly tapping with a corner of an SD card etc Do not press with an object with a sharp tip or do not press hard Adjusting the Touch Panel ...

Page 17: ... 31 3 Playback Mode Button 0 Switches to the playback mode 4 Recording Start Stop Button 0 6 Video Recording Start Button 0 7 Video Recording Stop Button 0 Q Still Image Recording Button 5 Mark Button for video only 0 By tapping the icon while recording is in progress you can mark a particular scene to make it easier to find it Marking the Video While Recording A p 54 6 Menu Button Operating the M...

Page 18: ...ion Buttons for Still Image Playback A p 76 Index Screen Thumbnail Display Display The following is a screen of the model with the built in memory F is not displayed on the GZ EX315 GZ E308 GZ E305 screen 1 A B Video Still Image Mode Button 0 Switches between video and still image modes 2 Date Button Operation Buttons for Video Playback A p 66 Operation Buttons for Still Image Playback A p 76 3 Re...

Page 19: ...ge A p 239 2 CONNECTION SETTINGS Menu CONNECTION SETTINGS video still image A p 244 3 Help Button Tap the K help button and item to display descriptions 4 MEDIA SETTINGS Menu MEDIA SETTINGS video still image A p 245 5 Close Button Exit the menu 6 SETUP Menu SETUP video still image A p 241 7 EDIT Menu EDIT Menu video A p 238 EDIT Menu still image A p 240 Getting Started 19 ...

Page 20: ...ct the region where you live and tap SAVE 0 Time difference between the selected city and the GMT Greenwich Mean Time is displayed 0 Tap 0 or 1 to select the city name Memo 0 The clock can be reset again later Resetting the Clock A p 20 0 When using this unit overseas you can set it to the local time for recording Setting the Clock to Local Time when Traveling A p 23 0 SET DATE TIME is displayed w...

Page 21: ...ou live and tap SAVE 0 Time difference between the selected city and the GMT Greenwich Mean Time is displayed 0 Tap 0 or 1 to select the city name Changing the Display Language The language on the display can be changed The following is a screen of the model with Wi Fi functions 1 Tap MENU 2 Tap SETUP 3 Tap LANGUAGE 0 Tap 3 or 2 to scroll the screen 4 Tap to the desired language 0 Tap 3 or 2 to sc...

Page 22: ... a tripod or monopod This is useful for preventing camera shake and recording from the same position 0 To prevent this unit from falling off check the tripod mounting screw holes and positioning holes on the unit carefully before mounting and turn the screws until they are fastened firmly Caution 0 To prevent injuries or damages which may result if this unit falls off read the instruction manual o...

Page 23: ... pack you need a converter plug that matches the shape of the outlet Setting the Clock to Local Time when Traveling Change the date and time display to the local time by selecting your travel destination in AREA SETTING of CLOCK ADJUST Restore the region settings after you returned from the trip The following is a screen of the model with Wi Fi functions 1 Tap MENU 2 Tap SETUP 3 Tap CLOCK ADJUST 0...

Page 24: ...ted in some regions 0 For more information refer to the catalog 0 For details on the provided accessories refer to Verifying the Accessories Verifying the Accessories A p 12 Approximate Recording Time Using Battery o GZ EX355 GZ EX315 Battery Pack Actual recording time Continuous recording time Maximum Recording Time BN VG114 Supplied 1 h 5 m 2 h BN VG121 1 h 40 m 3 h 5 m BN VG138 3 h 5 h 30 m o G...

Page 25: ... VIDEO QUALITY setting selected in the recording menu VIDEO QUALITY A p 230 B TOUCH PRIORITY AE AF Displays the setting of TOUCH PRIORITY AE AF By default it is set to FACE TRACKING Capturing Subjects Clearly TOUCH PRIORITY AE AF A p 45 C Time Displays the current time Clock Setting A p 20 D Image Stabilizer Displays the image stabilizer setting Reducing Camera Shake A p 53 E Recording Media Displ...

Page 26: ...or handheld shooting j Selects the most suitable settings when a tripod is used for shooting Memo 0 Scenes can be detected according to the shooting conditions and automatically adjusted in Intelligent Auto mode 0 Multiple scenes may be detected depending on the recording conditions 0 Some functions may not work properly depending on the shooting conditions Operation Buttons for Video Recording Op...

Page 27: ...In such a case turn off the power then remove the AC adapter and battery pack This unit will be reset 0 Disclaimer We shall not be held responsible for loss of recorded contents when recording videos audio or playback cannot be operated due to malfunctions in this unit provided parts or SD card Once deleted recorded contents data including data loss due to malfunctions in this unit cannot be resto...

Page 28: ... 3 Check if the recording mode is P Intelligent Auto 0 If the mode is H Manual tap H on the recording screen to display the mode switching screen Tap P to switch the recording mode to Intelligent Auto 4 Set the focus on the subject 0 When focused the focus icon lights up in green 5 Take a still image 0 PHOTO lights up when a still image is being captured 0 After recording close the lens cover Memo...

Page 29: ...cenes of Intelligent Auto Display Icon Description g Captures one s skin beautifully V Allows people to be captured naturally f Record a group of people with the most suitable settings W Record the smiling face clearly S Records while focusing on a near object a Focuses at a far distance and captures a sharp image with vivid colors Z Records in dark places with minimal noise in the overall image T...

Page 30: ...e LCD monitor within 5 minutes after the power is turned off by closing the monitor QUICK RESTART A p 242 0 When AUTO POWER OFF is set to ON this unit turns itself off automatically to conserve power when it is not operated for 5 minutes only when using the battery pack AUTO POWER OFF A p 242 0 When TOUCH PRIORITY AE AF is set to FACE TRACKING this unit detects faces and automatically adjusts its ...

Page 31: ...e set for both video and still image modes The following is a screen of the model with Wi Fi functions 1 Open the lens cover 2 Open the LCD monitor 0 Set the recording mode to either A video or B still image 0 To switch the mode between video and still image tap A or B on the recording screen to display the mode switching screen Tap A or B to switch the mode to video or still image respectively Yo...

Page 32: ...A p 34 BRIGHTNESS ADJUST 0 Overall brightness on the screen can be adjusted 0 Use this when recording in a dark or bright location Adjusting Brightness A p 35 BACKLIGHT COMP 0 Corrects the image when the subject appears dark due to backlight 0 Use this when shooting against the light Setting Backlight Compensation A p 36 WHITE BALANCE 0 Overall color on the screen can be adjusted 0 Use this when t...

Page 33: ...he mode is P Intelligent Auto tap P on the recording screen to display the mode switching screen Tap H to switch the recording mode to Manual 2 Tap MENU 0 The top menu appears 3 Tap RECORD SETTING 4 Tap SCENE SELECT 0 Tap 0 or 1 to move to the previous next menu 0 Tap L to exit the menu 0 Tap J to return to the previous screen 5 Tap the appropriate scene 0 Tap OFF to cancel the selection 0 Tap L t...

Page 34: ...ED RECORDING or AUTO REC Adjusting Focus Manually Set this when the focus is not clear in Intelligent Auto or when manual focusing is desired The following is a screen of the model with Wi Fi functions 1 Select the Manual recording mode 0 If the mode is P Intelligent Auto tap P on the recording screen to display the mode switching screen Tap H to switch the recording mode to Manual 2 Tap MENU 0 Th...

Page 35: ...are displayed Adjusting Brightness You can adjust the brightness to your preferred level The following is a screen of the model with Wi Fi functions 1 Select the Manual recording mode 0 If the mode is P Intelligent Auto tap P on the recording screen to display the mode switching screen Tap H to switch the recording mode to Manual 2 Tap MENU 0 The top menu appears 3 Tap RECORD SETTING 4 Tap BRIGHTN...

Page 36: ...u can correct the image when the subject appears too dark due to backlight The following is a screen of the model with Wi Fi functions 1 Select the Manual recording mode 0 If the mode is P Intelligent Auto tap P on the recording screen to display the mode switching screen Tap H to switch the recording mode to Manual 2 Tap MENU 0 The top menu appears 3 Tap RECORD SETTING 4 Tap BACKLIGHT COMP 0 Tap ...

Page 37: ...be selected for a better backlight compensation effect Setting White Balance You can set the color tone to suit the light source The following is a screen of the model with Wi Fi functions 1 Select the Manual recording mode 0 If the mode is P Intelligent Auto tap P on the recording screen to display the mode switching screen Tap H to switch the recording mode to Manual 2 Tap MENU 0 The top menu ap...

Page 38: ...ing the sea at shallow water area water appears green using an optional marine case Using MWB 1 Hold a sheet of plain white paper in front of the lens so that the white paper fills the screen 2 Position the cursor to MWB and press and hold SET Or press and hold the MWB icon 3 Release your touch after the menu disappears and o lights up Memo 0 The setting will not change if MWB is being tapped too ...

Page 39: ... with Effects You can add animation effects to video recordings The animation effects appear when smiles are detected or when the screen is touched Type of Effect Description of Effect ANIMATION EFFECT Records videos with animation effects Recording with Animation Effects ANIMATION EFFECT A p 40 DECORATE FACE EFFECT Detects faces and enables decorations such as crowns or sunglasses to be added Rec...

Page 40: ...rding mode You can also use the A B button on this unit 2 Tap MENU 0 The top menu appears 3 Tap SPECIAL RECORDING Go to step 4 Alternatively tap ANIMATION EFFECT in the shortcut menu Go to step 5 4 Tap ANIMATION EFFECT 0 Tap L to exit the menu 0 Tap J to return to the previous screen 5 Select a desired effect and tap SET 0 Tap 0 or 1 to change the effect 0 Press the START STOP button the camera to...

Page 41: ...etected Animation effect appears when smiles are detected Animation effect appears when smiles are detected Animation effect appears when the screen is touched Animation effect appears when the screen is touched Animation effect appears when the screen is touched Animation effect appears when the screen is touched Recording 41 ...

Page 42: ...A B button on this unit 2 Tap MENU 0 The top menu appears 3 Tap SPECIAL RECORDING Go to step 4 Alternatively tap DECORATE FACE EFFECT in the shortcut menu Go to step 5 4 Tap DECORATE FACE EFFECT 0 Tap L to exit the menu 0 Tap J to return to the previous screen 5 Select a desired effect and tap SET 0 Tap 0 or 1 to select an item 0 Press the START STOP button the camera to start recording Press agai...

Page 43: ...Tap J to return to the previous screen 6 Select a stamp 0 Tap K to start selecting a stamp Tap on the desired stamp to use The number indicates the size of the stamp 0 Tap I to scroll through the list of stamps 0 Tap M to change the size of stamps 0 Tap J to return to the previous screen 7 Tap on the screen to add a stamp 0 Tap J and the YES button to delete the stamp 0 Tap ON OFF to display hide ...

Page 44: ...ss The number indicates the thickness of the line 0 You can select a color from white gray black etc 0 Select P to tap and erase part of the line 0 Tap H to select the line color Tap I to scroll through the list of colors 0 Tap L to select the line thickness 0 Tap J to return to the previous screen 7 Draw a line with your finger 0 Tap J and the YES button to delete all the lines 0 Tap ON OFF to di...

Page 45: ...desired position face color area again 0 To cancel FACE TRACKING PET TRACKING or COLOR TRACKING tap the blue frame 0 To cancel AREA SELECT tap the white frame Setting Details OFF Deactivates the function FACE TRACKING e appears on the screen Recording is performed while tracking and automatically adjusting the tapped face subject with appropriate focus and brightness In addition a blue frame appea...

Page 46: ...lt to detect faces of pets that are totally black covered in long hair or in backlight 0 COLOR TRACKING may not function properly in the following cases when recording subjects with no contrast when recording subjects that are moving at high speed when recording in a dark place when the surrounding brightness changes 0 AREA SELECT is not available while the digital zoom is in use 0 When FACE TRACK...

Page 47: ...ases when menu is being displayed when remaining recording time or battery power is being displayed when any functions in SPECIAL RECORDING is set Caution 0 If TOUCH PRIORITY AE AF is not set to FACE TRACKING SMILE SHOT will not work 0 If appropriate results cannot be obtained record with SMILE SHOT set to OFF Capturing Pets Automatically PET SHOT PET SHOT automatically captures a still image upon...

Page 48: ... 0 Subjects other than your pet may be detected by mistake sometimes Make use of PET SHOT only for pets such as dogs or cats 0 After a pet is detected and captured it takes time before the next recording may be performed 0 PET SHOT does not work in the following cases when menu is being displayed when remaining recording time or battery power is being displayed when any functions in SPECIAL RECORD...

Page 49: ...ghts up after information collection is complete 0 To cancel the registration tap STOP When CANCEL FACE RECOGNITION appears tap YES to return to the normal recording mode 7 Tap RECORD and record the face from the front 0 A face is captured to be used on the face registration index screen 0 Other than tapping RECORD you can also record by pressing the SNAPSHOT button fully 0 A sound can be heard wh...

Page 50: ...ber 1 tap number 1 The priority level of the registered subject becomes number 1 while the priority levels of the original number 1 and the ones below drop by one place In this example the original number 1 becomes number 2 and the orignal number 2 becomes number 3 0 When REG is tapped the registration complete screen appears 0 Tap OK to complete the registration 0 You can edit registered face inf...

Page 51: ... 5 4 Tap 1 on the lower right of the screen 5 Tap SMILE NAME DISPLAY 6 Tap the desired setting Setting Details OFF Displays only the frames when faces are detected ON Displays the frames names and smile levels when faces are detected 0 Frame Appears around detected faces Name Appears for faces that are registered Smile level Appears in value 0 100 for detected smiles Memo 0 The camera is able to d...

Page 52: ...entication Information A p 49 0 If you select CHANGE NAME proceed to step 12 in Registering Human Face Personal Authentication Information A p 50 0 If you select CHANGE ORDER OF PRIORITY proceed to step 13 in Registering Human Face Personal Authentication Information A p 50 Registering Human Face Personal Authentication Information A p 49 Canceling Deleting the Registered Face Information You can ...

Page 53: ...ng 0 The setting of image stabilizer changes with every press Setting Details b OFF Deactivates image stabilizer a ON Reduces camera shake under normal shooting conditions r ON AIS A video mode only Reduces camera shake more effectively when shooting bright scenes on the wide angle end Only on the wide angle end approx 5x Memo 0 It is recommended to set the image stabilizer to OFF when shooting a ...

Page 54: ...be done from the smartphone GZ EX355 GZ EX315 Using the Markings A p 180 Slow motion High speed Recording You can record videos in slow motion by increasing the recording speed to emphasize the movements and play back the slow motion video smoothly This is a handy function for checking movements such as golf swings Video file in AVCHD only Recording Speed 250 fps Image Size 720 576 Maximum Recordi...

Page 55: ...t to OFF it is recommended that a tripod be used and recording be performed in a bright location with the subject magnified as much as possible Tripod Mounting A p 22 Recording at Intervals TIME LAPSE RECORDING This function enables the changes of a scene that occur slowly over a long period to be shown within a short time by taking frames of it at a certain interval This is useful for making obse...

Page 56: ... INTERVAL Takes a frame at 2 second intervals Recorded videos will be played back at 50 times speed 5SEC INTERVAL Takes a frame at 5 second intervals Recorded videos will be played back at 125 times speed 10SEC INTERVAL Takes a frame at 10 second intervals Recorded videos will be played back at 250 times speed 20SEC INTERVAL Takes a frame at 20 second intervals Recorded videos will be played back ...

Page 57: ...appears 6 Press the SNAPSHOT button to start recording 0 Tap still image recording Q to start recording 0 Press the START STOP button or tap f to stop recording 0 CAPTURE lights up when a scene is recorded 0 Settings of the Stop Motion video are not saved when the power is turned off Caution 0 Audio cannot be recorded during STOP MOTION REC 0 This function does not support the iFrame recording for...

Page 58: ...es in brightness within the red frame When there are no more movements of the subject changes in brightness within the red frame recording will stop in 5 seconds 0 To stop video recording manually press the START STOP button However as the AUTO REC setting remains at ON even after the video recording is stopped recording starts again when movements of the subject changes in brightness are detected...

Page 59: ...he LCD monitor 0 Check if the recording mode is B 0 If the mode is A video tap A on the recording screen to display the mode switching screen Tap B to switch the mode to still image You can also use the A B button on this unit 2 Tap MENU 0 The top menu appears 3 Tap RECORD SETTING 4 Tap 1 on the lower right of the screen 5 Tap SELF TIMER 0 Tap L to exit the menu 0 Tap J to return to the previous s...

Page 60: ...e lower right of the screen 5 Tap SELF TIMER 0 Tap L to exit the menu 0 Tap J to return to the previous screen 6 Tap FACE DETECTION 7 After making sure that everyone is facing the camera press the SNAPSHOT button 0 Frames appear around the faces of the subjects 0 Pressing the SNAPSHOT button again starts the 10 second self timer 8 The photographer enters the frame 0 The shutter is released 3 secon...

Page 61: ...IME RECORDING 0 Tap L to exit the menu 0 Tap J to return to the previous screen 6 Select the type if the clock with 0 or 1 and tap SET 0 When SET is tapped the precaution for date time recording appears 0 Tap L to exit the menu 7 Adjust the display position of the date and time display with a finger mark by touching it with your finger and dragging it 0 Move the date and time display while touchin...

Page 62: ...time 0 The remaining recording time is displayed only in the video recording mode 0 Press the INFO button to check the remaining recording time of each recording media 0 To display the remaining battery power tap l 0 l will not be displayed when the AC adapter is connected 0 To exit the display tap L 4 Display the remaining battery power 0 For video recording tap J to return to the remaining recor...

Page 63: ... m 44 h 50 m SEW 2 h 50 m 5 h 40 m 11 h 30 m 23 h 30 m 34 h 30 m 46 h 10 m 92 h 40 m iFrame 1280x720 GZ EX355 GZ EX315 10 m 30 m 1 h 2 h 3 h 4 h 8 h iFrame 960x540 GZ EX355 GZ EX315 15 m 40 m 1 h 10 m 2 h 40 m 3 h 50 m 5 h 10 m 10 h 30 m 0 The actual recording time may shorten depending on the shooting environment Approximate Number of Still Images Unit Number of Shots Image size Built in memory S...

Page 64: ...BN VG138 3 h 20 m 5 h 45 m 0 The above are values when LIGHT is set to OFF and MONITOR BRIGHTNESS is set to 3 standard 0 The actual recording time is an estimate in case that such operations as zooming is used or recording is stopped repeatedly It may be shorter in the actual usage It is recommended to prepare battery packs ready for three times the expected recording time 0 Recording time may dif...

Page 65: ...G menu o Switching to the video playback screen 1 Open the LCD monitor 0 Check if the recording mode is A 0 If the mode is B still image tap B on the recording screen to display the mode switching screen Tap A to switch the mode to video You can also use the A B button on this unit 2 Tap PLAY to select the playback mode 3 The video playback screen is displayed Caution 0 Make a backup of important ...

Page 66: ...ring Index Screen Display Display Description A Video Still Image Mode A B Switches between video and still image modes B Date Moves to the previous next date C Displays the next index screen thumbnail display 0 You can perform the same operation with the zoom lever D Displays the previous index screen thumbnail display 0 You can perform the same operation with the zoom lever E REC Switches to the...

Page 67: ... Reverse search speed increases with each tap E l Reverse slow motion Press and hold to start reverse slow playback F d e Playback pause G i Forward search speed increases with each tap G k Forward slow motion Press and hold to start slow playback H g Advances to the next scene 0 Allows the same functions as the zoom lever to be performs while pausing playback I REC Switches to the recording mode ...

Page 68: ... the mode to video You can also use the A B button on this unit 2 Tap PLAY to select the playback mode 3 Tap J to open the mark playback mode 4 Tap DIGEST to select the DIGEST Mark Playback mode 0 When the thumbnail display is tapped directly without tapping the DIGEST button normal playback additional marks can be added starts 0 Tap SET to adjust the playback time per scene and the playback posit...

Page 69: ...ogress F Score GZ EX355 GZ EX315 Displays the score of the game displayed only if the score is registered Memo 0 Once a scene is marked the next mark won t be made within 5 seconds GAME PLAYBACK GZ EX355 GZ EX315 0 Game playback is a function to playback the goal scenes and or marked scene that is recorded by the smartphone application Everio sync 2 0 To start tap J on the playback screen 0 For th...

Page 70: ...Game playback mode Indicates that the game playback is in progress F Score Displays the score of the game displayed only if the score is registered o During the DIGEST Game Playback Display Description A Date and time display B Mark Delete button Deletes the mark that is currently displayed C DIGEST Playback Cancel Button Moves to the normal mark playback D Recorded time Displays the time that the...

Page 71: ...h the mode to video You can also use the A B button on this unit 2 Tap PLAY to select the playback mode 3 Tap J to open the mark playback mode 4 Tap SET 5 Select the items for setting 0 Proceed to Step 6 if P B TIME PER SCENE is selected and proceed to Step 7 if P B POSITION ADJUST is selected 6 Select the playback time per scene 0 Tap J to return to the previous screen 7 Adjust the playback posit...

Page 72: ...ct a scene for Digest Playback 0 Error message is displayed if no scene is found Select another scene or tap AUTO 8 Select the Digest Playback time Only when AUTO is selected in Step 7 0 The time display of Digest Playback varies according to the recording time 0 When it takes time more than 2 seconds for DIGEST PLAYBACK to start after selecting Digest Playback time a progress status will be displ...

Page 73: ... and record in advance Capturing Smiles Automatically SMILE SHOT A p 46 REGISTERED FACE SCN Playback the scenes mainly with a person whose face is registered Registering Human Face Personal Authentication Information A p 49 MARKED SCENE Start a digest playback by piecing the scenes that are marked during recording PLAYBACK PLAYLIST Plays back the playlists that you have created The following is a ...

Page 74: ...rding is not performed correctly such as turning off the power in the middle of recording You can perform the following operations to play back the videos with defective management information The following is a screen of the model with the built in memory 1 Open the LCD monitor 0 Check if the recording mode is A 0 If the mode is B still image tap B on the recording screen to display the mode swit...

Page 75: ...ith the built in memory 1 Open the LCD monitor 0 Check if the recording mode is B 0 If the mode is A video tap A on the recording screen to display the mode switching screen Tap B to switch the mode to still image You can also use the A B button on this unit 2 Tap PLAY to select the playback mode 3 Tap on the file to start playback 0 Tap I J to select the media for playback and change the index sc...

Page 76: ...eo Still Image Mode A B Switches between video and still image modes B R Rotates to the left rotates by 90 with each tap C S Rotates to the right rotates by 90 with each tap D h Returns to the previous still image 0 You can perform the same operation with the zoom lever E d e Starts pauses slideshow Slideshow Playback A p 77 F g Advances to the next still image 0 You can perform the same operation...

Page 77: ...ou want You can search and play videos or still images according to recording dates The following is a screen of the model with the built in memory 1 Tap MENU 0 Tap I J to select the media for playback GZ EX355 0 Searching can be performed in both the video and still image modes The image shows the video mode 2 Tap PLAYBACK SETTING 3 Tap SEARCH DATE 4 Tap a recording date then tap NEXT 0 Tap again...

Page 78: ...TPUT in the CONNECTION SETTINGS menu to 4 3 VIDEO OUTPUT A p 244 Images are projected horizontally on the TV 0 Adjust the TV s screen accordingly The color of images looks strange 0 Adjust the TV s screen accordingly HDMI CEC functions do not work properly and the TV does not work in conjunction with this unit 0 TVs may operate differently depending on the specifications even if they are HDMI CEC ...

Page 79: ...rns on automatically 3 Press the external input button on the TV to switch to the input from this unit via the connected connector 4 Play back a file Playing Back Videos A p 65 Playing Back Still Images A p 75 Memo 0 Change the settings in HDMI OUTPUT according to the connection HDMI OUTPUT A p 244 0 When connected to the TV via the HDMI mini cable images and sounds may not be output properly depe...

Page 80: ... 0 This unit turns off automatically Memo 0 Depending on the TV connected the display language of this unit will automatically switch to the language that is selected for the TV when this unit is turned on This is applicable only if this unit supports the language selected for the TV To use this unit with a language that differs from the display language of the TV set HDMI CONTROL to OFF 0 The dis...

Page 81: ...lu ray Recorder P P DVD writer with playback function CU VD50 P Only for AVCHD compatible devices Caution 0 DVDs that are created in AVCHD format cannot be played back on DVD players with standard quality You may not be able to remove the disc from the player Digest Playback on a Blu ray or DVD Player You can play back a few seconds from each scene of the recorded videos in the created disc 1 Load...

Page 82: ...ions apply for the still image mode 2 Tap YES 0 Tap h g to select the previous or next file 0 When no file remains the screen returns to the index screen Deleting Selected Files Deletes the selected files The following is a screen of the model with the built in memory Caution 0 Deleted files cannot be restored 1 Open the LCD monitor 0 Tap A or B to select the video or still image mode 0 Tap B or A...

Page 83: ...tion of the Currently Displayed File A p 83 Protecting Releasing Protection of Selected Files A p 84 Caution 0 When the recording media is formatted even the protected files will be deleted Protecting Releasing Protection of the Currently Displayed File Protects or releases protection of the currently displayed file 1 Tap MENU 2 Tap EDIT 3 Tap PROTECT CANCEL 4 Tap YES 0 Tap h g to select the previ...

Page 84: ...also use the A B button on this unit 2 Tap PLAY to select the playback mode 3 Tap MENU 4 Tap EDIT 5 Tap PROTECT CANCEL 6 Tap on the files to protect or release protection of 0 P appears on the selected files To remove P from a file tap on the file again 0 I and P are displayed on the files that are already protected To release protection of a file tap on the file such that P is removed 0 Tap SEL A...

Page 85: ...re by tapping forward slow motion k and reverse slow motion l 5 Press the SNAPSHOT button Memo 0 Still images are captured with a size of 1920 1080 0 Captured still images are stored in the media where the video is being played back from Combining Videos Recorded by Seamless Recording GZ EX355 Videos that are recorded on two separate media and with SEAMLESS RECORDING in the video recording menu en...

Page 86: ...r the previous session is complete it is necessary to combine seamless videos or delete the combination information of the seamless videos To delete the combination information of seamless videos select DEL COMBINED SCENES in step 6 Capturing a Required Part in the Video TRIMMING Select the required part of a video and save it as a new video file 0 The original video remains in its existing locati...

Page 87: ...lay back only your favorite videos in the order you like The original video file remains even when it is registered to a playlist 0 To create a new playlist Creating Playlists with Selected Files A p 87 Creating Playlists by Date A p 89 0 To edit or delete a created playlist Editing Playlists A p 90 Deleting Playlists A p 91 Memo 0 When a video file is deleted or moved the same file will be remove...

Page 88: ...insert the video image 0 Repeat steps 8 9 and arrange the videos in the playlist 0 To change the position of a video in the playlist lower row select the insertion point with E F after step 8 and tap ADD 0 d appears when the inserted video is selected Tap J to deselect 0 Tap on the selected video again to check the video After checking tap J 0 To delete of a video in the playlist lower row tap the...

Page 89: ...o deselect 0 Tap on the selected video again to check all the videos of the same date After checking tap J 0 Tap 0 1 or move the zoom lever to display the previous next video 0 The number on the video indicates the number of videos recorded on the same day 9 Tap ADD and insert the video image 0 Repeat steps 8 9 and arrange the videos in the playlist 0 To change the position of a video in the playl...

Page 90: ... 8 Tap on the video upper row to arrange in the playlist 0 d appears on the selected video Tap J to deselect 0 Tap on the selected video again to check the video After checking tap J 0 Tap 0 1 or move the zoom lever to display the previous next video 0 X indicates the size of the video 9 Tap ADD and insert the video image 0 Repeat steps 8 9 and arrange the videos in the playlist 0 To change the po...

Page 91: ...reen of the model with the built in memory 1 Open the LCD monitor 0 Check if the recording mode is A 0 If the mode is B still image tap B on the recording screen to display the mode switching screen Tap A to switch the mode to video You can also use the A B button on this unit 2 Tap PLAY to select the playback mode 3 Tap MENU 4 Tap EDIT 5 Tap EDIT PLAYLIST Editing 91 ...

Page 92: ... a BD Writer External Blu ray Drive o Preparing a BD Writer External Blu ray Drive Preparing a BD Writer External Blu ray Drive A p 93 o Copying to Discs Copying All Files A p 94 Copying Files by Date A p 95 Copying Selected Playlists A p 97 Copying Selected Files A p 98 Select and copy the desired videos or still images individually o Other Operations Playing Back with a BD Writer External Blu ra...

Page 93: ...he BD writer external Blu ray drive C Turn on the BD writer external Blu ray drive D Connect the AC adapter to this unit 0 This unit powers on automatically when the AC adapter is connected 0 This unit turns on and the BACK UP menu appears 0 While the USB cable is connected the BACK UP menu is displayed 0 Refer also to the instruction manual of the BD writer external Blu ray drive 4 Insert a new d...

Page 94: ...lu ray DISC or DVD AVCHD 0 The media changes to the tapped item Select the appropriate setting according to the disc 0 Selecting Blu ray DISC enables you to save videos in a Blu ray disc in the high definition quality 0 Selecting DVD AVCHD enables you to save videos in a DVD in the high definition quality 4 Tap the media you would like to make a backup GZ EX355 5 Tap the desired method 0 ALL SCENE...

Page 95: ...e built in memory 1 Select video or still image mode 2 Tap SELECT AND CREATE video or SELECT AND SAVE still image 0 While the video mode is shown in the image the same operations apply for the still image mode 0 Tap A to switch between the video and still image modes 0 Tap A to switch between the video 50i video 50p and still image modes Switch to the mode in which you want to copy files 3 Tap Blu...

Page 96: ...EATE OR PRESS STOP TO EXIT appears change the disc 10 Tap OK when COMPLETED is displayed 11 Press and hold the M button for 2 seconds or more to turn off this unit and disconnect the USB cable Caution 0 Do not turn off the power or remove the USB cable until copying is complete 0 Files that are not on the index screen during playback cannot be copied Special files cannot be copied either 0 All DVD...

Page 97: ...d appears on the selected playlist upper row Tap J to deselect 0 Tap on the selected playlist again to check the content of the playlist After checking tap J 0 Tap 0 1 or move the zoom lever to display the previous next playlist 7 Tap ADD to insert a playlist 0 Repeat steps 6 7 and arrange the playlists 0 To change the position of a playlist lower row select the insertion point with E F after step...

Page 98: ... with a BD Writer External Blu ray Drive A p 100 0 To create a playlist Creating Playlists from the Recorded Videos A p 87 Copying Selected Files Select and copy the desired videos or still images individually The following is a screen of the model with the built in memory 1 Select video or still image mode 2 Tap SELECT AND CREATE video or SELECT AND SAVE still image 0 While the video mode is show...

Page 99: ...STOP TO EXIT appears change the disc 11 Tap OK when COMPLETED is displayed 12 Press and hold the M button for 2 seconds or more to turn off this unit and disconnect the USB cable Caution 0 Do not turn off the power or remove the USB cable until copying is complete 0 Files that are not on the index screen during playback cannot be copied Special files cannot be copied either 0 All DVDs will be fina...

Page 100: ...es Connecting via the HDMI Mini Connector A p 79 Connecting via the AV Connector A p 80 Creating Discs with a DVD Writer You can copy the recorded files to discs or play back the created discs using an optional DVD writer Creating Discs with a DVD Writer o Preparing a DVD Writer Preparing a DVD Writer CU VD3 A p 101 Preparing a DVD Writer CU VD50 A p 101 o Copying to Discs Copying All Files A p 10...

Page 101: ...ocks or malfunctions may occur Preparing a DVD Writer CU VD50 1 Remove the AC adapter and battery pack from this unit 2 Open the LCD monitor 3 Connect the USB cable and the AC adapter A Connect the USB cable provided with the DVD writer B Connect the AC adapter of the DVD writer 0 Turn on the DVD writer C Connect the AC adapter to this unit 0 This unit powers on automatically when the AC adapter i...

Page 102: ...still image mode 2 Tap CREATE FROM ALL video or SAVE ALL still image 0 While the video mode is shown in the image the same operations apply for the still image mode 0 Tap A to switch between the video and still image modes 3 Tap the media you would like to make a backup GZ EX355 4 Tap the desired method 0 While the video mode is shown in the image the same operations apply for the still image mode...

Page 103: ...er A p 107 Copying Files by Date Videos or still images are sorted and copied according to the date on which they were recorded The following is a screen of the model with the built in memory 1 Select video or still image mode 2 Tap SELECT AND CREATE video or SELECT AND SAVE still image 0 While the video mode is shown in the image the same operations apply for the still image mode 0 Tap A to switc...

Page 104: ...created disc refer to Playing Back with a DVD Writer A p 107 Playing Back with a DVD Writer A p 107 Copying Selected Playlists Arrange and copy the created playlists in the order you like The following is a screen of the model with the built in memory 1 Select video mode 2 Tap SELECT AND CREATE 3 Tap the media you would like to make a backup GZ EX355 4 Tap CREATE BY PLAYLIST 5 Tap on the playlist ...

Page 105: ...ton for 2 seconds or more to turn off this unit and disconnect the USB cable Caution 0 Do not turn off the power or remove the USB cable until copying is complete 0 Files that are not on the index screen during playback cannot be copied Special files cannot be copied either 0 All DVDs will be finalized automatically Files cannot be added to the DVD R DVD RW later Memo 0 A list of playlists is disp...

Page 106: ...fter selecting all the files tap SAVE 0 While the video mode is shown in the image the same operations apply for the still image mode 7 Tap EXECUTE 0 The number of discs required to copy the files is displayed Prepare the discs accordingly 8 Tap AUTO or BY DATE A mode only 0 When AUTO is selected videos with similar recording dates are displayed in groups 0 When BY DATE is selected videos are disp...

Page 107: ...nected to the DVD writer Connecting via the HDMI Mini Connector A p 79 Connecting via the AV Connector A p 80 Creating a Disc Using a Connected Blu ray Recorder You can create discs using a Blu ray recorder by connecting it to this unit using a USB cable The following is a screen of the model with the built in memory 1 Remove the AC adapter and battery pack from this unit 2 Open the LCD monitor 3 ...

Page 108: ...layback 0 Set VIDEO OUTPUT in the CONNECTION SETTINGS menu to the aspect ratio 4 3 or 16 9 of the connecting TV VIDEO OUTPUT A p 244 7 Start recording 0 Start playback on this unit and press the record button on the recorder Playing Back Videos A p 65 0 After playback is complete stop the recording Memo 0 AV cable P N QAM1322 001 Wiring specifications for video audio of the 4 pole mini plug are de...

Page 109: ...in the CONNECTION SETTINGS menu to the aspect ratio 4 3 or 16 9 of the connecting TV VIDEO OUTPUT A p 244 7 Start recording 0 Start playback on this unit and press the record button on the recorder Playing Back Videos A p 65 0 After playback is complete stop the recording Memo 0 AV cable P N QAM1322 001 Wiring specifications for video audio of the 4 pole mini plug are described in the following Fo...

Page 110: ...ring copying and playing back Turning off the unit or the USB external hard disk drive Disconnecting the USB cable 0 Do not format the USB external hard disk drive using the PC If you did format again using this unit All the data in the USB external hard disk drive will be erased 0 Avoid the following operations using the PC Deleting files or folders in the USB external hard disk drive Moving file...

Page 111: ...still image All videos or still images in this unit are copied 0 UNSAVED SCENES video UNSAVED IMAGES still image Videos or still images that have never been copied are automatically selected and copied 5 Check that there is sufficient remaining space on the hard disk drive and tap YES 0 Backup starts when YES is tapped 6 Tap OK when COMPLETED is displayed 7 Press and hold the M button for 2 second...

Page 112: ...top playback and turn off the camcorder by pressing the M button for about 2 seconds Then disconnect the USB cable Memo 0 Sound or video may be interrupted during playback Deleting Folders in the USB External Hard Disk Drive Files that are copied to the external hard disk drive can be deleted Caution 0 Deleted files cannot be restored 0 Be sure to back up important files on a PC Backing Up Files A...

Page 113: ...p YES 0 After formatting tap OK Importing Files from the USB External Hard Disk Drive You can copy video files from a USB external hard disk drive to the built in memory of this unit or an SD card The following is a screen of the model with the built in memory 1 Select video mode 2 Tap IMPORT FROM DEVICE in BACK UP 3 Tap USB HDDFBUILT IN MEM or USB HDDFSD 0 Files will be imported to the selected m...

Page 114: ... an SD Card GZ EX355 You can copy videos and still images from the built in memory to SD card Copying still images to cards makes it convenient to bring them to the shop for printing developing Caution 0 Make sure that there is enough space left in the destination medium 0 Videos in the SD card cannot be copied to the built in memory 1 Open the LCD monitor 0 Tap A or B to select the video or still...

Page 115: ...in memory to SD card Files that are moved will be deleted from the built in memory Moving still images to SD cards makes it convenient to bring them to the shop for printing developing Caution 0 Make sure that there is enough space left in the destination medium 0 Videos in the SD card cannot be moved to the built in memory 1 Open the LCD monitor 0 Tap A or B to select the video or still image mod...

Page 116: ...emove P from a file tap on the file again 0 Tap SEL ALL to select all files 0 Tap REL ALL to release all selections 7 Tap SET 0 SET is deactivated when no file is selected 8 Tap YES 0 Moving of files starts 0 After moving tap OK Copying 116 ...

Page 117: ...e animation on the Detailed User Guide Windows XP 0 Refer to the operating instructions found in the animation on the Detailed User Guide Windows Vista Windows 7 Windows XP OS Windows Vista 32 64 bit Home Basic or Home Premium Pre installed versions only Service Pack 2 Windows 7 32 64 bit Home Premium Pre installed versions only Service Pack 1 Windows XP Home Edition or Professional Pre installed ...

Page 118: ...ar format and perform editing using the provided software Windows Vista Windows 7 0 Refer to the operating instructions found in the animation on the Detailed User Guide Windows XP 0 Refer to the operating instructions found in the animation on the Detailed User Guide Copying 118 ...

Page 119: ...J to return to the previous screen 0 The provided software LoiLoFit for Everio starts up on the computer The subsequent operations are to be performed on the computer 6 Select the files to back up 0 Click Select all to select all the files at once 7 After selecting click Next 8 Click Yes to start backup 0 Backup starts 0 The tab on the right side becomes blank when the backup is completed Memo 0 V...

Page 120: ...r Windows Vista Click OK 4 Disconnect the USB cable and close the LCD monitor Recording Videos to Discs 1 Insert a new disc into the PC s recordable DVD or Blu ray drive 2 Click Disk to select the disc type 3 Select the date that the desired videos for saving on the disc was recorded 4 Select the files to save 5 Click Next Copying 120 ...

Page 121: ...oFit for Everio For details refer to the following link http loilo tv us product 33 page 27 0 Videos recorded in the iFrame format can not be copied 0 Depending on the PC environment even if the operating environment is adequate 1 frame per second may be reduced during video playback 0 To view the help file of LoiLoFit for Everio select Help from the LoiLoFit for Everio s menu bar or press F1 on t...

Page 122: ...s displayed after the camera operation is completed 0 Operations are to be performed on the computer after the screen switches 6 Select Computer Windows Vista My Computer Windows XP Computer Windows 7 from the Start menu then click on the JVCCAM_MEM or JVCCAM_SD icon 0 Open the folder with the desired files List of Files and Folders A p 123 List of Files and Folders A p 123 7 Copy the files to any...

Page 123: ...created in the built in memory and SD card as shown below They are created only when necessary GZ EX355 is the only model with the built in memory Caution 0 When the camera and PC are connected by an USB cable recorded media are read only Copying 123 ...

Page 124: ... in the Help menu of Everio MediaBrowser 4 Verifying System Requirements Guideline Right click on Computer or My Computer in the Start menu and select Properties to check the following items Windows Vista Windows 7 0 Refer to the operating instructions found in the animation on the Detailed User Guide Windows XP 0 Refer to the operating instructions found in the animation on the Detailed User Guid...

Page 125: ... 4 Tap CONNECT TO PC 5 Tap PLAYBACK ON PC 0 Tap L to exit the menu 0 Tap J to return to the previous screen 0 Everio Software Setup appears on the computer Operations are to be performed on the computer after the screen switches Memo 0 If Everio Software Setup doesn t appear double click JVCCAM_APP in My Computer or Computer then double click install or Install exe 0 If the auto play dialog box ap...

Page 126: ...uter The subsequent operations are to be performed on the computer 6 Select the source of the image file 7 Start backup 0 Backup starts 8 After backup is complete click OK Memo 0 Before making backup load the SD card in which the videos and still images are stored on this unit 0 If you encounter any problems with the provided software Everio MediaBrowser 4 please consult the Pixela User Support Ce...

Page 127: ...monitor Organizing Files After backing up your files organize them by adding labels such as Family Trip or Athletic Meet This is useful not only for creating discs but for viewing the files too 1 Double click on the Everio MediaBrowser 4 icon 0 The provided software starts up 2 Display the month of the files to organize 3 Create a user list 0 A new user list is added to the user list library Copyi...

Page 128: ... Spanish 800 1532 4865 toll free Other Countries in Europe English German French Spanish 44 1489 564 764 Asia Philippines English 63 2 438 0090 China Chinese 10800 163 0014 toll free Homepage http www pixela co jp oem jvc mediabrowser e Recording Videos to Discs Copy the files that are arranged using the user list to discs 1 Insert a new disc into the PC s recordable DVD drive 2 Select the desired...

Page 129: ...mode to create an AVCHD disc the videos need to be converted to XP recording mode before copying Therefore it may take a longer time than copying videos recorded in other modes 0 To view the help file of Everio MediaBrowser 4 select Help from the Everio MediaBrowser 4 s menu bar or press F1 on the keyboard 0 If you encounter any problems with the provided software Everio MediaBrowser 4 please cons...

Page 130: ...ter the camera operation is completed 0 Operations are to be performed on the computer after the screen switches 6 Select Computer Windows Vista My Computer Windows XP Computer Windows 7 from the Start menu then click on the JVCCAM_SD icon 0 Open the folder with the desired files List of Files and Folders A p 131 7 Copy the files to any folder in the computer desktop etc Caution 0 When the camera ...

Page 131: ...s and Folders Folders and files are created in the SD card as shown below They are created only when necessary Caution 0 When the camera and PC are connected by an USB cable recorded media are read only Copying 131 ...

Page 132: ...and PC are connected by an USB cable recorded media are read only 0 MTS files that are copied to a Mac computer cannot be imported to iMovie To use MTS files with iMovie import the files using iMovie Memo 0 To edit view the files use a software that supports iFrame video AVCHD video JPEG still image files 0 When removing this unit from the computer drag and drop the JVCCAM_MEM GZ EX355 or JVCCAM_S...

Page 133: ...es or movements are detected by the camera You can also set to record videos on the camera during detection Sending Still Images via E mail upon Detection of Face or Movement DETECT MAIL A p 146 VIDEO MAIL 0 Videos of up to 15 seconds can be recorded and sent via e mail Record and Send Videos via E mail VIDEO MAIL A p 147 TV MONITORING 0 Connect this unit to the DLNA compatible TV via access point...

Page 134: ...lure to do so may increase the risk of personal information being intercepted such as user names passwords and the content of your mails or illegal access to the network 0 Due to the design of wireless LAN note that security may be breached by unusual or unforeseeable means 0 For more details on wireless LAN and network security please consult the manufacturer of your wireless LAN device 0 JVC sha...

Page 135: ... turn off automatically after 10 days of continuous usage 0 When not monitoring from a smartphone or computer the focus of the camera is fixed 0 Even when monitoring from a smartphone or computer the focus of the camera will be fixed if not operated for more than 3 hours Focus works again when the camera is operated 0 You may have difficulty establishing a connection via direct monitoring in an en...

Page 136: ...AVCHD 5 Check the SSID and the PASS being displayed on the screen of the camera 6 Select the SSID in step 5 from the Wi Fi network selection screen of your smartphone and enter the PASS on the password screen Operation on the smartphone or computer 0 For details on connecting your smartphone or computer to a Wi Fi network please refer to the instruction manual of the phone terminal in use 7 A conn...

Page 137: ...tivate WPS refer to the instruction manual of the device in use 7 A connection is established and Q appears on the camera s screen Monitoring the Images from a Smartphone or Computer o Smartphone Android iPhone Memo 0 Prior to use this function a smartphone application needs to be installed on the smartphone Installing Smartphone Applications A p 179 1 Start Everio sync 2 on the smartphone after s...

Page 138: ...wirelessly From a smartphone or computer in connection you can monitor the images captured by the camera 0 Recording of videos and still images may be performed while monitoring Caution 0 This function is not designed for disaster or crime prevention 0 To prevent the situation of forgetting to turn off the power this unit will turn off automatically after 10 days of continuous usage 0 When not mon...

Page 139: ...SETTING Operation on this camera 5 Tap ACCESS POINTS Operation on this camera 6 Tap ADD Operation on this camera 7 Tap EZ REGISTRATION WPS Operation on this camera 8 Activate WPS of the access point wireless LAN router within 2 minutes 0 To activate WPS refer to the instruction manual of the device in use 9 After registration is complete tap OK on the camera s screen Operation on this camera o Sea...

Page 140: ...n keyboard to enter characters The character changes with every tap ABC for example enter A by tapping once B by tapping twice or C by tapping 3 times 0 Tap DELETE to delete a character 0 Tap CANCEL to exit 0 Tap A a 1 to select character input type from upper case letter lower case letter and number 0 Tap E or F to move one space to the left or right 0 The password is not required if the wireless...

Page 141: ...e Applications A p 179 o Operation on this camera 1 Tap MENU Operation on this camera 0 The top menu appears 2 Tap the Wi Fi Q icon Operation on this camera 3 Tap INDOOR MONITORING O Operation on this camera 4 Tap START I Operation on this camera 5 Start making a connection Operation on this camera 0 Name SSID of the access point wireless LAN router in connection is displayed 6 The following is di...

Page 142: ...the camera s screen displayed when the computer and the camera are connected wirelessly 0 The URL for the computer to connect to appears 2 Check the URL being displayed on the camera screen which starts from http 0 After checking the URL tap QUIT to return to the previous screen 3 Start Internet Explorer web browser on the computer and enter the URL 4 Log in with your username and password 0 The u...

Page 143: ... internet For more information contact your internet service provider Memo 0 Depending on the wireless LAN router in use and signal strength you may experience connection problems or slow connections 0 When the zoom or pan cradle is operated by using the smartphone or computer it may take longer for responses as compared to the manual operations Settings Required in Advance To operate it is necess...

Page 144: ...ss point wireless LAN router in connection is displayed 6 The following is displayed when the camera is connected to the access point 0 The URL WAN for the smartphone to connect to appears Does not appear if DDNS is not set or set incorrectly 0 LUPnP is displayed when UPnP cannot be used 7 Check the URL WAN 0 After checking the URL tap QUIT to return to the previous screen 0 LUPnP is displayed whe...

Page 145: ...ed access from others Also avoid using easily guessable passwords such as birth dates You are recommended to change your password periodically Setting the Password DIRECT MONITORING INDOOR MONITORING OUTDOOR MONITORING A p 159 0 There is no guarantee that the operations will work with all computer environments For example the video download feature of mobile safari browser etc is not supported Cau...

Page 146: ...essible from the web cannot be used Settings Required in Advance To send e mails the following settings are required in advance The above settings are not necessary if they have already been set for other functions 1 Registering an access point Registering the Access Points of the Camera to Connect ACCESS POINTS A p 168 2 Setting the account for sending e mails Setting the Sender s E mail Address ...

Page 147: ...o obtain his her consent in advance 0 If you reply to the received e mail by using this unit the receiver can not check your replied e mail by using this unit Check the e mails sent by this unit from computer etc 0 JVC will not be responsible for any trouble that occurs upon the sending of mails Record and Send Videos via E mail VIDEO MAIL Videos of up to 15 seconds can be recorded and sent via e ...

Page 148: ...mails may be marked as spam or the usage limited may be exceeded Be sure to check the terms of the internet provider in advance to find out if there are any restrictions on the number or size of e mails that can be sent 0 When setting another person as the recipient be sure to obtain his her consent in advance 0 Depending on the e mail service provider the sending of video mail may not be supporte...

Page 149: ...peration Method 1 Tap MENU Operation on this camera 0 The top menu appears 2 Tap the Wi Fi Q icon Operation on this camera 3 Tap TV MONITORING K Operation on this camera 4 Tap START I Operation on this camera 5 Start making a connection Operation on this camera 6 Connection in progress 7 After the connection is completed wait for the DLNA device to start up Operation on this camera 0 If a consider...

Page 150: ...mputer install LoiLoFit for Everio in your computer Installing the Provided Software A p 118 0 Wireless LAN router use a product that has a Wi Fi certification logo 0 Activate the UPnP function of the wireless LAN router Settings Required in Advance 1 Registration of the required information for connecting the camera to the access point wireless LAN router is necessary Registering the Access Point...

Page 151: ...he location information it is necessary to connect the smartphone to the camera and start the smartphone application Also setting the LOC INFO TRANS INT for the smartphone application is necessary Smartphone Application Settings A p 190 0 Activate the GPS function of the smartphone in advance 0 The recorded location information can be used on the software provided with this unit What You Need 0 Sm...

Page 152: ...r smartphone or computer to a Wi Fi network please refer to the instruction manual of the phone terminal in use 7 A connection is established and Q appears on the camera s screen o Connection by Wi Fi Protected Setup WPS 1 Tap MENU Operation on this camera Set the camera to the recording mode 0 The top menu appears 2 Tap the Wi Fi Q icon Operation on this camera 3 Tap the DIRECT MONITORING N icon ...

Page 153: ...e 0 For details on using the smartphone refer to the instruction manual of the device in use 2 Start Everio sync 2 on the smartphone 3 Tap DIRECT MONITORING 4 Monitor screen is displayed 0 To change the time interval for obtaining the GPS location information OFF 15 sec tap Q Smartphone Application Settings A p 190 5 Receiving the location information Display on this camera 0 When the GPS location...

Page 154: ...artphone by setting the camera on the pan cradle To use a pan cradle change the setting of AV TERMINAL in advance Change the setting from the menu screen of the camera o Changing the setting of the AV terminal 0 By default the AV terminal is set to AV To use a pan cradle change the setting as described in the following steps 1 Tap MENU Operation on this camera 2 Tap CONNECTION SETTINGS 3 Tap AV TE...

Page 155: ...urned ON pan cradle moves to the left right to adjust the position o Operations from the smartphone application 0 Connect the camera and the smartphone via DIRECT MONITORING or INDOOR MONITORING OUTDOOR MONITORING Image Monitoring via Direct Connection DIRECT MONITORING A p 135 Image Monitoring via an Access Point at Home INDOOR MONITORING A p 138 Image Monitoring via the Internet OUTDOOR MONITORI...

Page 156: ... Registering the Access Points of the Camera to Connect ACCESS POINTS A p 168 0 Obtaining a dynamic DNS account Obtaining a Dynamic DNS DDNS Account A p 161 0 Setting the account on this camera Setting Dynamic DNS on this Camera OUTDOOR MONITORING A p 162 0 Setting the sender s e mail address Setting the Sender s E mail Address of the Camera A p 163 0 Registering the recipient s e mail address Reg...

Page 157: ...ON Sets the UPnP of the camera OFF Disables UPnP ON Enables UPnP Setting the UPnP of this Camera OUTDOOR MONITORING A p 161 0 DDNS SETTING Configures various settings related to DDNS Setting Dynamic DNS on this Camera OUTDOOR MONITORING A p 162 0 HTTP PORT Default 80 Changes the port number to access to the camera Changing the HTTP Port DIRECT MONITORING INDOOR MONITORING OUTDOOR MONITORING A p 16...

Page 158: ...ds deletes or perform LAN settings of access points wireless LAN router Registering the Access Points of the Camera to Connect ACCESS POINTS A p 168 0 MAIL SETTING Sets the e mail addresses of the sender and recipient Setting the Sender s E mail Address of the Camera A p 163 Registering the Recipient s E mail Address of the Camera A p 165 0 MAC ADDRESS Media Access Control address Displays the MAC...

Page 159: ...his camera 5 Register a password Operation on this camera 0 By default the password is set to 0000 INDOOR MONITORING OUTDOOR MONITORING 0 Tap on the on screen keyboard to enter characters The character changes with every tap ABC for example enter A by tapping once B by tapping twice or C by tapping 3 times 0 Tap DELETE to delete a character 0 Tap CANCEL to exit 0 Tap A a 1 to select character inpu...

Page 160: ...rt Wi Fi Direct fails set to OFF Memo 0 When set to OFF connection to devices that do not support Wi Fi Direct will be disabled Changing the HTTP Port DIRECT MONITORING INDOOR MONITORING OUTDOOR MONITORING Changes the port number to access to the camera Valid when setting up multiple cameras for Outdoor Monitoring 1 Tap MENU Operation on this camera 0 The top menu appears 2 Tap the Wi Fi Q icon Op...

Page 161: ...ve received a confirmation e mail to the address used in registration and access the URL stated in the e mail Operation on a computer or smartphone 3 Set the username and password used in registration on the camera Operation on this camera Setting Dynamic DNS on this Camera OUTDOOR MONITORING A p 162 4 Execute OUTDOOR MONITORING Operation on this camera If OUTDOOR MONITORING is executed while dyna...

Page 162: ... on this camera 6 Enter the DDNS settings username password Operation on this camera 0 Tap on the on screen keyboard to enter characters The character changes with every tap ABC for example enter A by tapping once B by tapping twice or C by tapping 3 times 0 Tap DELETE to delete a character 0 Tap CANCEL to exit 0 Tap A a 1 to select character input type from upper case letter lower case letter and...

Page 163: ...eration on this camera 0 Tap CHANGE to change the contents that are already set 0 Enter the e mail address and tap SET 0 Tap on the on screen keyboard to enter characters The character changes with every tap 0 Tap DELETE to delete a character 0 Tap CANCEL to exit 0 Tap A a 1 to select character input type from upper case letter lower case letter and number 0 Tap E or F to move one space to the lef...

Page 164: ... tap SET 0 Tap on the on screen keyboard to enter characters The character changes with every tap 0 Tap DELETE to delete a character 0 Tap CANCEL to exit 0 Tap A a 1 to select character input type from upper case letter lower case letter and number 0 Tap E or F to move one space to the left or right 0 After setting tap SET 12 Tap NEXT Operation on this camera 0 The following does not appear if AUT...

Page 165: ... use of addresses other than Gmail please consult the mail service provider Internet provider etc for information on the settings Registering the Recipient s E mail Address of the Camera Registers the e mail addresses of recipients on the camera 1 Tap MENU Operation on this camera 0 The top menu appears 2 Tap the Wi Fi Q icon Operation on this camera 3 Tap 1 on the lower right of the screen Operat...

Page 166: ... 0 An icon L appears after tapping VIDEO MAIL and the recipient s e mail address for the VIDEO MAIL 0 To cancel press the icon one more time Memo 0 Up to 8 e mail addresses can be registered as recipients Caution 0 When setting another person as the recipient be sure to obtain his her consent in advance 0 Check whether notifications indicating errors have been sent to the sender s e mail address M...

Page 167: ... recording upon detection of subject s movements 0 Select FACE DETECTION to start recording upon detection of human faces Setting the Detection Interval of this Camera DETECT MAIL SETTING Sets the time period to enable detection again after the previous one 1 Tap MENU Operation on this camera 0 The top menu appears 2 Tap the Wi Fi Q icon Operation on this camera 3 Tap DETECT MAIL P Operation on th...

Page 168: ... method and wireless LAN setup are performed automatically in WPS allowing easy registration of connection settings between devices Search and Register A search is conducted to locate access points Select and register an access point from the list of search results Manual Registration Enter the name and authentication method manually to register an access point WPS PIN Registration Enter the WPS P...

Page 169: ...device in use 9 After registration is complete tap OK on the camera s screen Operation on this camera o Search and Register 1 Tap MENU Operation on this camera 0 The top menu appears 2 Tap the Wi Fi Q icon Operation on this camera 3 Tap 1 on the lower right of the screen Operation on this camera 4 Tap COMMON Wi Fi SETTING Operation on this camera 5 Tap ACCESS POINTS Operation on this camera 6 Tap ...

Page 170: ... A a 1 to select character input type from upper case letter lower case letter and number 0 Tap E or F to move one space to the left or right 0 The password is not required if the wireless LAN router is not security protected 10 After registration is complete tap OK on the camera s screen Operation on this camera o Manual Registration 1 Tap MENU Operation on this camera 0 The top menu appears 2 Ta...

Page 171: ...ct the type of authentication method security Operation on this camera 0 Select according to the setting of your router 10 When authentication method is not set to NONE enter a password and tap SET Operation on this camera 0 Tap on the on screen keyboard to enter characters The character changes with every tap ABC for example enter A by tapping once B by tapping twice or C by tapping 3 times 0 Tap...

Page 172: ...WPS PIN Operation on this camera 0 The PIN code appears 8 Enter the PIN code displayed on the camera to the access point wireless LAN router 0 For details on how to enter the PIN code refer to the instruction manual of the device in use 9 Tap START Operation on this camera 0 Tap START after entering PIN code to the wireless LAN router Connection cannot be established if START is tapped before ente...

Page 173: ...is camera 0 Tap USE to use the selected access point 0 Tap DELETE to delete the registered access point 7 Perform the LAN settings when DHCP is set to OFF Operation on this camera 0 After setting tap OK 0 LAN settings comprise of the following items DHCP ON Obtains IP address from the DHCP server automatically OFF Settings of IP ADDRESS SUBNET MASK DEFAULT GATEWAY PRIMARY DNS and SECONDARY DNS are...

Page 174: ...rd Operation on this camera 0 Tap on the on screen keyboard to enter characters The character changes with every tap ABC for example enter A by tapping once B by tapping twice or C by tapping 3 times 0 Tap DELETE to delete a character 0 Tap CANCEL to exit 0 Tap A a 1 to select character input type from upper case letter lower case letter and number 0 Tap E or F to move one space to the left or rig...

Page 175: ... all the devices Registering the MAC Address TV MONITORING Register the MAC address of the TV monitor to Everio 1 Tap MENU Operation on this camera 0 The top menu appears 2 Tap the Wi Fi Q icon Operation on this camera 3 Tap TV MONITORING 4 Tap MAC ADDRESS LIST 5 Tap ADD 6 Enter the MAC address of the TV monitor 0 Tap on the on screen keyboard to enter characters 0 Tap DELETE to delete a character...

Page 176: ... the address during direct connection while the below shows the MAC address when connected to an access point 0 After checking tap SET Protecting the Network Settings with a Password Sets a password to lock and protect the network settings 1 Tap MENU Operation on this camera 0 The top menu appears 2 Tap the Wi Fi Q icon Operation on this camera 3 Tap 1 on the lower right of the screen Operation on...

Page 177: ...s Returns the Wi Fi settings to their default values 1 Tap MENU Operation on this camera 0 The top menu appears 2 Tap the Wi Fi Q icon Operation on this camera 3 Tap 1 on the lower right of the screen Operation on this camera 4 Tap COMMON Wi Fi SETTING Operation on this camera 5 Tap INITIALIZATION Operation on this camera 6 Tap YES Operation on this camera Using Wi Fi GZ EX355 GZ EX315 177 ...

Page 178: ...t either of the 2 HIGH SPEED or LOW SPEED 0 For details on how to use a pan cradle refer to the following Using the Pan Cradle Sold Separately A p 154 o Change the setting via smartphone 1 Tap Q Confirm that the camera and a smartphone are connected via Wi Fi and the monitor screen is displayed on the smartphone 2 Tap PAN OPERATION SPEED 3 Tap HIGH SPEED or LOW SPEED Using Wi Fi GZ EX355 GZ EX315 ...

Page 179: ...ifications of Google Play are subject to changes without prior notice For operating details refer to the help file of Google Play o iPhone iPad iPod touch 1 Tap App Store on the home screen 2 Search for the Everio sync 2 application 3 Tap on the Everio sync 2 application 0 The detailed information of the application is displayed 4 Tap FREE F INSTALL 0 Enter your password on the password entry scre...

Page 180: ...ng the Markings Enter the mark to make it easy to find the scene later o Common for Android and iOS 1 Tap Marking while recording the video 2 Tap the mark icon D at the scene you want to mark 0 Once a scene is marked the next mark won t be made within 5 seconds 0 Tap Monitor to return to the monitor screen o Screen display of the camera while marking 0 The mark icon is displayed when a scene is ma...

Page 181: ...find the scenes you want to view later o Common for Android and iOS 1 Tap Game Score 2 Tap the scorecard 0 Proceed to step 5 to keep the team settings unchanged 3 Tap TEAM SELECTION 0 Tap TEAM LIST to change the team name and color and to add a team 4 Select the team then tap OK 5 Tap c to start recording the video Using Wi Fi GZ EX355 GZ EX315 181 ...

Page 182: ...scorecard 0 Tap the Undo button to cancel the latest score entry 0 When the score is registered next entry cannot be made for 5 seconds 8 Mark the favotite scenes 0 Mark the favorite scenes by tapping the flag icon D 0 Once a scene is marked the next mark won t be made within 5 seconds 9 When the game is ended tap Game End Using Wi Fi GZ EX355 GZ EX315 182 ...

Page 183: ...me can be set prior to recording use alphabets and numbers Game Score Settings A p 191 B Game score recording icon Transferring Videos AVCHD format Transfer videos recorded in AVCHD format to the smartphone Videos recorded in the 50p mode cannot be forwarded 0 The video to be forwarded is converted to the following format Item Details System MP4 Video Codec H 264 MPEG 4 AVC Baseline Profile Resolu...

Page 184: ...the check mark A to the files to transfer and tap the transfer mark icon B on the lower right 0 Number of the selected image files is indicated next to the check mark in lower left 0 To set the length of video you are transferring refer to the below instructions Smartphone Application Settings A p 190 6 Tap TRANSFER 0 Tap CANCEL to cancel the operation 7 TRANSFER starts Using Wi Fi GZ EX355 GZ EX3...

Page 185: ...u can set the length of transferred video A Tap MANUAL in step 5 B At the start point enter the starting time of the video Specify the lengths of the video by using the slider bar 10 to 300 sec C After confirming the setting tap TRANSFER and then tap TRANSFER one more time 0 Tap to set the start point of the video transfer minutes seconds 0 Length of the transferred video can be adjusted by using ...

Page 186: ...artphone 0 Start the application after confirming that the smartphone is connected to this camera 2 Select the connection type to the camera 0 Tap the current connection type 0 Recording screen appears 3 Tap Index 4 Select iFrame from the tabs in the lower part of the screen 0 Tap Monitor to return to the monitor screen 0 Tap Q to move to the setting screen 5 In the index screen tap the desired im...

Page 187: ...ts 0 Tap CANCEL to cancel the operation 8 After transferring is complete tap OK 0 To play back and check the video tap CHECK Android only 0 To upload the video tap SHARE Android only Tap the desired service then proceed to the uploading process To make use of a service it is necessary to perform registration beforehand Using Wi Fi GZ EX355 GZ EX315 187 ...

Page 188: ...hone 0 Start the application after confirming that the smartphone is connected to this camera 2 Select the connection type to the camera 0 Tap the current connection type 0 Recording screen appears 3 Tap Index 4 Select the Still Image tab in the lower part of the screen and tap the index screen 0 Tap Monitor to return to the monitor screen 0 Tap Q to move to the setting screen 5 Enter the check in...

Page 189: ...ap CANCEL to cancel the operation 8 After transferring is complete tap OK 0 To play back and check the still image tap CHECK Android only 0 To upload the still image tap SHARE Android only Tap the desired service then proceed to the uploading process To make use of a service it is necessary to perform registration beforehand Using Wi Fi GZ EX355 GZ EX315 189 ...

Page 190: ...ble for videos in AVCHD format only GAME SCORE SETTING Enter the recording methods of the game score as well as the team information Game Score Settings A p 191 URL Enter the URL of the camera that is connected to the smartphone via wireless network HTTP AUTHORIZATION Set the user name and the password for INDOOR MONITORING OUTDOOR MONITORING Thedefaultusernameis everio fixed andthe password is 00...

Page 191: ...ping the desired color from the color palette Tap the button to add a new team SCORE BUTTON SETTING Tap BUTTON SETTING to select up to 4 buttons Each number indicates the score that can be added once Select the button s depending on the type of the games CHANGE BACKGROUND COLOR Set the background color of the game score screen PRIORITIZE THE SCORE The score can be entered within 5 seconds after th...

Page 192: ...otionJPEG Sound of the camera cannot be played back from the browser Recording and zoom operations can be performed from the browser 0 The monitor s image stops automatically after monitoring is performed continuously for 12 hours in Full HD or SD To resume press the reload button 0 To use Full HD or SD it is necessary to install Media Player 12 in advance 0 Lagging of the screen may be caused by ...

Page 193: ...isplay AVCHD o Video Index Screen Thumbnail Display iFrame 0 To download a video click on the thumbnail o Still Image Index Screen Thumbnail Display 0 To download a still image click on the thumbnail Using Wi Fi GZ EX355 GZ EX315 193 ...

Page 194: ...o DETECT MAIL SETTING Screen Notification mail settings such as detection method and recipient s e mail address can be changed even when the camera is out of reach Using Wi Fi GZ EX355 GZ EX315 194 ...

Page 195: ...operated Connection gets disconnected or a UNABLE TO CONNECT message is displayed 0 Establish connection again at a place with good signal strength Transmission speed may drop or connection may fail if the devices are placed too far away from each other when there are objects in between or when microwave ovens or other wireless devices are in use 0 If connection cannot be established again restart...

Page 196: ...is interrupted or delayed 0 If the network speed is slow videos and audio sound may be interrupted or delay may become significant 0 For web browser Lagging may become significant due to the performance of the computer If the stream format is set to Full HD change to SD or Motion JPEG and try again Wi Fi Specifications A p 199 0 For web browser If lagging is severe reload the screen regularly 0 Fo...

Page 197: ...nd audio sound may be interrupted or delay may become significant 0 For web browser Lagging may become significant due to the performance of the computer If the stream format is set to Full HD change to SD or Motion JPEG and try again Wi Fi Specifications A p 199 0 For web browser If lagging is severe reload the screen regularly 0 For smartphone Try to change the place and time to locate an enviro...

Page 198: ... notifications are received Refer to Unable to send e mails and adjust the settings accordingly If notifications are received Check the content of the notification Note Do not continue sending e mails with the same settings if you receive error notifications Depending on the provider you may be marked as a sender of spam junk mail Unable to attach images to e mails 0 Depending on the provider some...

Page 199: ...ompliant H 264 Baseline Profile 640x360 or 1280x720 25p Audio AAC 48kHz 16 bits 2ch Still Image Transmission JPEG format o When Using Web Browser Item Details Operating Environment Windows 7 Internet Explorer 9 or a later version and Windows Media Player 12 or a later version are installed 0 For Full HD make use of a computer with the following system requirements CPU Intel Core 2 Duo 2 GHz or hig...

Page 200: ...Audio AAC 48kHz 16 bits 2ch Time Max 15 seconds DETECT MAIL Item Details Still Image Transmission JPEG 640x360 Using Wi Fi GZ EX355 GZ EX315 200 ...

Page 201: ...AN router OUTDOOR MONITORING Images being captured by Everio can be sent to the grandparents PC or smartphone by the wireless LAN Wi Fi spot via the Internet DETECT MAIL When your child returns home while you are away a still image is sent to you by e mail VIDEO MAIL Let s send video messages Good morning Good night to your father or husband who is on the business trip TV MONITORING A DLNA compati...

Page 202: ...ot support Wi Fi Direct Normally set to ON 0 HTTP Port Normally set to 80 Display the screen for reading the QR code 1 Tap MENU Operation on this camera 0 The top menu appears 2 Tap the Wi Fi Q icon Operation on this camera 3 Tap 1 on the lower right of the screen Operation on this camera 4 Tap COMMON Wi Fi SETTING Operation on this camera 5 Tap SET FROM QR CODE 6 Tap EXECUTE Read a QR code 1 Read...

Page 203: ...ately if the screen is tapped 5 Check the SSID and the PASS being displayed on the screen of the camera 6 Select the SSID in step 5 from the Wi Fi network selection screen of your smartphone and enter the PASS on the password screen Operation on the smartphone or computer 0 For details on connecting your smartphone or computer to a Wi Fi network please refer to the instruction manual of the phone ...

Page 204: ...es Operation on the smartphone or computer 0 To activate WPS refer to the instruction manual of the device in use 7 A connection is established and Q appears on the camera s screen Monitoring the Images from a Smartphone or Computer o Smartphone Android iPhone Memo 0 Prior to use this function a smartphone application needs to be installed on the smartphone Installing Smartphone Applications A p 1...

Page 205: ...yed when the computer and the camera are connected wirelessly 0 The URL for the computer to connect to appears 2 Check the URL being displayed on the camera screen which starts from http 0 After checking the URL tap QUIT to return to the previous screen 3 Start Internet Explorer web browser on the computer and enter the URL Using Wi Fi by Creating a QR Code GZ EX355 GZ EX315 205 ...

Page 206: ...ra 0 The top menu appears 2 Tap the Wi Fi Q icon Operation on this camera 3 Tap 1 on the lower right of the screen Operation on this camera 4 Tap COMMON Wi Fi SETTING Operation on this camera 5 Tap SET FROM QR CODE 6 Tap EXECUTE Read a QR code 1 Read a QR code Operation on this camera 2 Tap YES 3 Tap OK 0 Tap NEXT to return to the screen to read the QR code 0 Set contents are saved Registering the...

Page 207: ... minutes 0 To activate WPS refer to the instruction manual of the device in use 9 After registration is complete tap OK on the camera s screen Operation on this camera o Search the access point and select from the list Set the name SSID of the access point wireless LAN router and the password beforehand 1 Tap MENU Operation on this camera 0 The top menu appears 2 Tap the Wi Fi Q icon Operation on ...

Page 208: ...outer is not security protected 10 After registration is complete tap OK on the camera s screen Operation on this camera 0 Other methods such as Manual Registration and WPS PIN Registration are also available Refer to the following link for details Registering the Access Points of the Camera to Connect ACCESS POINTS A p 168 Connecting the smartphone or computer to the access point wireless LAN rou...

Page 209: ...rtphone Installing Smartphone Applications A p 179 1 Start Everio sync 2 on the smartphone after setting INDOOR MONITORING 0 Tap START in INDOOR MONITORING on the camera to start 2 Tap INDOOR MONITORING 3 The recording screen is displayed 0 How to operate from a smartphone Using Smartphone Applications A p 179 o Monitoring from the computer Windows7 1 Tap the URL button shown on the camera s scree...

Page 210: ...DOOR MONITORING A p 162 4 Execute OUTDOOR MONITORING Operation on this camera If OUTDOOR MONITORING is executed while dynamic DNS settings are enabled the camera will access the dynamic DNS server 5 Tap CAMERA NETWORK INFO to check that the URL WAN is displayed Registration complete Image Monitoring via the Internet OUTDOOR MONITORING A p 143 Caution 0 Registration will be canceled if you do not a...

Page 211: ... 2 Tap YES 3 Tap OK 0 Tap NEXT to return to the screen to read the QR code 0 Set contents are saved Registering the access points wireless LAN router to this unit o Wi Fi Protected Setup WPS Registration 1 Tap MENU Operation on this camera 0 The top menu appears 2 Tap the Wi Fi Q icon Operation on this camera 3 Tap 1 on the lower right of the screen Operation on this camera 4 Tap COMMON Wi Fi SETT...

Page 212: ...on this camera o Search the access point and select from the list Set the name SSID of the access point wireless LAN router and the password beforehand 1 Tap MENU Operation on this camera 0 The top menu appears 2 Tap the Wi Fi Q icon Operation on this camera 3 Tap 1 on the lower right of the screen Operation on this camera 4 Tap COMMON Wi Fi SETTING Operation on this camera 5 Tap ACCESS POINTS Ope...

Page 213: ... registration is complete tap OK on the camera s screen Operation on this camera 0 Other methods such as Manual Registration and WPS PIN Registration are also available Refer to the following link for details Registering the Access Points of the Camera to Connect ACCESS POINTS A p 168 o Regular Operation Connect this camera to a smartphone or computer 1 Tap MENU Operation on this camera 0 The top ...

Page 214: ...one Installing Smartphone Applications A p 179 1 Start Everio sync 2 on the smartphone after setting OUTDOOR MONITORING 0 Tap START in OUTDOOR MONITORING on the camera to start 2 Tap OUTDOOR MONITORING 3 Log in with your username and password if authentication cannot be achieved 0 The username is everio and the default password is 0000 Changing the Settings A p 157 4 The recording screen is displa...

Page 215: ...uired items for setting the e mail server SMTP server 0 SMTP server set the name of the e mail server SMTP server from which an e mail account is obtained 0 SMTP port number set according to the condition when the e mail account is obtained Normally set to 25 0 SMTP authentication method set according to the condition when the e mail account is obtained 0 User name set if the SMTP authentication m...

Page 216: ...ad by this unit 3 Tap OK 0 Tap NEXT to return to the screen to read the QR code 0 Set contents are saved Registering the access points wireless LAN router to this unit o Wi Fi Protected Setup WPS Registration 1 Tap MENU Operation on this camera 0 The top menu appears 2 Tap the Wi Fi Q icon Operation on this camera 3 Tap 1 on the lower right of the screen Operation on this camera 4 Tap COMMON Wi Fi...

Page 217: ...on this camera o Search the access point and select from the list Set the name SSID of the access point wireless LAN router and the password beforehand 1 Tap MENU Operation on this camera 0 The top menu appears 2 Tap the Wi Fi Q icon Operation on this camera 3 Tap 1 on the lower right of the screen Operation on this camera 4 Tap COMMON Wi Fi SETTING Operation on this camera 5 Tap ACCESS POINTS Ope...

Page 218: ... the wireless LAN router is not security protected 10 After registration is complete tap OK on the camera s screen Operation on this camera 0 Other methods such as Manual Registration and WPS PIN Registration are also available Refer to the following link for details Registering the Access Points of the Camera to Connect ACCESS POINTS A p 168 o Regular Operation Sending a Notification Mail 1 Tap M...

Page 219: ... the recipient s e mail address 0 E mail function set the function of the e mail that is transmitted to the recipient s e mail address 0 Up to 8 e mail addresses can be set 0 Startreadingfrom 1 ifmultiplee mailaddressesareset Clickthenumber or o Enter values in the required items for setting the sender s e mail address 0 E mail address set the sender s e mail address o Enter values in the required...

Page 220: ...reen to read the QR code 0 Set contents are saved Registering the access points wireless LAN router to this unit o Wi Fi Protected Setup WPS Registration 1 Tap MENU Operation on this camera 0 The top menu appears 2 Tap the Wi Fi Q icon Operation on this camera 3 Tap 1 on the lower right of the screen Operation on this camera 4 Tap COMMON Wi Fi SETTING Operation on this camera 5 Tap ACCESS POINTS O...

Page 221: ...nt wireless LAN router and the password beforehand 1 Tap MENU Operation on this camera 0 The top menu appears 2 Tap the Wi Fi Q icon Operation on this camera 3 Tap 1 on the lower right of the screen Operation on this camera 4 Tap COMMON Wi Fi SETTING Operation on this camera 5 Tap ACCESS POINTS Operation on this camera 6 Tap ADD Operation on this camera 7 Tap SEARCH Operation on this camera 0 The ...

Page 222: ...s camera 0 Other methods such as Manual Registration and WPS PIN Registration are also available Refer to the following link for details Registering the Access Points of the Camera to Connect ACCESS POINTS A p 168 o Regular Operation Record videos to send a video mail 1 Tap MENU Set the camera to the recording mode 0 The top menu appears 2 Tap the Wi Fi Q icon 3 Tap VIDEO MAIL L 4 Tap VIDEO MAIL A...

Page 223: ...for the TV monitor 0 MAC address filter set to ON if monitoring images with a specific TV device 0 Add the MAC address register the physical address when monitoring images with a specific TV device Up to 8 addresses can be registered Display the screen for reading the QR code 1 Tap MENU Operation on this camera 0 The top menu appears 2 Tap the Wi Fi Q icon Operation on this camera 3 Tap 1 on the l...

Page 224: ...Protected Setup WPS Registration 1 Tap MENU Operation on this camera 0 The top menu appears 2 Tap the Wi Fi Q icon Operation on this camera 3 Tap 1 on the lower right of the screen Operation on this camera 4 Tap COMMON Wi Fi SETTING Operation on this camera 5 Tap ACCESS POINTS Operation on this camera 6 Tap ADD Operation on this camera 7 Tap EZ REGISTRATION WPS Operation on this camera Using Wi Fi...

Page 225: ... Tap the Wi Fi Q icon Operation on this camera 3 Tap 1 on the lower right of the screen Operation on this camera 4 Tap COMMON Wi Fi SETTING Operation on this camera 5 Tap ACCESS POINTS Operation on this camera 6 Tap ADD Operation on this camera 7 Tap SEARCH Operation on this camera 0 The search results appear on the camera s screen 8 Tap the name SSID of the desired access point from the list of s...

Page 226: ...ecting your TV to a Wi Fi network please refer to the instruction manual of the TV in use Connecting This Camera to the TV 1 Tap MENU Operation on this camera 0 The top menu appears 2 Tap the Wi Fi Q icon Operation on this camera 3 Tap TV MONITORING K Operation on this camera 4 Tap START I Operation on this camera 5 Start making a connection Operation on this camera 6 Connection in progress 7 Afte...

Page 227: ... still image recording Operating the Top Menu You can configure various settings using the menu The following is a screen of the model with Wi Fi functions 1 Tap MENU 0 The top menu appears 0 The menu differs according to the mode in use 2 Tap the desired menu 3 Tap the desired setting Memo 0 To display the previous next menu Tap 0 or 1 0 To exit the screen Tap L quit 0 To display the help file Ta...

Page 228: ...ed menu and setting Shortcut Menu During Video Recording Mode 0 Allows settings of EASY STORAGE ANIMATION EFFECT DECORATE FACE EFFECT SMILE SHOT SMILE NAME DISPLAY and BACKLIGHT COMP manual mode only Shortcut Menu During Still Image Recording Mode 0 Allows settings of EASY STORAGE SMILE SHOT SMILE NAME DISPLAY and BACKLIGHT COMP manual mode only Memo 0 To return to the top menu Tap J return 0 To e...

Page 229: ...only in the manual recording mode TELE MACRO Enables close up shots when using the telephoto T end of the zoom Taking Close up Shots A p 38 Displayed only in the manual recording mode TOUCH PRIORITY AE AF Automatically adjusts focus and brightness based on the subjects faces or selected area Capturing Subjects Clearly TOUCH PRIORITY AE AF A p 45 LIGHT Turns on off the light Setting Details OFF Doe...

Page 230: ...T SHOT A p 47 SEAMLESS RECORDING GZ EX355 Continues recording on the SD card without stopping when the remaining space on the built in memory runs out Setting Details OFF Does not switch recording media automatically ON Switches recording media automatically Memo 0 Seamless recording cannot be performed if there is not enough free space in the SD card 0 q appears if seamless recording cannot be pe...

Page 231: ...om Set this when digital zoom is not desired 60x DYNAMIC 55x DYNAMIC Enables recording with 1 40x optical zoom and 41 60x dynamic zoom when the image stabilizer is in normal mode or set to off Enables recording with 1 40x optical zoom and 41 55x dynamic zoom when the image stabilizer is in active mode or when the camera is set to the iFrame mode 120x DIGITAL 110x DIGITAL Enables recording with 1 4...

Page 232: ... 0 The microphone input level is not changed 1 Decreases the microphone input level slightly 2 Decreases the microphone input level K2 TECHNOLOGY Reduces the degradation of sound quality caused by digital signal processing and records a sound quality close to the original Setting Details OFF Deactivates K2 TECHNOLOGY ON Activates K2 TECHNOLOGY Settings Menu 232 ...

Page 233: ...ecording automatically by sensing the changes in subject s movement brightness within the red frame displayed on the LCD monitor Recording Automatically by Sensing Movements AUTO REC A p 58 ANIMATION EFFECT Records videos with animation effects Recording with Animation Effects ANIMATION EFFECT A p 40 DECORATE FACE EFFECT Detects faces and enables decorations such as crowns or sunglasses to be adde...

Page 234: ... in the manual recording mode TELE MACRO Enables close up shots when using the telephoto T end of the zoom Taking Close up Shots A p 38 Displayed only in the manual recording mode TOUCH PRIORITY AE AF Automatically adjusts focus and brightness based on the subjects faces or selected area Capturing Subjects Clearly TOUCH PRIORITY AE AF A p 45 SELF TIMER Use this when taking a group photo Taking Gro...

Page 235: ...aces are detected Setting SMILE NAME DISPLAY A p 51 PET SHOT Automatically captures a still image upon detection of the face of a pet such as dogs or cats Capturing Pets Automatically PET SHOT A p 47 IMAGE SIZE Sets the image size number of pixels for still images Setting Details 3840X2160 8M 1920X1080 2M Takes still images with aspect ratio 16 9 0 The sides of still images recorded in 16 9 aspect...

Page 236: ... AUTO REC Starts recording automatically by sensing the changes in subject s movement changes in brightness within the red frame displayed on the LCD monitor Recording Automatically by Sensing Movements AUTO REC A p 58 Settings Menu 236 ...

Page 237: ...ime during video playback Setting Details OFF Does not display the date and time during playback ON Displays the date and time during playback DIGEST PLAYBACK Plays back a digest of the recorded videos DIGEST PLAYBACK A p 72 PLAYBACK PLAYLIST Plays back the playlists that you have created PLAYBACK PLAYLIST A p 73 PLAYBACK OTHER FILE Plays videos with defective management information PLAYBACK OTHER...

Page 238: ...are arranged is called a playlist By creating a playlist you can play back only your favorite videos in the order you like The original video file remains even when it is registered to a playlist Creating Playlists with Selected Files A p 87 Creating Playlists by Date A p 89 Editing Playlists A p 90 TRIMMING Select the required part of a video and save it as a new video file The original video rem...

Page 239: ...ck Setting Details SLIDE Switches the screen by sliding in from right to left BLINDS Switches the screen by dividing into vertical strips CHECKERBOARD Switches the screen by changing through a checkered pattern RANDOM Switches the screen with a random effect from SLIDE BLINDS and CHECKERBOARD Memo 0 Slideshow effects are not available when playing back still images in external devices such as USB ...

Page 240: ...g Releasing Protection of Selected Files A p 84 COPY GZ EX355 Copies files from the built in memory to the SD card Copying Files to an SD Card GZ EX355 A p 114 MOVE GZ EX355 Moves files from the built in memory to the SD card Files that are moved to the SD card will be deleted from the built in memory Moving Files to an SD Card GZ EX355 A p 115 Settings Menu 240 ...

Page 241: ...cal Time when Traveling A p 23 Setting Daylight Saving Time A p 24 DATE DISPLAY STYLE Sets the order of year month day and the time display format 24H 12H Sorting Order Time Display month day year 12h year month day 24h day month year LANGUAGE The language on the display can be changed Changing the Display Language A p 21 FACE REGISTRATION recording only Registers the faces of people who are often...

Page 242: ... DEMO MODE Plays a demonstration of the special features of this unit Setting Details OFF Deactivates the function ON Plays a demonstration of the special features of this unit Memo 0 This mode is not available in the playback mode 0 SMILE NAME DISPLAY is set to ON when the demo mode is activated Setting SMILE NAME DISPLAY A p 51 TOUCH SCREEN ADJUST Adjusts the response position of the buttons on ...

Page 243: ...OPEN SOURCE LICENSES recording only GZ EX355 GZ EX315 Displays the open source software licenses that are used in this unit Settings Menu 243 ...

Page 244: ...escreen TV 16 9 HDMI OUTPUT Sets the output from the HDMI connector of this unit when it is connected to a TV Setting Details AUTO It is recommended to select AUTO usually 576p Select this when the video is not output in AUTO correctly HDMI CONTROL Sets whether to link operations with an HDMI CEC compliant TV Setting Details OFF Turns off linked operations ON Turns on linked operations AV TERMINAL...

Page 245: ...numbers to 1 File number of the AVCHD video file starts from 0 Caution 0 All data on the built in memory will be deleted when it is formatted Copy all files on the built in memory to a computer before formatting 0 Make sure that the battery pack is fully charged or connect the AC adapter as the formatting process may take some time FORMAT SD CARD Deletes all files on the SD card Setting Details FI...

Page 246: ... videos are stored on this unit 0 After backing up your files using the provided software they cannot be restored to this unit 0 Delete unwanted videos before making backup It takes time to back up many videos Deleting Unwanted Files A p 82 o GZ E308 GZ E305 PLAYBACK ON PC 0 Displays videos recorded by this unit by using the Everio MediaBrowser 4 Installing the Provided Software Built in A p 125 0...

Page 247: ...crophone 0 Do not cover the microphone with your fingers during video recording Rear A DC Connector 0 Connects to an AC adapter to charge the battery B ACCESS Access Lamp 0 Lights up blinks during recording or playback Do not remove the battery pack AC adapter or SD card C POWER CHARGE Power Charge Lamp 0 Lights up Power ON 0 Blinks Charging in progress 0 Goes out Charging finished D START STOP Vi...

Page 248: ...holding down the button again Using the Silent Mode A p 27 D a Image Stabilizer Button 0 The setting of image stabilizer changes with every press while video recording is stopped Reducing Camera Shake A p 53 E INFO Information Button 0 Recording Displays the remaining time for video only and battery power 0 Playback Displays file information such as recording date F AV Connector 0 Connects to the ...

Page 249: ...s self portraits to be taken by rotating the monitor Using the Touch Screen A p 16 Names of Buttons and Functions on the LCD Monitor A p 17 Caution 0 Do not press against the surface with force or subject it to strong impact Doing so may damage or break the screen Names of Parts 249 ...

Page 250: ...ing Videos in Auto Mode A p 25 Manual Recording A p 31 M Setting Scenes of Intelligent Auto 0 Displays scenes detected automatically in the Intelligent Auto function Multiple scenes may be detected Scenes of Intelligent Auto A p 26 N SILENT MODE Using the Silent Mode A p 27 O Zoom ZOOM A p 231 P Focus Adjusting Focus Manually A p 34 Q Brightness Adjusting Brightness A p 35 Video Recording A Video ...

Page 251: ...n Indicator Operation Buttons for Video Playback A p 66 D Date Time 0 Displays the recording date and time E Media REC MEDIA FOR VIDEO GZ EX355 A p 245 F Battery Indicator Checking the Remaining Recording Time A p 62 G Playback Time H Time Lapse Playback Time Lapse Setting A p 56 I External Storage Playback Playing Back with a DVD Writer A p 107 Playing Back with a BD Writer External Blu ray Drive...

Page 252: ...IMAGE GZ EX355 A p 245 F Battery Indicator Checking the Remaining Recording Time A p 62 G SILENT MODE Using the Silent Mode A p 27 H External Storage Playback Playing Back with a DVD Writer A p 107 Playing Back with a BD Writer External Blu ray Drive A p 100 Playing Back Files in the USB External Hard Disk Drive A p 112 I 1080p Output HDMI OUTPUT A p 244 Indications on the LCD monitor 252 ...

Page 253: ...rking properly Turning Off the Power 1 Close the LCD monitor 2 Remove the AC adapter and battery pack from this unit reattach them open the LCD monitor and this unit powers on automatically Reset complete Troubleshooting 253 ...

Page 254: ...ources and depending on the shooting conditions exposure and focus may not be adjusted correctly in the Intelligent Auto mode In this case adjust the settings manually Adjusting Focus Manually A p 34 Recording stops automatically Recording stops automatically as it cannot be performed for 12 or more consecutive hours according to specifications It may take some time to resume recording Turn off th...

Page 255: ...AT SD CARD A p 245 The motion is choppy Use a high speed SD card Class 4 or higher Types of Usable SD Card A p 15 Clean the terminals of the SD card with a dry cotton swab or something similar Execute FORMAT SD CARD in the MEDIA SETTINGS menu All data will be deleted FORMAT SD CARD A p 245 Verify the system requirements of your computer when using LoiLoFit for Everio to play back GZ EX355 GZ EX315...

Page 256: ...5 If the SD card is write protected set it to off Unable to create DVD with a DVD writer Connect the USB cable correctly Preparing a DVD Writer CU VD50 A p 101 Preparing a DVD Writer CU VD3 A p 101 Unable to create disc with a BD writer external Blu ray drive Connect the USB cable correctly Preparing a BD Writer External Blu ray Drive A p 93 BACK UP menu does not disappear While the USB cable is c...

Page 257: ...nto view A band or a ball of bright light may appear when there is a bright light source near this unit but this is not a malfunction The recorded subject is too dark Use backlight compensation when the background is bright and the subject is dark Setting Backlight Compensation A p 36 Use NIGHTALIVE in SCENE SELECT Shooting According to Scene Subject A p 33 Use GAIN UP in the menu GAIN UP A p 229 ...

Page 258: ...CEC functions of this unit cannot be guaranteed to operate in combination with all the TVs In such cases set HDMI CONTROL to OFF HDMI CONTROL A p 244 The unit operates slowly when switching between video mode and still image mode or when switching the power on or off It is recommended that you copy all videos and still images onto your computer and erase the files from this unit If there are many ...

Page 259: ...ot be playable UNSUPPORTED FILE Use files recorded with this unit Files recorded with other devices may not be playable THIS FILE IS PROTECTED Switch off the PROTECT CANCEL function in the EDIT menu Protecting Files A p 83 CHECK CARD S WRITE PROTECTION SWITCH Set the write protect switch of the SD card to off INSUFFICIENT AVAILABLE SPACE Delete files or move files to a computer or other devices Re...

Page 260: ...ock CAMERA TEMPERATURE IS HIGH PLEASE TURN CAMERA OFF TO ALLOW IT TO COOL DOWN PLEASE WAIT Turn off the power of this unit let and it cool down before turning on the power again POWER IS OFF OR USB DEVICE IS UNSUPPORTED Turn on the power of the connected USB device Connect the AC adapter to the DVD writer or BD writer external Blu ray drive INSERT DISC Open the tray of the DVD writer or BD writer ...

Page 261: ...ohol Doing so may cause damage to the unit 0 When using a chemical cloth or cleaner be sure to observe the warning labels and instructions of the product 0 Do not leave the device in contact with rubber or plastic products for a long time Lens LCD Monitor 0 Use a lens blower commercially available to remove any dust and a cleaning cloth commercially available to wipe off any dirt Mold may form if ...

Page 262: ...9 Lowest illumination 3 lux 1 lux SCENE SELECT NIGHTALIVE Zoom during video recording Optical zoom Up to 40x Dynamic zoom Up to 60x Digital zoom Up to 200x Zoom during still image recording Optical zoom Up to 40x LCD monitor 3 0 230 000 pixels color LCD Recording media Built in memory 16 GB GZ EX355 SD SDHC SDXC card commercially available Types of Usable SD Card A p 15 Clock battery Rechargeable ...

Page 263: ... x D excluding cord and AC plug Mass Approx 77 g Battery Pack BN VG108 GZ E308 GZ E305 Item Details Power voltage 3 5 V 3 6 V Capacity 860 mAh Dimensions mm 31 x 21 5 x 43 W x H x D Mass Approx 30 g Battery Pack BN VG114 GZ EX355 GZ EX315 Item Details Power voltage 3 6 V Capacity 1400 mAh Dimensions mm 31 x 21 5 x 43 W x H x D Mass Approx 40 g Memo 0 The specifications and appearance of this produ...

Page 264: ......

Reviews: