background image

(No.PA056<Rev.002>) 3

Design and specifications are subject to change without notice.

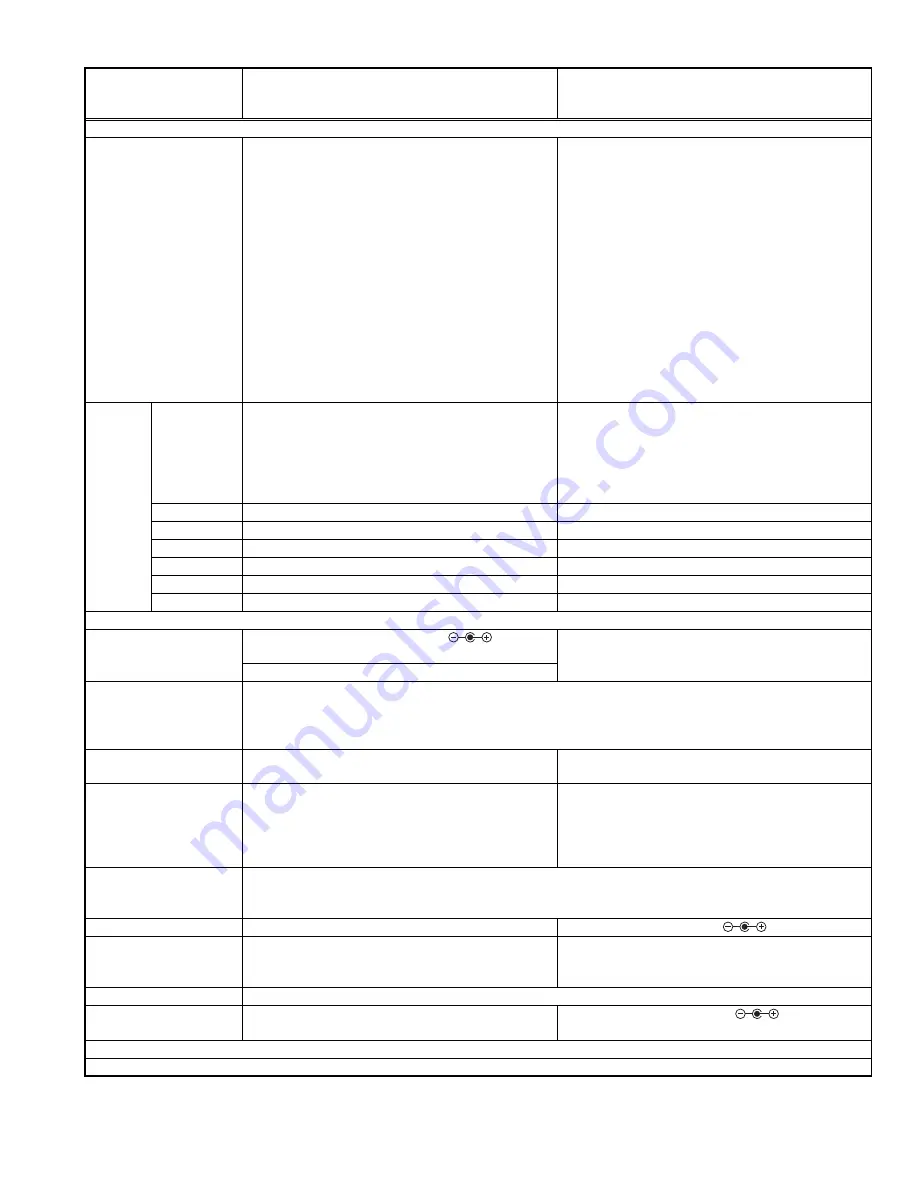
 INPUT CONNECTORS

HDMI

2-System (screw lock mechanism) / Equivalent to 
HDMI2.0b
HDCP2.2 / 4K signals / 3D signals (FP, SBS, TAB) / 
Deep Color: 8/10/12bit / Color space: YCbCr (4:4:4), 
YCbCr (4:2:2), RGB / Input level: 0-255 (PC), 16-235 
(Video), 16-255 (Super White)
For details of supported signals, refer to the WEB in-
struction manual.
To view all supported signals of this unit, we recom-
mend cables that support a transfer speed of 
18Gbps.
EDID can be switched at the user menu only for the 
HDMI 2 terminal.
EDID setting value A: Factory default (HDMI2.0b) / 
B:4K input not allowed (DLA-X95R, X75R, X55R, 
X35 equivalent)

Not used

Display
Port

terminals

Not used

4 lines / Display Port, 1 input mode (Display Port 1 to 
4 can be selected)
2 input mode (using Dipaly Port 1 and 3, 2 stripes, 
frame sequential)
4 input mode (using Dipaly Port 1 to 4, cross, 4 
stripes, frame sequential)

Input level

-

INPUT MODE: 0-255 (PC) /16-235 (Video)

Color space

-

YCbCr (4:4:4), YCbCr (4:2:2), RGB

version

-

Equivalent to Ver.1.2

HDCP version

-

incompatible

Input (Max)

-

4096 x 2160 @ 120Hz

Deep Color

-

8/10/12bit

 CONTROLL CONNECTORS

Trigger

1 line / 

Ø

3.5 mm DC Power jack ( 

 ) / 12 V / 

maximum 0.1 A

Not used

Output timing: off / on (Power) / on (Anamo)

IR Remote

IR remote control, Distance: 7m, Angle range: Horizontal ±30 degrees, Vertical ±20 degrees
One remote control sensor each in front and behind the unit
Remote control A/B (Factory default: "A", To switch settings: Choose user menu on the unit, press "MENU" 
and "BACK" on the remote control at the same time)

ECO Mode

OFF(Factory default value) :DLA-RS4500K
ON (Factory default value) : Except DLA-RS4500K

Not used

LAN terminal

1 line / RJ-45 plug
10BASE-T/100BASE-TX
Supports DHCP / Control 4 SDDP (ON / OFF possible)
PJ control / service correspondence / calibration 
compatible

1 line / RJ-45 plug
10BASE-T/100BASE-TX
Supports DHCP / PJ control / service correspon-
dence / calibration compatible / for firmware up

RS-232 terminal

1-System/RS-232C/D-Sub9 pin, JVC External command system (HD-ILA compliant), all settings status, 
individual retrieval possible, maintains OSD display when reference commands are received during OSD 
display, (except SSSV)

Syncro terminal

Not used

1 line / 

Ø

3.5 mm stereo mini ( 

 )  / 5V, TTL output

3D SYNCRO terminal

1 line / Mini DIN 3 Pin
Emitter PK-EM 2 (wireless system) / PK-EM 1 (Infra-
red system: Discontinued product)

Not used

SERVICE terminal (USB) 1 line / USB Type A / for firmware up
Wired remote

Not used

1 line / 

Ø

3.5 mm stereo mini ( 

 )  / Power sup-

ply 5V, maximum 3mA output / signal 5V, TTL input

 Corresponding signal

Refer to the WEB instruction manual.

Item

DLA-RS4500K

DLA-Z1E

DLA-Z1C

DLA-VS4500

Summary of Contents for DLA-RS4500K

Page 1: ...Rev 002 2017 6 D ILA PROJECTOR PA056 Rev 002 2017 6 SERVICE MANUAL DLA RS4500K DLA Z1E DLA Z1C DLA VS4500 COPYRIGHT 2017 JVC KENWOOD Corporation TABLE OF CONTENTS 1 PRECAUTION 4 2 SPECIFIC SERVICE INSTRUCTIONS 8 3 DISASSEMBLY 12 4 ADJUSTMENT 16 5 TROUBLESHOOTING 20 ...

Page 2: ...stribution PK CS 1601 recommended OS Windows 7 8 10 for each 32 64 bit version color luminometer Refer to the instruction manual for supported models OPTICAL D ILA device Size 0 7 inch R G B devices Pixels H 4096 pixels x V 2160 pixels 3 devices total Pixels 8 847 360 pixels Aspect 17 9 1 57mm x 0 83mm Laser light source BLU Escent Technology Laser and Phosphor Power 510W Average usage time 20 000...

Page 3: ... timing off on Power on Anamo IR Remote IR remote control Distance 7m Angle range Horizontal 30 degrees Vertical 20 degrees One remote control sensor each in front and behind the unit Remote control A B Factory default A To switch settings Choose user menu on the unit press MENU and BACK on the remote control at the same time ECO Mode OFF Factory default value DLA RS4500K ON Factory default value ...

Page 4: ...rts 9 When a power cord has been replaced check that 10 15 kg of force in any direction will not loosen it Fig 1 1 2 10 Also check areas surrounding repaired locations 11 Products using cathode ray tubes CRTs In regard to such products the cathode ray tubes themselves the high volt age circuits and related circuits are specified for compli ance with recognized codes pertaining to X ray emission Co...

Page 5: ...rd plug prongs and externally ex posed accessible parts Use an AC voltmeter to measure across both terminals of load Z See Fig 1 1 9 and follow ing Fig 1 1 12 Fig 1 1 9 5 Grounding Class 1 model only Confirm specified or lower grounding impedance between earth pin in AC inlet and externally exposed accessible parts Video in Video out Audio in Audio out or Fixing screw etc Measuring Method Connect ...

Page 6: ...removed Class Label advisory Location WARNING High voltage caution Do not open the cabinet unless you are the service person The interior consists of many high voltage parts It is dangerous to touch them REAR PANEL Caution when connecting power plug Be sure to perform ground connection Ground connection must be performed before connecting the power plug to a power source To remove ground connectio...

Page 7: ...oling efficiency may deteriorate and temperature inside this unit will rise and then it can lead to abnormal operation and failure Also observe there is plenty of free space between the projector and adjacent walls ceiling and other equipment Note that excess heat can cause failure and damage to both the projector and nearby equipment Therefore please make sure pay attention not to block the air i...

Page 8: ...0004 00 PWB exchange INTERLOCK PWB FOR TOP PLATE KD1 025W 005 PWB exchange INTERLOCK PWB FOR FRONT COVER KD1 025W 006 PWB exchange AC INPUT PWB KD1 026W 001 PWB exchange POWER PWB POWER UNIT CC 2 pcs W0H 0028 01 PWB exchange MOTOR PWB XD1 024W 00 XD1 024W 01 PWB exchange DD PWB XD1 023W 00 XD1 023W 01 PWB exchange KEYPAD PWB KD1 025W 002 PWB exchange C SENS PWB KD1 025W 004 PWB exchange P SENS PWB...

Page 9: ...ver Do not expose the laser safety goggles to direct laser beam Otherwise it may damage the goggles Do not use laser other than the laser and wavelength specified There may be lasers of the same name with different wave lengths Do not remove the laser safety goggles during operations Do not use the laser safety goggles as light shielding goggles for welding The complete absorption type products ar...

Page 10: ... these as necessary during service 2 5 1 ENTER 1 No menu shown 2 Press the OK button 3 Within press the button 4 Within press the button 5 Within press the OK button 6 Within press the BACK button 7 Within press the OK button to display the service menu NOTE When the Service Menu Screen is not displayed go back to the beginning It is recommended that you press the buttons a little earlier and stea...

Page 11: ...00 25 Raster Yellow 100 Item Selection variable range Factory setting Function Soft Ver Model Location Display only Model code is displayed Soft Ver Display only Software summary version displayed on the user menu are displayed Main Display only Main CPU version is displayed VP Display only Versions for VP_FPGA VP_CPU are displayed DDM Display only Versions for DD1 Master _FPGA DD1 Mas ter _CPU ar...

Page 12: ...onnector For connection of each board refer to the WIRING DIAGRAM of the Standard Circuit Diagram 3 2 DISASSEMBLY PROCEDURE 3 2 1 REMOVING THE FRONT PWB Fig 3 1 and Fig 3 2 1 Remove the 6 screws and remove the SIDE COVER Fig 3 1 2 Remove the 2 screws a and remove the FRONT COVER 3 Remove the 6 screws b and remove the CENTER FRAME 4 Remove 1 screw c and remove the FRONT FRAME 5 Remove 4 screws d an...

Page 13: ...RE SENSOR PWB and LD UNIT Fig 3 6 1 Remove the 2 screws a and remove the BRACKET 2 Remove the 3 screws b and remove the RELAY 1 PWB 3 Remove the 2 screws c and remove the BRACKET 4 Remove 1 screw d and remove the INTERNAL TEM PERATURE SENSOR PWB 5 Remove the 2 screws e and remove the BRACKET 6 Remove the 2 screws f and remove the FAN BRACKET 7 Remove 1 screw g and remove the EXTERNAL TEM PERATURE ...

Page 14: ...remove the SIDE PLATE 2 Remove the 4 screws b and remove the RELAY 2 PWB 3 Remove the 2 screws c and remove the INTAKE FAN and the EXHAUST FAN 4 Remove the 2 screws d and remove the SHIELDING COVER 5 Remove the 6 screws e and remove the BRACKET 6 Remove the 12 screws f and remove the LD DRIVER PWB Fig 3 8 SIDE PLATE POWER PWB POWER PWB INTAKE FAN AC INPUT PWB EXHAUST FAN SHIELDING COVER a a a a a ...

Page 15: ...d the REMOVE DUCT 2 7 Remove the OP COOLING FAN Fig 3 9 8 Remove the 2 screws a and remove the FRONT PLATE 9 Remove the 2 screws b and remove the INTERLOCK PWB for the FONT COVER 10 Remove 4 screws c and remove the OP BASE 11 Remove the 4 screws d and remove the OPTICAL UNIT Fig 3 10 BRACKET COVER DUCT 1 R DEVICE COOLING FAN OP COOLING FAN a a a a a a a a b c c d d d c b DUCT 2 B DEVICE COOLING FA...

Page 16: ...k 4 0 installed 4 3 REQUIRED ADJUSTMENTS BY REPLACING COMPONENTS The following adjustment procedure is required after replacing PWB ASS Ys and OPTICAL BLOCK 4 3 1 COMPONENT REQUIRED ADJUSTMENT AT REPLACING 1 When the main EEPROM can not be backup OS Windows8 7 XP Memory More than 16 Mbytes Hard disk free space More than 5 Mbytes RS 232C interface At least 1 port Display resolution Minimum 800 600 ...

Page 17: ...der Software 2 Select Com Port then connect the PC to the projector and click Connect 3 Select the info menu 4 Select the model code from the Model and write the model code A0A1 DLA RS4500K DLA Z1C E A0C1 Not use A0B1 DLA VS4500 4 4 3 Destination writing Note Perform this operation during standby mode PROCEDURE 1 Run ServiceCommander Software 2 Select Com Port then connect the PC to the projector ...

Page 18: ...e EEPROM menu 4 Click DD Adjust Mode of DD set ON 5 Click A0 of Write to ROM of DD and load of backup the anf0 file to the PC 6 In the similar procedure for the A2 A4 A6 memory 7 Click DD Adjust Mode of DD set OFF 4 4 6 Pixel shift adjustment PROCEDURE 1 Input color cross hatch signal 2 From the Service menu set Adjust to Pixel Shift 3 Adjust H Pixel Adj R H Pixel Adj B to make H direction Pixel S...

Page 19: ... Connect 4 Select the EEPROM menu 5 Click Write to Mecha ROM of Mecha CPU 4K and se lect the saved initial value file to write the backup data 4 4 10 Mecha EEPROM lens set value etc backup Note Perform the operation with the power ON Input the signal from external equipment PROCEDURE 1 Run ServiceCommander Software 2 Select Com Port then connect the PC to the projector and click Connect 3 Select t...

Page 20: ...tion Blinking time Each time of turning on off Type Monitor objective Operating point Temperature sensor External temperature sensor 45 C LD mode MID HIGH is 62 C Internal temperature sensor 60 C LD block inside LD 1 75 C LD block inside LD 2 75 C Near DDS IC 100 C Near the DDM IC 100 C Near VP_FPGA 100 C Heat sink of R device 75 C Heat sink of B device 75 C Heat sink of G device 75 C Type Monitor...

Page 21: ...Fan abnormality detection 31 Exhaust fan of the POWER PWB is abnormal stop 32 Intake fan of the power supply PWB is abnormal stop 33 LD fan 1 is abnormal stop 34 LD fan 2 is abnormal stop 35 LD fan 3 is abnormal stop 36 Intake fan of LD UNIT is abnormal stop 37 The exhaust fan of the LD UNIT is abnormal stop 38 DD cooling fan is abnormal stop 39 R device cooling fan is abnormal stop 3A G device co...

Page 22: ...VP FPGA UPDATE2 UDP 3 DD MASTER FPGA UPDATE3 UDP 4 DD SLAVE FPGA UPDATE4 UDP 5 MECHA CPU UPDATE6 UDP 7 CMS DATA UPINFO UDI Update information management files UPDATE UDP Update files for each device rename the file names as follows Note Perform only this when update is not available using the user menu Simultaneously press the MENU key and Back key on the projector for 5 seconds The projector will...

Page 23: ...ANDBY ON The interval of light ing up will become shorter as it progresses Once the LED of the LAN terminal of the projector turns off update is completed Check that the power of the projector is turned off and then re move the AC cable Hardware Reset Display during overwrite error When an overwrite error has occurred the 3 LEDs STANDBY ON LIGHT and WARNING will blink In this case remove the AC ca...

Page 24: ... No PA056 Rev 002 JKS Printed in Japan JVC KENWOOD Corporation Media Business Division 7 58 shinmei cho Yokosuka city Kanagawa prefecture 239 8550 Japan ...

Reviews: