background image

3-9

Cassette mechanism assembly and parts list

= EM-30L
=UD-24
=LEN-320M
=MOBIL-1

1

27

13

3

34

2

8

15

10

14

16

7

12

23

3

2

4

9

6

5

24

29

25

22

17

20

19

18

11

21

31

36

26

28

30

1

11

6

5

33

32

33

32

35

35

SLC-S303M

A

B

8.7

+

_

0.1

0.15 mm

A

B

C

C

Block No.

M

M

M

P

Grease

The lower side

Head amplifier
      board

Switch board

Summary of Contents for CA-UXP400

Page 1: ...MICRO COMPONENT SYSTEM MB262 2004 6 UX P400 TABLE OF CONTENTS 1 PRECAUTION 1 3 2 SPECIFIC SERVICE INSTRUCTIONS 1 6 3 DISASSEMBLY 1 7 4 ADJUSTMENT 1 30 5 TROUBLE SHOOTING 1 31 Area suffix US Singapore UF China UP Korea UT Taiwan UW Brazil Mexico Peru CA UXP400 SP UXP400 SP UXP400 ...

Page 2: ...ls CD player section Dynamic range 88 dB Signal to noise ratio 93 dB Wow and flutter Immeasurable Cassette deck section Frequency response Normal type I 50 Hz 14 000 Hz Wow and flutter 0 15 WRMS Speakers Speaker units 10 cm cone 1 Impedance 4 Ω Dimensions approx 145 mm 230 mm 191 mm W H D Mass approx 1 8 kg each General Power requirement AC 110 V AC 127 V AC 220 V AC 230 V AC 240 V adjustable with...

Page 3: ...ack control shafts etc to be sure the product is safe to operate without danger of electrical shock Do not use a line isolation transformer during this check Plug the AC line cord directly into the AC outlet Using a Leakage Current Tester measure the leakage current from each exposed metal parts of the cabinet particular ly any exposed metal part having a return path to the chassis to a known good...

Page 4: ...ptical pickup The tester s internal power source can easily destroy the laser diode 1 6 Handling the traverse unit optical pickup 1 Do not subject the traverse unit optical pickup to strong shocks as it is a sensitive complex unit 2 Cut off the shorted part of the flexible cable using nippers etc after replacing the optical pickup For specific details refer to the replacement procedure in the text...

Page 5: ...lock failed or defeated AVOID DIRECT EXPOSURE TO BEAM e VARNING Synlig och osynling laserstrålning när den öppnas och spärren är urkopplad Betrakta ej strålen s VARO Avattaessajasuojalukitus ohitettuna tai viallisena olet alttiina näkyvälle ja näkymättömälle lasersäteilylle Vältä säteen kohdistumista suoraan itseesi f ADVARSEL Synlig og usynlig laserstråling når maskinen er åben eller interlocken ...

Page 6: ...1 6 No MB262 SECTION 2 SPECIFIC SERVICE INSTRUCTIONS This service manual does not describe SPECIFIC SERVICE INSTRUCTIONS ...

Page 7: ... two screws B attaching the side panels L R to the bottom chas sis See Fig 2 3 From the both sides of the main body release the engage ment sections a b of the side panels L R from the top cover assembly in the direction of the arrow See Figs 3 and 4 4 Remove the side panels L R toward this side Fig 1 Fig 2 Fig 3 Fig 4 Side panel R Side panel L Rear panel A A Side panel L B B Bottom chassis Side p...

Page 8: ...taching the front panel assembly See Figs 6 and 7 4 Release the two claws c and claws d to draw out the front panel assembly in the direction of the arrow See Figs 6 and 7 5 From the right side of the main body disconnect the card wire from the connector CN730 on the main board See Fig 8 6 Disconnect the wire from the connector CN271 on the main board See Fig 8 7 Remove the front panel assembly in...

Page 9: ...ck side of the main body remove the screw D attaching the top cover assembly to the rear panel See Fig 9 2 From the right side of the main body disconnect the card wires from the connectors CN701 CN702 on the main board See Fig 10 3 Take out the top cover assembly from the main body Fig 9 Fig 10 Top cover assembly D Rear panel Top cover assembly Card wires CN702 CN701 Main board ...

Page 10: ... the bottom side of the top cover assembly discon nect the card wires from the connectors CN33 CN34 on the head amp mechanism control board 2 Remove the four screws E attaching the cassette mecha nism assembly and take out the cassette mechanism as sembly from the top cover assembly Fig 11 E CN34 CN33 Cassette mechanism assembly Head amp mechanism control board Top cover assembly Card wires E ...

Page 11: ...the following procedures remove the side panel L 1 From the back side of the main body remove the two screws F attaching the tuner to the rear panel See Fig 12 2 Disconnect the card wire from the connector CN1 on the tuner See Fig 13 Fig 12 Fig 13 F Rear panel Card wire CN1 Tuner ...

Page 12: ...N711 fix the wire with the wire holder 3 1 7 Removing the fan See Figs 14 and 15 Prior to performing the following procedures remove the side panels L R and rear panel 1 From the outside of the rear panel remove the two screws H attaching the fan bracket to the rear panel See Fig 14 2 From the inside of the rear panel move the fan bracket in the direction of the arrow to release the engagement sec...

Page 13: ...he power supply board See Fig 17 Prior to performing the following procedures remove the side panel L and rear panel 1 From the left side of the main body remove the screw K at taching the power supply board 2 Remove the power supply board toward this side and dis connect the connector CN104 on the power supply board 3 From the forward side of the power supply board discon nect the wires from the ...

Page 14: ...ove it from the en gagement sections i j of the shield case Fig 18 3 1 11 Removing the heat sink See Fig 19 Prior to performing the following procedure remove the side panels L R front panel assembly top cover assembly tuner rear panel main board power supply board and power ampli fier board 1 From the side of the power amplifier board remove the two screws M attaching the heat sink 2 From the sid...

Page 15: ...aching the shield case to the bottom chassis See Fig 20 Reference When attaching the shield case on the bottom chassis align the projections k m n of the bottom chassis in the holes of the shield case See Fig 20 2 Take out the shield case with the power amplifier board from the bottom chassis 3 Remove the three screws Q attaching the CD mechanism assembly to the bottom chassis See Fig 21 Fig 20 Fi...

Page 16: ...ly and rear panel 1 From the forward side of the power supply board discon nect the wires from the connectors CN102 CN103 CN105 See Fig 22 Reference Remove the power supply board as required See Fig 17 2 From the top side of the main body remove the four screws R attaching the power transformer See Fig 23 Fig 22 Fig 23 CN102 CN103 Power supply board CN105 R R R Power transformer ...

Page 17: ... front panel assembly remove the four screws S attaching the FL board 2 Take out the FL board from the front panel assembly and disconnect the card wire from the connector CN751 on the FL board Reference When attaching the FL board align the projections p of the front panel assembly in the holes of the FL board Fig 24 CN751 Card wire FL board p S S S S p Front panel assembly ...

Page 18: ...nside of the front panel assembly remove the ten screws T attaching the switch board See Fig 26 3 Take out the switch board from the front panel assembly and disconnect the card wire from the connector CN760 on the switch board See Fig 26 Reference When attaching the switch board align the projections q of the front panel assembly in the holes of the switch board See Fig 26 Fig 25 Fig 26 Mic volum...

Page 19: ...rocedure remove the side panels L R and front panel assembly 1 From the inside of the front panel assembly remove the screw U attaching the headphone jack board Reference After attaching the headphone jack board fix the wire with the spacer Fig 27 Spacer Headphone jack board U Front panel assembly Wire ...

Page 20: ...shing and remove the leaf spring See Fig 2 3 Remove the bushing of the tray assembly from the projec tion a on the CD mechanism assembly and move the tray assembly in the direction of the arrow See Fig 3 4 Remove the claw b of the tray assembly from the CD mechanism assembly and take out the tray assembly See Fig 3 Fig 1 Fig 2 Fig 3 3 2 2 Removing the traverse mechanism assembly See Figs 4 1 From ...

Page 21: ...connect the card wire from the connector CN602 on the CD servo board and take out the CD traverse mechanism assembly with the CD servo board Fig 4 CD mechanism assembly CN602 CD servo board B B Traverse mechanism assembly ...

Page 22: ...e the lock of the connector CN601 on the CD servo board in the direction of the arrow and disconnect the card wire See Fig 6 Caution Solder the short land sections g on the CD pickup before dis connecting the card wire from the connector CN601 on the CD servo board If the card wire is disconnected without at taching solder the CD pickup may be destroyed by static electricity See Fig 6 When attachi...

Page 23: ... out of the CD pickup See Fig 8 7 From the bottom side of the CD pickup solder the short land sections k on the CD pickup See Fig 9 8 Release the lock of the connector on the CD pickup in the direction of the arrow and disconnect the card wire See Fig 9 Caution Solder the short land sections k on the CD pickup before dis connecting the card wire from the connector on the CD pick up If the card wir...

Page 24: ...w 2 See Fig 10 Fig 10 3 2 6 Removing the feed motor See Figs 5 7 and 11 Remove the traverse mechanism assembly 1 From the top side of the traverse mechanism assembly re move the wire yellow from the solder sections d on the CD servo board See Fig 5 2 Remove the wire white from the solder sections e on the CD servo board See Fig 5 3 Remove the screw D attaching the shaft holder and take out the sha...

Page 25: ...taching the CD loading switch board 3 2 8 Removing the motor See Figs 12 and 13 Remove the tray assembly 1 From the bottom side of the CD mechanism assembly re move the wires from the solder section n on the CD loading switch board See Fig 12 2 From the top side of the CD mechanism assembly remove the belt from the motor pulley See Fig 13 Note Take care not to attach grease on the belt 3 Remove th...

Page 26: ...ise as you turn the flywheel R counterclockwise See Fig 2 and 3 3 Disconnect the flexible wire from connector CN31 on the head amplifier mechanism control board 4 Remove the spring from the back of the head 5 Loosen the azimuth screw for reversing attaching the head 6 Remove the head on the front side of the head mount Fig 1 Fig 2 Fig 3 Cassette mechanism assembly Fly wheelR Trigger arm Head mount...

Page 27: ...l pulse board REFERENCE If necessary unsolder the 4 pin wire soldered to the main motor 3 3 3 Removing the main motor See Fig 4 7 1 Remove the two screws B 2 Half raise the motor and remove the capstan belt from the motor pulley ATTENTION Be careful to keep the capstan belt from grease When reas sembling refer to Fig 6 and 7 for attaching the capstan belt Fig 4 Fig 5 Fig 6 Fig 7 Head amplifier mec...

Page 28: ...rd Fig 8 Fig 9 3 3 5 Removing the reel pulse board and solenoid See Fig 10 Prior to performing the following procedure remove the head amplifier mechanism control board 1 Remove the screw C 2 Release the tab a b c d and e retaining the reel pulse board 3 Release the tab f and g attaching the solenoid on the reel pulse board 4 The reel pulse board and the solenoid come off Fig 10 Fly wheel R Fly wh...

Page 29: ...the left to disengage the gear If the gear can not be disengaged easily push up the boss Q slightly and raise the rear side of the head mounts slightly to return the direction lever to the reversing side 2 Tighten the azimuth screw for reversing 3 Reattach the spring from the back of the Play Record Clear head 4 Connect the flexible wire to connector CN31 on the head amplifier mechanism control bo...

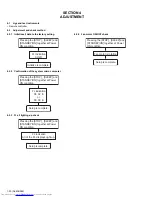
Page 30: ...nitialize is complete Pressing the STOP SLEEP and STANDBY ON together at Power ON condition FL indication COLD Pressing the STOP SLEEP and STANDBY ON together at Power ON condition Setup is complete FL indication 08 02 E or 09 00 E Pressing the STOP SLEEP and STANDBY ON together at Power ON condition Setup is complete FL indication All of the FL displays light up Pressing the STOP SLEEP and STANDB...

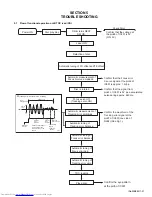
Page 31: ...ent of TE amplitude and automatic tuning of TE balance 500mv div 2ms div Fig 1 Approx 3sec IC601 20pin TEOUT Approx 1 4V VREF Power ON Disc play Key Confirm that the Focus error S curve signal at the pin32 of IC651 is approx 1 4Vp p Confirm that the signal from pin22 of IC651 is 0V as a accelerated pulse during approx 640ms Confirm the waveform of the Tracking error signal at the pin20 of IC601 on...

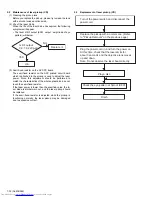
Page 32: ... whole optical block do not touch the semi fixed resistor If the laser power is lower than the specified value the la ser diode is almost worn out and the laser pickup should be replaced If the semi fixed resistor is adjusted while the pickup is functioning normally the laser pickup may be damaged due to excessive current 5 3 Replacement of laser pickup CD Is RF output 0 9 0 22Vp p YES NO O K Repl...

Page 33: ... No MB262 1 33 ...

Page 34: ... No MB262 AV MULTIMEDIA COMPANY AUDIO VIDEO SYSTEMS CATEGORY 10 1 1chome Ohwatari machi Maebashi city 371 8543 Japan Victor Company of Japan Limited WPC Printed in Japan ...

Page 35: ...MICRO COMPONENT SYSTEM MB262 2004 6 UX P400 TABLE OF CONTENTS 1 PRECAUTION 1 3 2 SPECIFIC SERVICE INSTRUCTIONS 1 6 3 DISASSEMBLY 1 7 4 ADJUSTMENT 1 30 5 TROUBLE SHOOTING 1 31 Area suffix US Singapore UF China UP Korea UT Taiwan UW Brazil Mexico Peru CA UXP400 SP UXP400 SP UXP400 ...

Page 36: ...ls CD player section Dynamic range 88 dB Signal to noise ratio 93 dB Wow and flutter Immeasurable Cassette deck section Frequency response Normal type I 50 Hz 14 000 Hz Wow and flutter 0 15 WRMS Speakers Speaker units 10 cm cone 1 Impedance 4 Ω Dimensions approx 145 mm 230 mm 191 mm W H D Mass approx 1 8 kg each General Power requirement AC 110 V AC 127 V AC 220 V AC 230 V AC 240 V adjustable with...

Page 37: ...ack control shafts etc to be sure the product is safe to operate without danger of electrical shock Do not use a line isolation transformer during this check Plug the AC line cord directly into the AC outlet Using a Leakage Current Tester measure the leakage current from each exposed metal parts of the cabinet particular ly any exposed metal part having a return path to the chassis to a known good...

Page 38: ...ptical pickup The tester s internal power source can easily destroy the laser diode 1 6 Handling the traverse unit optical pickup 1 Do not subject the traverse unit optical pickup to strong shocks as it is a sensitive complex unit 2 Cut off the shorted part of the flexible cable using nippers etc after replacing the optical pickup For specific details refer to the replacement procedure in the text...

Page 39: ...lock failed or defeated AVOID DIRECT EXPOSURE TO BEAM e VARNING Synlig och osynling laserstrålning när den öppnas och spärren är urkopplad Betrakta ej strålen s VARO Avattaessajasuojalukitus ohitettuna tai viallisena olet alttiina näkyvälle ja näkymättömälle lasersäteilylle Vältä säteen kohdistumista suoraan itseesi f ADVARSEL Synlig og usynlig laserstråling når maskinen er åben eller interlocken ...

Page 40: ...1 6 No MB262 SECTION 2 SPECIFIC SERVICE INSTRUCTIONS This service manual does not describe SPECIFIC SERVICE INSTRUCTIONS ...

Page 41: ... two screws B attaching the side panels L R to the bottom chas sis See Fig 2 3 From the both sides of the main body release the engage ment sections a b of the side panels L R from the top cover assembly in the direction of the arrow See Figs 3 and 4 4 Remove the side panels L R toward this side Fig 1 Fig 2 Fig 3 Fig 4 Side panel R Side panel L Rear panel A A Side panel L B B Bottom chassis Side p...

Page 42: ...taching the front panel assembly See Figs 6 and 7 4 Release the two claws c and claws d to draw out the front panel assembly in the direction of the arrow See Figs 6 and 7 5 From the right side of the main body disconnect the card wire from the connector CN730 on the main board See Fig 8 6 Disconnect the wire from the connector CN271 on the main board See Fig 8 7 Remove the front panel assembly in...

Page 43: ...ck side of the main body remove the screw D attaching the top cover assembly to the rear panel See Fig 9 2 From the right side of the main body disconnect the card wires from the connectors CN701 CN702 on the main board See Fig 10 3 Take out the top cover assembly from the main body Fig 9 Fig 10 Top cover assembly D Rear panel Top cover assembly Card wires CN702 CN701 Main board ...

Page 44: ... the bottom side of the top cover assembly discon nect the card wires from the connectors CN33 CN34 on the head amp mechanism control board 2 Remove the four screws E attaching the cassette mecha nism assembly and take out the cassette mechanism as sembly from the top cover assembly Fig 11 E CN34 CN33 Cassette mechanism assembly Head amp mechanism control board Top cover assembly Card wires E ...

Page 45: ...the following procedures remove the side panel L 1 From the back side of the main body remove the two screws F attaching the tuner to the rear panel See Fig 12 2 Disconnect the card wire from the connector CN1 on the tuner See Fig 13 Fig 12 Fig 13 F Rear panel Card wire CN1 Tuner ...

Page 46: ...N711 fix the wire with the wire holder 3 1 7 Removing the fan See Figs 14 and 15 Prior to performing the following procedures remove the side panels L R and rear panel 1 From the outside of the rear panel remove the two screws H attaching the fan bracket to the rear panel See Fig 14 2 From the inside of the rear panel move the fan bracket in the direction of the arrow to release the engagement sec...

Page 47: ...he power supply board See Fig 17 Prior to performing the following procedures remove the side panel L and rear panel 1 From the left side of the main body remove the screw K at taching the power supply board 2 Remove the power supply board toward this side and dis connect the connector CN104 on the power supply board 3 From the forward side of the power supply board discon nect the wires from the ...

Page 48: ...ove it from the en gagement sections i j of the shield case Fig 18 3 1 11 Removing the heat sink See Fig 19 Prior to performing the following procedure remove the side panels L R front panel assembly top cover assembly tuner rear panel main board power supply board and power ampli fier board 1 From the side of the power amplifier board remove the two screws M attaching the heat sink 2 From the sid...

Page 49: ...aching the shield case to the bottom chassis See Fig 20 Reference When attaching the shield case on the bottom chassis align the projections k m n of the bottom chassis in the holes of the shield case See Fig 20 2 Take out the shield case with the power amplifier board from the bottom chassis 3 Remove the three screws Q attaching the CD mechanism assembly to the bottom chassis See Fig 21 Fig 20 Fi...

Page 50: ...ly and rear panel 1 From the forward side of the power supply board discon nect the wires from the connectors CN102 CN103 CN105 See Fig 22 Reference Remove the power supply board as required See Fig 17 2 From the top side of the main body remove the four screws R attaching the power transformer See Fig 23 Fig 22 Fig 23 CN102 CN103 Power supply board CN105 R R R Power transformer ...

Page 51: ... front panel assembly remove the four screws S attaching the FL board 2 Take out the FL board from the front panel assembly and disconnect the card wire from the connector CN751 on the FL board Reference When attaching the FL board align the projections p of the front panel assembly in the holes of the FL board Fig 24 CN751 Card wire FL board p S S S S p Front panel assembly ...

Page 52: ...nside of the front panel assembly remove the ten screws T attaching the switch board See Fig 26 3 Take out the switch board from the front panel assembly and disconnect the card wire from the connector CN760 on the switch board See Fig 26 Reference When attaching the switch board align the projections q of the front panel assembly in the holes of the switch board See Fig 26 Fig 25 Fig 26 Mic volum...

Page 53: ...rocedure remove the side panels L R and front panel assembly 1 From the inside of the front panel assembly remove the screw U attaching the headphone jack board Reference After attaching the headphone jack board fix the wire with the spacer Fig 27 Spacer Headphone jack board U Front panel assembly Wire ...

Page 54: ...shing and remove the leaf spring See Fig 2 3 Remove the bushing of the tray assembly from the projec tion a on the CD mechanism assembly and move the tray assembly in the direction of the arrow See Fig 3 4 Remove the claw b of the tray assembly from the CD mechanism assembly and take out the tray assembly See Fig 3 Fig 1 Fig 2 Fig 3 3 2 2 Removing the traverse mechanism assembly See Figs 4 1 From ...

Page 55: ...connect the card wire from the connector CN602 on the CD servo board and take out the CD traverse mechanism assembly with the CD servo board Fig 4 CD mechanism assembly CN602 CD servo board B B Traverse mechanism assembly ...

Page 56: ...e the lock of the connector CN601 on the CD servo board in the direction of the arrow and disconnect the card wire See Fig 6 Caution Solder the short land sections g on the CD pickup before dis connecting the card wire from the connector CN601 on the CD servo board If the card wire is disconnected without at taching solder the CD pickup may be destroyed by static electricity See Fig 6 When attachi...

Page 57: ... out of the CD pickup See Fig 8 7 From the bottom side of the CD pickup solder the short land sections k on the CD pickup See Fig 9 8 Release the lock of the connector on the CD pickup in the direction of the arrow and disconnect the card wire See Fig 9 Caution Solder the short land sections k on the CD pickup before dis connecting the card wire from the connector on the CD pick up If the card wir...

Page 58: ...w 2 See Fig 10 Fig 10 3 2 6 Removing the feed motor See Figs 5 7 and 11 Remove the traverse mechanism assembly 1 From the top side of the traverse mechanism assembly re move the wire yellow from the solder sections d on the CD servo board See Fig 5 2 Remove the wire white from the solder sections e on the CD servo board See Fig 5 3 Remove the screw D attaching the shaft holder and take out the sha...

Page 59: ...taching the CD loading switch board 3 2 8 Removing the motor See Figs 12 and 13 Remove the tray assembly 1 From the bottom side of the CD mechanism assembly re move the wires from the solder section n on the CD loading switch board See Fig 12 2 From the top side of the CD mechanism assembly remove the belt from the motor pulley See Fig 13 Note Take care not to attach grease on the belt 3 Remove th...

Page 60: ...ise as you turn the flywheel R counterclockwise See Fig 2 and 3 3 Disconnect the flexible wire from connector CN31 on the head amplifier mechanism control board 4 Remove the spring from the back of the head 5 Loosen the azimuth screw for reversing attaching the head 6 Remove the head on the front side of the head mount Fig 1 Fig 2 Fig 3 Cassette mechanism assembly Fly wheelR Trigger arm Head mount...

Page 61: ...l pulse board REFERENCE If necessary unsolder the 4 pin wire soldered to the main motor 3 3 3 Removing the main motor See Fig 4 7 1 Remove the two screws B 2 Half raise the motor and remove the capstan belt from the motor pulley ATTENTION Be careful to keep the capstan belt from grease When reas sembling refer to Fig 6 and 7 for attaching the capstan belt Fig 4 Fig 5 Fig 6 Fig 7 Head amplifier mec...

Page 62: ...rd Fig 8 Fig 9 3 3 5 Removing the reel pulse board and solenoid See Fig 10 Prior to performing the following procedure remove the head amplifier mechanism control board 1 Remove the screw C 2 Release the tab a b c d and e retaining the reel pulse board 3 Release the tab f and g attaching the solenoid on the reel pulse board 4 The reel pulse board and the solenoid come off Fig 10 Fly wheel R Fly wh...

Page 63: ...the left to disengage the gear If the gear can not be disengaged easily push up the boss Q slightly and raise the rear side of the head mounts slightly to return the direction lever to the reversing side 2 Tighten the azimuth screw for reversing 3 Reattach the spring from the back of the Play Record Clear head 4 Connect the flexible wire to connector CN31 on the head amplifier mechanism control bo...

Page 64: ...nitialize is complete Pressing the STOP SLEEP and STANDBY ON together at Power ON condition FL indication COLD Pressing the STOP SLEEP and STANDBY ON together at Power ON condition Setup is complete FL indication 08 02 E or 09 00 E Pressing the STOP SLEEP and STANDBY ON together at Power ON condition Setup is complete FL indication All of the FL displays light up Pressing the STOP SLEEP and STANDB...

Page 65: ...ent of TE amplitude and automatic tuning of TE balance 500mv div 2ms div Fig 1 Approx 3sec IC601 20pin TEOUT Approx 1 4V VREF Power ON Disc play Key Confirm that the Focus error S curve signal at the pin32 of IC651 is approx 1 4Vp p Confirm that the signal from pin22 of IC651 is 0V as a accelerated pulse during approx 640ms Confirm the waveform of the Tracking error signal at the pin20 of IC601 on...

Page 66: ... whole optical block do not touch the semi fixed resistor If the laser power is lower than the specified value the la ser diode is almost worn out and the laser pickup should be replaced If the semi fixed resistor is adjusted while the pickup is functioning normally the laser pickup may be damaged due to excessive current 5 3 Replacement of laser pickup CD Is RF output 0 9 0 22Vp p YES NO O K Repl...

Page 67: ... No MB262 1 33 ...

Page 68: ... No MB262 AV MULTIMEDIA COMPANY AUDIO VIDEO SYSTEMS CATEGORY 10 1 1chome Ohwatari machi Maebashi city 371 8543 Japan Victor Company of Japan Limited WPC Printed in Japan ...

Page 69: ... No M1 Speaker assembly and parts list US UP UT UW Block No M2 CD mechanism assembly and parts list Block No MB Cassette mechanism assembly and parts list Block No MP Electrical parts list Block No 01 06 Packing materials and accessories parts list Block No M3 UX P400 3 2 3 6 3 7 3 9 3 11 3 18 Area suffix US Singapore UF China UP Korea UT Taiwan UW Brazil Mexico Peru ...

Page 70: ... No M M M 1 i m H H D B FL board Switch board Headphone jack board F F E G K E J j A k L DI750 27 37 42 84 22 85 16 6 17 20 4 18 5 70 1 2 12 7 75 60 57 64 82 32 26 25 76 23 71 74 81 66 65 61 62 58 70 21 77 67 59 68 16 15 8 10 3 18 21 36 14 68 30 69 19 19 50 92 ...

Page 71: ... e B Main board Power amplifier board Power supply board G K K J J D C A L L C p p 40 39 41 38 35 34 7 37 86 79 80 78 42 63 37 32 87 31 26 88 58 63 24 73 72 44 44 47 83 48 49 53 46 55 52 51 54 52 29 33 45 37 33 25 30 28 11 13 40 30 43 91 56 89 90 ...

Page 72: ... 2m BLACK P400UT 34 QMPK200 200 JD POWER CORD EU 2m BLACK P400US P400UW 35 QZW0033 001 STRAIN RELIEF 36 QYSSST3008Z TAP SCREW M3 x 8mm x2 37 QYSDST3005Z TAP SCREW M3 x 5mm x4 38 GV40480 002A IC HOLDER 39 GV30559 007A HEAT SINK P400US P400UT P400UW 40 QYSBST3006E TAP SCREW M3 x 6mm x2 41 QYSBSG3012Z TAP SCREW M3 x 12mm x2 42 QYSBSTG3006Z TAP SCREW M3 x 6mm 43 QYSBSTG3006Z TAP SCREW M3 x 6mm 44 QYSB...

Page 73: ...79 QMF51W2 1R25 J8 FUSE F 1003 80 QMF51W2 6R3 J8 FUSE F 1005 81 QUQH12 0922AJ CARD WIRE 82 QUQH12 1022AJ CARD WIRE 83 QUQH12 1113AJ CARD WIRE FC 1 84 QUQH12 1508AJ CARD WIRE 85 QUQH12 1008AJ CARD WIRE 86 QUQH12 1114AJ CARD WIRE 87 QUQM10 1716AJ CARD WIRE 88 QQT0426 002 POWER TRANSF P400UF P400UP 88 QQT0426 003 POWER TRANSF P400US P400UT P400UW 89 LV43268 001A CCC LABEL P400UF 90 E70891 001 CLASS 1...

Page 74: ...mbol No Part No Part Name Description Local 1 UP4 BK 00 01 SARAN BOARD x2 2 UP4 MK 00 01 MARK x2 3 UP4 WO 00 01 CONE SPEAKER x2 4 UP4 ML 00 01 TAPPING SCREW x8 5 UP4 JD 00 01 RUBBER MAT x8 6 UP4 HT 02 01 RATING LABEL x2 Block No M M M 2 Block No M M M 2 US UP UT UW 1 2 4 3 5 6 ...

Page 75: ...8 33 31 29 30 30 31 29 31 31 12 18 19 16 15 17 23 22 21 13 14 20 26 25 27 10 6 36 4 3 5 1 8 9 7 2 24 11 a b c c b 7 95mm 0 10mm A A a 3 5mm 0 1mm 18mm 0 1mm 12 0mm 0 1mm JVG 31N JVS 1003 Grease FL 7750E Block No M M M B Backside Switch board FMU ST1 1M ...

Page 76: ...SGT1425M TAP SCREW 1 4mm x 2 5mm 15 LV10855 001A TM CHASSIS 16 LV43468 001A T T ASSY 17 QAR0302 001 SPINDLE MOTOR 18 VKZ4743 001 SPECIAL SCREW x2 19 LV40157 001A SCREW SHAFT 20 LV43651 001A SS GEAR 21 LV43650 001A F MOTOR GEAR 22 QAR0303 001 FEED MOTOR 23 QYSPSPT2030M SCREW M2 x 3mm 24 LV34565 002A F MIDDLE GEAR 25 LV34563 001A SHAFT HOLDER 26 QYSPSFT1740Z TAP SCREW M1 7 x 4mm 27 QUQ105 1506BB FFC...

Page 77: ...UD 24 LEN 320M MOBIL 1 1 27 13 3 34 2 8 15 10 14 16 7 12 23 3 2 4 9 6 5 24 29 25 22 17 20 19 18 11 21 31 36 26 28 30 1 11 6 5 33 32 33 32 35 35 SLC S303M A B 8 7 _ 0 1 0 15 mm A B C C Block No M M M P Grease The lower side Head amplifier board Switch board ...
Page 78: ... 14 LV41584 001A BRAKE R 15 LV41585 003A BRAKE L 16 QYSBSF2005Z SCREW 2mm x 5mm 17 VKS5603 00G MAIN PULLEY ASS 18 VKS3785 001MM FR ARM 19 VKW5284 002 SWING SPRING 20 VKS2278 003 TRIGGER ARM 21 VKW5301 001 FR SPRING 22 VKW5266 001 ELEVATOR SPRING 23 WDL214025 WASHER 24 QYSBSF2005Z SCREW 2mm x 5mm 25 VKS3786 00G CLUTCH ASSY 26 VKF3205 00B F WHEEL ASSY R 27 WDL183425 SLIT WASHER 28 VKF3207 00C F WHEE...

Page 79: ...10uF 50V C2132 QFLC1HJ 222Z M CAPACITOR 2200pF 50V J C2180 QCFB1HZ 104Y C CAPACITOR 0 1uF 50V Z C2181 QDXB1CM 332Y C CAPACITOR 3300pF 16V M C2200 QTE1C06 107Z E CAPACITOR 100uF 16V C2201 QFLC1HJ 104Z M CAPACITOR 0 1uF 50V J C2202 QTE1C06 107Z E CAPACITOR 100uF 16V C2203 QCBB1HK 103Y C CAPACITOR 0 01uF 50V K C2204 QETN1HM 226Z E CAPACITOR 22uF 50V M C2220 QTE1C06 476Z E CAPACITOR 47uF 16V C2221 QET...

Page 80: ...1 16W J R7129 NRSA63J 222X MG RESISTOR 2 2kΩ 1 16W J R7131 NRSA63J 103X MG RESISTOR 10kΩ 1 16W J R7132 NRSA63J 103X MG RESISTOR 10kΩ 1 16W J R7135 NRSA63J 222X MG RESISTOR 2 2kΩ 1 16W J R7136 NRSA63J 222X MG RESISTOR 2 2kΩ 1 16W J R7145 NRSA63J 222X MG RESISTOR 2 2kΩ 1 16W J R7146 NRSA63J 103X MG RESISTOR 10kΩ 1 16W J R7149 NRSA63J 222X MG RESISTOR 2 2kΩ 1 16W J Symbol No Part No Part Name Descrip...

Page 81: ...0 UW C4001 QETM1EM 478 E CAPACITOR 4700uF 25V M C4101 QETM1EM 828 E CAPACITOR 8200uF 25V M C4102 QETN1CM 107Z E CAPACITOR 100uF 16V M C4103 QTE1H28 105Z E CAPACITOR 1uF 50V C4107 QETN1AM 336Z E CAPACITOR 33uF 10V M C4108 QTE1H28 105Z E CAPACITOR 1uF 50V C4109 QFLC1HJ 223Z M CAPACITOR 0 022uF 50V J C4110 QETN1HM 474Z E CAPACITOR 0 47uF 50V M C4111 QFLC1HJ 104Z M CAPACITOR 0 1uF 50V J C4112 QFLC1HJ ...

Page 82: ...ITOR 0 1uF 16V K C259 NDC31HJ 101X C CAPACITOR 100pF 50V J C291 QERF0JM 226Z E CAPACITOR 22uF 6 3V M C603 NCB31CK 104X C CAPACITOR 0 1uF 16V K C604 NCB31CK 104X C CAPACITOR 0 1uF 16V K C605 NDC31HJ 391X C CAPACITOR 390pF 50V J C606 NDC31HJ 560X C CAPACITOR 56pF 50V J C609 NDC31HJ 470X C CAPACITOR 47pF 50V J C610 NCB31CK 563X C CAPACITOR 0 056uF 16V K C611 NCB31CK 104X C CAPACITOR 0 1uF 16V K C612 ...

Page 83: ...33X MG RESISTOR 33kΩ 1 16W J R672 NRSA63J 102X MG RESISTOR 1kΩ 1 16W J R673 NRSA63J 102X MG RESISTOR 1kΩ 1 16W J R674 NRSA63J 102X MG RESISTOR 1kΩ 1 16W J R675 NRSA63J 102X MG RESISTOR 1kΩ 1 16W J R676 NRSA63J 0R0X MG RESISTOR 0Ω 1 16W J R678 NRSA63J 270X MG RESISTOR 27Ω 1 16W J R679 NRSA63J 0R0X MG RESISTOR 0Ω 1 16W J R681 NRSA63J 103X MG RESISTOR 10kΩ 1 16W J R682 NRSA63J 391X MG RESISTOR 390Ω 1...

Page 84: ...1 4W J R108 QRE141J 273Y C RESISTOR 27kΩ 1 4W J R110 QRE141J 103Y C RESISTOR 10kΩ 1 4W J R116 QRE141J 102Y C RESISTOR 1kΩ 1 4W J R121 QRE141J 153Y C RESISTOR 15kΩ 1 4W J R201 QRE141J 512Y C RESISTOR 5 1kΩ 1 4W J R202 QRE141J 512Y C RESISTOR 5 1kΩ 1 4W J R204 QRE141J 222Y C RESISTOR 2 2kΩ 1 4W J R205 QRE141J 104Y C RESISTOR 100kΩ 1 4W J R206 QRE141J 113Y C RESISTOR 11kΩ 1 4W J R207 QRE141J 912Y C R...

Page 85: ...3 17 MEMO ...

Page 86: ...3 18 Packing materials and accessories parts list P3 P5 P4 P1 P2 P6 A1 A2 A3 A4 A5 A6 A7 A8 A10 P11 P9 P8 A9 P10 P7 A13 P13 P14 A12 A12 P12 P3 A14 A14 A14 A15 A15 Block No M M M 3 UF only US UP UT UW ...

Page 87: ...ER BOX x2 P400US P400UP P400UT P400UW A 12 9910007721 NET ASSY x2 P400UF A 13 UXP400K SPBOX SPEAKER BOX x2 P400UF A 14 LV43644 001A LABEL x3 P400UP A 15 LV43644 001A LABEL x2 P400UP P 1 QPC02503515P POLY BAG 25cm x 35cm P 2 GV20291 001A CARTON ASSY P400UF P 2 GV20267 006A CARTON ASSY P400UP P400US P400UT P400UW P 3 GV10196 001A CUSHION TOP P 4 GV10197 001A CUSHION BTM P 5 QPC05006515P POLY BAG 50c...

Reviews: