background image

27

4

  Select the repeat mode you want.

A-B

Repeats a desired portion (see below).

TITLE

*

Repeats the current title.

ALL

Repeats the disc (not applicable for 
DVD) or programmed track.

CHAPTER

**

Repeats the current chapter.

TRACK

**

Repeats the current track.

OFF

Cancels Repeat Play.


*

  While playing a DVD-VR, “PG” appears, and while 

playing a Play List, “PL” appears.


**

  During Program Play and Random Play, “STEP” 

appears.

5

  Finish the setting.

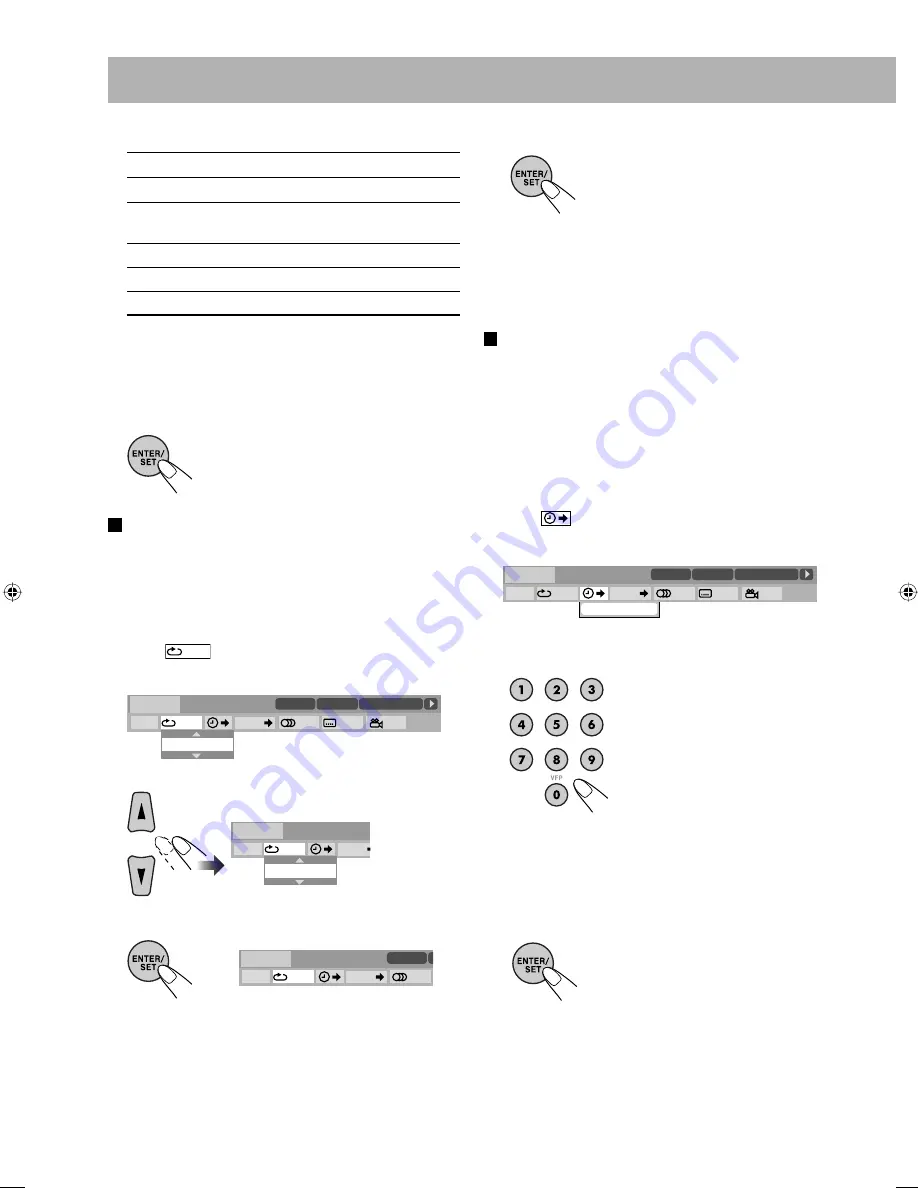
 A-B Repeat

You can repeat playback of a desired portion by specifying 
the beginning (point A) and the ending (point B).
•  A–B Repeat cannot be used for MP3/WMA/WAV/JPEG/

MPEG-1/MPEG-2/DivX files and some DVDs.

1

  While playing, display the entire on-screen bar.

2

  Select 

OFF

.

3

  Display the pop-up window.

4

  Select “A-B.”

5

  Select the start point (A).

OFF

1/3

1/3

1/3

TIME

TITLE


14

TOTAL

 1:25:58

CHAP


23

DVD-VIDEO

TITLE  2

TIME

OFF

CHAP.

1

/

3

1

/

3

1

/

1

TOTAL   

1:01:58

CHAP  3

OFF

Dolby D
3/2.1ch

1/3

TIME

TITLE


14

CH

DVD-VIDEO

TITLE  2

TIME

A-

CHAP.

1

/

3

C

Dolby D
3/2.1ch

6

  Select the end point (B).

A-B Repeat starts. The selected 
portion plays repeatedly.
•  You can search for the end point 

using the 

¡

 button.

To cancel A-B Repeat,

 repeat steps 

1

 to 

3

, and select 

“OFF” in step 

4

.

•  A-B Repeat will also be canceled when you stop play or 

skip the chapter or track.

 Time Search

You can move to a particular point by specifying the 
elapsed playing time from the beginning.
•  This function is not available during Program Play and 

Random Play.

1

  While playing (without PBC for SVCD/VCD), display 

the entire on-screen bar.


•  Time Search can also be used before starting playback 

(not applicable for DVD Video/DVD-VR). 

2

  Select 

.

3

  Display the pop-up window.

4

  Enter the time.


You can specify the time in hours/minutes/seconds.

Examples:

To move to a point of 1 (hours): 
02 (minutes): 00 (seconds), press 
1, 0, 2, 0, then 0.
To move to a point of 54 
(minutes): 00 (seconds), press 0, 5, 
4, 0, then 0.


•  It is always required to enter the hour digit (even “0” 

hours), but it is not required to enter the final zeros 
(the last two digits in the examples above).


• 

To correct a mis-entry,

 press 

2

 to erase the last entry.

5

  Confirm your entry.

The System starts playing the disc 
from the selected playing time.

OFF

1/3

1/3

1/3

TIME

TITLE


14

TOTAL

 1:25:58

CHAP


23

DVD-VIDEO

TITLE  2

TIME

OFF

CHAP.

1

/

3

1

/

3

1

/

1

TIME    

0:00:58

CHAP  3

TIME   _ : _ _ : _ _

Dolby D
3/2.1ch

OFF

TIME

T

DVD-VIDEO

TIME

OFF

CHAP.

A–B

Dolby D
3/2.1ch

EN25-32_UX-GP7V[U]1.indd   27

EN25-32_UX-GP7V[U]1.indd   27

6/16/08   11:22:28 AM

6/16/08   11:22:28 AM

Summary of Contents for CA-UXGP7V

Page 1: ...MICRO COMPONENT SYSTEM UX GP7V Consists of CA UXGP7V and SP UXGP7V SUPER VIDEO INSTRUCTIONS GVT0258 005A US UN UB UG UX A UH ...

Page 2: ...re no user serviceable parts inside the unit leave all servicing to qualified service personnel 3 CAUTION Visible and or invisible class 1M laser radiation when open Do not view directly with optical instruments 4 REPRODUCTION OF LABEL CAUTION LABEL PLACED INSIDE THE UNIT CAUTION Do not block the ventilation openings or holes If the ventilation openings or holes are blocked by a newspaper or cloth...

Page 3: ... follows 1 Front No obstructions and open spacing 2 Sides Top Back No obstructions should be placed in the areas shown by the dimensions below 3 Bottom Place on the level surface Maintain an adequate air path for ventilation by placing on a stand with a height of 10 cm or more Front view Side view European Union only ...

Page 4: ...System DO NOT install the System in a location near heat sources or in a place subject to direct sunlight excessive dust or vibration Install in a place which is level dry and neither too hot nor too cold between 5 C and 35 C Leave sufficient distance between the System and the TV Keep the speakers away from the TV to avoid interference with the TV Power sources When unplugging the System from the...

Page 5: ...ture Tone 17 Setting the Clock 18 Turning Off the Power Automatically 18 Unique Video Disc File Operations 19 Selecting the Audio Track 19 Selecting the Subtitle Language 20 Special Effect Playback 21 Advanced Playback Operations 22 Programming the Playing Order Program Play 22 Playing at Random Random Play 23 Playing Repeatedly 24 Prohibiting Disc Ejection Child Lock 24 On Screen Operations 25 On...

Page 6: ... system This System accommodates both NTSC and PAL system and can play back discs files recorded in either system To change the color system see page 17 Note on Region Code DVD players and DVDs have their own Region Code numbers This System can play back only DVDs with an appropriate Region Code number For details see Specifications on page 41 RG ERROR appears if DVD with other Region Code is load...

Page 7: ...U 1 Batteries 2 AC plug adapter 1 not supplied for Australia Thailand Hong Kong region and the Middle East If any items are missing consult your dealer immediately Rear panel From AM FM antenna See page 5 Ÿ From the speakers See page 5 From the digital input of digital audio component See page 5 From the powered subwoofer See page 6 From the input of TV monitor See page 6 To a wall outlet Plug in ...

Page 8: ...oor antenna not supplied ŸSpeakers When connecting the speaker cords match the polarity of the speaker terminals red to and black to DO NOT connect more than one speaker to each terminal DO NOT push or pull the speakers as this will damage the foot spacers at the bottom of the speakers Digital audio component Set DIGITAL AUDIO OUTPUT in the AUDIO menu correctly according to the connected digital a...

Page 9: ...powered subwoofer The connected subwoofer can reproduce the bass sounds recorded in front left and right channels but cannot reproduce the LFE signals encoded in multi channel software Before plugging the System to the power supply make sure that the powered subwoofer is turned off TV monitor Connect the COMPONENT jacks S VIDEO jack or VIDEO jack whichever you want to use You can get better pictur...

Page 10: ...icator Lights when Auto Standby is activated Flashes when playback stops with Auto Standby activated i SLEEP indicator Lights when the Sleep Timer is activated 1 iPod indicator Lights when an iPod is selected as the source 2 Disc format indicators SVCD lights when playing back an SVCD VCD lights when playing back a VCD CD lights when playing back a CD DVD lights when playing back a DVD 3 Playback ...

Page 11: ... 3 Adjust the volume To turn off standby the System The STANDBY lamp on the main unit lights in red A small amount of power is always consumed even while on standby For private listening Connect a pair of headphones to the PHONES jack on the main unit The sound will no longer come out of the speakers H PHONE appears on the display for a while Be sure to turn down the volume before connecting or pu...

Page 12: ...Tune in to a station you want to preset You can also store the monaural reception mode for FM preset stations if it is selected 2 Activate the preset number entry mode Finish the following process while the indication on the display is flashing How to select a number Examples To select number 5 press 5 To select number 10 press 10 To select number 15 press 10 1 then 5 To select number 30 press 10 ...

Page 13: ...TYPE in PICTURE menu on page 33 You can use the control screen appears on the TV For still moving picture files it appears while playback is stopped For details see page 28 The System can store the stop point and when you start playback again by pressing DVD CD 6 even while on standby it starts from the position where you have stopped Resume Play RESUME indicator lights on the display when you sto...

Page 14: ...ce For DivX MPEG 1 MPEG 2 files each time you press the 3 or 2 button you can skip to a scene by 30 seconds or 5 minutes depending on the files To locate an item directly Remote ONLY You can select a title chapter track file directly and start playback For DVD Video you can select a title before starting playback while you can select a chapter after starting playback To select a number see How to ...

Page 15: ... directly It might cause damages to the connector part When you connect your iPod to the dock make sure the terminal on the dock is fully inserted into the iPod Do not carry the System with iPod dock open and iPod is connected You might drop it or it might cause damages to the iPod dock Remove the iPod from the dock when you do not use it When you cannot operate the connected iPod through the unit...

Page 16: ... the number of the level increases the preset input level is increased while holding Shuffle Songs SHUFFLE appears on the display for a while The shuffle icon lights up on the display screen of the iPod To cancel press TUNER PLAY MODE again until the shuffle icon disappears Repeat Play REPEAT appears on the display for a while repeat all or repeat one lights up on the display screen of the iPod ap...

Page 17: ...o reinforce the heavy sound This boosts the low and high frequency sound Sound Turbo II When Sound Turbo II is turned on AHB Pro see below is automatically turned on and cannot be turned off The AHB indicator does not light even though the function is turned on To reinforce the bass sound Remote ONLY While Sound Turbo II is off the richness and fullness of the bass sound is clearly maintained rega...

Page 18: ...setup MY SOUND 1 While playing 2 Enter MY SOUND setup 3 Follow the TV on screen instructions to start the measurement Canceled 4 Follow the TV on screen instructions to store in PRESET 1 2 or 3 3 EXIT 1 2 PRESET MY SOUND SELECT PRESET 1 TO 3 AND PRESS THE ENTER KEY TO STORE EXIT MY SOUND PRESET DATA STORED MY SOUND SELECT START AND PRESS THE ENTER KEY TO START MEASUREMENT START EXIT MY SOUND MEASU...

Page 19: ...ng the ECO ecology Mode Setting the ECO mode allows you to reduce power consumption by turning the display off while on standby While the System is on standby Canceled while holding To exit MY SOUND setup To select the preset MY SOUND Remote ONLY This does not function for DivX files Creating 3 Dimensional Sound Field 3D Phonic Remote ONLY This only functions while listening to a disc This does no...

Page 20: ...olding Remote ONLY 2 Select a preset picture tone NORMAL Normally select this CINEMA Suitable for a movie source USER1 USER2 You can adjust parameters and can store the settings See the following To clear the screen press VFP again while holding SHIFT To adjust the picture tone 1 Select USER1 or USER2 Follow steps 1 and 2 explained in To select a preset picture tone 2 Select a parameter you want t...

Page 21: ...MPEG 1 MPEG 2 DivX files Group and file number DVD Video Title and chapter number Turning Off the Power Automatically Remote ONLY Auto Standby This only functions while playing a disc A STBY indicator lights on the display When the playback stops the A STBY indicator starts flashing If no operation is done for about 3 minutes while the indicator is flashing the System turns off standby automatical...

Page 22: ...o DVD VR SVCD VCD You can also select the audio track using the on screen bar see page 26 While playing a DVD Video Ex While playing a DivX file While playing a DVD VR or SVCD VCD ST1 ST2 ST To listen to normal stereo 2 channel playback L1 L2 L To listen to the left audio channel R1 R2 R To listen to the right audio channel SVCD can have 4 audio channels SVCD usually uses these 4 channels to recor...

Page 23: ...or SVCD While playing you can select the subtitles even if no subtitles are recorded on the disc For DVD Video DVD VR SVCD You can also select the subtitle language using the on screen bar see page 25 While playing a DivX file DVD Video 1 2 Ex 1 3 3 3 2 3 FRENCH JAPANESE ENGLISH 1 3 2 3 JAPANESE 3 3 ENGLISH FRENCH JAPANESE While playing a DVD VR While playing an SVCD To select multi angle view use...

Page 24: ...ideo To resume normal playback press DVD CD 6 To replay the previous scenes One Touch Replay This function is only used while playing DVD Video DVD VR While playing The playback position moves back about 10 seconds before the current position only within the same title for DVD Video Zoom Remote ONLY 1 While playing While playing a DVD Video DVD VR SVCD VCD and MPEG 1 MPEG 2 DivX file While playing...

Page 25: ...fore starting playback activate Program Play 2 Select chapters tracks files you want for Program Play 1 For DVD Video and MP3 WMA WAV files Select a title or group number 2 Select a chapter or track file number To select a number see How to select a number on page 9 3 Repeat step 2 until you complete your program 4 Start playback Playback starts in the order you have programmed To skip To pause To...

Page 26: ...g while holding In the reverse order In the programmed order Playing at Random Random Play Remote ONLY You can play all chapters or tracks at random Random Play cannot be used for DVD VR and JPEG MPEG 1 MPEG 2 DivX files on a disc 1 Before starting playback activate Random Play 2 Start playback Playback starts in random order Random Play ends when the entire disc has been played To skip a chapter ...

Page 27: ...nt chapter REP TTL Repeats the current title REP TRK Repeats the current track file REP GRP Repeats the current group REP PG Repeats the current program REP PL Repeats the current Play List REP ALL Repeats all the contents or programmed tracks files During Program Play and Random Play REP STEP appears instead of these indications and the repeat mode changes as follows for all discs Prohibiting Dis...

Page 28: ...Dolby D Audio format 3 2 1ch 2 0 0 ch Channel number PROGRAM RANDOM Current play mode TITLE 2 Current title CHAP 3 Current chapter TRACK 14 Current track Current program Current Play List TIME 0 00 58 Time indication 3 Operation modes Playback Forward Reverse search Forward Reverse slow motion Pause Stop 4 Function icons on the pull down menu TIME Select to change the time indications OFF Select t...

Page 29: ... on the on screen bar and the display on the main unit 1 While playing display the entire on screen bar 2 Make sure TIME is selected highlighted 3 Change the time indication TIME Elapsed playing time of the current chapter track not applicable for DVD VR REM Remaining time of the current chapter track not applicable for DVD VR TOTAL Elapsed disc time T REM Remaining time of title DVD Video program...

Page 30: ...e end point using the button To cancel A B Repeat repeat steps 1 to 3 and select OFF in step 4 A B Repeat will also be canceled when you stop play or skip the chapter or track Time Search You can move to a particular point by specifying the elapsed playing time from the beginning This function is not available during Program Play and Random Play 1 While playing without PBC for SVCD VCD display the...

Page 31: ...rogram PG or Play List PL To select playback type To display the Original Programs To display the Play Lists To remove the list press the same button again CHAPTER _ 1 3 1 3 1 3 TIME TITLE 14 TOTAL1 25 58 CHAP 23 DVD VIDEO TITLE 2 TIME OFF CHAP 1 3 1 3 1 1 TOTAL 1 01 58 CHAP 3 Dolby D 3 2 1ch Ex When Original Program is selected Ex When Play List is selected 1 Listed number 2 Recording creating da...

Page 32: ...al 41 Spring Summer Fall Winter Track Information Cloudy mp3 Fair mp3 Fog mp3 Hail mp3 Indian summer mp3 Rain mp3 Shower mp3 Snow mp3 Thunder mp3 Typhoon mp3 Wind mp3 Winter sky mp3 Title Rain Artist Album 1 2 5 4 9 8 7 0 REPEAT STEP 3 RANDOM 6 To move the highlight bar between group list and file list To select an item in the list Move the highlight bar to the desired item If you move the highlig...

Page 33: ...ed from the factory DAILY 1 ON Time 6 00 OFF Time 8 00 Source TUNER FM 1 Volume level DAILY 2 ON Time 7 00 OFF Time 9 00 Source TUNER FM 1 Volume level DAILY 3 ON Time 10 00 OFF Time 12 00 Source TUNER FM 1 Volume level 1 Select one of the timer setting modes you want to set DAILY 1 ON time DAILY 2 ON time or DAILY 3 ON time When the clock has not been set pressing CLOCK TIMER makes the System ent...

Page 34: ...s The System turns on tunes in to the specified station or starts playing from the specified source and gradually increases the volume level to the preset level after for 30 seconds While Daily Timer is working the timer indicator flashes on the display When the off time comes The System stops playback and turns off on standby automatically The timer setting remains in memory until you change it T...

Page 35: ...D Video See page 39 SUBTITLE You can select the initial subtitle language for DivX files DVD Video See page 39 ON SCREEN LANGUAGE You can select ENGLISH CHINESE or SPANISH as the on screen language PICTURE MONITOR TYPE 16 9 4 3 LB 4 3 PS You can select the monitor type to match your TV when you play back picture recorded for wide screen televisions 16 9 NORMAL 16 9 MULTI NORMAL Wide screen televis...

Page 36: ...l decoder or an amplifier with a built in Dolby Digital decoder STREAM PCM When connecting to a DTS decoder or an amplifier with a built in DTS decoder DOWN MIX This setting is effective for digital audio output if DIGITAL AUDIO OUTPUT is set to PCM ONLY DOLBY SURROUND Select this when connecting to a surround decoder STEREO Select this when connecting to a stereo receiver MD player etc D RANGE CO...

Page 37: ... a disc of UDF Bridge format For details about DVD VR format and Play List refer to the manual of the recording equipment For MP3 WMA WAV playback MP3 WMA WAV discs require a longer readout time than regular CDs It depends on the complexity of the group file configuration Some MP3 WMA WAV files cannot be played back and will be skipped This results from their recording processes and conditions Thi...

Page 38: ...ommended to turn off the equalizer of the iPod For information on operating the iPod see the iPod instruction manual If the iPod does not play correctly update your iPod software to the latest version For details about updating your iPod check on the Apple web site http www apple com Daily Operations Sound Other Adjustments see pages 14 to 18 Adjusting the Sound This function also affects the soun...

Page 39: ...cannot change audio language during playback Special Effect Playback During slow motion playback no sound will be emitted While zoomed in the picture may look coarse Advanced Playback Operations see pages 22 to 24 Programming the Playing Order Program Play While programming steps Your entry will be ignored if you have tried to program an item number that does not exist for example selecting track ...

Page 40: ...1 and Version 2 This System can only show ID3 Tag Version 1 Groups and tracks are not played back as you expect The playing order is determined when the groups and tracks were recorded It depends on the writing application MP3 WMA WAV JPEG MPEG 1 MPEG 2 or DivX files are not played back The disc may contain different types of files ex MP3 WMA WAV JPEG In this case you can only play back the files ...

Page 41: ...o Logic and the double D symbol are trademarks of Dolby Laboratories DTS is a registered trademark of DTS Inc and DTS2 0 Digital Out is a trademark of DTS Inc Official DivX Ultra Certified product Plays all versions of DivX video including DivX 6 with enhanced playback of DivX media files and the DivX Media Format DivX DivX Ultra Certified and associated logos are trademarks of DivX Inc and are us...

Page 42: ...Bengali Bangla IW Hebrew OC Occitan TI Tigrinya BO Tibetan JI Yiddish OM Afan Oromo TK Turkmen BR Breton JW Javanese OR Oriya TL Tagalog CA Catalan KA Georgian PA Panjabi TN Setswana CO Corsican KK Kazakh PS Pashto Pushto TO Tonga CY Welsh KL Greenlandic PT Portuguese TR Turkish DA Danish KM Cambodian QU Quechua TS Tsonga DZ Bhutani KN Kannada RM Rhaeto Romance TT Tatar EL Greek KO Korean KOR RN K...

Page 43: ... CD 44 1 kHz 16 bit Linear PCM 48 kHz 16 bit Linear PCM CD with DTS DTS bitstream 44 1 kHz 16 bit Linear PCM MP3 WMA WAV MPEG 1 MPEG 2 32 44 1 48 kHz 16 bit Linear PCM DivX with MP2 MP3 32 44 1 48 kHz 16 bit Linear PCM with Dolby Digital Dolby Digital bitstream 32 44 1 48 kHz 16 bit Linear PCM While playing some DVDs digital signals may be emitted at 20 bits or 24 bits at their original bit rate t...

Page 44: ...ed Accessories See page 4 Design and specifications are subject to change without notice Specifications Amplifier section CA UXGP7V Output Power 60 W 30 W 30 W at 4 Ω 10 THD Audio Input AUDIO IN Stereo min 3 5 mm 500 mV 50 kΩ at IN_LVL1 250 mV 50 kΩ at IN_LVL2 125 mV 50 kΩ at IN_LVL3 Audio Output SUBWOOFER OUT 500 mV 10 kΩ Digital output OPTICAL DIGITAL OUT 21 dBm to 15 dBm 660 nm 30 nm Digital in...

Page 45: ...MUTING p 14 FILE TYPE 9 11 37 GROUP TITLE SKIP o 11 iPod 6 2 8 12 MENU PL g 11 12 28 29 MY SOUND 15 16 Number buttons 5 9 11 27 28 ON SCREEN h 26 REPEAT e 13 24 RETURN 7 12 SCAN MODE 13 17 SET UP 9 32 SHIFT r 11 14 16 21 23 30 31 37 SLEEP A STBY t 18 SLOW 9 4 21 S TURBO II l 14 SUBTITLE h 20 37 TOP MENU PG 7 11 28 29 TUNER i 8 10 TUNER PLAY MODE w 9 13 22 23 TV CH UP DOWN q 40 TV VIDEO s 40 VFP f ...

Page 46: ...UX GP7V 0908WMKMDWJMM 2008 Victor Company of Japan Limited EN MICRO COMPONENT SYSTEM ...

Reviews: