background image

To verify service entitlement by product serial number, use our Serial Number Entitlement
(SNE) Tool:

https://tools.juniper.net/SerialNumberEntitlementSearch/

Opening a Case with JTAC

You can open a case with JTAC on the Web or by telephone.

Use the Case Management tool in the CSC at

http://www.juniper.net/cm/

.

Call 1-888-314-JTAC (1-888-314-5822 toll-free in the USA, Canada, and Mexico).

For international or direct-dial options in countries without toll-free numbers, visit us at

http://www.juniper.net/support/requesting-support.html

Revision History

January 2014—Web only. Added procedures for installing the MX2010 router using the
router transport kit.

May 2013—530-051881 Revision 1. Initial release.

Copyright © 2014, Juniper Networks, Inc. All rights reserved.

Juniper Networks, Junos, Steel-Belted Radius, NetScreen, and ScreenOS are registered trademarks of Juniper Networks, Inc. in the United
States and other countries. The Juniper Networks Logo, the Junos logo, and JunosE are trademarks of Juniper Networks, Inc. All other
trademarks, service marks, registered trademarks, or registered service marks are the property of their respective owners.

Juniper Networks assumes no responsibility for any inaccuracies in this document. Juniper Networks reserves the right to change, modify,
transfer, or otherwise revise this publication without notice.

Copyright © 2014, Juniper Networks, Inc.

72

MX2010 3D Universal Edge Router Quick Start

Summary of Contents for MX2010 3D

Page 1: ...he Pallet Jack with Attachment to Install the Router 20 Install the Router Using a Router Transport Kit 24 Unpack the Router Transport Kit 24 Install the Router Transport Kit onto the Router 26 Secure the Router Transport Platform to the Router 28 Use the Router Transport Kit to Install the Router in a Four Post Rack 31 Use the Router Transport Kit to Install the Router In an Open Frame Rack 38 St...

Page 2: ... Configuration 65 Safety Warnings 66 Compliance Statements for NEBS for the MX2010 Router 68 Compliance Statements for EMC Requirements for the MX2010 Router 68 Canada 68 European Community 68 Declaration of Conformity 68 Japan 69 United States 70 Junos OS Documentation and Release Notes 71 Requesting Technical Support 71 Self Help Online Tools and Resources 71 Opening a Case with JTAC 72 Revision...

Page 3: ...ce from access during installation The MX2010 router has 10 dedicated line card slots which means a maximum of 10 Modular Port Concentrators MPCs including adapter cards ADCs and Modular Interface Cards MICs a host subsystem consisting of 2 Control Board with Routing Engines CB REs and 8 Switch Fabric Boards SFBs ADCs provide housing to MPCs The MPCs attach to the ADC which in turn mates to the ba...

Page 4: ...rack must be strong enough to support the weight of the fully configured router up to 985 lb 446 79 kg For the cooling system to function properly the airflow around the chassis must be unrestricted Allow at least 36 in 91 44 cm of clearance between front to rear cooled routers Allow 2 8 in 7 cm between the side of the chassis and any non heat producing surface such as a wall NOTE To help redirect...

Page 5: ...hardware device rack or cabinet component that obstructs the 34 U rack space from being access during installation Figure 1 MX2010 Rack Clearance and Router Dimensions for Four Post Rack g007451 59 50 in 151 13 cm 36 20 in 91 95 cm 19 in 48 26 cm 19 2 in 48 768 cm 5 Copyright 2014 Juniper Networks Inc Rack Mounting Requirements ...

Page 6: ...Requirements and Guidelines Using a Router Transport Kit The router requires a minimum 42 in 106 7 cm diameter of space to turn the chassis on the router transport kit see Figure 3 on page 7 NOTE The router transport kit handles can be removed to accommodate aisle width Copyright 2014 Juniper Networks Inc 6 MX2010 3D Universal Edge Router Quick Start ...
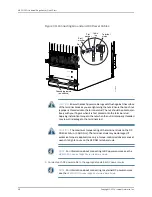
Page 7: ... lifted from the floor using the router transport kit is 1 5 in 3 8 cm The side view measurements of the router with the router transport kit installed is 59 5 in 151 1 cm high and 36 20 in 91 95 cm wide with the transport kit measuring 23 40 in 59 4 cm high see Figure 4 on page 8 7 Copyright 2014 Juniper Networks Inc Moving Requirements and Guidelines Using a Router Transport Kit ...

Page 8: ...n 59 4 cm The front view measurements of the router with the router transport kit installed is 30 78 in 78 2 cm wide see Figure 5 on page 8 Figure 5 Measurements of the Router Transport Kit Installed on the MX2010 Front View g000052 30 78 in 78 2 cm 19 0 in 48 26 cm Copyright 2014 Juniper Networks Inc 8 MX2010 3D Universal Edge Router Quick Start ...
Page 9: ...s 1 2 and 3 1 2 in 12 7 mm drive ratchet 1 4 in 6 35 mm torque controlled driver or socket wrench to tighten the nuts on the router transport kit 1 1 8 in 28 57 mm torque controlled driver or socket wrench to tighten router transport kit winch mechanism 9 16 in or 14 mm open end or socket wrench with extension to remove bracket bolts from the shipping pallet Electrostatic discharge wrist strap Ant...

Page 10: ...helf installation The distance between the front rack rail and rear rack rail is 36 20 in 91 95 cm 2 Partially insert screws into the open holes in the rear flanges of the four post mounting shelf see Figure 6 on page 11 NOTE Depending on the type of rack or cabinet you have cage nuts may be required 3 Tighten all the screws completely 4 On the front of each front rack rails partially insert a mou...

Page 11: ...front to back usable rack space when installing the MX2010 router into a four post rack or cabinet NOTE If you are installing the MX2010 router into a network cabinet make sure that no hardware device rack or cabinet component obstructs the 34 U rack space from access during installation 11 Copyright 2014 Juniper Networks Inc Install the Mounting Hardware ...

Page 12: ... crate The router chassis is bolted to this pallet A large rack mount tray pallet jack attachment EMI cover and a cardboard accessory box are also included in the shipping crate Before removing the router from the shipping crate you must remove all components see Remove Components on page 14 Because of the router s size and weight up to 985 lb 446 79 kg depending on configuration we strongly recom...

Page 13: ...tion site as possible where you have enough room to remove the components from the chassis While the chassis is bolted to the shipping pallet you can use a forklift or pallet jack to move it NOTE The staging and installation area must be ESD approved 2 Position the shipping crate with the arrows pointing up 3 Open all the latches on the shipping crate 4 Remove the front door of the shipping crate ...

Page 14: ...ewdriver to remove the bolts and screws from the brackets 13 Set the shipping brackets aside for later use to secure the router to the pallet jack attachment NOTE If you ordered a router transport kit see Unpack the Router Transport Kit on page 24 for instructions on how to unpack and install the router transport kit 14 Save the shipping crate cover and packing materials in case you need to move o...

Page 15: ...re you install the router See Table 1 on page 15 for information on MX2010 router components Table 1 Components to Remove from the Front of the MX2010 Router Number of FRUs Slots Component Description Component No 1 Craft interface 1 8 0 through 7 Switch Fabric Boards SFBs 2 2 0 and 1 Control Board and Routing Engine CB RE 3 10 0 through 9 MPCs with ADCs and MICs 4 15 Copyright 2014 Juniper Networ...

Page 16: ...to Remove from the Rear of a AC Powered MX2010 Router Number of FRUs Slots Component Description Component No 2 Fan tray 2 and fan tray 3 behind cage door Upper fan trays two 1 1 PDM1 AC PDM Three phase delta or wye 2 9 0 through 8 AC PSM 3 1 PSM air filter 4 1 PDM0 AC PDM Three Phase delta or wye 5 1 Fan tray air filter 6 2 Fan tray 0 and fan tray 1 behind access door Lower fan trays two 7 Copyri...

Page 17: ...omponents Table 3 Components to Remove from the Rear of a DC Powered MX2010 Router Number of FRUs Slots Component Description Component No 2 Fan tray 2 and fan tray 3 behind cage door Upper fan trays two 1 1 PDM1 DC PDM 2 9 0 through 8 DC PSM 3 1 PSM air filter 4 1 PDM0 DC PDM 5 2 DC cable manager 6 1 Fan tray air filter 7 2 Fan tray 0 and fan tray 1 behind access door Lower fan trays two 8 17 Cop...

Page 18: ... discharge ESD grounding strap to your bare wrist and connect the strap to an approved site ESD grounding point See the instructions for your site 2 Loosen the two captive screws on each side of the fan tray access panel and open 3 Loosen the two captive screws on the fan tray faceplate 4 Press and hold the latch while simultaneously pulling the fan tray out approximately 1 to 3 in Place one hand ...

Page 19: ...all the Pallet Jack Attachment on page 19 Use the Pallet Jack with Attachment to Install the Router on page 20 Install the Pallet Jack Attachment 1 Remove the pallet jack attachment from the shipping crate 2 Place the pallet jack attachment across both pallet jack legs 3 Using a 9 16 in 14 mm drive socket wrench loosen and remove the eight shipping bracket support torque fasteners that are located...

Page 20: ...router using a pallet jack with attachment 1 Ensure that the rack or cabinet is in its permanent location and is secured to the building Ensure that the installation site allows adequate clearance for both airflow and maintenance For details see the MX2010 3D Universal Edge Router Hardware Guide 2 Reattach the front and rear shipping covers to the chassis to help move the router The handles on the...

Page 21: ...chassis from tilting 6 Lower the pallet jack before moving This will help distribute the weight evenly and reduce the risk of tilting or damage to the chassis NOTE An empty MX2010 router weighs approximately 234 lb 106 14 kg 7 Using the pallet jack position the router in front of the rack or cabinet centering it in front of the mounting shelf NOTE If you are installing the MX2010 router into a net...

Page 22: ...the mounting shelf overlap by approximately 2 inches 11 With four people pushing on the front mounting flanges slide the router until the center mounting brackets open frame racks or front mounting flanges four post racks contact the rack rails In a four post rack the mounting shelf ensures that the holes in the front mounting flanges of the chassis align with the holes in the rack rails 12 Move t...

Page 23: ...Figure 15 Loading the MX2010 Router into a Four Post Rack g007436 23 Copyright 2014 Juniper Networks Inc Use the Pallet Jack with Attachment to Install the Router ...

Page 24: ...uter Transport Kit to Install the Router In an Open Frame Rack on page 38 Unpack the Router Transport Kit The router transport kit is shipped in a wooden crate A wooden pallet forms the base of the crate Metal clips secure the top and front of the crate in place The router transport kit shipping container measures 36 in 91 4 cm high 32 in 81 3 cm wide and 44 5 in 113 cm deep see Figure 17 on page ...

Page 25: ...egin installation To unpack the router transport kit 1 Move the router transport kit shipping crate to an ESD approved staging area where you have enough room to remove the kit for assembly 2 Position the shipping crate with the arrows pointing up 3 Remove the metal clips on the shipping crate that secure the top and front to the crate see Figure 18 on page 25 Figure 18 Open Router Transport Kit S...

Page 26: ...m the shipping container 8 Remove the vapor corrosion inhibitor VCI packs attached to the pallet being careful not to break the VCI packs open 9 Save the shipping crate cover pallet and packing materials in case you need to move or ship the router transport kit at a later time Install the Router Transport Kit onto the Router NOTE The router transport kit be purchased from Juniper Networks The rout...

Page 27: ...number 3 Phillips screwdriver loosen the captive screws that secure the router transport mounting plate and wheel assembly left and right to the router transport platform and set them aside see Figure 20 on page 27 Figure 20 Preparing the Router Transport Kit for Installation g000019 5 Remove the four shipping brackets that secure the router to the shipping crate platform using a 9 16 in 14 mm soc...

Page 28: ...ransport mounting plate and wheel assembly to the chassis Figure 21 Installing the Router Transport Kit onto the MX2010 Router g000055 Secure the Router Transport Platform to the Router 1 Ensure that the rack is in its permanent location and is secured to the building Ensure that the installation site allows adequate clearance for router transport kit turn ratios airflow and maintenance 2 Using th...

Page 29: ... of each of the four router transport mounting brackets Make sure the bubbles within the T shaped levels are between the lines indicating the chassis is level CAUTION Do not raise the chassis above 1 in 2 54 cm This will ensure the router will not tilt when transporting which can result in injury or damage to the router 4 Turn the four wheels on the router transport kit toward the rear of the chas...

Page 30: ...directly under the router aligning the router transport platform with the bottom of the chassis by adjusting the four leveling mounts NOTE The router transport platform height can be adjusted between 0 25 in 0 6 cm to a maximum of 4 in 10 16 cm 7 Secure the router transport platform to the router transport mounting plates using the four latch locks see Figure 23 on page 30 Figure 23 Securing the R...

Page 31: ...nsport kit to install the router NOTE Four people are needed to install the router into a rack CAUTION Before front mounting the router in a rack have a qualified technician verify that the rack is strong enough to support the router s weight and is adequately supported at the installation site 31 Copyright 2014 Juniper Networks Inc Use the Router Transport Kit to Install the Router in a Four Post...

Page 32: ...ing Winch Strap Plate Four Post Rack g000060 2 Using a four person team transport the router to the rack installation location and center it in front of the mounting shelf NOTE A minimum of 38 in 96 5 cm of clearance is required to roll the chassis sideways Copyright 2014 Juniper Networks Inc 32 MX2010 3D Universal Edge Router Quick Start ...
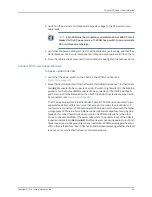
Page 33: ... 25 Installing Winch Mount Bracket to Rack Rails g000024 4 Adjust the height of the router by turning the handles clockwise until the router transport platform is aligned with the surface of the mounting shelf and slightly higher than the mounting shelf see Figure 26 on page 34 NOTE Make sure the bubbles within the T shaped levels are between the lines indicating the router is level 33 Copyright 2...

Page 34: ...er with Rack Mounting Shelf g000063 6 Unlock the four toggle latches that secure the router transport platform to the router transport mounting plate and wheel assembly 7 Lift the wheels up by turning the handles counterclockwise so that the weight of the router is on the router transport platform Copyright 2014 Juniper Networks Inc 34 MX2010 3D Universal Edge Router Quick Start ...
Page 35: ...o the chassis and set them aside see Figure 27 on page 35 Figure27 RemoveRouterTransportMountingPlateandWheelAssembly g000065 9 Attach the winch strap to the winch strap plate at the rear of the router see Figure 28 on page 36 35 Copyright 2014 Juniper Networks Inc Use the Router Transport Kit to Install the Router in a Four Post Rack ...

Page 36: ... g000067 10 Attach a 1 1 8 in 28 57 mm socket drive wrench to the winch mechanism and turn clockwise to start pulling the chassis into the rack see 1 Figure 29 on page 37 Copyright 2014 Juniper Networks Inc 36 MX2010 3D Universal Edge Router Quick Start ...
Page 37: ...to the Rack g000068 NOTE A four person team is needed to carefully guide the router into the rack while operating the winch 37 Copyright 2014 Juniper Networks Inc Use the Router Transport Kit to Install the Router in a Four Post Rack ...

Page 38: ...e router is level 14 Reassemble the router transport kit and set aside Use the Router Transport Kit to Install the Router In an Open Frame Rack NOTE Four persons are needed to install the router into a rack CAUTION Before front mounting the router in a rack have a qualified technician verify that the rack is strong enough to support the router s weight and is adequately supported at the installati...

Page 39: ...e short lift capability of the router transport kit we recommend that you install the router on the bottom of the rack NOTE Make sure the bubbles within the T shaped levels are between the lines indicating the router is level 4 Adjust the four leveling mounts on the router transport platform until all four leveling mounts rest firmly on the ground see Figure 30 on page 40 39 Copyright 2014 Juniper...

Page 40: ...ack Mounting Shelf g000064 5 Unlock the four toggle latches that secure the router transport platform to the router transport mounting plate and wheel assembly Copyright 2014 Juniper Networks Inc 40 MX2010 3D Universal Edge Router Quick Start ...
Page 41: ...lates and wheel assembly to the chassis and set them aside see Figure 31 on page 41 Figure 31 Remove Router Transport Mounting Plate and Wheel Assembly g000066 8 Grasping the handles on the shipping covers carefully slide the router into the rack until the center mounting brackets contact the rack rails see Figure 32 on page 42 41 Copyright 2014 Juniper Networks Inc Use the Router Transport Kit to...

Page 42: ...arefully guide the router into the rack NOTE There must be a minimum of 45 U of usable rack space when installing the MX2010 into a 45 U rack 9 Remove the router transport platform and set the platform aside Copyright 2014 Juniper Networks Inc 42 MX2010 3D Universal Edge Router Quick Start ...
Page 43: ...that the router is installed properly in the rack see that all the mounting screws on one side of the rack are aligned with the mounting screws on the opposite side and the router is level 12 Reassemble the router transport kit and set aside 43 Copyright 2014 Juniper Networks Inc Use the Router Transport Kit to Install the Router In an Open Frame Rack ...

Page 44: ...our bare wrist and connect the strap to one of the ESD points on the chassis For more information about ESD see the MX2010 3D Universal Edge Router Hardware Guide 6 Place the grounding cable lug over the grounding points The upper pair is sized for UNC 1 4 20 bolts and the lower pair is sized for M6 bolts 7 Secure the grounding cable lug to the grounding points first with the washers then with the...

Page 45: ...OTE Remove the shipping covers before installing router components 2 Slide each component into the chassis evenly so that it does not become stuck or damaged 3 Tighten the captive screws and secure all levers for each component NOTE Make sure that all empty slots are covered with a blank panel before operating the router 45 Copyright 2014 Juniper Networks Inc Step 5 Reinstall Components ...

Page 46: ...E 3 Plug the other end of the cable into the network device Connect a Management Console 1 Turn off the power to the management device 2 Plug one end of the RJ 45 Ethernet cable into the CONSOLE or AUX port on the CB RE 3 Plug the female DB 9 end into the device s serial port Connect the Line Card Cables 1 Have ready a length of the type of cable used by the MPCs or MICs For cable specifications s...

Page 47: ...nt system to prevent it from dislodging or developing stress points Secure the cable so that it is not supporting its own weight as it hangs to the floor Place excess cable out of the way in a neatly coiled loop in the cable management system Placing fasteners on the loop helps to maintain its shape CAUTION Avoid bending fiber optic cable beyond its minimum bend radius An arc smaller than a few in...

Page 48: ...s is 0 V and that there is no chance that the cable leads might become active during installation 3 Detach the ESD grounding strap from the approved site ESD grounding point and connect the strap to one of the ESD points on the chassis 4 Switch off O the AC PSMs and disengage all AC PSMs 5 Verify that the correct three phase delta AC PDMs are installed and secured in the chassis before connecting ...

Page 49: ... from the PDM before the PDM can be removed from the chassis The MX2010 chassis is not sensitive to phase rotation sequence either CW or CCW will operate correctly To connect wires to the terminal block that serves six PSMs a Insert the grounding wire into the grounding point labeled GND b Insert the wire labeled L1 into the input terminal labeled A1 c Insert the wire labeled L2 into the input ter...

Page 50: ...iring compartment apply AC voltage to the PDM with disengaged PSM to make sure that two LEDs on the PDM are lit green and that the AC voltage between AC terminal blocks A1 B1 B1 C1 C1 A1 A2 B2 B2 C2 and C2 A2 for three phase delta PDM is not more than 264VAC when measured with a DVM Then turn off the AC breaker de energizing the PDM and install the metal cover and engage all AC PSMs NOTE The color...

Page 51: ...scharge ESD grounding strap to your bare wrist and connect the strap to an approved site ESD grounding point See the instructions for your site 2 Switch off the dedicated customer site circuit breakers Ensure that the voltage across the AC power source cable leads is 0 V and that there is no chance that the cable leads might become active during installation 3 Detach the ESD grounding strap from t...

Page 52: ...before connecting the power input cables If the PDM must be removed both input power cables must be uninstalled and removed from the PDM before the PDM can be removed from the chassis The MX2010 chassis is not sensitive to phase rotation sequence either CW or CCW will operate correctly To connect wires to the terminal block that serves six PSMs a Insert the grounding wire into the grounding point ...

Page 53: ...e input terminal labeled C2 e Insert the wire labeled N into the input terminal labeled N2 WARNING In order to protect power supplies from input voltage that may be caused by mis wired PDMs before reinstalling the metal cover to the wiring compartment apply AC voltage to the PDM with disengaged PSM to make sure that two LEDs on the PDM are lit green and that the AC voltage between AC terminal bloc...

Page 54: ...l PDM wiring cover and using a number 2 Phillips screwdriver tighten the four captive screws on the metal AC wiring compartment 14 Use the provided plastic cable tie to fasten the AC power cord to the PDM 15 Verify that the AC power cord is not touching or blocking access to router components and that it does not drape where people could trip on it 16 Repeat the procedure for the other three phase...

Page 55: ...g installation 4 Using both hands slide the PSM straight into the chassis until the PSM is fully seated in the chassis slot Tighten the two captive screws to secure the PSM to the chassis 5 Verify that the INP0 or INP1 LEDs on the PSM are lit green steadily The INP0 or INP1 LEDs will be lit yellow if that input s voltage is in reverse polarity Check the polarity of the power cables to fix the cond...

Page 56: ...the DIP switch is set to on On Green INP0 AC input is out of the required voltage range On Yellow AC input to the PSM is not present Off AC input is within the required voltage range and the DIP switch is set to on On Green INP1 AC input is out of the required voltage range On Yellow AC input to the PSM is not present Off 9 Repeat Steps 1 through 8 for installing PSMs in slots 0 1 and 2 where requ...

Page 57: ...h captive screws NOTE Make sure the DC circuit feed switch on the PDM faceplate matches the current rating amperage 60A or 80A This switch applies to all inputs of this PDM and that selecting 60A reduces the available power output capacity of the PSMs supplied by this PDM 7 Loosen the captive screws on the clear plastic cable restraint protecting the terminal studs on the faceplate of the PDM 8 Se...

Page 58: ...readed may result in damage to the terminal stud CAUTION The maximum torque rating of the terminal studs on the DC PDM is 25 lb in 33 89 Nm The terminal studs may be damaged if excessive torque is applied Use only a torque controlled driver or socket wrench to tighten nuts on the DC PDM terminal studs NOTE For information about connecting to DC power sources see the MX2010 3D Universal Edge Router...

Page 59: ...r the top feed INP1 expected to be connected If both DIP switches 0 and 1 are turned to the ON position then both top and bottom feeds are expected to be connected see Figure 40 on page 60 The DC power subsystem is feed redundant Each DC PSM can be connected to two separate feeds from different sources that are used to provide feed redundancy If two feeds are connected PSM input power will be draw...

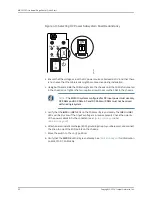
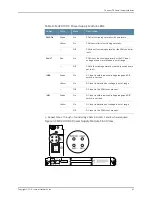
Page 60: ... DC PSMs AC and DC PSMs or PDMs must not be mixed within a single system 5 Verify that the INP0 or INP1 LEDs on the PSM are lit green steadily The INP0 or INP1 LEDs will be lit yellow if that input s voltage is in reverse polarity Check the polarity of the power cables to fix the condition see Figure 41 on page 61 and Table 8 on page 61 6 Attach an electrostatic discharge ESD grounding strap to yo...

Page 61: ...ches are set to off Off DC input is within required voltage range and DIP switch is set to on On Green INP0 DC input is detected but voltage is out of range On Yellow DC input to the PSM is not present Off DC input is within required voltage range and DIP switch is set to on On Green INP1 DC input is detected but voltage is out of range On Yellow DC input to the PSM is not present Off 9 Repeat Ste...

Page 62: ...NOTE Each PSM slot not occupied by a DC PSM must be covered by a PSM blank panel Copyright 2014 Juniper Networks Inc 62 MX2010 3D Universal Edge Router Quick Start ...
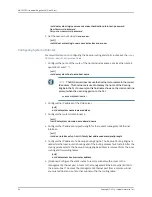
Page 63: ...ds on page 63 Configuring System Attributes on page 64 Committing the Configuration on page 65 Entering Configuration Mode 1 Verify that the network device is powered on 2 Log in as the root user There is no password Amnesiac ttyd0 login root 3 Start the CLI root cli root 4 Enter configuration mode root configure Entering configuration mode edit root Configuring User Accounts and Passwords For inf...

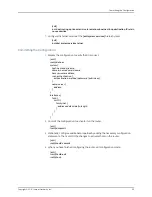
Page 64: ...f the DNS server edit root set system name server address 3 Configure the router s domain name edit roott set system domain name domain name 4 Configure the IP address and prefix length for the router s management Ethernet interface edit root set interfaces fxp0 unit 0 family inet address address prefix length 5 Configure the IP address of a backup Routing Engine The backup Routing Engine is used ...

Page 65: ... router address root authentication authentication method password public key name server address interfaces fxp0 unit 0 family inet address address prefix length 2 Commit the configuration to activate it on the router edit root commit 3 Optionally configure additional properties by adding the necessary configuration statements Then commit the changes to activate them on the router edit root host ...

Page 66: ...replace the router Perform only the procedures described in this Quick Start or in the MX2010 3D Universal Edge Router Hardware Guide Other services should be performed by authorized service personnel only Read the installation instructions before you connect the router to a power source Before installing the router read the guidelines for site preparation in the MX2010 3D Universal Edge Router Ha...

Page 67: ...r always make the ground connection first and disconnect it last Wire the DC PDMs using the appropriate lugs When you connect power the proper wiring sequence is ground to ground RTN to RTN then 48 V to 48 V When you disconnect power the proper wiring sequence is 48 V to 48 V RTN to RTN then ground to ground Always connect the ground wire first and disconnect it last Do not work on the system or c...

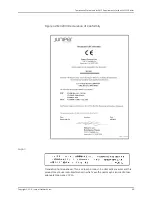
Page 68: ...a on page 68 European Community on page 68 Declaration of Conformity on page 68 Japan on page 69 United States on page 70 Canada This Class A digital apparatus complies with Canadian ICES 003 Cet appareil numérique de la classe A est conforme à la norme NMB 003 du Canada European Community This is a Class A product In a domestic environment this product may cause radio interference in which case t...

Page 69: ...ese This is a Class A product In a domestic environment this product may cause radio interference in which case the user may be required to take adequate measures VCCI A 69 Copyright 2014 Juniper Networks Inc Compliance Statements for EMC Requirements for the MX2010 Router ...

Page 70: ...rcial environment This equipment generates uses and can radiate radio frequency energy and if not installed and used in accordance with the instruction manual may cause harmful interference to radio communications Operation of this equipment in a residential area is likely to cause harmful interference in which case the user will be required to correct the interference at his own expense Copyright...

Page 71: ...ocal pdf resource guides 7100059 en pdf Product warranties For product warranty information visit http www juniper net support warranty JTAC Hours of Operation The JTAC centers have resources available 24 hours a day 7 days a week 365 days a year Self Help Online Tools and Resources For quick and easy problem resolution Juniper Networks has designed an online self service portal called the Custome...

Page 72: ...010 router using the router transport kit May 2013 530 051881 Revision 1 Initial release Copyright 2014 Juniper Networks Inc All rights reserved Juniper Networks Junos Steel Belted Radius NetScreen and ScreenOS are registered trademarks of Juniper Networks Inc in the United States and other countries The Juniper Networks Logo the Junos logo and JunosE are trademarks of Juniper Networks Inc All oth...

Reviews: