junger X*AP RM1 Manual Download Page 8


X*AP RM

1


    4 

 
You must press one of the respective 

<F-Keys>

 and that field will be highlighted as well as the Rotary 

Encoder. Now you can change the value by turning the knob. When the setting of all fields is finished,  
you must press 

<SAVE>

. The display will return to the initial "

Remote panel Menu"

 page 1/3. 


Getting started – attach a device  to a 

X*AP RM

1

 remote panel 

 
You must press one of the 

"Device x" <F-Keys>

 of the 

"Remote Panel Menu"


and a different window will open: 


Same procedure: Set up the IP address of the device you are about to attach. 
You must turn "

Show device in selection"

 to 

ON

 in order to reach that device via the initial display later on. 

Pressing 

<SAVE> 

will return to the 

"Remote Panel Menu" 

menu


page 1/3. 


Getting started – 

X*AP RM

1

 remote panel


menu page 2/3 

– 

firmware display


Via the upper right  

<page>

 button you reach the other pages of the Remote Panel Menu: 


Page 2/3 shows permanent information of firmware versions and the device. 


Getting started – 

X*AP RM

1

 remote panel


menu page 3/3 

– 

reboot, restore factory default, device test


Page 3/3 is next in the page cycle: 


Page three allows you to reboot or restore of factory defaults. It also offers testing the device.

 X*AP RM

1


remote panel LEDs, buttons and the rotary knob. Pressing the Device Test button opens up further menus to 
test the respective items. 

MENU

ESC

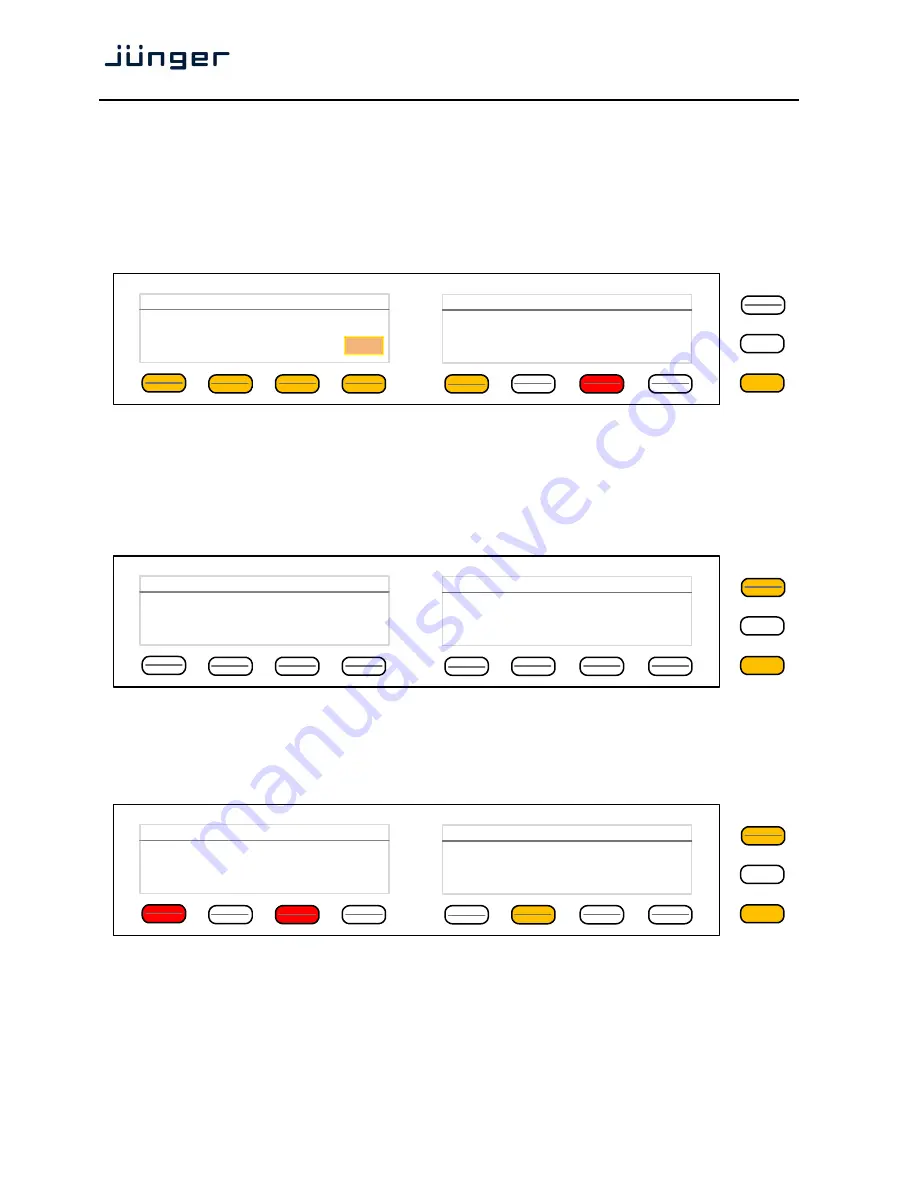
Remote Panel Menu :: Attach to Base Units

     10            .          110          .           83

10

IP address of device 1

Show device
In selection

SAVE

ON

MENU

ESC

Remote Panel Menu

Firmware Info

Version:

    31914

Date:

     Mo 28. Sep. 13:42:26 CEST 2015

Kernel:

     31913

Device Info

2/3

Serial Number:

7201100728

HW Revison:

1

MAC Address:

00:50:C2:58:38:32

MENU

ESC

Remote Panel Menu

Reboot / Restore

Reboot

Reboot &

Restore Factory Defaults

Device Tests

3/3

Summary of Contents for X*AP RM1

Page 1: ......

Page 2: ......

Page 3: ......

Page 4: ...tton initiates a bypass function of the attached base unit OLED display graphical display 8 LED bar graphs 16 segment multicolor bar graph display Status LED shows the device summary status provided b...

Page 5: ...display 4 Getting started X AP RM1 remote panel Menu page 3 3 reboot factory default test 4 Browser based set up firmware update of the X AP RM1 remote panel 6 Getting started basic X AP RM1 remote p...

Page 6: ...ntrol the 8 Hot Keys may be programmed by the administrator as part of the D AP events system Hardware concept The X AP RM1 remote panel is a stand alone unit In the past it was possible to mount it i...

Page 7: ...ling a X AP RM1 into an IP network is as follows 1 Ask the system service people for a unique IP addresses of the network the netmask and the gateway address 2 Assign the X AP RM1 remote panel an IP a...

Page 8: ...page 2 3 firmware display Via the upper right page button you reach the other pages of the Remote Panel Menu Page 2 3 shows permanent information of firmware versions and the device Getting started X...

Page 9: ...the X AP RM1 by pressing Keys in the upper menu When you press a key of your choice the name of it will be displayed in the example above the BYPASS button You can also check the rotary encoder by eit...

Page 10: ...nnect and unknown device In case of connect you may press one of the highlighted buttons If you press the F Key the X AP RM1 remote panel will connect with that unit The above example has just one uni...

Page 11: ...ion and operates in ITU mode In this case you have two parameter sets for the first program ALL and LFE if the LFE is not linked Since the Dynamics have two subsections Expander and Compressor this me...

Page 12: ...nd Max TPL dBTP the Maximum True Peak level The measure for the EBU Meter display is LUFS Loudness Units Full Scale as long as not defined differently For details pls refer to the EBU Tech 3341 docume...

Page 13: ...display After connecting with a device the Main Display opens up Main Display ESC will jump back to power up display MENU opens Operating display F Key 1 Empty 2 Audio Processor 1 Input 2 Upmix page 1...

Page 14: ...supply with approx 1m cable attached Consumption 12 W Dimensions 19 1RU depth 6 cm Environmental operating temperature 0 C to 50 C non operating temperature 20 C to 70 C humidity 90 non condensing Dim...

Page 15: ...ct power To avoid electrical shock switch off the device power then disconnect the power cord from the mains power Do not block the power cord it must remain accessible to the user at all times To avo...

Page 16: ...r Beijing Technology Ltd Sales Service Support Unit 068 2nd Floor No 38 GuangQu Road ChaoYang District 100021 Beijing China phone 86 137 0102 6664 china jungeraudio com J nger Audio USA Service Suppor...

Reviews: