


xiii
Precautions upon Equipment Operation
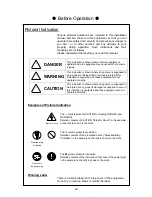
DANGER
Never attempt to check or repair the inside of the equipment.
Checking or repair by an unqualified person may cause a fire or an electric
shock.
Contact our head office, or a nearby branch or local office to request
servicing.
Never remove the cover of this equipment.
Touching the high-voltage section inside will cause an electric shock.
Do not attempt to disassemble or tamper with this equipment.
Otherwise, a fire, an electric shock, or a malfunction may occur.
When conducting maintenance, make sure to turn the main power off.
Failure may result in electric shock.
Turn off the main power before cleaning the equipment. Especially when a
rectifier is used, make sure to turn it off since voltage is still outputted from the
rectifier even after the indicator and the radar are turned off. Failure may
result in equipment failure, or death or serious injury due to electric shock.
When conducting maintenance work on the radar antenna, make sure to turn
its main power off.
Failure may result in electric shock or injuries.
Make sure to turn off the radar antenna safety switch. Failure may result in
injuries caused by physical contact with the rotating radar antenna.
Summary of Contents for JAN-7201
Page 2: ......
Page 24: ...xxii CWA 246 26inch Display Unit Mount Kit Warning Label ...
Page 25: ...xxiii CWA 245 19inch Display Unit Mount Kit Warning Label ...
Page 28: ...xxvi Warning Label NKE 1632 Radar Antenna Warning Label NKE 2632 2632 H Radar Antenna ...
Page 30: ...xxviii NTG 3230 Transmitter Receiver 30 kW ...
Page 33: ...xxxi CWA 245 Display Unit Mount Kit CWA 246 Display Unit Mount Kit ...
Page 76: ...2 Installation of Scanner Unit 2 2 Installation for the specified scanner model 2 13 ...
Page 78: ...2 Installation of Scanner Unit 2 2 Installation for the specified scanner model 2 15 ...
Page 80: ...2 Installation of Scanner Unit 2 2 Installation for the specified scanner model 2 17 ...
Page 82: ...2 Installation of Scanner Unit 2 2 Installation for the specified scanner model 2 19 ...
Page 84: ...2 Installation of Scanner Unit 2 2 Installation for the specified scanner model 2 21 ...
Page 86: ...2 Installation of Scanner Unit 2 2 Installation for the specified scanner model 2 23 ...
Page 88: ...2 Installation of Scanner Unit 2 2 Installation for the specified scanner model 2 25 ...
Page 90: ...2 Installation of Scanner Unit 2 2 Installation for the specified scanner model 2 27 ...
Page 92: ...2 Installation of Scanner Unit 2 3 Installation of Transmitter Receiver 2 29 ...
Page 94: ...2 Installation of Scanner Unit 2 3 Installation of Transmitter Receiver 2 31 ...


