background image


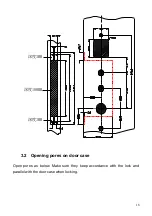
19 

A-A

3
26
2

180

31

260.8

180

26

240.5

18

121


3.3  Installation procedures 

Before  installation,  please  put  through  all  of  the  connecting  wire,  press  the 

initialization button on the circuit board to initialize the lock firstly, which will also 

delete all of the passwords, cards and fingerprints to restore the factory setting. 

3.3.1 installing lock mortise


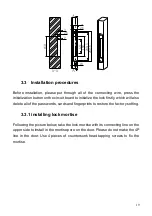
Following the picture below, take the lock mortise with its connecting line on the 

upper side to install in the mortise pore on the door. Please do not make the 4P 

line  in  the  door.  Use  4  pieces  of  countersunk  head  tapping  screws  to  fix  the 

mortise.   

Summary of Contents for JYF-3002

Page 1: ... Alarming Function 16 2 4 1 Low voltage alarm 16 2 5 Backup power 16 2 6 Installing replacing batteries 16 2 6 1 Installing batteries 16 2 6 2 Replacing batteries 16 2 7 Remarks 17 3 Installation Procedures 17 3 1 Opening pores on the door 17 3 2 Opening pores on lock holder case 18 3 3 Installation procedures 19 4 Maintenance and upkeep 22 4 1 Daily maintenance and upkeep 22 4 2 Notice for use 23...

Page 2: ...2 5 3 Accessories 27 A 2 2013 年 7 月 ...

Page 3: ...problem 2 If your house is sprucing up it is suggested to uninstall the lock after you exanimate the locks and to reinstall them after the sprucing up The aims are 1 To avoid the lock appearance being damaged by corrosives and the wet paint on the door will influence the gearing of the lock 2 Ethyl alcohol paint and other chemicals will be used when we sprucing up the house which will be volatized...

Page 4: ...r convenience we make this form for administrator to record information of user registration You can also make you form according to your specific requirements No Department Name Fingerprint No Date of registration signature Remarks ...

Page 5: ...3 1 Introduction of the fingerprint lock 1 1 Feactures ...

Page 6: ...ation Army Bank Law Court Hospital Office building Residential area etc 1 1 2 Introduction of functions Adopting the international advance biotechnology to ensure its high quality 4 peaces AA batteries handles can prevent the wreaking havoc Unlocking methods 1 Fingerprint Password mechanical key 2 Card password mechanical key 1 2 Diamensions ...

Page 7: ...eter surface treatment 14 Static Power Consumption 30 u A 15 Dynamic Power Consumption The working current is under 200 mA 16 Control system Dicaryon dual circuit and individual control 17 The fingerprint battery life Open door for 5000 times 18 The combination battery life Open door for 6000 times 19 Working voltage DC 6 V 20 Power supply mode Battery powered 21 Combination capacity 100 Groups 22...

Page 8: ...are the right and wrong way of putting finger as below 手指须放置在指纹采集窗中心 保持手指平放在指纹采集窗 轻轻地把手指按在指纹采集窗 保持平稳 不要向前或向后滑 Lock out function Pull the handle upwards inside or outside the door can make it lock out and realize the function of anti theft bolt Rotate the small knob in the back of the lock 45 degrees the door will be deadlock and it cannot be opened outside in any ways 2 2 Setting in the mode of Ca...

Page 9: ...l to the Stand alone model Put in 8 bit management passwords then press 5 button buzzer 5 sounds blue light flashing then press the key button to confirm the buzzer beep long you have change it successfully If you want to exit press the button 2 In combination mode if swipe the card first or enter a password before pressing the key button there would be sounds of di di blue lights flashing Then pu...

Page 10: ...e the card it reading is the unlock card Within 5 seconds if the lock hasn t detected the valid IC card then you will hear two short beeps beep beep the unlock card key card was setting well 2 2 Process of setting unlocking card Entry the Setting key state take the IC cards close to the inductive area of lock if setting the card success you will sound a short beep and then a long beep Repeat this ...

Page 11: ...very first cleared card 4 Unlocking the door 4 1 IC card key to unlock Use the valid IC card near the lock inductive area a beep from the buzzer motor rotate and blue lights on indicate the lock is opened After the lock checked the open action the lock will locked automatically if it didn t checked open action the blue light will off within 5 seconds it locked the door automatically Note If the IC...

Page 12: ... removed Or read the management card or put in the management password directly to remove the channel status Password functions and operating instructions Management password Function setting and clearing the valid passwords and unlocking the lock Unlocking passwords Function open the lock 1 Change the management password 1 1 Put in the original 8 bit password and press unlock key 12345678 the mot...

Page 13: ...assword and press 4 you will hear a long sound and see blue light flashing put in the password previous to the unlock password you want to clear a long sound of tick means clear it successfully If you want to clear the first unlocking password you have to put in the last unlocking password If you want to exit press the key 3 2 Clearing all unlock password Put in the 8 bit management password then ...

Page 14: ...locking password Put in the unlocking password and press the unlock key one sound of beep motor rotating and blue lights flash slowly indicate the lock is opened when the door lock detect the open action it close the door automatically If the door lock didn t detect the open action 5 seconds later the blue light off lock close the door automatically Notes If you put in the wrong password 5 times c...

Page 15: ...ne combined mode of using Mifare card and the password to unlock together 5 The card is set on the lock no need other system software You can set 2 management cards and 200 unlocking cards at most 6 You can change the password by yourself and set garbled 1 set of management password and 50 set of unlocking password at most 7 The lock support garbled input the longest is up to 12 digits numbers 8 F...

Page 16: ...initialization will be finished At this moment there is not any effective cards or fingerprints and the management password is 123456 2 Changing the management password the default management password is 123456 Press management password to enter the programming mode Next press 8 and put in a new management password ending with pressing Then put in the management password second time and end with p...

Page 17: ...ord to enter the programming mode Next press 5 and put in the 2 digit password number you want to delete and end up with pressing Repeat the 2 digit number LOCK and the password is deleted 8 Setting keep open state Opening the lock by fingerprint or password press the handle to keep opening the door for 6 seconds until you hear the voice prompt of the door is in the keep open state The setting is ...

Page 18: ...n and then put in password to open it 2 6 Installing replacing batteries 2 6 1 Installing batteries Unscrew the battery cover slide it upwards take it away and put in 8 pieces AA batteries of 1 5V voltage Then put the cover back and screw it 2 6 2 Replacing batteries A Using the battery of wrong model will cause explosions B Please use Carbon zinc Alkaline manganese dioxide battery of brands only ...

Page 19: ...please flush with water immediately If your eyes touch it immediate water flushing is necessary and then go to a doctor 2 8 Remarks 2 8 1 When you add a new user please do record the user number for administration 2 8 2 instruction sound remarks The voice prompt of successful means successful operation while voice prompt of failed means failed operation 3 Installation Procedures 3 1 Opening pores ...

Page 20: ...18 深度3MM 深度3MM 深度100MM 3 2 Opening pores on door case Open pores as below Make sure they keep accordance with the lock and parallel with the door case when locking ...

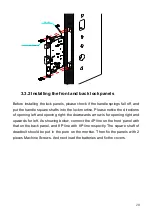
Page 21: ...nitialize the lock firstly which will also delete all of the passwords cards and fingerprints to restore the factory setting 3 3 1 installing lock mortise Following the picture below take the lock mortise with its connecting line on the upper side to install in the mortise pore on the door Please do not make the 4P line in the door Use 4 pieces of countersunk head tapping screws to fix the mortise...

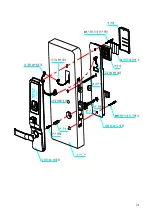
Page 22: ...ease notice the directions of opening left and opening right the downwards arrow is for opening right and upwards for left As showing below connect the 4P line on the front panel with that on the back panel and 8P line with 8P line respectly The square shaft of deadbolt should be put in the pore on the mortise Then fix the panels with 2 pieces Machine Screws And next load the batteries and fix the...

Page 23: ...21 电池盖 M5 适配长度机牙螺丝 M5 适配长度机牙螺丝 4 节5号碱性电池 电池盒 后面板8P连接线 锁芯4P连接线 旋钮方轴 把手弹簧 把手方轴 指纹锁02 后面板 把手方轴 前面板8P连接线 前面板4P连接线 把手弹簧 左开门外 指纹锁02 前面板 ...

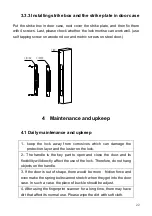
Page 24: ...from corrosives which can damage the protection layer and the luster on the lock 2 The handle is the key part to open and close the door and its flexibility will directly affect the use of the lock Therefore do not hang objects on the handle 3 If the door is out of shape there would be more friction force and even make the spring bolts cannot stretch when they get into the door case In such a case...

Page 25: ...lease keep the rotating parts oiled to make sure their smooth drive and longer life span Examine once half year or one year is suggested 14 When using the lock please put some graphite powder or pencil core powder into the lock core groove regularly or when the mechanical key cannot infix or pull out smoothly Please do not add any lubricant oil because that may paste on the mechanical spring and h...

Page 26: ...Elimination moisture the hand and try again 4 2 2 The fingerprint is recognized and the green light on but the door is not unlocked A Installation error Elimination install the lock correctly B Hear the sound of elevator rotating but the door is not unlocked Elimination 1 The handle is not back to the origin 2 Square shaft of the handle is too short 3 The spring of the handle in the back cover fal...

Page 27: ...e not connecting correctly B Something wrong with the elevator 4 2 7 No response when touch the keypad Reasons include A Out of power or the batteries installed incorrectly replace the battery or use external backup power B Too many times of illegal operations the keypad is auto locked try again after 15 minutes C Wires between the front and back lock cover are not connect correctly when installed...

Page 28: ... the cover man made sabotage or other force majeure 3 Locks repaired in unassigned maintenance stations 5 1 3 Life long maintenance Maintenance after one year will be charged 5 2 Packing List No Items Quantity 01 Front lock case 1 set 02 Back lock case 1 set 03 Lock mortise 1 set 04 Strike plate 1 piece 05 Strike box 1 piece 06 Cross Recessed Oval Countersunk Head Screws adaptation 4 piece 07 Squa...

Page 29: ...ece 12 QC test label General 1 piece 13 warranty card 1 piece 14 Certificate of Approval 1 piece 5 3 Accessories Strike box Strike plate Screws PA4 0X25 Square shaft of handle Bolts OM8 0XM5XL Square shaft for lock out Shifting fork Mechanical keys 2pieces ...

Reviews: