background image

49

50

24

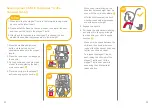
6. Pull down the adjustment webbing  
    and adjust it to the proper length   
    to make sure your child is snugly   
    secured. 

24

   !

  Make sure the space between the  

  child and the shoulder harness is  
  about the thickness of one hand  
  lay flat on children's chest.

!

  To release the stages™ isofix 

seat, taking the child out of the 
stages™ isofix seat, lift the 
stages™ isofix seat up 

25

-2

 while 

squeezing the child restraint 
release button. 

25

-1


25

2

1

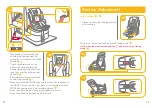
Toddler Mode (Forward Facing Mode)

Forward Facing    2-4 years old
Recline position    Position 1-7

!  

Please install the base on the vehicle seat (with rebound bar 

attached), then install the shell, and then put the child in the stages™ 
isofix.

!  

Ensure rebound bar is fitted to base.

!  

The most convenient way to install the shell is when the base is in 

the 7

th

 position.

26

27

1

If the stages™ isofix is secure, the 
child restraint latched indicator shows 
green. If the stages™ isofix is not 
secure, the latched indicator shows 
red. 

27

-1

!

   Pull up on the stages™ isofix seat 

to make sure it is securely latched 
into the base.

!

   Please ensure that there is no gap    

between the vehicle seat and the 
bottom of the base.

Summary of Contents for stages ISOFIX I1507

Page 1: ...1 stages ISOFIX child restraint ECE R44 04 Group 0 1 2 0 25kg CNS 11497 ECE R44...

Page 2: ...1 2 Joie 0 I CNS 3972 ECE R16 ISOFIX CNS 11497 ECE R44 25kg 7 1 2 3 4 5 10 6 8 9 12 11 13 14 18 16 15 17 19 7 1 2 3 4 5 6 7 8 9 10 11 ISOFIX 12 13 14 15 16 ISOFIX 17 ISOFIX 18 19...

Page 3: ...3 4 25kg 7 100 2 2 PE ISOFIX 1 ISOFIX 2 3...

Page 4: ...SEMI UNIVERSAL I S O F I X I S O F I X I S O F I X I S O F I X A C D Allison Baby UK Ltd Venture Point Towers Business Park Rugeley Staffordshire WS15 1UZ www joiebaby com I1507 25kg 7 0 14 9kg 620 6...

Page 5: ...11497 15 25kg 1 1 2 9 18kg 4 2 4 3 7 1 1 7 1 7 Installation Mode Installation Reference Age Recline Position 4 years 2 years to Position Limit to use the first position 1 7 Approx Approx Baby mode To...

Page 6: ...9 10 0 6 without being attached to the insert to bolster the infant s back for more comfort 2 1 2 4 1 4 4 1 ISOFIX ISOFIX 5 1 ISOFIX 6 1 ISOFIX 6 2 ISOFIX 6 1 7 5 1 6 1 2 ISOFIX 4 13...

Page 7: ...12 11 ISOFIX ISOFIX ISOFIX 7 1 ISOFIX 9 ISOFIX 8 1 9 8 9 1 7 8 1 10 1 2 12 1 2 13 1 2 ISOFIX ISOFIX 10 1 10 2 ISOFIX 11 1 11 2 ISOFIX 12 1 12 2 ISOFIX ISOFIX 13 1 ISOFIX 13 2 11 1 2...

Page 8: ...13 14 14 38 4 1 7 14 1 14 2 14 1 2 15 1 16 17 15 1 1 0 6 2 3 4 5 16 6 17 7...

Page 9: ...15 16 18 1 19 20 1 18 18 1 2 19 3 20 22 23 21 4 21 22 5 23...

Page 10: ...17 18 24 25 2 1 6 24 25 1 25 2 26 27 1 2 4 1 7 7 27 1...

Page 11: ...19 20 29 28 1 2 3 28 4 29 1 2 3 30 30 5 6 29...

Page 12: ...3 7 1 7 7 31 32 33 34 35 36 21 22 31 32 33 36 34 35 37...

Page 13: ...23 24 37 1 2 3 38 37 1 37 2 ISOFIX 37 3 38 1 40 1 41 39 1 2 39 41 7 40 1 41...

Page 14: ...25 26 1 42 43 42 1 22 30 2 42 1 7 42 4 43 50 43 oods 44 45 50 46 49 48 47...

Page 15: ...27 28 30 goods Note...

Page 16: ...oved to CNS 11497 and UN ECE regulation 44 04 series of amendments Please read all the instructions in this manual before installing and using the product Instruction Manual stages ISOFIX child restra...

Page 17: ...7 years old Base These instructions show the use of the stages isofix seat and the base Please read all the instructions in this manual before installing and using the product IMPORTANT KEEP FOR FUTU...

Page 18: ...cing mode when the child is under 2 years old It is still advisable to use rearward facing mode when the child is over 2 years old WARNING DO NOT have your child in swaddled clothes when using this ch...

Page 19: ...concerning mainte nance repair and part replacement Do not place any objects in the load leg area in front of your base WARNING Frequently check the ISOFIX guides for dirt and clean them if necessary...

Page 20: ...497 and UN ECE regulation 44 04 series of amendments for general use in vehicles fitted with ISOFIX anchorages systems It will fit vehicles with positions approved as ISOFIX positions Please refer to...

Page 21: ...pprox Approx Baby mode Toddler mode 0 18kg Child s Weight Position 1 7 15 25kg Junior Mode Approx 3 7 years Reference Images 1 1 2 9 18kg CNS 11497 Choose the Installation Mode Concerns on Installatio...

Page 22: ...infant does not fit comfortably The cushion can be used separately without being attached to the insert to bolster the infant s back for more comfort 1 2 1 2 Use Infant Insert Installing the Base for...

Page 23: ...oad leg is in the wrong position Make sure the load leg is in full contact with the vehicle floor pan Squeeze the load leg releasing button then shorten the load leg upwards 8 9 1 7 8 1 10 1 2 12 1 2...

Page 24: ...e vehicle door can be closed to allow more seating space 14 2 15 1 If the stages isofix is secure the stages isofix latched indicator shows green If the stages isofix is not secure the stages isofix s...

Page 25: ...to disengage the buckle 19 3 Fix the buckles on the both sides of seat to make placing the baby more convenient 20 20 4 Place the child into the stages isofix and pass both arms through the harnesses...

Page 26: ...g Mode Forward Facing 2 4 years old Recline position Position 1 7 Please install the base on the vehicle seat with rebound bar attached then install the shell and then put the child in the stages isof...

Page 27: ...the both sides of seat to make placing the baby more convenient 28 4 Place the child into the stages isofix and engage the buckle 29 29 28 30 When used forward facing the shoulder harness height must...

Page 28: ...hicle seat with rebound bar attached then install the shell and then put the child in the stages isofix Ensure rebound bar is fitted to base The most convenient way to install the shell is when the ba...

Page 29: ...38 Make sure that both ISOFIX connectors are securely attached to their ISOFIX anchor points The colors of the indicators on both ISOFIX connectors should be completely green 37 3 Do not use shoulder...

Page 30: ...snaps into one of the 7 positions The head support positions are shown as 42 When the head support is adjusted to the 4th position or higher side wings will extend for more shoulder space see images 4...

Page 31: ...detergent gasoline or other organic solvent to wash the child restraint It may cause damage to the child restraint Do not twist the soft goods to dry with great force It may leave the soft goods with...

Page 32: ......

Page 33: ...JK033_C1507 B Share the joy at joiebaby com gemm 0 0 13kg...

Reviews: