


19
20
3.
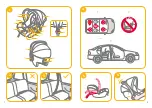
用力拉 緊汽 車安 全 帶,使汽 車安 全 帶緊實的 繫 住嬰 兒提 籃
(圖23)
!
盡 力拉 緊汽 車安 全 帶,並確 定汽 車安 全 帶 沒有鬆弛 或 扭曲。
!
汽 車安 全 帶 不能 對寶 寶的 身 體 造 成 壓迫。
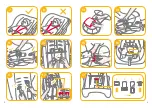
汽 車安 全 帶 安裝 好 後 如
圖24
所 示。
!
汽 車 腰 帶 卡入
2
個側面卡槽
(圖24.1)
!
汽 車安 全扣 正 確 扣 合
(圖24.2)
!
汽 車 肩帶 卡入後 方卡槽
(圖24.3)
ii. 搭配J oie手推車使用
本 嬰 兒提 籃 可搭配 具有特 殊 餐 盤、扶手或 小腿 靠的 J oie 手 推車使 用,
提 籃 適 用但不限 於以下型 號 的 J oie 手 推車︰全部 m u ze、ex to u r a、
b ris k、kix x、litet r a x、k ro m e車型,部分 aire、mir u s 車型。
!
購買前,請 確 定 您 的手 推車 可與 本 嬰 兒提 籃 搭配使 用。
!
本 產 品 僅供一 位 寶 寶使 用。
!
安裝 嬰 兒提 籃前 請 給手 推車剎車。
!
請 確 定,用於固定 嬰 兒提 籃 的部件已牢固固定 於手 推車上。
!
請將 手 推車 靠背 調至 最平 躺 段位。
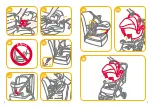
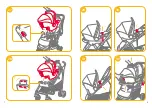
請依以下步驟 將 嬰 兒提 籃 安裝 到手 推車上︰
1.
將 嬰 兒提 籃 置 於手 推車內部,以使 提 籃卡 鉤 卡 到 扶手,餐 盤 或 小
腿 靠邊 緣。嬰 兒提 籃 將自動 扣 合到位
(圖25,26,27,28)
!
扶手有 布套 時,請 先揭開 布套上的 黏 扣 帶
(圖27.1)
!
對於有特 殊 小腿 靠 的手 推車,請 先將小腿 靠 調至 最 直 立位 置,
並揭開 布套
(圖28.1)
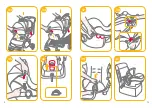
2.
用手 推車兩側 的 固定 織 帶固定 嬰 兒提 籃
(圖29,30,31)
!
將 提 籃往 上 提,確保 提 籃已正 確 固定。
移除 嬰 兒提 籃 時,先從 提 籃 上 取下固定 織 帶,按 壓提 籃 釋 鎖 把手,同
時 從手 推車內提出提 籃 即可
(圖32,33,34)
!
如果 您 對 這些手 推車 的使 用有任 何問 題,請 查閱它們各自的使
用說明書。
拆 卸 遮 陽 篷 和 座 墊
拆 卸遮 陽篷 時,按 壓遮 陽篷 卡座內 的凸點,同 時拔出遮 陽篷 條 即可
(圖35)
拆 卸 座 墊 時,請 參照以下操作步驟︰
1.
請 先 移除小座 墊。鬆開安 全扣,解開小座 墊兩側 的 鈕 扣,即可 取出
小座 墊。
2.
將 胯 帶 從 胯 帶 護 片內 的 鬆 緊帶中穿出,移除 胯 帶 護 片
(圖36)
3.
請 參 考“ 肩帶高度調 整"相 關操作,移除 肩帶和肩帶 護 片。
4.
將 位 於座椅邊 緣 背面的 固定 片拉出
(圖37)
5.
將金 屬鉤片從 座椅邊 緣 取下,再將金 屬鉤片往 上 拉,分離 座 墊和推
車 釋 鎖 按鈕
(圖38)
6.
依
圖39
所 示做法 將 座 墊從調 整 按鈕 周 圍移除。
依相 反步驟 即可重 新組裝 座 墊,但 須 確 定 肩帶 沒有交 叉或 扭曲。
保 養 與 維 護
!
小座 墊填 充 物拆除 後,請將其存放 於寶 寶無 法 接 觸 到 的地方。
!
請以
30
度以下水溫清 洗。
!
請 勿 使 用熨斗 熨 燙。
!
請 勿使 用漂白劑及乾洗。
!
請 勿使 用未 經 稀釋 的中性清 潔劑、汽油或 其他有機溶劑清 洗 本兒
童保護裝 置,否則可能 對保護裝 置 造 成 損壞。
!
請 勿大 力扭乾,過分大 力扭乾 可能 留下皺 褶。
!
請於陰涼 處 鋪平晾 乾。
!
當長 時間不使 用嬰 兒提 籃或 底座時,請將 嬰 兒提 籃或 底座 從汽 車
座椅上 拆除,並存放 於陰涼 處 及 寶 寶不易 接 觸 的地方。
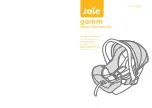
Summary of Contents for gemm
Page 1: ...CNS 11497 ECE R44 gemm 0 0 13kg...
Page 4: ...3 4 11 9 12 10 7 8 15 13 1 2 1 14 16 1 2 3 4 17 1 2...
Page 5: ...5 6 AIRBAG 22 21 19 20 25 26 18 23 1 3 2 24 1...
Page 6: ...7 8 29 30 31 32 27 1 28 1...
Page 7: ...9 10 35 37 39 34 33 38 40 36...
Page 8: ...11 12 100 13 PE...
Page 22: ......


