4
INSTALLATION
4.1
Location Requirements
To achieve optimum performance and trouble-free
service, it is essential that the proposed installation site
meets with the location and space requirements for the
model being installed. For dimensions, weight and
space requirements, including service access details,
refer to Section 9.
The clearances recommended are nominal
for the safe operation and maintenance of the
unit and power and control panels. Local
health and safety regulations, or practical
considerations for service replacement of
large components, may require larger
clearances than those given in Section 9.
Units are designed for indoor installation and not
intended for wet, corrosive or explosive atmospheres.
Installation should allow for water drain, ventilation and
sufficient clearance for service.
For installation in equipment rooms near noise-critical
areas, common walls should be of adequate sound
attenuating construction, all doors should be tightly
gasketed, and the unit should have vibration isolators
fitted.
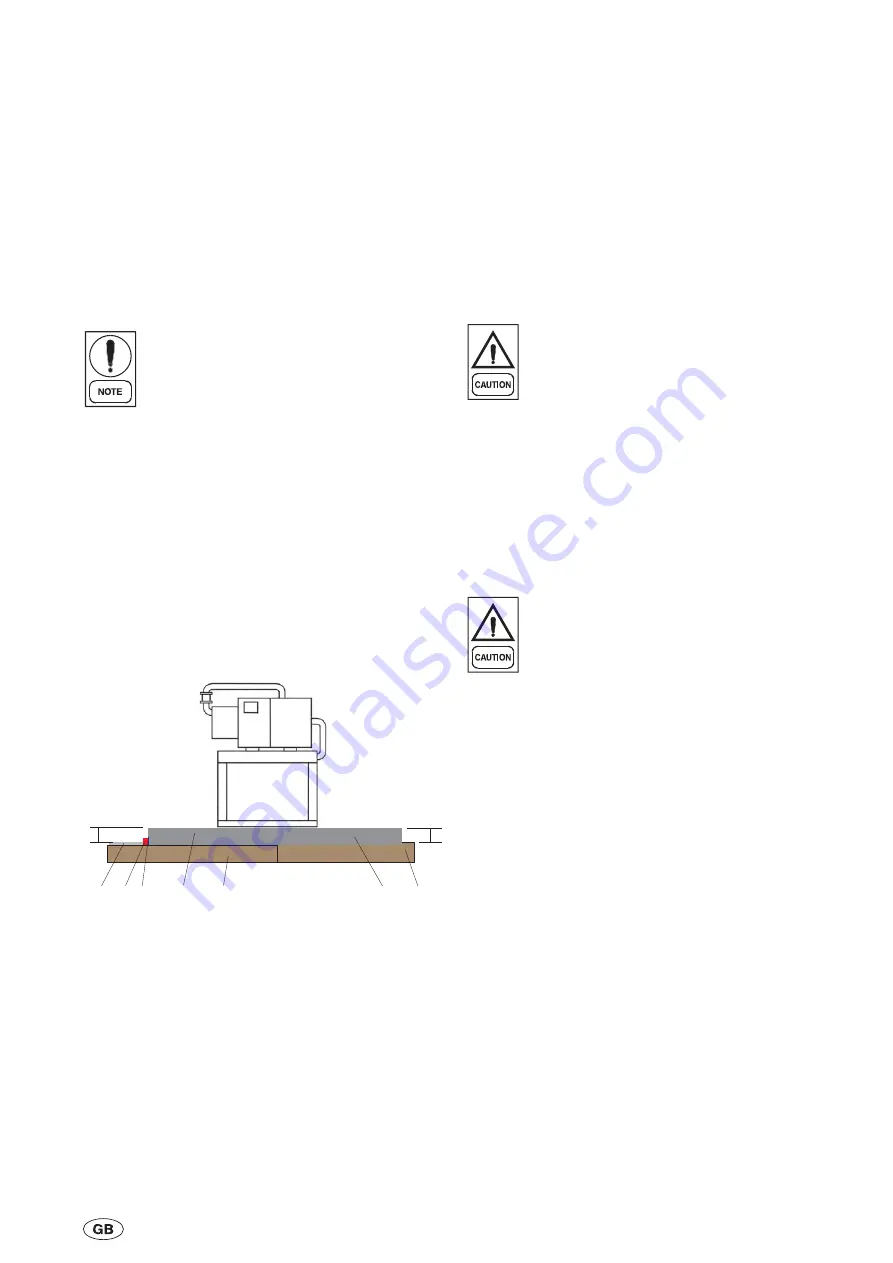
The unit must be installed on a suitable flat and level
concrete base (2) that extends to fully support the unit
base frame.
On basement foundations remove a portion of the
basement floor (3) so that a concrete base can be
poured resting on the ground (1) , with a corkboard (4)
installed on both sides, and a waterproof sealing
compound (5).
The concrete base must capable of supporting 150% of
the operating weight. In case of upper floors, the unit
and piping should be isolated from walls and ceiling. The
unit may be bolted to the foundation using 13 mm Ø
holes in the base of the framework. When lower
transmitted vibration levels are required optional
anti-vibration isolators can be supplied loose for site
installation.
4.2
Installation of Vibration Isolators
An optional set of spring and cage or rubber mat type
vibration isolators can be supplied loose with each unit.
Installation drawings are attached inside the power and
control panel.
Only spring and cage
or
rubber mat type
vibration isolators can be installed. Do not
install both types of vibration isolator together.
4.3
Pipework Connection
General Requirements
The following piping recommendations are intended to
ensure satisfactory operation of the unit. Failure to
follow these recommendations could cause damage to
the unit, or loss of performance, and may invalidate the
warranty.
The maximum flow rate and pressure drop for
the cooler and condenser must not be
exceeded at any time.
Refer to Section 9 for details.
n
The water must enter the heat exchangers by the
inlet connection. Refer to Section 9 for details.
n
A flow switch must be installed in the customer
pipework at the outlet of the exchangers as shown
in the arrangement diagrams, and wired back to the
control panel using screened cable. For details
refer to “Electrical Connection”. This is to prevent
damage to the exchanges caused inadequate
liquid flow.
n
The flow switch used must have gold plated
contacts for low voltage/current operation. Paddle
type flow switches suitable for 10 barg working
pressure can be obtained from Johnson Controls
as an option for the unit.
n
The liquid pump(s) installed in the pipework
system(s) should discharge directly into the unit
heat exchanger section of the system. The
pump(s) require an auto-starter (by others) to be
wired to the control panel. For details refer to
“Electrical Connection”.
4
-
1
035-21786-100 Rev. 1 (0909)
150
-
200
mm
150
-
200
mm
1
1
2
2
3
4
5
Summary of Contents for York YCRE 040
Page 2: ......
Page 49: ...9 3 035 21786 100 Rev 1 0909 Suction Pressure Evaporator Sub cooling Temperatures...
Page 54: ...9 7 Clearances and Foundations 9 8 035 21786 100 Rev 1 0909...
Page 55: ...9 8 Dimensions 9 9 035 21786 100 Rev 1 0909 Model YCSE 040...
Page 56: ...9 10 035 21786 100 Rev 1 0909 Model YCSE 050...
Page 57: ...9 11 035 21786 100 Rev 1 0909 Model YCSE 060...
Page 58: ...9 12 035 21786 100 Rev 1 0909 Model YCSE 080...
Page 59: ...9 13 035 21786 100 Rev 1 0909 Model YCSE 100...
Page 60: ...9 14 035 21786 100 Rev 1 0909 Model YCRE 040...
Page 61: ...9 15 035 21786 100 Rev 1 0909 Model YCRE 050...
Page 62: ...9 16 035 21786 100 Rev 1 0909 Model YCRE 060...
Page 63: ...9 17 035 21786 100 Rev 1 0909 Model YCRE 080...
Page 64: ...9 18 035 21786 100 Rev 1 0909 Model YCRE 100...
Page 66: ...This Page Intentionally Blank 10 2 035 21786 100 Rev 1 0909...


