background image

T600HPx-4 and T600HPx-4+PIR Series Heat Pump Thermostat Controllers Installation Instructions

3

Wiring

When an existing thermostat controller is replaced, 
remove and label the wires to identify the terminal 
functions. When a T600HPx-4 or T600HPx-4+PIR 
Series Thermostat Controller is replaced, simply 
remove the old screw terminal blocks and reinsert them 
onto the PCB of the replacement thermostat controller.      

To wire the thermostat controller:

1.

Strip the ends of each wire a 1/4 in. (6 mm) and 
connect them to the appropriate screw terminals as 
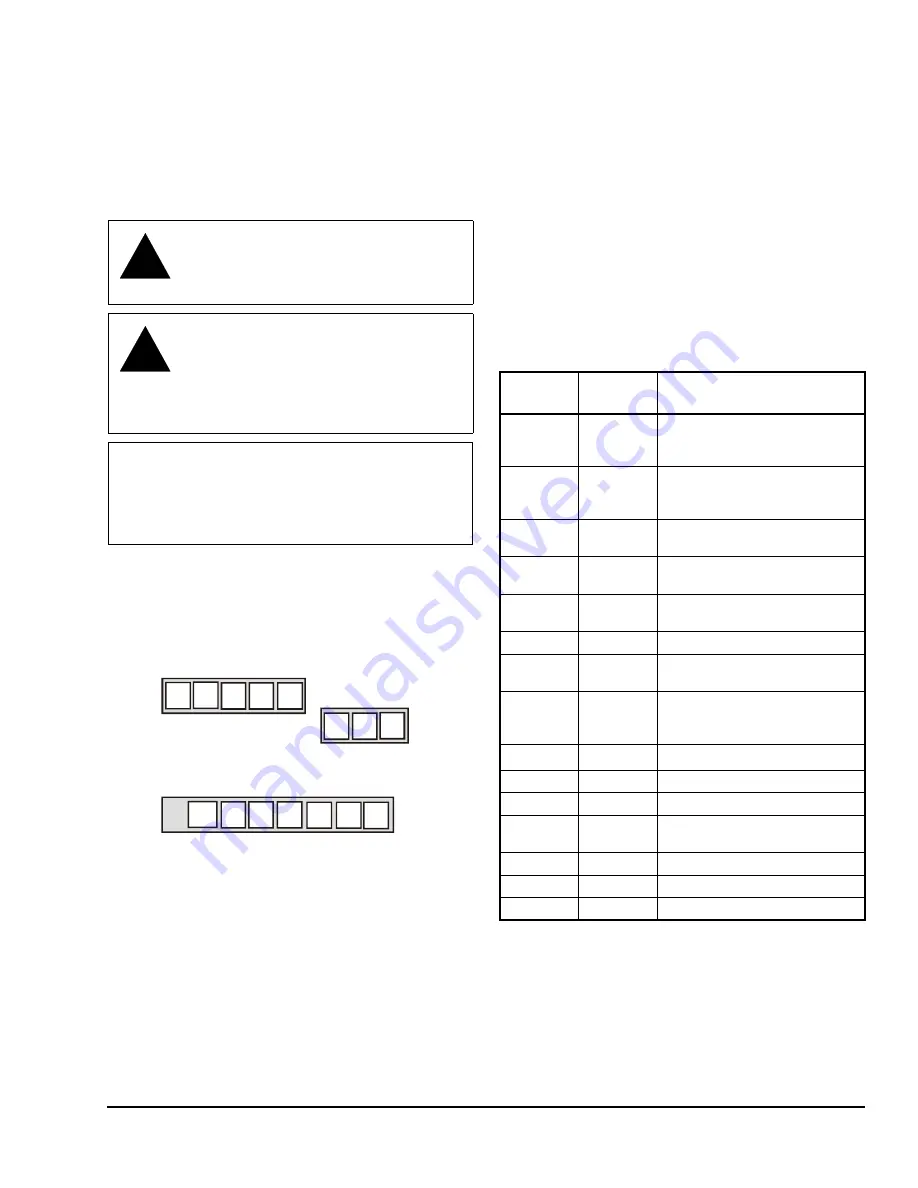
indicated in Figure 5.  

2.

Carefully push any excess wire back into the wall. 

Note:

Seal the hole in the wall with fireproof material 

to prevent drafts from affecting the ambient 
temperature readings.

3.

Reinsert the screw terminal blocks onto the PCB.

Note:

If multiple wires are inserted into the terminals, 

be sure to properly twist the wires together prior to 
inserting them into the terminal connectors.

4.

For PIR models, carefully reattach the PIR 
connector to the PCB.

5.

Reattach the thermostat controller cover to the 
mounting base (top side first).

6.

Use a Phillips-head screwdriver to install the 
security screw on the bottom of the thermostat 
controller cover if desired. The security screw 
comes packaged separately in a plastic bag with 
the thermostat controller.  

!

CAUTION: Risk of Electric Shock.

Disconnect power supply before making 
electrical connections to avoid electric 
shock. 

!

CAUTION: Risk of Property Damage.

Do not apply power to the system before 
checking all wiring connections. Short 
circuited or improperly connected wires 
may result in permanent damage to the 
equipment. 

IMPORTANT:

Make all wiring connections in 

accordance with local, national, and regional 
regulations. Do not exceed the electrical ratings of 
the T600HPx-4 or T600HPx-4+PIR Series 
Thermostat Controller.

Figure 5: Terminal Blocks

Five-Pole
Left Top Connector

G

RC

C

1

3

4

5

Three-Pole
Right Top
Connector

RH

6

8

DI1 DI2

RS

Scom

Seven-Pole Bottom Connector

OS MS

AUX

10

11

12

14

15

16

13

FI

G

:T6

00

H

P

x_t

rm

bl

k

Y2

Y1

2

O/B

W1

7

Table 1:  Terminal Identification (See Figure 5.)

Terminal 

Number

Terminal 

Label

Function

1

Y2

1

1.

This terminal provides the voltage from RC through a 
relay contact.

Energizes Second-Stage 
Compressor on a Call for 
Heating or Cooling

2

Y1

1

Energizes First-Stage 
Compressor on a Call for 
Heating or Cooling

3

G

1

Energizes Fan in Accordance 
with Selected Fan Mode

4

RC

24 VAC from Equipment 
Transformer

5

C

24 VAC (Common) from 
Equipment Transformer

6

RH

24 VAC for Auxiliary Heating

7

W1

2

2.

This terminal provides the voltage from RH through a 
relay contact.

Energizes on a Call for Auxiliary 
Heating

8

O/B

Reversing Valve; Energizes a 
Valve on a Call for Heating or 
Cooling

10

AUX

1

Auxiliary Output

11

DI1

Configurable Digital Input 1

12

DI2

Configurable Digital Input 2

13

RS

Remote Room Temperature 
Sensor

14

Scom

Sensor Common

15

OS

Outside Air Temperature Sensor

16

MS

Not Used

Summary of Contents for T600HPN-4

Page 1: ...r as illustrated in Figure 1 IMPORTANT The T600HPx 4 and T600HPx 4 PIR Series Thermostat Controllers are intended to provide an input to equipment under normal operating conditions Where failure or malfunction of the thermostat controller could lead to personal injury or property damage to the controlled equipment or other property additional precautions must be designed into the control system In...

Page 2: ...rd to indicate the top of the thermostat controller 6 Drill a 3 16 in 5 mm hole at each of the two marked locations and tap nylon anchors included with the thermostat controller flush to the wall surface Note Other means of anchoring the device may be desired depending on the wall medium 7 Position the thermostat controller mounting base on the wall and use the two mounting screws included with th...

Page 3: ...upply before making electrical connections to avoid electric shock CAUTION Risk of Property Damage Do not apply power to the system before checking all wiring connections Short circuited or improperly connected wires may result in permanent damage to the equipment IMPORTANT Make all wiring connections in accordance with local national and regional regulations Do not exceed the electrical ratings o...

Page 4: ...rature Sensor Outside Air Temperature Sensor 24 VAC Thermostat Controller Power Aux Heat Y2 Y1 G RC C RH W1 O B Aux Fan Comp 2 Comp 1 Rev Valve FIG T600HPx 3_wrng Independent Contact Lighting On Off Actuation Exhaust Fan Figure 7 Wiring the T600HPx 4 or T600HPx 4 PIR Series Thermostat Controller for VDC Applications Separate 24 VAC Transformer Y2 Y1 G RC C RH W1 O B R4 To Auxiliary Heat Circuit O ...

Page 5: ...vate a setpoint adjustment Backlit LCD The T600HPx 4 and T600HPx 4 PIR Series Thermostat Controllers include a 2 line 8 character backlit display Low level backlighting is present during normal operation and it brightens when any user interface key is pressed The backlight returns to low level when the thermostat controller is left unattended for 45 seconds LEDs Three LEDs are included to indicate...

Page 6: ...eration T600HPx 4 PIR Series Thermostat Controllers A T600HPx 4 PIR Series Thermostat Controller or a T600HPx 4 Series Thermostat Controller equipped with a PIR accessory cover provides advanced occupancy logic Note The PIR strategy is an occupied strategy If the thermostat controller is programmed to be Unoccupied the PIR function does not have an affect on the occupancy strategy The thermostat c...

Page 7: ...rm condition is displayed locally when the input is closed An alarm message is included on the scrolling Status Display Menu and when the message is displayed the backlight momentarily lights up Each input can be configured to the Selection Options included in Table 2 Table 2 Installer Configuration Menu Part 1 of 7 Parameter Appearing on Display Description and Default Selection Options Pswrd Set...

Page 8: ...or connected to the input The thermostat controller heating or cooling action is locked out if no airflow is detected 10 seconds after the fan Terminal G is energized Contact open no airflow contact closed airflow present MenuScro Gives the option of having the display continuously scroll the parameters Default on off The scroll is inactive on The scroll is active Lockout Selectable Lockout Levels...

Page 9: ...the thermostat controller is problematic leading to unwanted cycling An example of a problematic installation is a wall mounted thermostat controller installed between the return and supply air feeds that is directly influenced by the supply air stream 2 2 0F 1 1C 3 3 0F 1 7C 4 4 0F 2 2C 5 5 0F 2 8C 6 6 0F 3 3C 7 7 0F 3 9C 8 8 0F 4 4C Anticycl Anti Short Cycle timer sets the minimum on off times f...

Page 10: ...er is in the Unoccupied mode when a Schedule Override Function is enabled using either the Main User Menu or DI1 or DI2 configured as a temporary override remote contact RemOVR Sets the effective duration of the Temporary heating or cooling setpoints set using the UP DOWN arrow keys Default 3 0 hrs Range 0 0 to 12 0 hrs adjustable in 1 hour increments Cal RS Sets the desired room air temperature s...

Page 11: ... Default 0 5 hours Range 0 5 hours to 24 0 hours adjustable in 0 5 hour increments 2 4event2 Sets the number of events within a 24 hour period Default 2 0 4 0 Four events two Occupied and two Unoccupied within a 24 hour period 2 0 Two events one Occupied and one Unoccupied within a 24 hour period Aux cont Energizes peripheral devices lighting equipment exhaust fans and economizers Default n o Note...

Page 12: ... 0 C Comf eco Selects how the auxiliary heat is used Default comfort Note Selecting economy in the heating mode adds a deadband between the heat pump and auxiliary heat The actual temperature maintained is lower than the true heating setpoint to maximize the heat pump operation When the outside air temperature drops below the low balance point the deadband is eliminated economy In the heating mode...

Page 13: ...eat pump coil is installed before the auxiliary heat all electric systems 1 Setting DI1 or DI2 to RemNSB disables schedules and stops the Schedule menu display Any other setting enables schedules and the Schedule menu T600HPP 4 and T600HPP 4 PIR models 2 T600HPP 4 and T600HPP 4 PIR models 3 When adjusting the numeric value press the UP DOWN arrow key to change the value by single increments press ...

Page 14: ...in User Menu 1 Press the NO key for all prompts until the Cancel ovrd prompt appears If the thermostat controller is in the override state this is the first prompt 2 Press the YES key to resume the programmed schedule The thermostat controller returns to the Status Display Menu Entering Permanent Temperature Setpoints The first prompt appearing in the Main User Menu of the thermostat controller wh...

Page 15: ...key to enter the temperature setting menu Press the YES key to change the Occupied cooling setpoint Press the NO key to advance to the Occupied heating setpoint menu Press the UP DOWN arrow keys to set the temperature Press the YES key to store the value and advance to the next menu Press the YES key to change the Occupied heating setpoint Press the NO key to advance to the Unoccupied cooling setp...

Page 16: ...r Menu 1 Press the NO key for all prompts until the fan mode prompt appears on the display Press the YES key to set the fan mode 2 Press the UP DOWN arrow keys to locate the desired fan mode Press the YES key to select the desired fan mode 3 Press the YES key to return to the Status Display Menu or press the NO key to return to the fan mode selection menu Programming the Daily Schedule Two Event T...

Page 17: ...est of the days of the week After setting the schedule for all the days of the week following the last entry for Sunday press the YES key to return to the Status Display Menu or press the NO key to start again at Monday Table 5 Programming the Daily Schedule Two Event Part 2 of 2 Thermostat Controller Display Description Occupied 12 00 AM Unoccup 12 00 AM Tuesday set Y N Copy Y N previous Wednesda...

Page 18: ...rmat menu Press the YES key to copy the schedule from the previous day Press the NO key to set a different schedule If the YES key was pressed the next prompt is for Wednesday Repeat the procedure for all days of the week After setting the schedule for all the days of the week following the last entry for Sunday press the YES key to return to the Status Display Menu or press the NO key to start ag...

Page 19: ...le in the schedule hold menu Permanent Occupied Hold occ hold This selection puts the thermostat controller into a permanent Occupied state via the Occupied setpoints Occupied hold appears in the Status Display Menu when this selection is active Permanent Unoccupied Hold This selection puts the thermostat controller into a permanent Unoccupied state via the Unoccupied setpoints Unoccup hold appear...

Page 20: ...mit frost protection room temperature setpoint SetClock Indicates that there has been a power failure greater than 6 hours and the clock needs to be reset T600HPP 4 and T600HPP 4 PIR models Fan lock Indicates that the thermostat controller heating or cooling action is locked out because no airflow was detected 10 seconds after the fan Terminal G was energized T600HPx 4 and T600HPx 4 PIR Series The...

Page 21: ...ompliant to CFR 47 Part 15 Subpart B Class A Canada UL Listed File E27734 CCN XAPX7 Under CAN CSA C22 2 No 24 Temperature Indicating and Regulating Equipment Industry Canada ICES 003 Europe CE Mark EMC Directive 2004 108 EC Australia and New Zealand C Tick Mark Australia NZ Emissions Compliant Shipping Weight 0 75 lb 0 34 kg The performance specifications are nominal and conform to acceptable indu...

Reviews: