


21
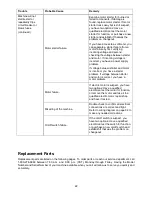
Troubleshooting: Mechanical and Electrical Problems
Trouble Probable
Cause
Remedy
Knives are worn.
Replace knives.
Uneven depth of cut
side to side.
Cutterhead not level with bed.
Level the bed.
Board thickness does
not match depth of
cut scale.
Depth of cut scale incorrect.
Adjust depth of cut scale.
Inadequate tension.
Adjust chain tension.
Sprockets misaligned.
Align sprockets.
Chain is jumping.
Sprockets worn.
Replace sprockets.
No incoming power.
Verify unit is connected to power.
Overload automatic re-set has not re-
set.
When the planer overloads on the
circuit breaker built into the motor
starter, it takes time for the machine
to cool down before restart. Allow unit
to adequately cool before attempting
restart. If problem persists, check
amp setting on the motor starter
inside the electrical box.
Planer frequently trips.
One cause of overloading trips which
are not electrical in nature is too
heavy a cut. The solution is to take a
lighter cut. If too deep a cut is not the
problem, then check the amp setting
on the overload relay. Match the full
load amps on the motor as noted on
the motor plate. If amp setting is
correct then there is probably a loose
electrical lead. Check amp setting on
motor starter.
Building circuit breaker trips or fuse
blows.
Verify that planer is on a circuit of
correct size. If circuit size is correct,
there is probably a loose electrical
lead. Check amp setting on motor
starter.
Machine will not
start/restart or
repeatedly trips
circuit breaker or
blows fuses.
Loosen electrical connections.
Go through all the electrical
connections on the planer including
motor connections, verifying the
tightness of each. Look for any signs
of electrical arcing which is a sure
indicator of loose connections or
circuit overload.
Summary of Contents for JWP-15DX
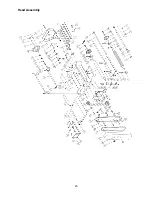
Page 23: ...23 Head Assembly ...
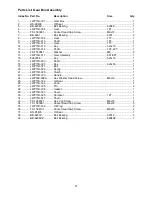
Page 26: ...26 Base Assembly ...
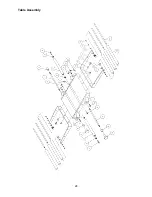
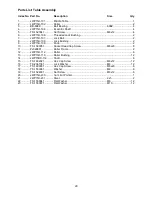
Page 28: ...28 Table Assembly ...
Page 30: ...30 Gear Box Assembly ...
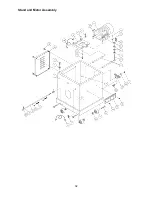
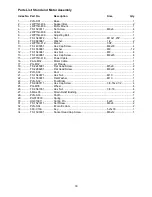
Page 32: ...32 Stand and Motor Assembly ...
Page 34: ...34 Electrical Connections ...
Page 35: ...35 ...


