background image

 8

6.4

  Removal from pallet 

To remove sander from pallet: 

1.  Open cabinet door and remove accessories. 

2.  Use ratchet wrench with extended socket to 

unscrew two bolts securing machine to pallet 
(Figure 2). 

3.  Move sander off pallet, with help from an 

assistant. 


Figure 2:  removal from pallet 

6.5

  Drum and spindle storage 

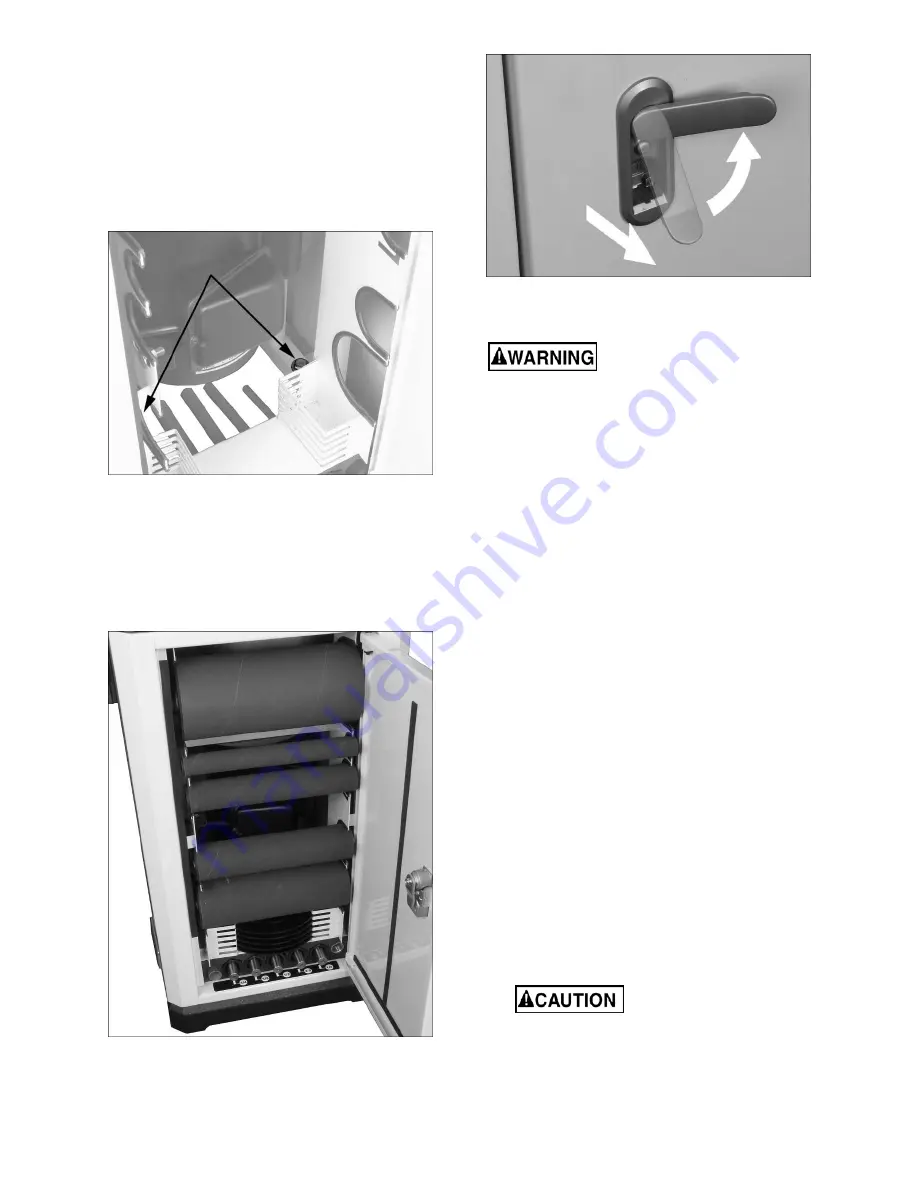
Keep drums, spindles and table inserts protected by 
storing them in cabinet (Figure 3). To open door, lift 
bottom of latch and rotate counterclockwise 90 
degrees (Figure 4). Reverse procedure to close 
cabinet door. 


Figure 3:  cabinet storage 


Figure 4:  door latch 

6.6

  Installing/removing spindles 


Disconnect sander from power 

source when installing or removing sanding 
assemblies. Failure to comply may cause 
serious injury. 

Open front shield (see 

sect. 8.1 Rubber Shields

).  

Thoroughly clean tapered area (A, Figure 5) on all 
spindle assemblies before installing. Also clean 
mating shaft on sander. 

Remove table insert if installed.  

Table may be tilted 15° backward to improve access 
(see 

sect. 8.2

.) 

6.6.1

  Small sleeve spindles 

Refer to Figure 5. 

1.  Slide sanding sleeve (B) completely onto 

spindle, ensuring that it slides into collar (C). 

2.  Tighten set screw on collar (C) with provided 

3mm hex wrench. Do not overtighten. 

3.  Pull on sleeve to ensure it is secure. 

4.  Position spindle taper (A) into main shaft and 

hold. 

5.  Rotate nut (D) clockwise by hand, as viewed 

from above. Continue rotating nut until spindle 
seats (stops turning with nut), then continue 
rotating nut until it is hand-tight. 

6.  Push in and hold spindle lock (E). Note: Rotate 

spindle to ensure proper engagement. 

7.  Use provided combination wrench to tighten nut 

further. Do not overtighten. 

8.  Release spindle lock. Make sure it retracts by 

rotating spindle slightly. 


Make sure spindle lock has 

fully disengaged before turning on sander, 
or damage to motor may result.


Summary of Contents for JOSS-S

Page 1: ...Instructions and Parts Manual Oscillating Spindle Sander Model JOSS S JET 427 New Sanford Road LaVergne Tennessee 37086 Part No M 723950 Ph 800 274 6848 Revision B 10 2015 www jettools com Copyright...

Page 2: ...as Authorized Service Centers located throughout the United States For the name of an Authorized Service Center in your area call 1 800 274 6846 or use the Service Center Locator on the JET website Mo...

Page 3: ...tage conversion 11 7 3 Extension cords 11 8 0 Adjustments 11 8 1 Rubber shields 11 8 2 Table tilt for bevel sanding 12 9 0 Operations 12 9 1 Operating guidelines 12 9 2 Safety switch 13 9 3 Safety key...

Page 4: ...Lead from lead based paint Crystalline silica from bricks cement and other masonry products Arsenic and chromium from chemically treated lumber Your risk of exposure varies depending on how often you...

Page 5: ...ools in damp or wet location or expose them to rain Keep work area well lighted 32 Hold workpiece down against table firmly at all times 33 Do not sand workpieces that are too small to be safely suppo...

Page 6: ...inet steel Base cast iron Sanding drums rubber Paint finish enamel and powder coating Table Table dimensions 24 1 2 W x 24 1 2 L Table height from floor 39 3 16 995mm Table tilt 45 front 15 back Dimen...

Page 7: ...with sleeve P 1 3 8 Spindle with sleeve R 1 1 4 Spindle with sleeve S 1 Spindle hex nut T 1 Combination wrench with magnet strip U 1 Hex wrench 3mm and magnet strip V Note All provided sanding sleeve...

Page 8: ...a A Figure 5 on all spindle assemblies before installing Also clean mating shaft on sander Remove table insert if installed Table may be tilted 15 backward to improve access see sect 8 2 6 6 1 Small s...

Page 9: ...se spindle lock E Make sure it retracts by rotating spindle slightly Make sure spindle lock has fully disengaged from spindle before turning on sander or damage to motor may result To remove a spindle...

Page 10: ...rounded Cord connected Tools In the event of a malfunction or breakdown grounding provides a path of least resistance for electric current to reduce the risk of electric shock This tool is equipped wi...

Page 11: ...box A similar diagram is printed in sect 13 In case of discrepancy diagram on machine takes precedence The power cord plug must be replaced with a UL CSA listed plug rated for 230V 7 3 Extension cords...

Page 12: ...needed loosen pointer E and align it with zero degree mark 6 Tilt table to 45 degrees and check accuracy of 45 degree stop screw F Adjust as needed Note The above procedure is sufficient for most woo...

Page 13: ...to do this may result in serious personal injury 10 1 General maintenance Clean the sander after each use Vacuum any residual dust inside the cabinet and around spindle area Periodically apply a ligh...

Page 14: ...or base on uneven surface Adjust stand or base so that it rests evenly on the floor Bearings worn Replace bearings Sanded edge not square Table not square to sanding drum Use a square to adjust table...

Page 15: ...15 12 1 1 JOSS S Table Assembly Exploded View...

Page 16: ...Screw M6 1 0P 20L 5 28 JOSS S 128 Flat Washer 6 4 16 1 6T 5 29 TS 1540021 Hex Nut M4 0 7P 3 30 JOSS S 130 Rubber Shield Holder 1 31 JOSS S 131 Phillips Round Head Screw M5 0 8P 20L 1 32 JOSS S 132 Ru...

Page 17: ...rew M3 0 5P 14L 2 71 JOSS S 171 Key 1 72 JOSS S 172 Phillips Flat Head Screw M5 0 8P 10L 3 73 JOSS S 173 Special Nut 1 74 JOSS S 174 Worm Shaft 1 75 OVS10 050 Spring Pin 6 30L 1 76 JOSS S 176 Oil Seal...

Page 18: ...18 12 2 1 JOSS S Cabinet Assembly Exploded View...

Page 19: ...Base 1 26 JOSS S 226 Strain Relief PG 9 1 27 JOSS S 227 Sponge Strip 10 2 470mm 2 28 JOSS S 228 Edging Strip for 4 Rubber Drum 2 29 JOSS S 229 Edging Strip for 1 Rubber Drum 2 30 JOSS S 230 Edging Str...

Page 20: ...20 12 3 1 JOSS S Spindle and Drum Assembly Exploded View...

Page 21: ...Spindle Assembly 1 22 JOSS S 322 Spindle Assembly incl 6 7 8 9 23 25 100G sleeve 5 8 1 23 JOSS S 323 Spindle 5 8 1 24 575906 Sanding Sleeve 60 Grit 4 pack 5 8 x 6 575908 Sanding Sleeve 100 Grit 4 pac...

Page 22: ...k 3 x 9 575949 Sanding Sleeve 150 Grit 4 pack 3 x 9 43 JOSS S 343 Washer 3 2 44 JOSS S 344 Drum Assembly incl 29 45 47 100G sleeve 4 1 45 JOSS S 345 Rubber Drum 4 1 46 575951 Sanding Sleeve 60 Grit 4...

Page 23: ...23 13 0 Electrical Connections JOSS S Spindle Sander...

Page 24: ...24 427 New Sanford Road LaVergne Tennessee 37086 Phone 800 274 6848 www jettools com...

Reviews: