12
8.3
Chuck preparation
Read and understand all
directions for chuck preparation. Failure to
comply may cause serious injury and/or
damage to the lathe.
The three-jaw scroll chuck is shipped pre-installed
on the lathe. It can be used for clamping cylindrical,
triangular and hexagonal stock, and has reversible
jaws.
The four-jaw chuck has independently adjustable
jaws, and permits the holding of square and
asymmetrical pieces. It also enables accurate
concentric set-up of cylindrical pieces.
Chucks are heavy; use an
assistant to help remove.
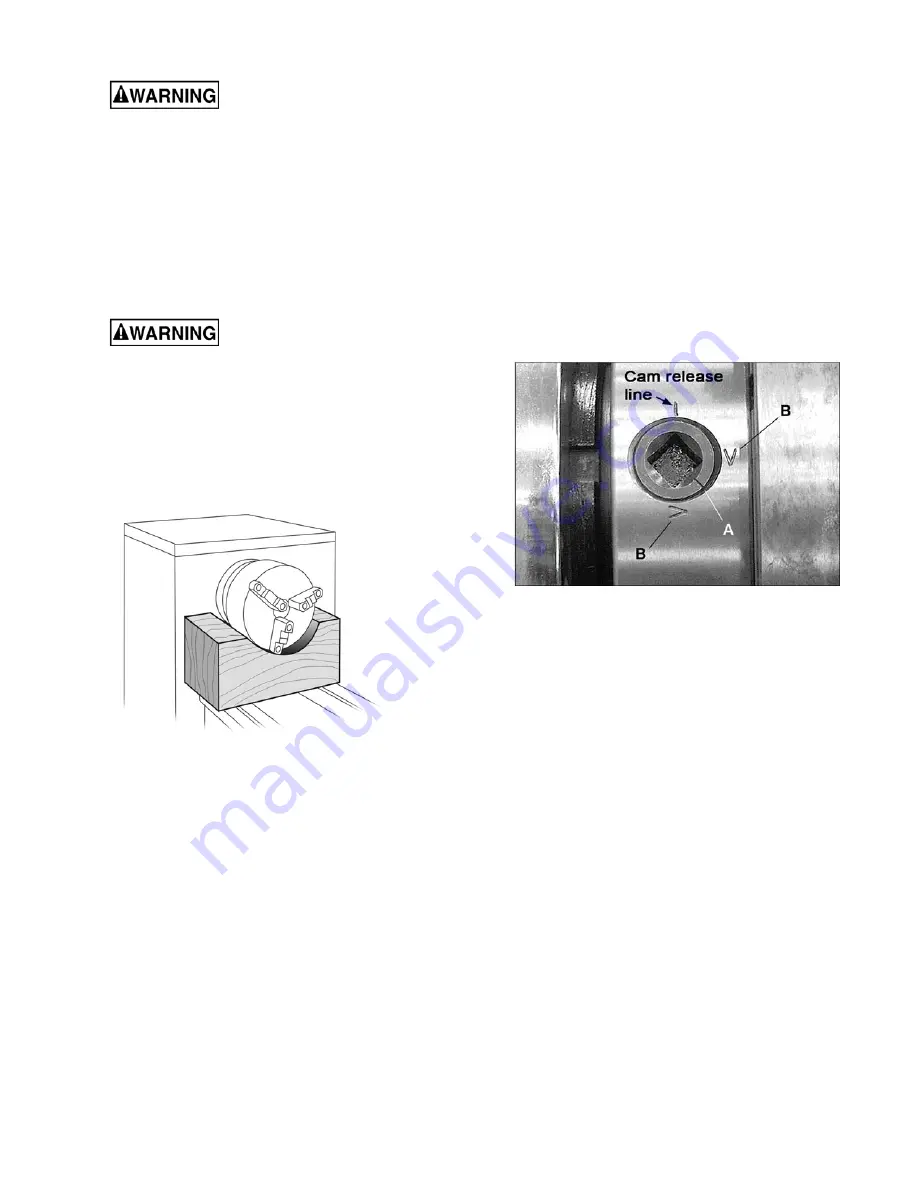
Before removing a chuck, place a flat piece of thick
plywood across the bedways under the chuck to
prevent damage to the bedways should the chuck
fall from your hands. Alternatively, many users
make a wood chuck cradle that sits atop the ways
and accepts the specific diameter of chuck, for
easier installing and removal. Figure 6 shows an
example.
Figure 6 – Chuck cradle (not included)
To remove a chuck from the spindle:
1. Support the chuck while turning six camlocks
1/4-turn counterclockwise, using the chuck
wrench from the tool box. See Figure 7.
2. Carefully remove the chuck from the spindle
and place on a firm work surface. If the spindle
seems stuck, use a mallet at various points on
the back side to help free it from the spindle.
3. Inspect the camlock studs. Make sure they
have not become cracked or broken during
transit. Clean all parts thoroughly with solvent.
Also clean the spindle and camlocks.
4. Cover all chuck jaws and the scroll inside the
chuck with #2 lithium tube grease. Cover the
spindle, camlocks, and chuck body with a light
film of 20W oil.
5. Lift the chuck up to the spindle nose and press
onto the spindle. Tighten in place by turning
the camlocks 1/4 turn clockwise. The index
mark (A, Figure 7) on the camlock should be
between the two indicator arrows (B) when
tight, as shown in Figure 7.
•
If the index mark (A) is
not
between the two
arrows, i.e. the cam turns beyond the
indicator arrows, then remove the chuck
and turn the camlock stud IN one full turn.
•
If a camlock will not engage, remove the
chuck and turn the camlock stud OUT one
full turn.
6. Make sure chuck is secure on the spindle with
the camlocks correctly engaged.
Figure 7 – Camlock
8.4
Break-in period
Do not run the lathe above 560 RPM for the first six
hours of operation, to allow gears and bearings to
adapt and run smoothly.
Summary of Contents for GH-1640ZK
Page 26: ...26 This page intentionally left blank ...
Page 27: ...27 This page intentionally left blank ...
Page 32: ...4 3 0 Stand Assembly Exploded View ...
Page 34: ...6 4 0 Brake Assembly Exploded View ...
Page 36: ...8 5 0 Bed Assembly Exploded View ...
Page 39: ...11 6 0 Headstock Assembly I Exploded View ...
Page 41: ...13 7 0 Headstock Assembly II Exploded View ...
Page 44: ...16 8 0 Headstock Assembly III Exploded View ...
Page 46: ...18 9 0 Headstock Assembly IV Exploded View ...
Page 48: ...20 10 0 Change Gear Box Assembly I Exploded View ...
Page 50: ...22 11 0 Change Gear Box Assembly II Exploded View ...
Page 52: ...24 12 0 Quick Change Gear Box I Exploded View ...
Page 55: ...27 13 0 Quick Change Gear Box II Exploded View ...
Page 57: ...29 14 0 Quick Change Gear Box III Exploded View ...
Page 59: ...31 15 0 Apron Assembly I Exploded View ...
Page 62: ...34 16 0 Apron Assembly II Exploded View ...
Page 65: ...37 17 0 Apron Assembly III Threading Dial Exploded View ...
Page 67: ...39 18 0 Saddle and Cross Slide Assembly Exploded View ...
Page 70: ...42 19 0 Tool Post and Compound Rest Exploded View ...
Page 72: ...44 20 0 Tailstock Assembly I Exploded View ...
Page 75: ...47 22 0 Steady Rest Assembly Exploded View ...
Page 78: ...50 24 0 Coolant and Work Light Assembly Exploded View ...
Page 83: ...55 28 1 Electrical Diagram GH 1640ZK Lathe 3PH 230V ...


