background image

16

VM9212

NOTE: When a VCD is playing with PBC turned “On”, 

activating random playback automatically turns PBC off. 

Accessing the DVD Menu

Press the 

MENU

 button (1) on the remote control to recall the 

main DVD menu. Use the directional (arrow) buttons (

<

>

/\


V

) on the joystick (16, 17, 18, 19) to select a title from the 

menu or touch the title on screen.
Press the 

TITLE

 button (2) on the remote control or on 

screen to select a different title for playback.
Press the 

>/||

 button (18) on the remote control or the 

ENTER


(joystick) button (20) to confirm your selection and begin 
playback. You can also select a title using the touch screen.

Moving Through Chapters

Press the 

>>|

 button (19) on the remote control, the 

>

 button 

on the joystick (17) or the 

>>|

 button on screen to advance to 

the next chapter on the DVD. 
Press the 

|<<

 button (17) on the remote control, the 

<

 button 

on the joystick (16), or the 

|<<

 button on screen to move to 

the previous chapter.

Goto Search

During DVD or VCD playback, perform the following steps to 
use the GOTO feature to access a specific location on a disc: 
1.

Press the 

GOTO

 button (21) on remote control to enter 

“GO TO” mode.

2.

Press the 

>>

 or 

<<

 buttons (14, 22) on the remote 

control or the 

<

 or 

>

 buttons (16, 17) on the joystick to 

select a category (highlighted in blue).

For DVD mode, you can choose Title, Chapter or 
Time search.

For VCD mode, you can choose Time or Track 
search.

3.

Enter a time into the field using the numeric keypad (29) 
on the remote control.

4.

Press the 

>/||

 button (18) on the remote control or the 

ENTER

 (joystick) button (20) to go to the specified 

location on the disc.

5.

Press the 

GOTO

 button again to exit.

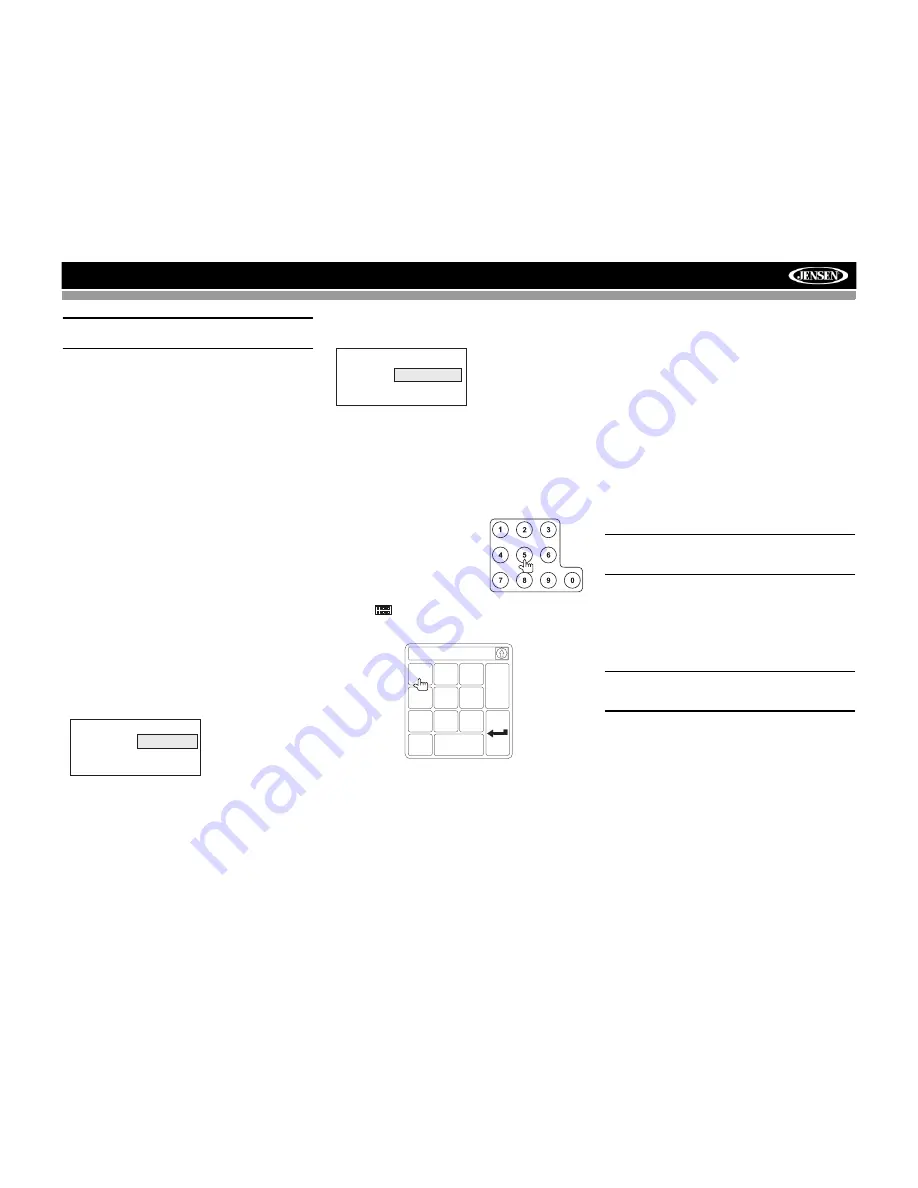
Direct Chapter / Track Selection

Remote Control Direct Entry

During DVD, VCD and CD 
playback, you can use the numeric 
keypad on the remote control (29) 
to access a track directly.

Touch Screen Direct Entry

To select a chapter/track directly, 
touch the 

 button on screen control to display the direct 

entry menu.

Enter the desired chapter/track using the on-screen number 
pad. Press the enter button (arrow) to tune to the selected 
station. To exit the screen without changing the station, touch 

Exit

. To clear your entry and start over, touch 

Clear

.

Viewing an Alternate Picture Angle 

(DVD Only)

Some DVDs contain scenes that have been shot 
simultaneously from different angles. For discs recorded with 

multiple angles, press the 

ANGLE

 button (13) on the remote 

control to toggle available angles of the on-screen image. 

Zooming

Press the 

ZOOM

 button (23) on the remote control to enlarge 

and pan through the video image using the following options: 
“Q1”, “Q2”, “Q3”, “Q4” and “OFF”.

Multi-Language Discs (DVD Only)

Changing Audio Language

If you are watching a disc recorded in multiple languages, 
press the 

AUDIO

 button (5) on the remote control to choose 

a language.

Changing Subtitle Language

If you are watching a disc recorded in multiple languages with 
subtitles, press the 

SUBTITLE

 button (9) on the remote 

control to choose the language in which you would like the 
subtitles to appear.

NOTE: During VCD playback, press the AUDIO button (5) 

on the remote control to choose between Left Channel, 

Right Channel, and Stereo.

PBC (Play Back Control - VCD Only)

For VCDs with play back functionality, play back control 
(PBC) provides additional controls for VCD playback.
Press the 

MENU

 button (1) on the remote control to toggle 

the PBC function “On”/”Off”. Once PBC is on, playback starts 
from track one of the play list.

NOTE: When PBC is activated, fast forward, slow 

playback, and previous/next track are available. Repeat 

and direct track selection are not available.

When PBC is activated, selecting random, scan, or search 
playback automatically deactivates PBC.

Search

Title

_ _ _

Chapter

_ _ _

Time

_ _ : _ _ : _ _

DVD Search

Title/Chapter

 – Go to 

specific time in a title/
chapter

Time

 – Go to specific 

time in current title

Search

Time

_ _ : _ _ : _ _

Track

_ _ _

VCD Track Search

Time

 – Go to specific 

time in the current track

Track

 – Go to specific 

track

Chapter: _ _

1

2

3

4

5

6

7

8

9

0

Clear

Exit

Summary of Contents for VM9212

Page 1: ...VM9212 Installation and Operation Manual 160Watts Peak 40W x 4...

Page 2: ......

Page 3: ...it you ll learn how to use all the features of your new Jensen VM9212 Mobile Multimedia Receiver for maximum enjoyment Preparation 1 Installation 2 Controls and Indicators 5 Remote Control 7 Using th...

Page 4: ...ii VM9212...

Page 5: ...nfrared Remote Control Two Composite Video Outputs for Additional Screens Two Audio Video Auxiliary Inputs for Game Console Camcorder Navigation etc Three Band Tone control Bass Mid and Treble w Eight...

Page 6: ...unit more stable CAUTION Be careful not to damage the car wiring 3 Place the radio in front of the dashboard opening so the wiring can be brought through the mounting sleeve Wiring Complete wiring as...

Page 7: ...n 1 Remove trim ring 2 Mount factory brackets on new radio using existing screws from old radio 3 Slide radio chassis into dash opening and secure 4 Reinstall dash panel 2 1 3 4 5 FINAL INSTALLATION 3...

Page 8: ...MUTE P CONT ANT CONT ACC BLACK YELLOW RED FUSE 15A Battery Ignition Switch BATTERY BATTERY Ground BATT ACC GND WHITE YELLOW RED External AV System AUX IN 1 AUX IN 2 WHITE YELLOW RED PINK Rear Video 2...

Page 9: ...omatically store strong radio stations in the six preset channels in the current band 4 TILT BAND Press to activate the tilt function Use the joystick to make adjustments while the red tilt icon is fl...

Page 10: ...ursor down 12 RESET Press to reset system settings to factory default except the password and parental lock setting 13 Pause Play Enter Press to pause or resume plaback or to confirm current selection...

Page 11: ...tes the preset station list ANGLE 13 Plays back disc in different angle for a scene Plays back Picture CD with different angle of picture dis played 14 Fast forwards the disc content Fast forwards the...

Page 12: ...ic Keypad 29 Directly accesses chapter 1 6 selects preset for current band Directly accesses track CLEAR 30 Delete entry or move back wards to correct error in Direct Access mode Delete entry or move...

Page 13: ...Quality Setting Mode Press the PIC button 24 on the remote control or the PIC AS PS button 3 on the monitor Parking Brake Parking Brake Inhibit When the pink Parking wire is connected to the vehicle b...

Page 14: ...lly extended horizontally Monitor is automati cally loaded into unit Monitor loading out vertically Unit stops at obstruction point Monitor swivels back to the unit Monitor swiv els back to the unit M...

Page 15: ...e volume level for 3 seconds Audio Control Menu The Audio Control feature allows you to easily adjust your audio system to meet the acoustical characteristics of your vehicle which vary depending on t...

Page 16: ...ing AM and PM 24Hr Clock displays 24 hour time up to 23 59 Clock HH MM Clock appears in the top right corner of the screen and on the LCD screen during certain operations NOTE The AM PM indication wil...

Page 17: ...r each quadrant until the calibration is completed Exiting the System Setup Menu To exit setup mode and resume normal playback press the SETUP button 31 on the remote control or touch the BACK button...

Page 18: ...Seek Tuning To seek the next station Touch the button on screen 12 Press the button 19 on remote control Press the button on the joystick 14 To seek the previous station Touch the button on screen 11...

Page 19: ...the screen section B Touch the 1 2 button to view a second page of controls Stopping Playback Touch the stop button on the screen or press the BAND button 20 on the remote control to stop DVD play Pau...

Page 20: ...isplay the direct entry menu Enter the desired chapter track using the on screen number pad Press the enter button arrow to tune to the selected station To exit the screen without changing the station...

Page 21: ...ide single layer DVD 5 Single side double layer DVD 9 Double side single layer DVD 10 Double side double layer DVD 18 MPEG 2 Method 133 minutes 242 minutes 266 minutes 484 minutes Single side single l...

Page 22: ...ough Tracks Press the button 19 on the remote control or on screen or use the button on the joystick 14 to advance to the next track on the disc Press the button 17 on the remote control or on screen...

Page 23: ...are expected to be played may not match the order in which they are actually played You may be able to set the order in which MP3 WMA files are to be played by writing them onto a medium such as a CD...

Page 24: ...n press the joystick button 13 on the front panel or press the button on the remote control 18 to suspend or resume disc play Moving Through Tracks Press the button 19 on the remote control or on scre...

Page 25: ...te malfunction MUTE wire is grounded Check that MUTE connection is not grounded and that it s properly insulated Unit resets itself when engine is off Incorrect connection between ACC and positive bat...

Page 26: ...laying VCD PCB is on Turn PCB off MP3 Interruption occurred during playback Disc is dirty or scratched Clean disc or replace File is damaged bad recording Recreate disc with good files Incorrect playb...

Page 27: ...damaged by foreign objects 5 Do not attempt to use a 3 8 cm CD Single disc in this unit either with or without an adaptor as damage to the player and or disc may occur Such damage is not covered by t...

Page 28: ...Noise Ratio 1 kHz 50dB Image Rejection 60dB Frequency Response 50Hz 2 kHz 3dB Monitor Screen Size 7 0 Measured diagonally 16 9 Widescreen 6 06 154 1mm W X 3 42 87mm H Screen Type TFT Liquid Crystal D...

Page 29: ...tenance section of your Installation and Operation Manual for additional information regarding the proper use of your product Limitations THE EXTENT OF THE COMPANY S LIABILITY UNDER THIS WARRANTY IS L...

Page 30: ...Audiovox Electronics Corporation Hauppauge NY 11788 Technical Assistance 1 800 323 4815 www jensen com 2007 Audiovox Ver 111307 Printed in China...

Reviews: