background image


 E-5

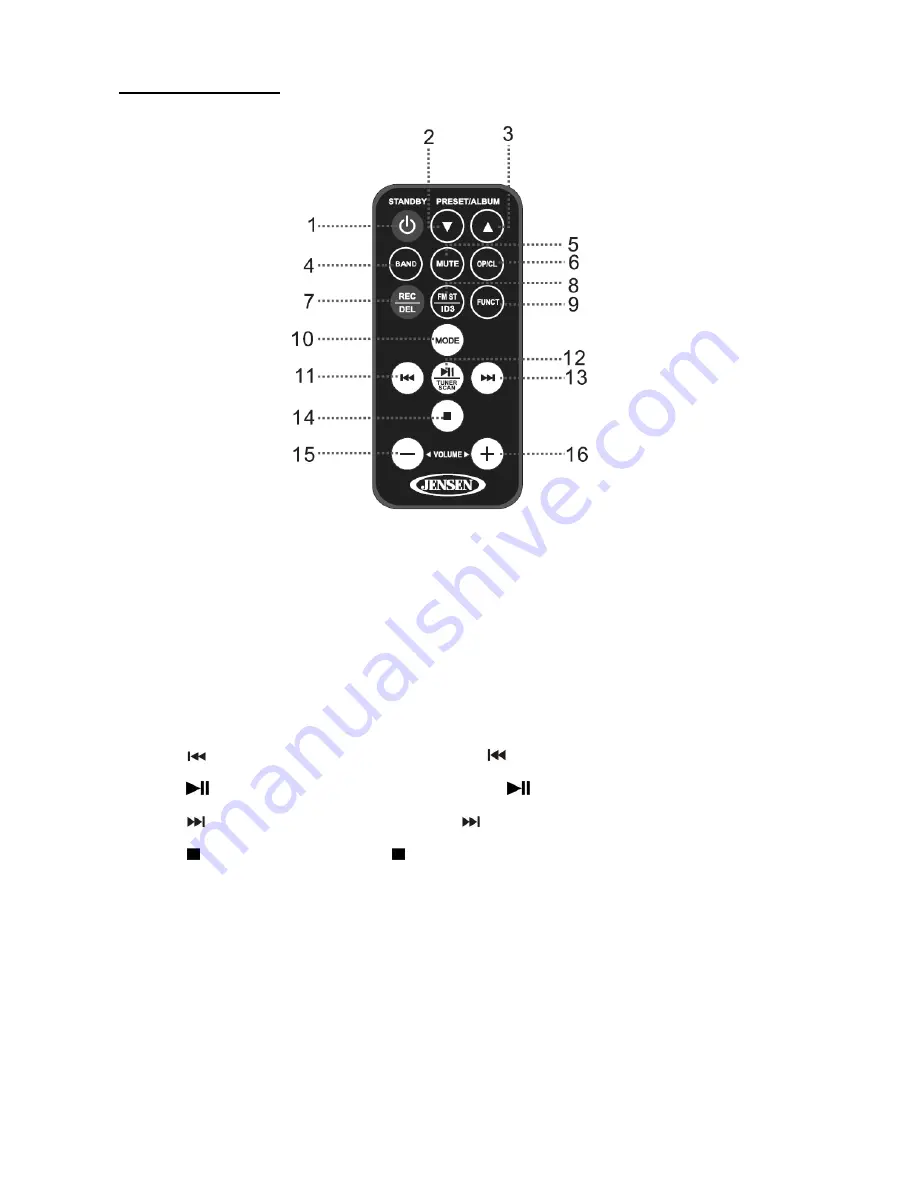
REMOTE CONTROL                                                                                                                                             


1 STANDBY 

BUTTON: 

Switches between standby mode and power on mode.


2 PRESET/ALBUM 

:

 Same function as “

ALBUM / PRESET 

” button on the unit.


3 PRESET/ALBUM 

:

 Same function as “

ALBUM / PRESET 

” button on the unit. 

4 BAND 

BUTTON:

 Same function as “

BAND

” button on the unit. 

5 MUTE 

BUTTON

: Mutes audio playback. 

6 OP/CL 

BUTTON

: Opens and closes the CD tray. 

7 REC/DEL 

BUTTON: 

Same function as “

REC/DEL

” button on the unit.


8 FM 

ST./ID3 

BUTTON

: Select between FM stereo and mono in RADIO MODE. Turns ID3 display 

ON/OFF during MP3 playback.


9 FUNCT 

BUTTON

: Same function as “

FUNCTION

” button on the unit


10 MODE

: Same function as “

MODE

” button on the unit. 

11 

 BUTTON:

 Same function as “

SKIP DOWN 

” button on the unit. Also used for searching 

radio stations when in TUNER mode. 

12 

  / TUNER SCAN BUTTON:

 Same function as “


PLAY/PAUSE

” & “

TUNER SCAN

” 

button on the unit. 

13 

 BUTTON: 

Same function as “

SKIP UP 

” button on the unit. Also used for searching 

radio stations when in TUNER mode. 

14 

 BUTTON: 

Same function as “  

STOP

” button on the unit. 

15  VOLUME - BUTTON: 

Decreases the volume level. 

16   BUTTON: 

Increase the volume level. 


Summary of Contents for JTA-575

Page 1: ...D STEREO TURNTABLE MP3 CD SYSTEM WITH CASSETTE AND AM FM STEREO RADIO MODEL JTA 575 USER MANUAL PLEASE READ THIS USER MANUAL COMPLETELY BEFORE OPERATING THIS UNIT AND RETAIN THIS BOOKLET FOR FUTURE REFERENCE ...

Page 2: ...nly with a cart stand tripod bracket or table recommended by the manufacturer or sold with the product When a cart is used use caution when moving the cart apparatus combination to avoid injury from tip over 12 Unplug this apparatus during lightning storms or when unused for a long period of time 13 Refer all servicing to qualified service personnel Servicing is required when the apparatus has bee...

Page 3: ...es should be placed on the product 26 The use of apparatus in moderate climates 27 Attention should be drawn to the environmental aspects of battery disposal SAVE THESE INSTRUCTIONS COMPLIANCE WITH FCC REGULATIONS This device complies with Part 15 of the FCC Rules Operation is subject to the following two conditions 1 This device may not cause harmful interference and 2 This device must accept any...

Page 4: ... loud and clear without annoying blaring or distortion and most importantly without affecting your sensitive hearing Sound can be deceiving Over time your hearing comfort level adapts to higher volumes of sound So what sounds normal can actually be loud and harmful to your hearing Guard against this by setting your equipment at a safe level BEFORE your hearing adapts To establish a safe level Star...

Page 5: ... BUTTON 20 CASSETTE STOP EJECT BUTTON 21 CASSETTE PAUSE BUTTON 22 CD TRAY 23 REC DEL BUTTON RECORD DELETE 24 TUNER SCAN PLAY PAUSE 25 STOP 26 TUNING SKIP DOWN 27 TUNING SKIP UP 28 ALBUM PRESET 29 ALBUM PRESET 30 CD OPEN CLOSE BUTTON 31 MAIN CABINET 32 FM WIRE ANTENNA 33 LINE OUT R JACK 34 LINE OUT L JACK 35 EXTERNAL POWER ADAPTOR JACK 36 SPEAKER OUT R JACK 37 SPEAKER OUT L JACK 38 45 RPM ADAPTOR 3...

Page 6: ...etween FM stereo and mono in RADIO MODE Turns ID3 display ON OFF during MP3 playback 9 FUNCT BUTTON Same function as FUNCTION button on the unit 10 MODE Same function as MODE button on the unit 11 BUTTON Same function as SKIP DOWN button on the unit Also used for searching radio stations when in TUNER mode 12 TUNER SCAN BUTTON Same function as PLAY PAUSE TUNER SCAN button on the unit 13 BUTTON Sam...

Page 7: ...is installed correctly The remote will not work if the battery is installed with the wrong polarity CAUTION 1 Danger of explosion if the battery is replaced incorrectly 2 Replace only with the same or equivalent type battery 3 Insert the battery holder back into the battery slot NOTE Only use a well known brand of battery to ensure the longest life and best performance GETTING STARTED Battery Prec...

Page 8: ...ving weak stereo stations The ST icon will light on the display to when receiving an FM stereo broadcast HINTS FOR BETTER RECEPTION 1 AM the receiver has a built in am bar antenna If AM reception is weak slightly rotating or re positioning the unit will usually improve the AM reception 2 FM the receiver has an FM wire antenna located on the back of the unit This wire should be totally unraveled an...

Page 9: ...will also show on the display 4 Move the TONE ARM over the record and lower it onto the section of the record you want to record 5 If you have a USB flash drive and an SD card inserted when recording from PHONO pressing the SKIP UP or SKIP DOWN button allows you to select what memory storage device you want to record to USB or SD Press the REC button again to confirm the memory storage device and ...

Page 10: ...Push on the cassette door to close it 3 Press the PLAY BUTTON to start playback Adjust the volume control to obtain the desired sound level 4 Use PAUSE BUTTON to pause playback press it again to resume the playback 5 Press the STOP EJECT BUTTON to stop the tape playback CASSETTE TAPE RECORDING 1 Tap the FUNCTION BUTTON repeatedly to select the source you want to record from PHONO CD AUX TUNER USB ...

Page 11: ...mode REPEAT ONCE REPEAT ALBUM REPEAT ALL RANDOM INTRODUCTION PLAYING FROM THE SD CARD SLOT 1 Tap the FUNCTION button repeatedly to select CARD mode CARD will show on the display 2 Insert an SD MMC card containing MP3 or WMA files into the SD card slot on the front of the unit 3 The system will start reading the SD MMC card automatically and display the total folder and number of MP3 WMA files it f...

Page 12: ...All tracks are now being copied to the other device 4 When the USB or SD icon stops flashing it means that all the files are copied and copying is completed REMARK If you press the REC button during playback in USB mode the file will copy from the USB to SD If you press the REC button during playback in SD mode the file will copy from the SD to the USB DELETING A FILE FROM THE USB SD CARD The syst...

Page 13: ...n to stop CD playback The display will show the total number of tracks Press the SKIP UP SKIP DOWN buttons to select tracks SKIP UP SKIP DOWN BUTTONS During CD playback tap the SKIP UP button once to play the next track Press and hold the SKIP UP button to search within the current track playing with high speed playback During CD playback tap the SKIP DOWN button once to play the previous track Pr...

Page 14: ... while the unit prepares for recording 4 The unit will re start to play the disk at the beginning The REC icon and either the USB or SD icon will be flashing on the display All tracks are now being copied to the storage device 5 When the USB or SD icon stops flashing it means that the folder copying is completed SPLIT TRACK FUNCTION FOR USB SD RECORDING FOR TURNTABLE CASSETTE AUX IN 1 MANUAL SPLIT...

Page 15: ...ails to play at all its bottom surface may require cleaning Before playing wipe the disc from the center outwards with a good soft cleaning cloth ABOUT CASSETTE TAPES Whenever you record on a cassette any previously recorded material is erased as the new material is recorded To prevent you from accidentally erasing material which you wish to save blank cassettes are equipped with erase prevention ...

Page 16: ...cles of the metal oxide coating that wear off the tape and accumulate on these parts and impair performance Switch off the power press the CASSETTE STOP EJECT BUTTON 5 to open the cassette door and press the CASSETTE PLAY BUTTON 8 Clean the tape heads pinch roller and capstan with a soft cloth or cotton pad dampened in isopropyl alcohol or special tape head cleaner 1 Avoid operating your unit unde...

Page 17: ...rty pick up lens Player is subject to excessive shock or vibration Clean or replace the defective CD Use a CD lens cleaning disc to clean the lens Relocate the player away from shock or vibration No sound when playing cassettes Unit is not in TAPE function mode Volume at minimum Select TAPE mode Increase volume Sound distorted Dirty tape head Clean the head Speed varies Tape old or worn Dirty roll...

Page 18: ...ilure to provide reasonable care and necessary maintenance as outlined in the user manual 3 Warranty of all SPECTRA products applies to residential use only and is void when products are used in nonresidential environment or installed outside the United States This warranty gives you specific legal rights and you may also have other rights which vary from state to state TO OBTAIN SERVICE please re...

Reviews: