4
®
CR560X
Disconnect Battery
Before you begin, always
disconnect the battery
negative terminal.
+
–
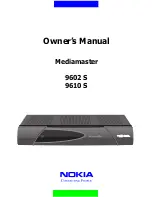
Bracket Mounted
1. Remove dashboard faceplate
2. Unscrew brackets
3. Disconnect wiring harness and
remove radio
Removal Tool
Some cars use a special removal tool
to release the radio.
1. Insert the tool(s)
2. Pull out the radio
3. Disconnect wiring harness and remove radio
Remove Old Radio
Your original car radio is installed in one of four ways, depending on the car.
MUTE B
BE LD
LOC
AM
PM
SEEK
A•PS
OPEN
EJ
®
4x25W
Auto R
everse
Jensen
Plus Tu
ner
Replacing an Aftermarket Radio
Use a screwdriver to bend tabs completely out
of the way. Pull sleeve from dashboard. The
sleeve should fit tightly and may be damaged
unless you remove it carefully.
ISO-DIN
1. Remove trim to expose DIN chassis.
2. Remove the ISO-DIN frame from the
dashboard.
3. Unscrew screws from the sides.
4. Disconnect wiring harness and remove
radio.
1
Bend
Tabs
Flat
2
Pull Sleeve Out
Caution: Edges are
sharp. Use a rag
or wear a glove.
MUTE B
BE LD
LOC
AM
PM
CH
SEEK
A•PS
OP
EN
EJ
®
4x25W
Auto R
everse
Jensen
Plus Tu
ner
1
3
2
COM
PAC
T
DIGIT
AL AU
DIO
EJECT
PWR
BASS
MO/ST
DISP
LO/DX
INT
RPT
RDM
SEL
VOL
CD
BAND
VOL
4 X 15 W
ATTS
8 X OV
ERSAM
PLING
. . .
RGCD
400
CD
5588 CR560X_EIN.p65
2/29/00, 10:46 PM
4