background image

E8 


3.  Reattach the battery door and make sure it’s securely locked in place. 


IMPORTANT: 

Be sure that the batteries are installed correctly. Wrong polarity may damage the unit 
and void the warranty. 


BATTERY NOTE AND CARE 

1.  Danger of explosion if the battery is replaced incorrectly. Replace only with the same or equivalent 

type 

2.  Do not mix old and new batteries. 
3.  Do not mix alkaline, standard (carbon-zinc) or rechargeable (nickel-cadmium) batteries. 
4.  If the unit is not to be used for an extended period of time, remove the batteries. Old or leaking 

batteries can cause damage to the unit and may void the warranty. 

5.  Do not try to recharge batteries not intended to be recharged; they can overheat and rupture. 

(Follow battery manufacturer’s directions). 

6.  Do not dispose of batteries in fire, batteries may leak or explode. 

BATTERY REPLACEMENT 

When the output sound of this unit becomes distorted or the CD player operation appears unstable, 
the batteries are weak. You need to replace all the exhausted batteries at the same time as soon as 
possible to avoid battery leakage. 


RADIO OPERATION 

 
1.  Press the POWER   button to turn the unit ON. The LCD display will light. 
2.  The unit defaults to FM radio mode when you power the unit up for the first time. If not, 

press the 

SOURCE

 button repeatedly to select FM mode.  

3. The “

FM

” indicator and frequency will show on the LCD display. 

4.  To tune the radio manually, slightly rotate the TUNING CONTROL KNOB counterclockwise 

(TUN- 

) or clockwise (TUN+ 

) until you hear a “click” sound. 

5.  Rotate the TUNING CONTROL KNOB counterclockwise (TUN- 

) to go DOWN in 

frequency, and clockwise (TUN+ 

) to go UP in frequency. 

6.  Rotate and hold the TUNING CONTROL KNOB counterclockwise to search DOWN to the 

next lower station available, or clockwise to search UP to the next available station. 

7. Adjust the 

VOLUME CONTROL

 to obtain the desired sound level. 
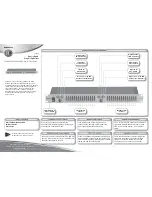
DC 5V

1.2A

AUX IN

OPE

N

OPE

N

Install batteries

REAR VIEW

SWITCHING FROM BATTERY OPERATION TO AC OPERATION

Insert the DC plug of the AC adaptor cord into the DC Jack located on the back of the unit. The 

batteries will automatically be disconnected once the plug is inserted. Plug the AC Adaptor into a 

120V AC wall outlet.


NOTE: To avoid losing any preset radio stations saved in memory, it’s important that you plug the AC 

Adaptor into a 120V AC wall outlet within 30 seconds from the time the DC plug is inserted into the 

CD-565.

Summary of Contents for CD-565

Page 1: ...Portable Stereo Bluetooth Music System with CD USER MANUAL CD 565 PLEASE READ THIS USER MANUAL COMPLETELY BEFORE OPERATING THIS UNIT AND RETAIN THIS BOOKLET FOR FUTURE REFERENCE...

Page 2: ...blades with one wider than the other A grounding type plug has two blades and a third grounding prong The wide blade or the third prong is provided for your safety If the provided plug does not fit in...

Page 3: ...in or water d If the product does not operate normally by following the operating instructions Adjust only those controls that are covered by the operating instructions as an improper adjustment of ot...

Page 4: ...t does cause harmful interference to radio or television reception which can be determined by turning the equipment off and on the user is encouraged to try to correct the interference by one or more...

Page 5: ...power on or gradually heat the room up and dry the unit before use Should any trouble occur disconnect the AC Adapter and refer servicing to qualified personnel PROTECT YOUR FURNITURE This system is...

Page 6: ...establish a safe level Start your volume control at a low setting Slowly increase the sound until you can hear it comfortably and clearly and without distortion Once you have established a comfortable...

Page 7: ...F CONTROLS PAIR PROG M M MEM REPEAT RANDOM SOURCE VOLUME TUN MAX MIN MEM PROG AUX 1ALL RAND MHz CD FM FM ST 15 16 1 2 6 7 9 12 14 18 17 3 4 5 8 Top View Rear View Front View 10 DC 5V 1 2A AUX IN OPEN...

Page 8: ...tput voltage is included and is required for operating this in AC power mode 1 Securely insert the DC plug of the adaptor cord into the DC Jack located on the back of the unit 2 Plug the AC Adaptor in...

Page 9: ...ss the POWER button to turn the unit ON The LCD display will light 2 The unit defaults to FM radio mode when you power the unit up for the first time If not press the SOURCE button repeatedly to selec...

Page 10: ...disc and or the compatibility of the CD compilation software Manufacturer is not responsible for the playback quality of CD R RW discs Do not attach a label or seal to either side of the CD R RW disc...

Page 11: ...prompt for input next program track 5 Repeat steps 2 3 to program as many as 20 tracks 6 Tap the PLAY PAUSE button to start the programmed play 7 You may tap the REPEAT button repeatedly to select rep...

Page 12: ...make a manual connection again later You may need to turn off the Bluetooth function of the paired external device first before making a new link Refer to manual of your smartphone or external Blueto...

Page 13: ...he back of the unit and also remove all the batteries from the battery compartment Wait for 3 minutes before reconnecting the power and turning the unit back on CARE AND MAINTENANCE 1 Do not subject t...

Page 14: ...he CD is self compiled the media used may not be compatible with the player Disc is dirty or scratched Dirty or defective disc Dirty pick up lens Player is subject to excessive shock or vibration Solu...

Page 15: ...purchase such as a duplicate copy of a sales receipt You must pay all shipping charges required to ship the product to SPECTRA for warranty service If the product is repaired or replaced under warran...

Page 16: ...00 to cover the cost of repair handling and return postage All out of warranty returns must be sent prepaid It is recommended that you contact SPECTRA first at 1 800 777 5331 or by email at custserv s...

Reviews: