background image

42

ENU

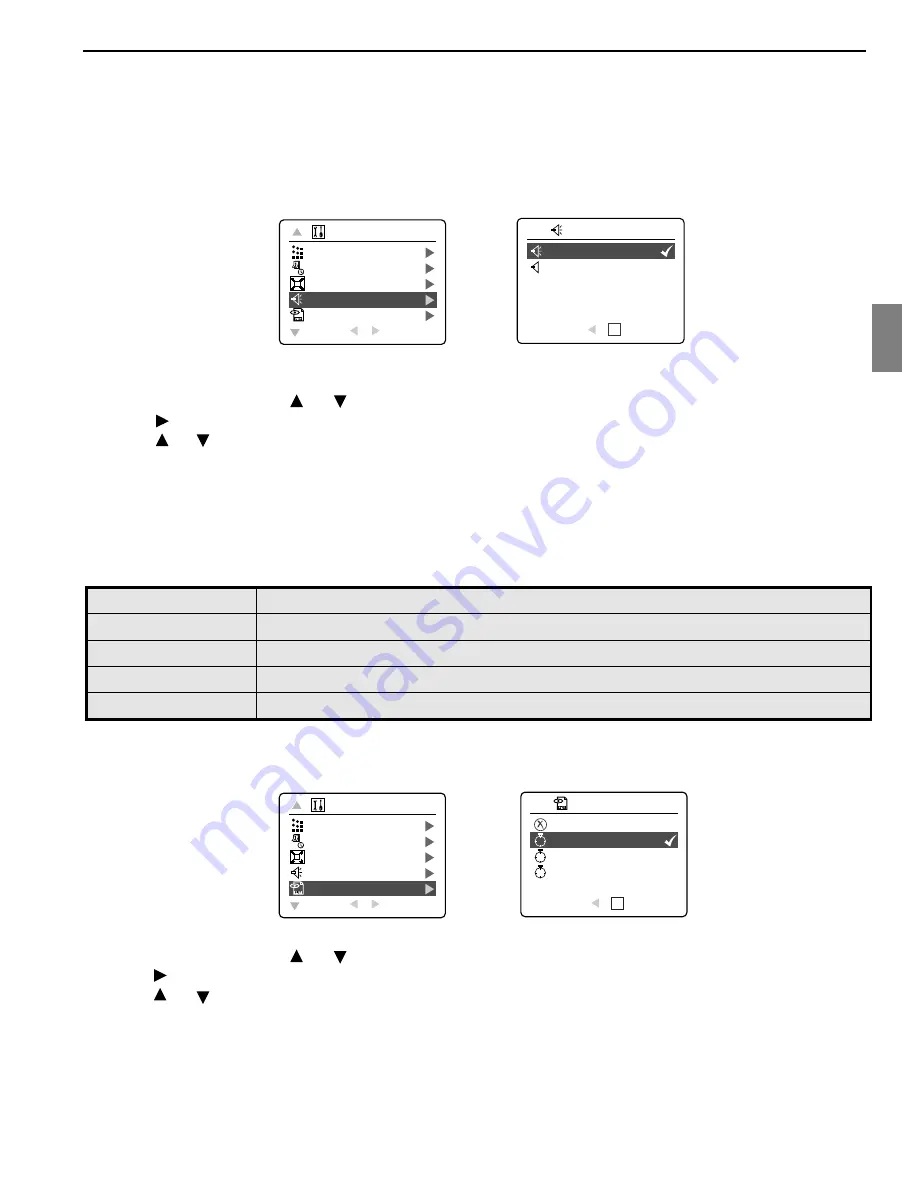
TURNING THE BEEP ON OR OFF

The camera provides an option to enable or disable the beep. By default, the beep is turned ON. The camera 
beeps in any of the following situations: 
•  When the camera is powered on.
•  After an image is captured. (For this situation, the camera will beep, regardless of the beep setting.)
•  When any button is pressed, except the Power Button, the Mode Slide Button and the Zoom Buttons.

To activate/deactivate the beep:

1.  In the Setup Menu, press      or      repeatedly until Beep is highlighted.
2.  Press      to enter its submenu.
3.  Press      or      to highlight the desired selection.
4. Press the 

OK

 button to set.

SETTING QUICK VIEW TIME INTERVAL

The camera provides programmable Quick View duration, which is the duration of time for an image to be 
displayed immediately after a picture is taken. 

Quick View 

Description

Off


No quick view, LCD continues to show live view. 

1 sec (Default)


Displays the image for 1 second then resumes to live view.

3 sec


Displays the image for 3 seconds then resumes to live view.

5 sec


Displays the image for 5 seconds then resumes to live view.

How to select Quick View time phrase:

1.  In the Setup menu, press      or      until Quick View is highlighted.
2.  Press      to enter its submenu.
3.  Press      or      to highlight the desired selection.
4. Press the 

OK

 button to set.

FORMAT
DATE/TIME SETUP
DIGITAL ZOOM

BEEP

QUICK VIEW

RETURN


 SELECT

SETUP

1

3

5

3

2

ON

OFF

RETURN


 SET

BEEP

OK

1

3

5

3

2

FORMAT
DATE/TIME SETUP
DIGITAL ZOOM
BEEP

QUICK VIEW

RETURN


 SELECT

SETUP

1

3

5

3

2

Off

1 Sec

3 Sec
5 Sec

RETURN


 SET

QUICK VIEW

OK

1

3

5

3

2

CUSTOMIZING THE CAMERA SETTINGS

Summary of Contents for JD C3.1z3

Page 1: ...User s Guide User s Guide www concord camera com...

Page 2: ...y engineered and manufactured to give you dependable operation Read this manual before operating the camera to become more familiar with it This manual has been written and formatted with depth and de...

Page 3: ...ve up Flash Button 22 OK Button 23 Wrist Strap Holder 24 Move to right Macro Button 25 Speaker 26 Move down Self Timer Button 27 Memory Card Slot 28 Battery Compartment 29 Move to left Continuous Shot...

Page 4: ...etting the Flash 12 Using the Optical Zoom 13 Using the Digital Zoom 13 Taking Pictures in Macro Mode 14 Taking Pictures in Continuous Mode 14 Taking Pictures in Self Timer Mode 15 Using the Main Menu...

Page 5: ...ements 45 Installation Requirements 45 Using the Installer Splash Screen 46 Flow Diagram for Software Installation 47 Identifying your Operating System 48 Installing the Driver and DirectX 9 Windows 9...

Page 6: ...logo will appear on the LCD for about 2 seconds If the camera is in Camera Mode or Video Clip Mode the lens cover will open and the lens will extend out automatically to the wide angle position Do not...

Page 7: ...Note 1 For each language there is a default setting on Date format and TV broadcast standard To change the TV broadcast standard refer to page 59 Language s Date Format Setting TV Broadcast Standards...

Page 8: ...y convenient for framing subjects during image video capture reviewing stored images video clips and for on screen display of the camera s current settings Press the button repeatedly to toggle betwee...

Page 9: ...ssible NEVER forcefully push the card into the camera to avoid damaging both the card and or the camera When the card is fully engaged a click can be heard 3 Close the Battery Memory Card door properl...

Page 10: ...ops blinking and the AF frame on the LCD changes to green fig 1 2 The camera will automatically determine the best focus and a rapid click can be heard 5 Hold the camera steady with both hands then fi...

Page 11: ...a rapid click can be heard Note For more information on Focus Lock refer to p 11 To change AF mode refer to p 24 5 Hold the camera steady with both hands then press and hold the Shutter button down fu...

Page 12: ...anges to green and the green AF LED stops blinking fig 1 2 3 Recompose your picture fig 1 3 Be sure to press and hold the Shutter button down halfway while recomposing the picture 4 To capture the pic...

Page 13: ...rdless of the lighting condition Use this mode to capture the mood of ambient lighting This mode is also useful for places that prohibit flash photography such as museums aquarium archeological exhibi...

Page 14: ...in the zoom bar on the LCD Allow for a short delay before the digital zoom can be activated 4 Press W to zoom out Activating Deactivating Digital Zoom 1 In Camera Mode press MENU to display the Main...

Page 15: ...s do not work in Macro Mode TAKING CONTINUOUS SHOTS This feature enables the camera to continuously capture 7 consecutive pictures with VGA 640x480 resolution when the Shutter button is pressed and he...

Page 16: ...en the image will be captured Note The Self Timer is automatically deactivated once the image is taken To deactivate the Self Timer before taking a picture press button until the Self Timer icon disap...

Page 17: ...WHITE BALANCE RETURN SELECT CAMERA MODE Q 3M 2M 1M V OFF PARTY INDOOR SNOW BEACH SUNSET RETURN SET SCENE SELECTION OK NIGHT LANDSCAPE FIREWORKS NIGHT PORTRAIT RETURN SET SCENE SELECTION OK AUTO SUNNY...

Page 18: ...is disabled in this mode Sport The camera will take 1 picture at a time in Sport Mode Continuous Shooting The camera will continuously take 7 consecutive pictures in Sport Mode with Sport Note Flash w...

Page 19: ...ress the OK button to select the Quality Mode 4 Press the MENU button to return to picture taking mode Note The default Quality is set at NORMAL SETTING IMAGE RESOLUTION Image Resolution determines th...

Page 20: ...MP VGA Quality 2048 x 1536 1600 x 1200 1024 x 768 640 x 480 Fine 42 60 140 351 Normal 84 135 316 771 Economy 146 229 536 1270 Images Stored on 128MB memory approx Resolution 3MP 2MP 1 3MP VGA Quality...

Page 21: ...de 2 Place your camera on a tripod or sturdy surface area 3 Set the camera to Self Timer mode 4 Press the shutter button Fireworks Use this mode to capture the burst of light from fireworks with a slo...

Page 22: ...ting in variable conditions Sunny For outdoors with sufficient sunlight Fluorescent For indoors with fluorescent or ambient lighting conditions Tungsten For indoors with tungsten lighting conditions T...

Page 23: ...ll make the picture darker To change the Exposure Compensation level 1 Press or repeatedly in the Main Menu until Exposure Compensation is highlighted 2 Press display the Exposure Compensation bar on...

Page 24: ...dy situations 400 400 is best for shooting in dark surroundings for example especially at night Note Higher ISO speeds increase image noise To take clean images use as low an ISO speed as possible TO...

Page 25: ...The camera provides two AF modes to perform the Auto Focus function AF Mode Description Spot In this mode the camera uses the center zone of the subject to perform auto focusing Use this mode when yo...

Page 26: ...recording OR 2 The camera will stop recording only after the memory is full Video Clip Information Resolution QVGA 320x240 or QQVGA 160x120 Best for e mail Frame rate 20fps File Format AVI Motion Pict...

Page 27: ...y for 7 seconds faster for the remaining 3 seconds then starts recording 4 Press the Shutter button again to stop recording Otherwise the camera will continue to record until the memory limit is reach...

Page 28: ...ts refer to p 21 For more information about Exposure Compensation refer to p 22 For more information about Metering differences refer to p 24 SETTING VIDEO CLIP RESOLUTION Note 160x120 resolution is i...

Page 29: ...eview Mode 2 Press or repeatedly to scroll through each file The file type and frame counter will be displayed on the LCD File Indication File Type JPEG Still Picture AVI Video Clip 3 When a Video Cli...

Page 30: ...iewing a stored still picture press the T button for different magnifications 3 Press or to navigate around the picture When the picture can pan no farther in one direction the directional arrow will...

Page 31: ...iew the picture or video clip in full screen Or press MENU button to return to the previous screen USING THE DELETE BUTTON TO DELETE YOUR FILES You can delete your files in Quick View Thumbnail or in...

Page 32: ...l Are you sure 2 Press or to highlight No or Yes 3 Press the OK button to select If No is selected no change will be made and the camera will return to the Review Mode If Yes is selected all the files...

Page 33: ...ake a selection All selections will be marked by a red check mark 8 To exit the menu press 9 To exit the menu at any time press the MENU button OK Are You Sure No Yes SELECT 0012 0012 DELETE FILE THUM...

Page 34: ...D return to the Thumbnail View Mode Deleting All Files 1 In Review Mode press MENU to enter Review Menu 2 Press or to highlight Delete File 3 Press to enter its submenu 4 Press or to highlight Delete...

Page 35: ...the display interval refer to the instructions below Video clips Only the first frame of the video clip will be shown 5 Press or once to speed up or slow down the Slide Show 6 Press or to skip to the...

Page 36: ...elect Yes or No If Yes is selected the camera will play the Slide Show repeatedly after you started playing a Slide Show 7 Press OK to select 8 Press to return to the previous menu Or press MENU to ex...

Page 37: ...90 degrees clockwise CW or counter clockwise CCW the newly rotated images can then be saved and replace the originally stored images 1 In Review Mode press or repeatedly to select the desired image to...

Page 38: ...E TV OPTION LANGUAGE OPTION RESTORE DEFAULT LCD BRIGHTNESS RETURN SELECT SETUP FORMAT DATE TIME SETUP DIGITAL ZOOM BEEP QUICK VIEW RETURN SELECT SETUP NTSC PAL RETURN SET TV OPTION OK N P T 2 MIN 3 MI...

Page 39: ...AF ASSIST LIGHT CAMERA INFO RETURN SELECT SETUP SETUP RETURN SELECT CAMERA MODE AUTO OFF AF ASSIST LIGHT 1 3 5 To use the Setup menu 1 Turn the camera on 2 Set the mode switch to Camera Mode or Review...

Page 40: ...ate Time format format Digital Zoom Yes Activates or deactivates the digital zoom No Beep On Off Activates or deactivates the beep Quick View Off 1 sec 3 sec 5 sec Sets Quick View Time interval AF Ass...

Page 41: ...er the Date Time is set press the OK button to quit Date Time setting SETTING THE LCD BRIGHTNESS To set the LCD Brightness 1 In the Setup Menu press or repeatedly until LCD Brightness is highlighted 2...

Page 42: ...selected no change will be made and the LCD will return to the previous screen If Yes is selected the LCD shows Formatting will erase all data Continue This will delete all files 5 Press or to highli...

Page 43: ...ogrammable Quick View duration which is the duration of time for an image to be displayed immediately after a picture is taken Quick View Description Off No quick view LCD continues to show live view...

Page 44: ...ra will turn on AF assist light if it is needed Off The camera will not turn on the AF assist light even if the subject is in a low light condition How to change AF assist light setting 1 In the Setup...

Page 45: ...tory default setting The LCD will show Restoring and then return to setup page The Default settings will be restored The table below lists the default settings OPTION DEFAULT STATUS Camera Mode Single...

Page 46: ...x 600 display with 16 bit color 1024 x 768 with 24 bit color or better is recommended USB Port 4x CD ROM Drive Macintosh Mac OS 9 0 9 1 9 2 and X 10 1 or later Power PC based 32MB of RAM 640 x 480 di...

Page 47: ...amera Drivers The USB Mass Storage camera drivers enable the camera to become an external drive on your computer Microsoft DirectX 9 DirectX 9 enables the movie playback applications on your computer...

Page 48: ...rectX 9 p 51 and DirectX 9 p 49 Installing ArcSoft PhotoImpression 2000 p 52 Installing Adobe Acrobat Reader 5 if needed p 54 Connecting the camera to the computer p 56 Downloading pictures and video...

Page 49: ...ion 4 Press OK to close the window For Windows 98 98SE Me 2000 if the My Computer icon is not on your desktop click Start Settings Control Panel to display the Control Panel window fig 1 2 Double clic...

Page 50: ...tically within 30 seconds after the CD ROM has been inserted click on My Computer either on the Desktop or in the Start Menu and locate the CD ROM Drive Double click on the CD ROM Drive icon for insta...

Page 51: ...10 Install progress bar Step 11 The next screen will begin the DirectX setup Select I accept the agreement then click Next Step 12 Click Next Step 13 Click Finish Your computer will automatically res...

Page 52: ...t automatically within 30 seconds after the CD ROM has been inserted click on My Computer either on the Desktop or in the Start Menu and locate the CD ROM Drive Double click on the CD ROM Drive icon f...

Page 53: ...D ROM into your computer s CD ROM Drive NOTE If the installer does not start automatically within 30 seconds after the CD ROM has been inserted click on My Computer either on the Desktop or in the Sta...

Page 54: ...ep 10 Make sure the two applications are checked and then click Next Step 11 Click Next Step 12 The screen will show the status of the installation Step 13 Click Finish Win98 will request for restart...

Page 55: ...lied CD ROM into your computer s CD ROM Drive NOTE If the installer does not start automatically within 30 seconds after the CD ROM has been inserted click on My Computer either on the Desktop or in t...

Page 56: ...omatically OR You may change the default folder by clicking Browse and selecting a different folder in your computer Click Next Step 10 Installation progress Step 11 Select Yes to restart the computer...

Page 57: ...ge 51 Downloading files from the camera Insert the memory card Caution Do not attempt to open the battery memory door to insert or remove the memory and or batteries when the camera is connected to th...

Page 58: ...ve by clicking on it The selected image will be highlighted by a border To choose all pictures click on Select All 7 Click on Get Photos The pictures will then be added to your album at the bottom of...

Page 59: ...era USB Mass Storage Device 3 Click OK in the Safe to Remove Hardware prompt 4 Unplug the Mini USB from the camera fig 1 2 Macintosh 1 Drag the JD C 3 1z3 removable drive icon on the desktop to the Tr...

Page 60: ...evision 3 Set the television to video mode according to the instructions in the owner s manual This is usually channel 3 4 or AV 4 Connect the other end of the cable into the VIDEO port located in the...

Page 61: ...th another that has free memory space 3 Transfer the photos video clips onto your computer Follow one of the below methods 1 Delete unwanted files 2 Insert an SD card or replace the SD card with a new...

Page 62: ...Try different ways to warm the batteries for instance place them in your pocket or warm them with your hands before re trying operation Press the reset button on the back of the camera with a pointed...

Page 63: ...ith the computer and printer Move the subject further away from the camera Change the camera setting to Auto Flash See p 12 Decrease exposure compensation See p 22 Move the subject closer to the camer...

Page 64: ...ED besides the optical viewfinder will remain ON and the Focus Mark at the center of display will be green then press the Shutter Button fully to capture the picture p 11 Use the Marco mode only for s...

Page 65: ...before taking pictures Remove the SD card from the card slot and slide the lock switch to off Format the inserted SD card before using it to take pictures Clean the Viewfinder with a soft cloth or cot...

Page 66: ...D for protection purposes during shipment has been removed Turn the LCD on by pressing Replace the batteries Set the camera to review mode The LCD turns off when the camera is connected to a televisio...

Page 67: ...the card P 41 Insert a card into the card slot See p 8 Take out the card and unlock Recharge the batteries to maximum capacity confirm the needed duration of re charge time Fully charge discharge the...

Page 68: ...us If you have questions concerning the operation of the camera or software installation you can speak to or e mail a customer service representative Please have the following information available GE...

Page 69: ...y Fine 4 5 1 Normal 11 1 Economy 17 1 Sensitivity ISO setting Auto 100 200 400 user selectable Capture Mode Single Shot Sport Continuous Shot Sport Continuous Shot Exposure Auto Auto Exposure metering...

Page 70: ...x 1200 1024 x 768 640 x 480 Fine 4 5 1 9 14 33 82 Normal 11 1 19 31 74 181 Economy 17 1 34 53 125 297 Images Stored on 32MB memory approx Image Quality Image Size 3MP 2MP 1 3MP VGA 2048 x 1536 1600 x...

Page 71: ...luded are Spanish Italian German English French Dutch Simplified Chinese Japanese and Portuguese Mode Selection Slide Switch for Camera Review Video Slide Show Yes AF Assist Light Yes Speaker Yes Trip...

Page 72: ...deposit itself on the battery contacts in the camera and or on the batteries follow steps below to clean the battery contacts to ensure proper electrical operation 1 Wet the tip of a cotton bud swab w...

Page 73: ...use for a long period Do not leave this camera in places subject to extremely high temperatures such as in a sealed vehicle under direct sunlight or in other places with extreme variances in temperat...

Page 74: ...nd video clips cannot be taken or deleted when the write protect switch is on When using a large capacity card writing reading and deleting may take some time Do not store the card in places with high...

Page 75: ...cations However there is no guarantee that interference will not occur in a particular installation If this equipment does cause harmful interference to radio or television reception which can be dete...

Reviews: