background image

18

USER MANUAL

JEFMIG151-A 

151A MIG WELDER - 230V 50Hz 

www.jeffersontools.com

WARNING: 

Be certain to shut off the welder, disconnect it from power, and discharge the torch to ground before 
adjusting, cleaning, or repairing the unit. Electrical repairs should only be made by a trained technician.

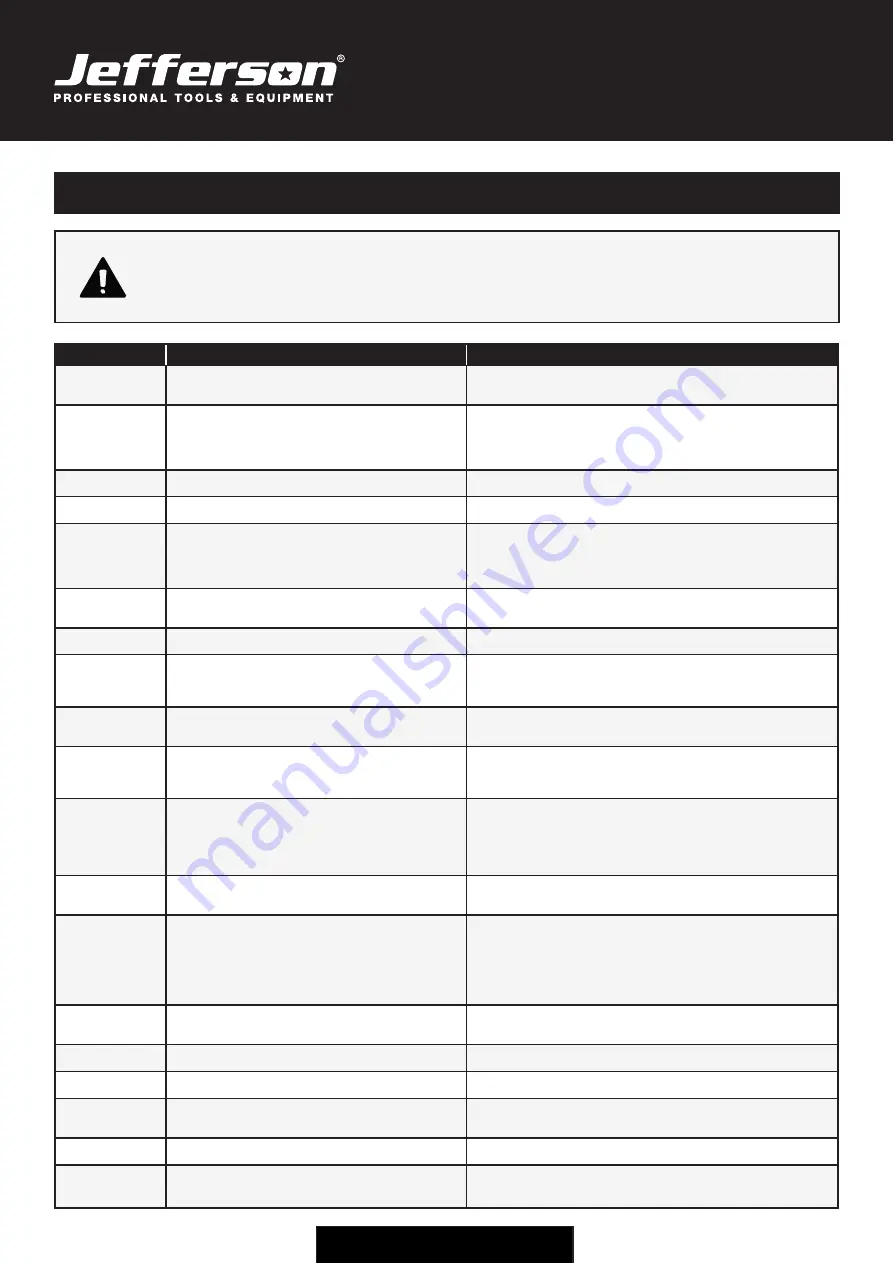
Symptom

Possible Cause

Corrective Action

No output

1. Duty cycle exceeded
2. Poor work clamp connection
3. Blown breaker or fuse

1. Allow welder to cool until lamp goes out
2. Be sure all connections are secure, and attaching surface is clean
3. Reduce circuit load, reset breaker or replace fuse

Wire tangles at  
drive roller

1. Wrong size contact tip
2. Torch liner clogged or damaged
3. Contact tip clogged or damaged
4. Drive roller worn
5. Not enough tension

1. Use proper size contact tip
2. Clean or replace wire liner
3. Clean or replace contact tip
4. Replace drive roller
5. Tighten tension knob

Gun nozzle arcs to 
work surface

1. Slag inside gun nozzle
2. Insulation ring melted or expired

1. Clean slag from gun nozzle
2. Replace nozzle

Work clamp and/or 
cable gets hot

1. Poor contact
2. Using an extension cord with excessive length

1. Be sure all connections are secure, and welding surface is clean
2. Never use an extension cord longer than 20ft

Wire does not feed

1. Wire jammed
2. Out of wire
3. Not enough tension
4. Wire liner worn
5. Contact tip clogged

1. Reload wire
2. Replace wire spool
3. Tighten tension knob if wire is slipping
4. Replace liner
5. Replace contact tip

Weld pops and 
sputters

1. Wire speed setting
2. Contact tip size too large
3. Drive roller slipping

1. Tune in correct setting
2. Replace contact tip
3. Increase tension

Weld current 
interrupted

1. Overheating protection activated due to overload

1. Protection automatically resets when transformer has cooled 
(approximately 15 minutes)

No weld current

1. Rectifier blown
2. Bad connection between clamp and workpiece
3. Break in earth lead
4. Break in torch lead

1. Replace rectifier
2. Clean or grind contact surface and weld area
3. Repair or replace earth lead
4. Repair or replace torch lead

Feed motor  
not working

1. Gear damaged or worn
2. Motor defective
3. PCB fault

1. Replace gears
2. Replace motor (contact service agent)
3. Replace PCB

Wire does not feed. 
Feed roller rotates

1. Pressure roller improperly adjusted
2. Dirt, copper, dust, etc. have collected in torch liner
3. Gas cup (nozzle) or tip defective
4. Deformed wire

1. Adjust tension
2. Clean the liner from the machine forward using compressed air
3. Replace gas cup (nozzle) and/or tip. Check roller tension (Sec 6)
4. Adjust roller tension

Wire feeds unevenly

1. Dirt etc. in liner
2. Gas cup (nozzle) or tip defective
3. Gas cup (nozzle) spattered
4. Feed roller groove clogged
5. Feed roller groove deformed
6. Pressure roller tension incorrect

1. Clean the liner from the machine forward using compressed air
2. Replace gas cup (nozzle) and/or tip
3. Clean or replace gas cup (nozzle)
4. Clean feed roller
5. Replace feed roller
6. Adjust tension

Unstable arc

1. Incorrect settings
2. Impurities in weld area
3. Worn or defective gas cup (nozzle)

1. Check settings
2. Clean and/or grind workpiece
3. Replace gas cup (nozzle)

Porous weld

1. No gas
2. Gas cup clogged
3. Draught blowing away shielding gas
4. Rusty/dirty joints
5. Torch too far from, or at wrong angle to, workpiece
6. Gas leak
7. Faulty electrovalve

1. Open gas cylinder, regulate gas flow
2. Clean or replace gas cup (nozzle)
3. Screen off welding site or increase gas flow
4. Clean and/or grind workpiece
5. Gas cup to workpiece should be 8-10mm. Torch angle approx 75°
6. Check hoses, connections and torch assembly. Press gas cup into position
7. Clean out or replace

Electrode sticking 
in gas cup (nozzle)

1. Worn or defective gas cup (nozzle)
2. Wire deformed
3. Wire speed too slow

1. Replace gas cup (nozzle)
2. Check roller tension
3. Increase wire speed

Irregular  
weld head

1. Torch incorrectly held
2. Wire weaving in weld pool

1. Use correct torch angle
2. Check roller tension and adjust

Weld bead too 
narrow and raised

1. Weld current too low
2. Weld speed too fast

1. Increase power and wire speed
2. Move torch more slowly and weave a little more

Weld bead too wide

1. Weld current too high
2. Weld speed too slow
3. Arc too long

1. Increase power and wire speed
2. Move torch more quickly and weave a little less
3. Bring torch closer to workpiece

Poor penetration

1. Weld current too low
2. Arc too long

1. Increase current and wire speed
2. Bring torch closer to workpiece

Excessive 
penetration

1. Weld current too high
2. Weld speed too slow
3. Incorrect distance of torch to workpiece

1. Decrease current and wire speed
2. Move torch faster
3. Torch distance should be 8-10mm

15. Troubleshooting

Summary of Contents for JEFMIG151-A

Page 1: ...User Manual v 1 1 JEFMIG151 A ...

Page 2: ......

Page 3: ...y instructions contained in this manual you will help to ensure operator safety and extend the potential lifespan of the equipment All photographs and drawing in this manual are supplied by Jefferson Tools to help illustrate the operation of the product whilst every effort has been made to ensure accuracy of information contained in this manual our policy of continuous improvement determines the r...

Page 4: ... must check all electrical equipment and appliances to ensure they are safe before using You must inspect power supply leads plugs and all electrical connections for wear and damage You must ensure the risk of electric shock is minimised by the installation of appropriate safety devices An RCCB Residual Current Circuit Breaker should be incorporated in the main distribution board We also recommend...

Page 5: ...able extension reel is used it should be fully unwound before connection A cable reel with an RCD fitted is recommended since any product which is plugged into the cable reel will be protected The section of the cable on the cable reel is important and should be at least 1 5mm but to be absolutely sure that the capacity of the cable is suitable for this product and for others that may be used in t...

Page 6: ...Any persons working within the area must wear a protective head shield and gloves Operators must receive adequate training before using the welder Stand correctly keeping a good footing and balance ensure the floor is not slippery and wear non slip shoes DO NOT operate the welder if it or the cables are damaged and DO NOT attempt to fit any unapproved torches or other components to the welder DO N...

Page 7: ...d through the two protruding brackets 7 until the first assembled wheel is up against the side of the tray 4 1 4 Slide the other wheel 8 onto the other end of the axle 10 and secure it by attaching a circlip 9 to the end of the axle 4 2 Assembly of front foot See fig 2 4 2 1 Place the foot 5 onto the underside of the tray 6 ensuring that the three holes on the foot align with the holes in the tray...

Page 8: ...etting combinations of the two switches according to the metal thickness 6 3 Wire speed control knob Used to control the wire speed turn clockwise to increase the wire speed or counter clockwise to decrease the wire speed The numbers 0 10 around the knob show the wire feed speed The rated wire feed speed for this equipment is 1 8m min 11 4m min 6 4 Overload light If you are welding with a large cu...

Page 9: ...ith a continuous flow of welding wire 4 Symbol for Single phase AC supply 5 Rating of internal protection provided by casing 6 Output U0 Rated minimum and maximum no load voltage I2 U2 Current and corresponding voltage X Welding ratio based on a 10 minute cycle 20 indicates 2 minutes welding and 8 minutes rest 100 would indicate continuous welding 7 Mains Supply U1 Rated supply voltage and frequen...

Page 10: ...the spool do not allow wire to uncoil and straighten 40 50mm of wire and gently push through the flexible plastic guide and through the 0 9mm feed roller groove and into the torch liner Refer to maintenance section 14 3 on how to reverse or change the roller for driving other wire diameters 8 1 7 Referring to fig 6 move the pressure roller moulding back round onto the grooved drive wheel and swing...

Page 11: ...form the wire When you have completed welding allow the welder to cool before storing in a safe dry place Note Damaged torches and cables are not covered under warranty 9 1 Thermal overload light see fig 9 If the duty cycle is exceeded as a result of welding too long with a high current the yellow overload light will illuminate and the welder will turn off When the welder has cooled down approx 5 ...

Page 12: ...e that the welder is disconnected from the mains power supply and open the side panel and check that the polarity is correctly set up for gas operation The earth clamp wire must be connected to the NEGATIVE terminal and the power torch lead must be connected to the POSITIVE terminal as shown in fig 11 11 2 Check wire feed roller If necessary change and or turn the wire feed roller See maintenance ...

Page 13: ... on a flow rate of 2 litres per minute Actual duration will be dependant upon various job conditions including the operator s welding technique All times are therefore approximate 11 9 Mig Mag gas welding principles Welding wire is automatically fed through an insulated liner to the tip of the torch The torch consists of a switch liner gas hose and control cable The switch activates the wire feed ...

Page 14: ...s switched OFF and the nozzle has been allowed to cool off Never connect disconnect or attempt to service the MIG torch until the machine is switched OFF and disconnected from the mains power supply Never allow the equipment cables to become wrapped around the operator or any bystanders in the working environment 12 Welding Guidelines IMPORTANT These instructions are not intended to teach you how ...

Page 15: ... the OFF position and then plug the power cable into the electrical outlet Step 4 While holding the torch with the wire and tip clearly out of the way of any grounded objects turn the power switch to ON position Step 5 Position yourself in the area to be welded and then place the face shield over your eyes Step 6 Press and hold the torch button and stroke the area to be welded with the electrode w...

Page 16: ...n the drive spindle See fig 16 The groove size you require should now be visible on the face of the roller Push the roller retainer back onto the drive spindle with the opening facing right Ensure that the flanges at the base of the retainer seat fully into the circular recess in the main moulding and then rotate the retainer through 90 to lock it in place 14 4 Contact tip to remove tip follow ste...

Page 17: ...moulding and arrange the inner connections within the moulding The gas pipe and wire liner will rest into notches on the inner ribs of the moulding The two thin switch wires should be to the left of the gas pipe and the larger black control cable should be to the right of the wire liner 14 6 9 Hook the upper moulding 1 onto the lower moulding 4 as shown in fig 18 7 Close the upper moulding down on...

Page 18: ...eed Feed roller rotates 1 Pressure roller improperly adjusted 2 Dirt copper dust etc have collected in torch liner 3 Gas cup nozzle or tip defective 4 Deformed wire 1 Adjust tension 2 Clean the liner from the machine forward using compressed air 3 Replace gas cup nozzle and or tip Check roller tension Sec 6 4 Adjust roller tension Wire feeds unevenly 1 Dirt etc in liner 2 Gas cup nozzle or tip def...

Page 19: ...ifier Bracket 28 Plastic Wheel 8 Clamp 29 Axle 9 Axle 30 Temperature Control 10 Wire Feed Unit 31 Control Circuit Board Bracket 11 Wire Feed Roller 32 Control Circuit Board 12 Side Panel A 33 Potentiometer 13 Power Cord 34 Knob 14 Earth Cable with Clamp 35 Nut M6 15 Welding Torch 36 Spring Washer 16 Cover 37 Washer 17 Wire Speed Knob 38 Insulating Washer 18 Switch 39 Screw M6 x 35 19 Overload Indi...

Page 20: ...de proof of purchase should a warranty claim be necessary Warranty Repair Should Jefferson confirm the existence of any defect covered by this warranty the defect will be corrected by repair or replacement at an authorized Jefferson dealer or repair centre Packaging Freight Costs The customer is responsible for the packaging of the equipment and making it ready for collection Jefferson will arrang...

Page 21: ...d of repair and any repairs needed are covered by the warranty policy In order to qualify for warranty cover all equipment presented must have been used serviced and maintained as instructed in the user manual Where repair is not covered by the warranty a quotation for repair labour costs and return delivery will be sent to the customer normally within 7 working days Note If the repair quotation i...

Page 22: ...irectives EN 60974 1 as amended Arc welding equipment Welding power sources Equipment Category MIG Welder Product Name Model JEFMIG151 A Notified Body TUV Product Service Ltd Signed by Stephen McIntyre Position in the company Operations Director Date 05 January 2017 This technical document is held by Jimmy Hemphill Technical file holder s address as shown below Name and address of manufacturer or ...

Page 23: ...23 USER MANUAL JEFMIG151 A 151A MIG WELDER 230V 50Hz www jeffersontools com ...

Page 24: ...r Business Park Chester United Kingdom CH4 9QR Tel 44 0 1244 646 048 Email sales jeffersontools com Before attempting to use this product please read all the safety precautions and operating instructions outlined in this manual to reduce the risk of fire electric shock or personal injury IMPORTANT SAFETY FIRST ...

Reviews: