background image


49 

Jaze Hotspot Gateway – User Guide 

9.


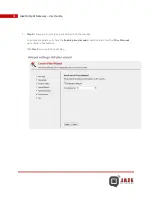
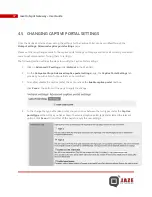
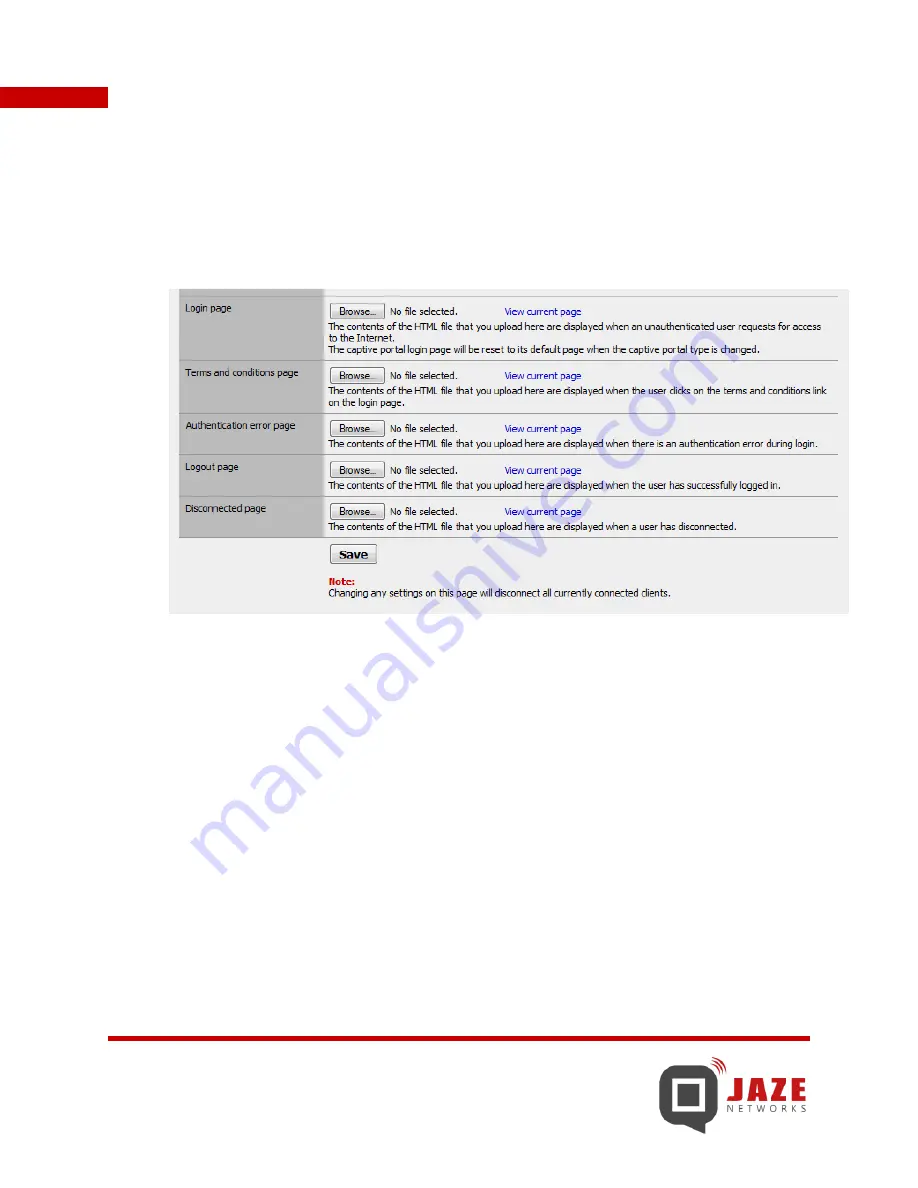
To upload your own designs for the 

Login page, Terms and Conditions page, Authentication Error 

page, Logout page and Disconnected page, 

the following steps are to be followed: 


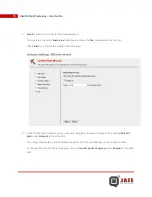
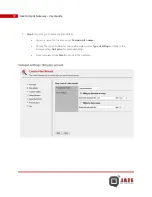
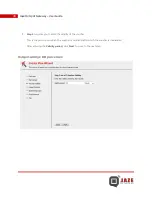
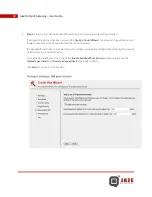
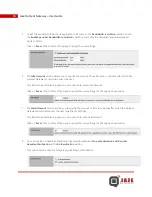
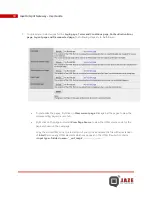
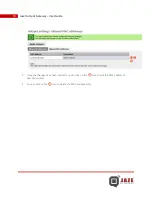
To customize the pages, first click on 

View current page 

links against the pages to view the 

corresponding page in a new tab. 


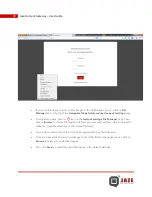
Right click on the page and select 

View Page Source

 to view the HTML source code for the 

page as shown on the next page.  

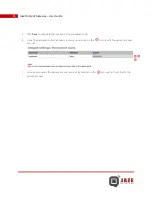
Copy the entire HTML code to a text editor of your choice and save the file with an extension 
of 

.html

. Remove any HTML elements which may appear in the HTML file which contains 

<input type='hidden' name='__csrf_magic' …………………>.


Summary of Contents for hotspot gateway

Page 1: ...JAZE HOTSPOT GATEWAY USER GUIDE ...

Page 2: ... are presented without warranty of any kind express or implied Users must take full responsibility for their application of any products In no event shall Jaze Networks or its suppliers be liable for any indirect special consequential or incidental damages including without limitation lost profits or loss or damage to data arising out of the use or inability to use this manual even if Jaze Network...

Page 3: ...2 Time settings 21 3 3 Changing administrator account settings 22 3 4 Non administrator account setup 23 Chapter 4 Hotspot Setup 24 4 1 Setting up the captive portal 24 4 2 Setting up bill plans 29 4 2 Creating prepaid plans 30 4 3 Creating postpaid plans 36 4 4 Creating free access plans 43 4 5 Changing captive portal settings 47 4 6 Editing bill plans 51 Chapter 5 Hotspot Advanced Settings 52 5 ...

Page 4: ...0 8 1 Voucher printer generated voucher customisation 80 8 2 PC generated voucher customisation 81 8 3 SMS customisation 82 Chapter 9 Device Diagnostics 83 9 1 Viewing system summary 83 9 2 Live monitoring 84 9 3 Viewing logs 86 9 4 Ping and Traceroute 88 9 5 Backing up configuration 90 9 6 Restoring configuration 91 9 7 Upgrading the firmware 92 9 8 Resetting to factory defaults 93 9 9 Rebooting ...

Page 5: ...ts Auto Configuration Guest devices can get connected to the network with any network settings stored on them even if they are incompatible with the network setup Generate instant vouchers Easily create users with the press of a single button and also send the credentials via SMS Multiple plan types Create prepaid postpaid or free access vouchers with fixed expiry date and usage limits based on ti...

Page 6: ... a COM port on a PC to access the command line interface of the device WAN interface This interface connects to your Internet connection Plug in the network cable from the modem or router provided by your ISP into this port LAN interface This interface connects to your wired or wireless network Plug in the uplink from your existing network into this port USB This is used for backing up and restori...

Page 7: ...o access the Web GUI of the device connect directly to the LAN interface with a network cable to a laptop or PC The laptop or PC will be assigned an IP address in the range through DHCP Once connected you can access the Web GUI of the device by typing in the following into a browser window http 172 16 1 1 This will prompt you with a screen asking you for a username and password to login as show be...

Page 8: ...8 Jaze Hotspot Gateway User Guide FIG 1 3 WEB GUI OF JAZE HOTSPOT GATEWAY ...

Page 9: ...RINTER Jaze Voucher Printer works with the Jaze Hotspot Gateway and allows you to print vouchers send SMS print bills and view statistics It comprises of a keypad with keys as follows 1 Bill plan mapped keys These keys can be mapped to a specific bill plans and are used to generate ...

Page 10: ...ting options on the display by scrolling up or down through lists 5 Function keys These keys perform fuctions based on soft keys displayed on the screen 6 Statistics keys These keys are used to display statistics about the number of vouchers created and the number of vouchers currently connected 7 Test key This key is used for performing tests on the SIM card by sending a test SMS or by making a t...

Page 11: ...open the screws on the back of the device and remove the back panel Inside you will find a slot for the SIM card as show below FIG 1 5 INSERTING THE SIM CARD To insert the SIM card pull the top of the SIM card slot down to release the lock Then insert the SIM card into the SIM card holder and lock it back by pushing it up Once completed put the back panel and the screws back on the device ...

Page 12: ...power adapter provided with the voucher printer is plugged in into this port 2 Debug interface This interface is used for performing software upgrades on the voucher printer 3 COM 1 This interface connects to the printer port on the Jaze Hotspot Gateway via the serial cable provided 4 COM 2 This interface is used for optionally connecting to an external printer and is disabled by default ...

Page 13: ...rface is connected to a switch which in turn connects to your wired or wireless network The COM 1 port on Voucher Printer is connected to the Printer port on the Hotspot Gateway Optionally a PC connected to a laser printer can be used for printing out vouchers and bills if required Once all the components are plugged in and powered on the device can be configured from any wired or wireless client ...

Page 14: ...e the default settings on the Jaze Hotspot Gateway Default IP address 172 16 1 1 Administrator username admin Password jaze DHCP server Enabled DHCP IP range 172 16 1 50 172 16 1 250 Hostname jaze Domain local To access the Web GUI of the device please follow the steps in 1 2 Jaze Hotspot Gateway ...

Page 15: ...k settings LAN page type in your desired IP address in the text box Choose the appropriate subnet mask you would like to use for your LAN from the dropdown box 3 Then Click on the Save button 4 You will then be prompted to reboot your device to apply the changes made 5 Click on reboot on the prompt that appears or click on Reboot system under Diagnostics 6 On the Diagnostics Reboot system page cli...

Page 16: ...ve to change the IP address on your laptop or PC to make sure it is in the same range of the newly set IP address You may also want to change the DHCP server settings on the device to make sure that the Jaze Hotspot Gateway gives IP address to its client in the new LAN IP range ...

Page 17: ...tically from the modem or router If you want to assign a Static IP to the WAN interface please follow the following steps 1 Click on WAN under Network in the Web GUI 2 On the Network settings LAN page choose Static from the Type dropdown box 3 Under the Static IP configuration type in the desired static IP address and the subnet mark from the dropdown list 4 Enter the IP address of the Gateway whi...

Page 18: ...ing steps are used to define the DHCP servers 1 Click on DNS under Network in the Web GUI 2 On the Network settings DNS page you can define three different DNS servers with DNS 1 being the DNS server with the highest priority and DNS 3 being the server with the lowest priority 3 Once the DNS servers are entered click on Save to apply your changes ...

Page 19: ...etwork in the Web GUI 2 On the Network settings DHCP server page check the checkbox against Enable DHCP server on LAN interface to enable the DHCP server 3 The Available range the entire range of IP address which can be used Under DHCP Range define the range of IP addresses which the DHCP server must allocate to the clients This range must be withing the range of IP address shown in the Available ...

Page 20: ...t section you can choose between http or https for the protocol By default http runs on port 80 and https runs on port 443 3 In order to change the port from the default port type in the desired port for the Web GUI in the Web GUI port text box 4 The Domain can be any word with or without dot separators between the words 5 Click on Save to apply the settings You will be prompted to reboot the devi...

Page 21: ...UI 2 In the System settings Time page select the time zone closest to you by selecting it from the Time zone dropdown list 3 You can specify the Time update interval in minutes for the amount of time between synchronization requests to the NTP server You can set this value to 0 to disable synchronization 4 You can specify the NTP time server from which the time is to be fetched by typing it in the...

Page 22: ... and or the password the following steps are to be followed 1 Click on User manager under System in the Web GUI 2 In the System settings Administrator account page under the Administrator account tab type in the new administrator username in the Username text box 3 To change the password for the administrator user type in the new password twice in the Password text box 4 Click on Save to apply the...

Page 23: ...inistrator account the following steps are to be followed 1 Click on User manager under System in the Web GUI 2 In the System settings Administrator account page under the User accounts tab click on the icon to add a new non administrator user 3 Type in the Username Password and Full name for the user in the respective text boxes 4 Click on Save to create the new non administrator user 5 Once the ...

Page 24: ... the Captive Portal an easy to use wizard is provided to simply setting up of the Captive Portal To following steps outline how the setting up of the captive portal through the Captive portal wizard 1 Click on Captive portal wizard under Hotspot in the Web GUI to start the wizard 2 Click Next on Step 1 to start configuring the Captive Portal 3 Step 2 of the wizard gives you a choice to choose from...

Page 25: ...login page On successful authentication the user is redirected to the original request or optionally to a differnet page The logout screen can be optionally displayed in a popup The Enable new URL redirection option enables you to specify the new URL to which the successfully authenticated user should be redirected to The Enable logout popup window option dispalys a popup window with a logout butt...

Page 26: ...ox and enter the Upload speed limit and Download speed limit separately in Kbit s Click Next to move to the next step In the above screenshot each user will be given a 2 Mbps bandwidth with 1 Mbps for upload and 1 Mbps for download since 1024 Kbit s 1 Mb s 5 Step 4 is used for uploading customized Login page Terms and Conditions page Authentication Error page Logout page and Disconnected page ...

Page 27: ...onding page in a new tab Right click on the page and select View Page Source to view the HTML source code for the page as shown on the next page Copy the entire HTML code to a text editor of your choice and save the file with an extension of html Remove any HTML elements which may appear in the HTML file which contains input type hidden name __csrf_magic ...

Page 28: ...e the image file accessible on the Hotspot Gateway You can then reference the files in the HTML pages directly by their filename Once you have made the required changes to the HTML files for the pages you can click on Browse to select your customized pages You can then click on Finish to upload the new HTML pages if specified and complete the setup of the captive portal You can view and change the...

Page 29: ...id plan are paid for in advance 2 Postpaid plan Create plans with no usage limits and billed at a predetermined rate per unit of time or data transferred Vouchers created using a postpaid plan are billed based on the total usage by a user at the end of the usage period 3 Free access plan Free access plan allows you to securely provide complimentary Internet access to your users without any billing...

Page 30: ...ANS To following steps outline the creation of a Prepaid Plan 1 Click on Bill plan wizard under Hotspot in the Web GUI to start the wizard 2 Step 1 requires you to choose the plan type Select Prepaid plan and click Next to begin the creation of a prepaid plan ...

Page 31: ...e plan under Prepaid plan name Choose the type of prepaid plan under Prepaid plan type and type in the corresponding Limit for the prepaid plan Type in the Price of the prepaid voucher in the corresponding text box and click Next to move to the next step Once completed click Next to move to the next step ...

Page 32: ... Guide 4 Step 3 requires you to enter the validity of the voucher This is the period upto which the voucher is valid and after which the voucher is invalidated After entering the Validity period click Next to move to the next step ...

Page 33: ...ill be carried forward over here if the bandwidth restriction is not enabled If a bandwidth restriction is specified here this setting overrides the settings defined during the captive portal setup if one had been setup To enable bandwidth restriction check the Enable bandwidth restriction checkbox and enter the Upload speed limit and Download speed limit separately in Kbit s Click Next to move to...

Page 34: ...r Guide 6 Step 5 allows you to provide a price discount on the voucher To enable price discount check the Enable price discount checkbox and enter the Price Discount percentage in the text box Click Next to move to the next step ...

Page 35: ... Finish to complete the creation of the bill plan 8 Once the bill plan is created you can view and bill plan and make changes to it by clicking Edit bill plan under Hotspot in the Web GUI The newly created plan is automatically mapped to the first available key on the voucher printer To change the Voucher Printer mapping click on Voucher printer keymap under Hotspot in the Web GUI ...

Page 36: ...NS To following steps outline the creation of a Postpaid Plan 1 Click on Bill plan wizard under Hotspot in the Web GUI to start the wizard 2 Step 1 requires you to choose the plan type Select Postpaid plan and click Next to begin the creation of a postpaid plan ...

Page 37: ... enter the plan details Type in a name for the plan under Postpaid plan name Choose the type of billing for the postpaid plan under Type of billing and type in the corresponding Unit price for postpaid billing Once completed click Next to move to the next step ...

Page 38: ... Guide 4 Step 3 requires you to enter the validity of the voucher This is the period upto which the voucher is valid and after which the voucher is invalidated After entering the Validity period click Next to move to the next step ...

Page 39: ... provide a discount on the usage To enable usage discount check the Enable usage discount checkbox and enter the Usage Discount percentage and the limit upto which the discount is applicable in the corresponding text boxes Click Next to move to the next step ...

Page 40: ...ill be carried forward over here if the bandwidth restriction is not enabled If a bandwidth restriction is specified here this setting overrides the settings defined during the captive portal setup if one had been setup To enable bandwidth restriction check the Enable bandwidth restriction checkbox and enter the Upload speed limit and Download speed limit separately in Kbit s Click Next to move to...

Page 41: ...r Guide 7 Step 6 allows you to provide a price discount on the voucher To enable price discount check the Enable price discount checkbox and enter the Price Discount percentage in the text box Click Next to move to the next step ...

Page 42: ... Finish to complete the creation of the bill plan 9 Once the bill plan is created you can view and bill plan and make changes to it by clicking Edit bill plan under Hotspot in the Web GUI The newly created plan is automatically mapped to the first available key on the voucher printer To change the Voucher Printer mapping click on Voucher printer keymap under Hotspot in the Web GUI ...

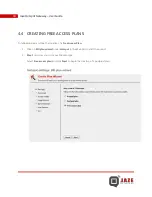
Page 43: ...S To following steps outline the creation of a Free Access Plan 1 Click on Bill plan wizard under Hotspot in the Web GUI to start the wizard 2 Step 1 requires you to choose the plan type Select Free access plan and click Next to begin the creation of a postpaid plan ...

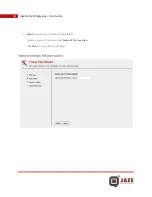
Page 44: ...44 Jaze Hotspot Gateway User Guide 3 Step 2 requires you to enter the plan details Type in a name for the plan under Name of the free plan Click Next to move to the next step ...

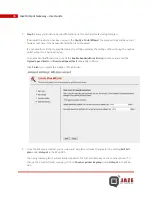
Page 45: ... Guide 4 Step 3 requires you to enter the validity of the voucher This is the period upto which the voucher is valid and after which the voucher is invalidated After entering the Validity period click Next to move to the next step ...

Page 46: ... captive portal setup if one had been setup To enable bandwidth restriction check the Enable bandwidth restriction checkbox and enter the Upload speed limit and Download speed limit separately in Kbit s Click Finish to complete the creation of the bill plan 6 Once the bill plan is created you can view and bill plan and make changes to it by clicking Edit bill plan under Hotspot in the Web GUI The ...

Page 47: ...ptive Portal settings 1 Click on Advanced CP settings under Hotspot in the Web GUI 2 On the Hotspot settings Advanced captive portal settings page the Captive Portal Settings tab provides you with a list of options that can be modified 3 To enable disable the captive portal check or uncheck the Enable captive portal text box Click Save at the bottom of the page to apply the change 4 To the change ...

Page 48: ... blank in case you do not wich to set an idle timeout Click on Save at the bottom of the page to apply the new settings if a change has been made 7 The Hard timeout section allows you to specify the amount of time in minutes after which the Hotspot Gateway should disconnect the user regardless of activity This field can be left blank in case you do not wich to set a hard timeout Click on Save at t...

Page 49: ...first click on View current page links against the pages to view the corresponding page in a new tab Right click on the page and select View Page Source to view the HTML source code for the page as shown on the next page Copy the entire HTML code to a text editor of your choice and save the file with an extension of html Remove any HTML elements which may appear in the HTML file which contains inp...

Page 50: ...ot settings File Manager page Then click on Browse to choose the required file from your computer and then click on upload to make the image file accessible on the Hotspot Gateway You can then reference the files in the HTML pages directly by their filename Once you have made the required changes to the HTML files for the pages you can click on Browse to select your customized pages Then click Sav...

Page 51: ... all the bill plans created To enable disable a bill plan check or uncheck the Enable checkbox against each of the bill plans Click Save to apply the changes made 3 Click on the icon beside the row for a bill plan to edit the bill plan This takes you to a page which allows you to edit the parameters for the bill plan 4 Click on the icon beside the row for a bill plan to delete the bill plan Clicki...

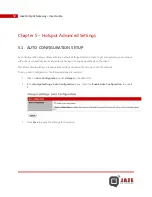
Page 52: ...tivity issues and without having to change any settings on the client This allows clients with even incompatible settings stored on them to get onto the network To setup Auto Configuration the following steps are involved 1 Click on Auto Configuration under Hotspot in the Web GUI 2 In the Hotspot settings Auto Configuration page check the Enable Auto Configuration to enable it 3 Press Save to appl...

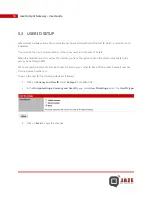
Page 53: ...bol which will be used for the vouchers and billing To setup the currency the following steps are followed 1 Click on Currency and User ID under Hotspot in the Web GUI 2 In the Hotspot settings Currency and User ID page under Currency settings enter your Currency abbreviation 3 Click on Save to apply the changes ...

Page 54: ...ed as the User ID you have the option to send the access credentials to the user s phone through SMS The room number option can also be chosen for entering any other ID like a PAN number Passport number Driving License number etc To setup the User ID the following steps are followed 1 Click on Currency and User ID under Hotspot in the Web GUI 2 In the Hotspot settings Currency and User ID page und...

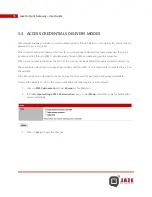
Page 55: ... number is chosen as the User ID the voucher can be delivered through a printed voucher only The voucher can be printed out using the provided voucher printer or on a laser printer connected to a PC on the network The SMS can be sent only when the Jaze Voucher Printer is used for generating the access credentials To setup the delivery mode for the access credentials the following steps are followe...

Page 56: ...en to the login page In order to define IP addresses for which the captive portal page needs to be bypassed the following steps are involved 1 Click on Captive portal bypass under Hotspot in the Web GUI 2 In the Hotspot settings Allowed IP Addresses page under the Allowed IP addresses tab click on the icon to add the IP address for which direct Internet access is needed 3 This will provide you wit...

Page 57: ...57 Jaze Hotspot Gateway User Guide 6 Once the changes have been applied you can click on the icon to edit the IP address or description later 7 You can click on the icon to delete the IP address entry ...

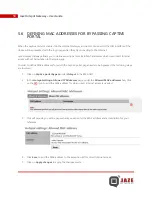
Page 58: ... to the login page In order to define MAC addresses for which the captive portal page needs to be bypassed the following steps are involved 1 Click on Captive portal bypass under Hotspot in the Web GUI 2 In the Hotspot settings Allowed IP Addresses page under the Allowed MAC addresses tab click on the icon to add the MAC address for which direct Internet access is needed 3 This will provide you wi...

Page 59: ...59 Jaze Hotspot Gateway User Guide 6 Once the changes have been applied you can click on the icon to edit the MAC address or description later 7 You can click on the icon to delete the MAC address entry ...

Page 60: ...y users who need Internet access without restrictions In order to create permanent user accounts the following steps are followed 1 Click on Permanent users under Hotspot in the Web GUI 2 In the Hotspot settings Permanent users page click on the icon to add a new permanent user 3 This will provide you with a page where you can enter the details for your new permanent user Enter your new permanent ...

Page 61: ...lete the creation of the permanent user 6 Once the permanent user has been created you can click on the icon to edit the permanent user account 7 You can also delete the permanent user account by clicking on the icon next to the entry for the permanent user ...

Page 62: ... on the top bar in the Web GUI 2 This will take you to the Hotspot settings Create user page which lists all the bill plans along with their corresponding Bill plan types 3 Click on the icon against the corresponding bill plan to create a user based on the bill plan 4 This will generate a voucher as shown on the next page The newly created voucher opens on a new tab in your brower 5 Click on the P...

Page 63: ...63 Jaze Hotspot Gateway User Guide ...

Page 64: ...room number mobile number or the serial number of the voucher depending on the User ID type chosen The following set of steps outlines how to view the vouchers and search for vouchers 1 Click on Current users under Hotspot in the Web GUI The Current users page can also be accessed by clicking on the CURRENT USERS button on the top bar in the Web GUI 2 This will take you to the Hotspot settings Cur...

Page 65: ...cess vouchers Unbilled expired vouchers This section lists all postpaid vouchers which are expired and are yet to be billed 4 The Current Users page allows you to carry out the following operations on the vouchers You can disconnect users from the Vouchers currently in use section by clicking on the icon next to the row for the entry You can delete a voucher permanently from the Hotspot Gateway by...

Page 66: ...n the Search for voucher by section and type in the appropriate search content in the corresponding text box 7 Click on the Search button to carry out the search 8 The Search results are displayed as shown below 9 You can click on the View all vouchers button to list all the vouchers again ...

Page 67: ...pot Reports page under the View reports section click on the icon to enter the Start date and the End Date for the period for which reports are to be viewed 3 Select Summary report option and click on View report button to view the summary report for the selected period as shown below 4 To view detailed Usage logs select the time period as outlined earlier and select the Usage logs option and clic...

Page 68: ...68 Jaze Hotspot Gateway User Guide 5 You can click on the Download CSV File link on the page to download the entire Usage logs in CSV format and save it permanently on your computer ...

Page 69: ... voucher printer In order to change the mapping of the bill plans to the keys on the voucher printer the following steps are followed 1 Click on Voucher printer keymap under Hotspot in the Web GUI 2 On the Hotspot settings Voucher printer keymap page select the bill plan from the drop down list against each key to map the bill plan to the corresponding key on the voucher printer 3 Click on the Sav...

Page 70: ...t out of standby mode The home screen of the Voucher Printer is displayed as shown below 2 Press any mapped key from 0 to 9 on the keypad of the Voucher Printer to generate the voucher based on the bill plan mapped to the key 3 If the User ID is chosen as mobile number you will be taken to a screen which asks you to enter the mobile number as shown below 4 Type in the mobile number by entering it ...

Page 71: ... a similar set of screens are displayed asking you to enter the room number 6 If the SMS is chosen for the Mode of delivery of the access credentials a SMS is sent to the mobile number typed in and a confirmation is displayed on the screen if the SMS has been successfully sent ...

Page 72: ...ate the bill for postpaid users 1 Click on any button on the keypad of the Voucher Printer to illuminate the backlight of the display and bring it out of standby mode The home screen of the Voucher Printer is displayed as shown below 2 Press the KEY on the Voucher Printer to search for a voucher The following screen is displayed when the KEY is presses The options displayed on this screen differ b...

Page 73: ...press the CONFIRM Key to enter it 5 If there is an entry with a unbilled voucher for the search the following screen is displayed with the result and the date and time the voucher was created as shown below Similar screens are displayed for results based on other search criteria 6 Press the CONFIRM Key to select the unbilled voucher A confirmation screen is displayed as on the next page Press the ...

Page 74: ...for it as shown below Use the navigation keys to highlight the criteria according to which the unbilled vouchers are to be listed and press the CONFIRM key 8 Once the criteria according to which the unbilled vouchers are to be listed is selected the list of all unbilled postpaid vouchers are displayed Use the navigation keys to select the unbilled voucher and press the CONFIRM key to generate the ...

Page 75: ... the following steps are involved 1 Click on any button on the keypad of the Voucher Printer to illuminate the backlight of the display and bring it out of standby mode 2 Press the M1 Key to display the number of vouchers created on the current day as shown below 3 Press the CONFIRM button to go back to the home screen 4 Press the M2 Key to display the number of users currenly logged in as shown b...

Page 76: ...button on the keypad of the Voucher Printer to illuminate the backlight of the display and bring it out of standby mode 2 Press the GREEN button on the Voucher Printer to bring up the SIM card test menu as shown below Select Send Test SMS and press the CONFIRM button 3 Enter the mobile number to which the Test SMS is to be sent and and press the CONFIRM button 4 Enter the message to be sent in the...

Page 77: ...77 Jaze Hotspot Gateway User Guide 5 A confirmation screen is displayed as shown below if the SMS has been successfully sent Press the Exit button to return back to the home screen ...

Page 78: ...utton on the Voucher Printer to bring up the SIM card test menu as shown on the next page Select Make Test Call and press the CONFIRM button 3 Enter the mobile number to which the Test Call is to be made and and press the CONFIRM button 4 The Voucher Printer will then try dialing the number and making the call to the mobile number entered Press the Exit button end the call and return back to the h...

Page 79: ...er provides you with a Help Menu listing out the functions of each of the buttons on th printer In order to access the Help Menu press on the RED button on the Voucher Printer This brings up a screen as shown below listing out the functions of each button on the Voucher Printer ...

Page 80: ...to be followed 1 Click on Voucher customisation under Hotspot in the Web GUI 2 On the Voucher customization tab select the checkboxes in the Show field column against the field names which are to be displayed Enter the Content for the field names in the corresponding text boxes 3 Click on Save to apply the changes made 4 Click on the Preview voucher link to preview the voucher after the required c...

Page 81: ...he PC generated voucher tab select the checkboxes in the Show field column against the field names which are to be displayed Enter the Content for the field names in the corresponding text boxes 3 You can also upload your logo by clicking Browse in the Content column for the Logo and selecting your desired file from your computer 4 Click on Save to apply the changes made 5 Click on the Preview vou...

Page 82: ...wed in order to customize the SMS 1 Click on SMS customisation under Hotspot in the Web GUI 2 On the Hotspot settings SMS Customisation page in the SMS Customisation section select the checkboxes in the Show field column against the fields which are to be displayed Enter the Content for the fields in the corresponding text boxes 3 Click on the Save button on the bottom of the page to apply the cha...

Page 83: ...mmary page provides System information such as the system time CPU and memory usage It also displays the status and the data transferred on the LAN and WAN interfaces since the last reboot To view the system summary click on System summary under Diagnostics This will provide you with the Diagnostics System summary page which displays information about the system WAN and LAN interfaces as shown bel...

Page 84: ...pot Gateway This allows you to monitor the bandwidth being used by the clients on the network at any point of time The following steps are involved to view the live usage graphs 1 Click on Live Monitoring under Diagnostics in the Web GUI 2 On the Diagnostics Live Monitoring page three graphs are displayed LAN traffic WAN traffic and CPU usage as shown below ...

Page 85: ... to bytes s text on top of the graph to toggle between bytes s and bits s for the unit to be used for displaying the graph 4 You can also click on the AutoScale up text to toggle between up and follow to allow the graph to automatically scale up or scale down based on the values or to remain at a constant scale ...

Page 86: ...nd DHCP The Current sessions tab lists all the currently connected clients on the network along with the IP address MAC address start time of the session and usage statistics for the session as shown below You can click on the icon to disconnect the client The Captive portal tab logs the captive portal activity and events including successful logins login failures timeouts and logout times as show...

Page 87: ...87 Jaze Hotspot Gateway User Guide You can click on the Show active and expired leases button to view expired leases also along with the active leases as shown below ...

Page 88: ...ackets to be sent out and the Count of the number of pick packets to be sent as shown below 3 Click on the Ping button to send out the ping packets 4 Upon a successful ping the Ping output is displayed as shown below In order to carry out a traceroute on the network the following steps are involved 1 Click on Tools under Diagnostics in the Web GUI 2 Click on the Traceroute tab and enter the IP add...

Page 89: ...e Hotspot Gateway User Guide the hostnames of the IP addresses on the route to be displayed 3 Click on the Traceroute button to carry out the operation 4 The Traceroute output will be displayed as shown below ...

Page 90: ...ed To backup the configuration of the device the following steps are involved 1 Click on Backup restore configuration under Diagnostics in the Web GUI 2 In the Diagnostics Backup restore configuration page under the Backup configuration section click on the Download configuration button to download the configuration of the device as a XML file 3 The browser provides a dialog box enabling you to sa...

Page 91: ...ckup restore configuration under Diagnostics in the Web GUI 2 In the Diagnostics Backup restore configuration page under the Restore configuration section click on the Browse button to select the XML configuration file from your computer 3 Once the required configuration file has been chosen click on the Restore configuration button to restore the new configuration to the device 4 The device will ...

Page 92: ...er Diagnostics in the Web GUI 2 On the Diagnostics Firmware upgrade page click on the Browse button to select the firmware image file on your computer 3 Once the required firmware image file is selected click on the Upgrade firmware button to upgrade the device to the new firmware 4 The device will reboot automatically and will run the upgraded firmware once the reboot is complete ...

Page 93: ...t Gateway to its factory default settings the following steps are followed 1 Click on Factory defaults under Diagnostics in the Web GUI 2 In the Diagnostics Factory defaults page click on the Yes button to reset the device to its factory default settings 3 The device will be rebooted automatically and once the device reboots it will be in its factory default state ...

Page 94: ...EVICE The Hotspot Gateway can be rebooted at any time by using the following steps 1 Click on Reboot system under Diagnostics in the Web GUI 2 In the Diagnostics Reboot system page click Yes to reboot the device 3 Wait for a minute for the device to reboot ...

Page 95: ...Printer port on the device 2 Connect the other end of the console cable to the COM port on your computer 3 Open a terminal emulation program such as Hyper Terminal or TeraTerm 4 Use the following settings in the terminal emulation program Parameter Value Baud Rate 9600 Data 8 bit Parity None Stop 1 bit Flow Control None 5 You will get the following prompt once you are connected to the device via t...

Page 96: ...96 Jaze Hotspot Gateway User Guide 6 Press x and hit Enter to get into the device setup menu as shown below ...

Page 97: ... Gateway the following steps are involved 1 At the Enter your option prompt enter 1 and then press Enter 2 Enter the interface name for the LAN and WAN ports or press a for auto detect and plug in the network cable for the LAN and WAN port when asked to do so 3 Press y and hit Enter to assign the interfaces to the LAN and WAN ports and reboot the device ...

Page 98: ...N interface and the DHCP server for the LAN the following steps are involved 1 At the Enter your option prompt enter 2 and then press Enter 2 Enter the LAN IP address the subnet mask enable the DHCP server and enter the DHCP range as shown below 3 Once the changes have been applied press Enter to continue ...

Page 99: ...rd for the Web GUI can be reset from the command line To reset the password for the Web GUI password the following steps are involved 1 At the Enter your option prompt enter 3 and then press Enter 2 Press y and hit Enter to reset the Web GUI password to the default which is jaze as shown below 3 Once the Web GUI password has been resetted press Enter to continue ...

Page 100: ...om the command line The following steps are involved to reset the device to its factory default settings 1 At the Enter your option prompt enter 4 and then press Enter 2 Press y and hit Enter to reset the device to its factory defaults as shown below 3 The device will reboot and will be in its factory default state once it reboots ...

Page 101: ...reboot the device from the command line interface the following steps are involved 1 At the Enter your option prompt enter 5 and then press Enter 2 Press y and hit Enter to reboot the device as shown below 3 It will take about a minute for the device to reboot ...

Page 102: ... ping a device on the network the following steps are involved 1 At the Enter your option prompt enter 6 and then press Enter 2 Enter the IP address or hostname of the device on the network to which the ping request has to be sent and press Enter The following screen shows a successful ping 3 Press Enter to continue and get back to the menu ...

Reviews: