background image

 13


Wilkinson Star Technical


General Plasma Cutting Information


 Before starting any welding or cutting activity ensure that you have suitable eye protection and      


 protective clothing. Also take the necessary steps to protect any persons within the welding area.


Notes for cutting operation 


 

Do not touch the hot workpiece with bare hands to avoid burning. 


 

It is recommended not to ignite the arc in the air if not necessary, for it will shorten the lifespan of the electrode and nozzle of the torch. 


 

It is recommended to initiate the cutting from the edge of the workpiece unless penetration is needed. 


 

Ensure spatter comes from the bottom of workpiece while cutting. If spatter comes upwards from the top of workpiece, it indicates that the 
workpiece has not been fully cut through. This could be due to not enough power or the cutting torch is moved too fast. 


 

For cutting a round or shaped piece or to meet precise cutting requirement, a stencil board or other tools are needed. 


 

It is recommended to pull the cutting torch while cutting. 


 

Keep the nozzle of the cutting torch upright over the workpiece and check if the arc is moving with the cutting line. Do not bend the cable too 
much, step on or press upon the cable to avoid restricting the air flow. The cutting torch may be burned if the air flow is too low. Keep the cutting 
cable away from sharp edges.


 

When the workpiece is nearly cut off, slow down the cutting speed and release the torch trigger to stop cutting. 


 

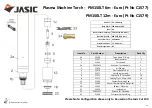
Check the torch consumables frequently to prolong the life.


 

Always ensure the correct consumables are fitted in the torch. Incorrect items may cause damage to the torch or machine.


 

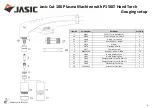
It is recommended that a torch of maximum length of 6 metres is used. If the torch cable is too long, the performance of this cutting machine 
such as arc ignition will possibly be affected due to the fact that the inner resistance of the cable will reduce the output voltage. 


• 

Please Note:


• 

Your air supply must be free of moisture, water, oil or any other contaminants. Excessive water or oil may cause double arcing, excessive    
electrode/tip wear or even torch head failure. Contaminants will also cause poor cut quality.


• 

When starting the arc, ensure you keep the pilot arc time to a minimum to avoid excessive wear on the cutting tip.


• 

Do not overtighten the electrode when fitting a new set of consumables. Over tightening may cause damage to the internal torch head thread 
so that the cutting tip will not seat correctly.


• 

Only use the supplied or recommended 

O

’ 

ring lubricant or grease for your plasma torch head, using the wrong lubricant that cannot         

withstand high temperatures could cause damage to the plasma torch head.   


Summary of Contents for Plasma Cut 100

Page 1: ...Wilkinson Star Technical Jasic Cut 100 P150LT Plasma Hand Torch Manual...

Page 2: ...Also take the necessary steps to protect any persons within the cutting area Index Page Number Jasic Cut 100 with P150LT Plasma Torch Overview 3 P150LT Consumable Breakdowns 4 P150LT Torch Information...

Page 3: ...e 150 Amps at 60 Gas Air Pressure Cutting 76 80 PSI 4 8 5 0 bar Gas Air Flow 466 SCFH 220 lpm Pilot Arc Ignition HF Jasic Cut 100 Plasma Cutting Machine supplied with P150LT 6m Plasma Hand Torch Wilki...

Page 4: ...1 12 C1393 Contact Nozzle Retaining Cap 1 13 C1007 Spring Holder Protection Nut 1 14 C1008 Stand Off Spring for C1007 5 15 C1009 Gouging Spacer use with item 12 1 16 C1010 Spacer for Contact Cutting u...

Page 5: ...m 60A 10 6 C1372 Cutting Tip 1 35mm 90A 10 8 C1018 Extended Diffuser 1 8a C1517 Extended Electrode 5 9 C1369 Extended Tip Max 50A 10 10 C1001 Extended Tip 1 35 90A 10 11 C1389 Nozzle Retaining Cap 1 1...

Page 6: ...d 1 1a 09706 P150LT Handle c w Switch 1 1b C1398 O Ring Torch Head 5 1c C1017 Front Insulator Vespel 1 5 C1377 Swirl Ring Vespel 1 8 C1018 Extended Diffuser 1 8a C1517 Extended Electrode 5 9 C1369 Ext...

Page 7: ...r Vespel 1 3 C1378 Diffuser 1 4 C1376 Electrode Hafnium 5 5 C1377 Swirl Ring Vespel 1 6 C1371 Cutting Tip 1 1mm 60A 10 6 C1372 Cutting Tip 1 35mm 90A 10 8 C1018 Extended Diffuser 1 8a C1517 Extended E...

Page 8: ...h 1 1b C1398 O Ring Torch Head 5 1c C1017 Front Insulator Vespel 1 3 C1378 Diffuser 1 4 C1376 Electrode Hafnium 5 5 C1377 Swirl Ring Vespel 1 6 WB300128 Gouging Tip 2 4mm 100A 10 11 C1389 Nozzle Retai...

Page 9: ...hing as soon as the retaining cap is removed preventing machine operation Without such a protection circuit as previously mentioned the open circuit voltage could be as high as 350V DC at the torch he...

Page 10: ...euro connector socket as shown in image Fig 1 below While using the key provided Fig 6 Push and hold in button in Fig 2 whilst at the same time rotate nut on torch clockwise until fully connected and...

Page 11: ...the Jasic Cut 100 Wilkinson Star Technical Item No Part Number Description Pack Qty 1b C1398 Torch Head O Ring 1 1c C1017 Front Insulator 1 2 C1354 Torch Head 1 2a C3055623 Machine Torch Handle 1 3 C1...

Page 12: ...osing the curtain to the welding bay or erecting screens Start the fume extraction unit before beginning cutting operation Ensure machine is used in a well ventilated area if not used in a welding bay...

Page 13: ...ing the air flow The cutting torch may be burned if the air flow is too low Keep the cutting cable away from sharp edges When the workpiece is nearly cut off slow down the cutting speed and release th...

Page 14: ...e of about 3 4mm and begin drawing the tip across the workpiece You should always start with the torch placed at farthest point from you and then cut by pulling the torch towards you Make sure to keep...

Page 15: ...above When cutting at above 40amps touching the tip to the work material will adversely affect your cut quality and consumable life When you start to drag cut you would place the tip cap of the torch...

Page 16: ...uld be held at a 90 perpendicular angle approximately 12mm or more above the workpiece Begin by establishing the pilot arc and slowly move the torch towards the workpiece until the cutting arc transfe...

Page 17: ...ay depend on the gouging tip profile To create a wider groove you can oscillate the plasma torch side to side in a half moon sequence while maintaining a constant smooth travel speed The gouge created...

Page 18: ...t further for cutting in corners using patterns or in tight areas It is generally best to start a cut from the edge of the plate hold the torch at 90 to the edge of the workpiece Press the trigger and...

Page 19: ...are considered a better option than single phase compressors The accessories used with the compressor are also important providing the correct air pressure air flow which is moisture and oil free is c...

Page 20: ...20 Jasic co uk Wilkinson Star Limited Shield Drive Wardley Industrial Estate Worsley Manchester United Kingdom M28 2WD Telephone 0044 0 161 728 7900 Email sales wilkinsonstar com Issue 4 July 2021...

Reviews: