25
Upper looper body
Mechanical Adjustment
MODEL: AirThread 2000D
To replace the upper looper and to adjust the position of the tip of the upper
looper
To replace the upper looper
To remove:
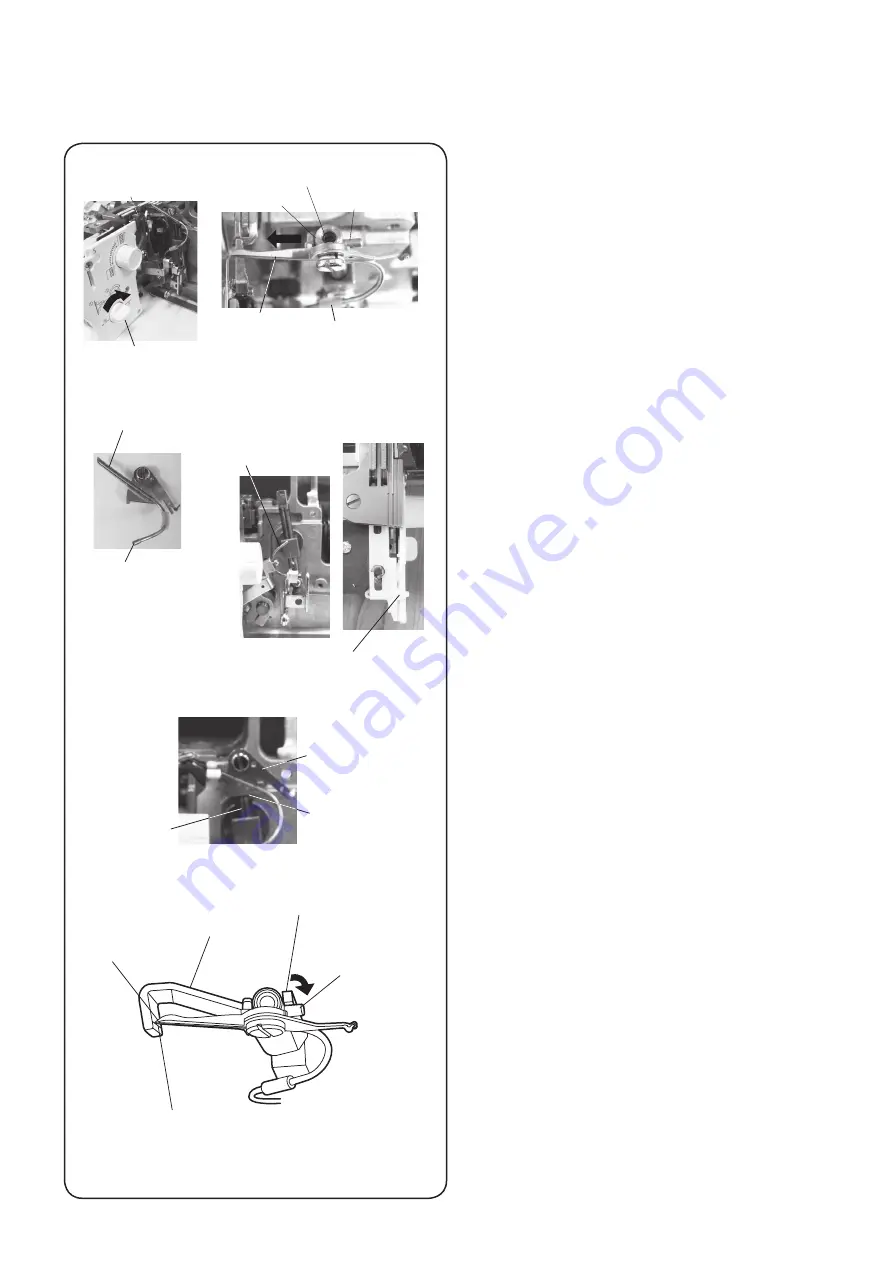
1. Open the looper cover and the side cover.
2. While pressing the upper knife release knob, turn it
clockwise by half a rotation to deactivate the upper knife.
3. Set the chaining finger switch knob to R.
4. Remove the left and right needles.
5. Remove the presser foot (unit).
6. Remove the needle plate.
7. Set the needle bar to the highest position by turning the
handwheel toward you.
8. Loosen the setscrew.
9. Pull the tube upward until the lower end of the tube aligns
with the lower end of the mouth of the upper looper.
10. Pulling up the upper looper, remove the mouth of the
upper looper from the upper looper connecting pipe.
11. Remove the spreader and attach it to the new upper
looper.
To attach:
1. Insert the mouth of the upper looper into the tube and pull
the tube upward until the lower end of the tube aligns with
the lower end of the mouth of the upper looper.
2. Set the needle bar to the highest position by turning the
handwheel toward you.
3. Inserting the upper looper pin into the side hole of the upper
looper, insert the upper looper pipe into the mouth of the
upper looper.
4. Partially tighten the setscrew.
5. Pull the tube downward until the upper end of the tube
aligns with the mouth of the upper looper.
To adjust the position of the tip of the upper looper:
1. Set the upper looper to the leftmost position by turning the
handwheel toward you.
2. Loosen the setscrew. When the upper looper moves down
from the leftmost position, place the upper looper tip gauge
on the upper looper shaft guiding the gauge against the
lower surface of the upper looper. Slightly turn the gauge to
the direction of arrow until the bulge of the gauge touches
the upper looper pin.
3. Move the upper looper to the right or the left to adjust the
position of the upper looper so that the tip of the upper
looper comes to the guide of the upper looper tip gauge.
Partially tighten the setscrew and remove the upper looper
tip gauge.
4. Turn the handwheel toward you to adjust the clearance
between the tip of the upper looper and the rear surface
of the lower looper; and tighten the setscrew (refer to “To
adjust the clearance between the upper looper and the
lower looper”) (Refer to page 28).
5. Attach the needle plate.
6. Attach the presser foot (unit).
7. Attach the left and right needles.
8. While pressing the upper knife release knob, turn it
clockwise by half a rotation to activate the upper knife.
9. Close the looper cover and the side cover.
10. After adjustment, check the leftmost position of the upper
looper, the timing of the upper looper and lower looper, and
the clearance between the needle and the upper looper
(Refer to pages 26, 27 and 29).
Setscrew
Upper
looper shaft
Upper looper pin
Upper looper
Tube
Upper knife release knob
Upper knife
Mouth of the
upper looper
Upper looper
connecting pipe
Needle plate setting knob: R
Upper looper
shaft
Lower edge of
the upper looper
Spreader
Upper looper tip gauge
Bulge
Upper looper pin
Upper looper tip
Guide line


