background image

Page 15

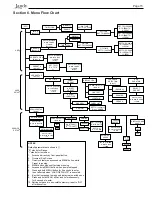
Section 6. Menu Flow Chart

[OFF]

USER SETUP

(Note 6)

ON TIME

SET TO [10:00AM]

DISPLAY LIGHT

[ 2 MIN TIME OUT ]

(Note 8) 

LIGHT OFF

LIGHT ON

 PRESET X

(Note 5)

SET TO [2750] RPM

R: MIN TO MAX

I: 10RPM

(Note 2)

SET TIME

TIMECLOCK

[DISABLE]

ENABLE

SET TO [12:00AM]

R: 12:00AM TO 

11:59PM

I: 1 MIN

LANGUAGE 

SELECTION

 (Note 7)

[ENGLISH]

SPANISH

FRENCH

LABEL

PRESET

SELECT

PRESET

 SET TO [5]

R: 5 TO 8

I: 1 

PRESET 3 OR 4

(Note 1,4) 

SET TO [2750] RPM

R: MIN TO MAX

I: 10RPM

(Note 2)

SET TO [12:00AM]

R: 12:00AM TO 

11:59PM

SET TO [12:00AM]

R: 12:00AM TO 

11:59PM

NOTES

Default parameters are shown in [ ].
“R” stands for Range.
“I” stands for Increment.

1.

Accessed directly by front panel button.

2.

Occurs at Run Screen.

3.

Timeclock features accessed via MENU button while 

       Preset is running.
4.

MENU button has no effect when running.

5.

Accessed via MENU button when pump is stopped.

6.

Press and hold MENU button for 5 seconds to enter.

7.   Is not affected when “LOAD DEFAULTS” is executed.
8.  Key that is pressed to wake up display is also acted upon.
9.   Press and hold MENU, eStar, and 4 simultaneously 
       for 5 seconds to enter.
10. Setting not saved in non-volatile memory; reset to “NO” 
       after execution.

USE

USER

SETUP

SET TO [“

PRESET n

”]

R: ALL CHARS

SELECT

LABEL TYPE

GENERAL

CUSTOM

LABEL LIST

PRESET 2

(Note 1,3) 

SET TO [2750]RPM

R: MIN TO MAX

I: 10RPM

(Note 2,3)

RUN

DURATION

SELECT

PRESET

SET TO [0:00]

R: 30 MIN TO 8 HRS

I: 30 MIN

eSTAR

(Note 1,3) 

OFF TIME

 SET TO [4:00PM]

SERVICE SETUP

(Note 9)

LOAD DEFAULTS

 (Note 10)

[NO]

YES

LAST FAULT

[LAST FAULT]
[2

ND

 TO LAST]

SET MIN LIMIT

SET TO [600]

R: 600 TO MAX LIM

I: 10

SET MAX LIMIT

SET TO [3450]

R: MIN LIM TO 3450

I: 10

SET ESTAR

SPEED

SET TO [1750]RPM

R: MIN TO MAX

I: 10RPM

SET TO [0:30]

R: 0 MIN TO 8 HRS

I: 30 MIN

PUMP

TYPE

[ePUMP]

VSP AC

PRIMING

[SPEED]

DURATION

SET TO [2750]
R: MIN LIM TO

SET TO [1]

R: 1 TO 5 MIN

DISPLAY POWER

USAGE

 [NO]

 YES

TIMECLOCK

[DISABLE]

ENABLE

SET TO [12:00AM]

R: 12:00AM TO 

11:59PM

SET TO [12:00AM]

R: 12:00AM TO 

11:59PM

OFF TIME

 SET TO [4:00PM]

ON TIME

SET TO [10:00AM]

FREEZE

PROTECT

SERVICE

SETUP

Summary of Contents for ePump

Page 1: ...serviced by a professional pool spa service technician The procedures in this manual must be followed exactly Failure to follow warning notices and instructions may result in property damage serious i...

Page 2: ......

Page 3: ...d Stop 9 3 4 Pump Speed Setting 9 3 5 Timeclock Setup and Operation 10 Section 4 Service Setup Options 11 4 1 Entering Service Setup 11 4 2 Minimum and Maximum Pump Speeds 11 4 3 Load Defaults 11 4 4...

Page 4: ...broken or missing Never replace a suction fitting with one rated less than the flow rate marked on the equipment assembly WARNING To Reduce the Risk of Injury a The water in a spa should never exceed...

Page 5: ...trant dans une cuve de relaxation et en sortant Pour viter l vanouissement et la noyade ventuelle ne prendre ni drougue ni alcool avant d utiliser une cuve de relaxation ni quand on s y trouve Les fem...

Page 6: ...crews 6 Plastic Film Additional materials are required for the installation of the user interface and must be supplied by the installer 1 A cable to connect the pump to the remotely mounted user inter...

Page 7: ...ump electrical circuit before starting the procedure Failure to comply may cause a shock hazard resulting in severe personal injury or death 2 Remove the cover of the pump junction box 3 Feed the RS 4...

Page 8: ...o comply may cause a shock hazard resulting in severe personal injury or death 2 Install the normally closed reman s switch to the timeclock assembly See timeclock manufacturer s instructions for deta...

Page 9: ...rted from the controller Manual operation of speeds eStar through 4 differs from manual operation of speeds 5 through 8 NOTE When starting the pump the pump will first run at the priming speed for the...

Page 10: ...UN mode 2 3 4 ePUMP MENU 2 PRESET 2 TIMECLOCK ENABLE 3 5 2 Timeclock Operation When the pump is stopped the associated green LED will illuminate indicating a timeclock program is enabled for that spee...

Page 11: ...enu press and hold MENU then press and hold the and preset 4 keys Hold all three 3 keys down for five 5 seconds To exit press any preset button 2 3 4 ePUMP MENU PRESS PRESET OR MENU 12 00AM PUMP IS OF...

Page 12: ...ing the arrow keys set the priming speed to the desired value Press MENU to accept and store 2 3 4 PRIMING SPEED RPM 3450 ePUMP MENU To set priming duration select PRIMING DURATION using the arrow key...

Page 13: ...s time the ePump controller does not support other types of pumps Section 5 User Set Up Options NOTE The ePumpTM user interface must be in the OFF mode before entering the user setup mode While in set...

Page 14: ...keys select the desired operating mode for the display backlight LIGHT OFF Turn off display backlight LIGHT ON Turn on display backlight 2 MIN TIMEOUT Turn on display backlight with automatic turn of...

Page 15: ...s not affected when LOAD DEFAULTS is executed 8 Key that is pressed to wake up display is also acted upon 9 Press and hold MENU eStar and 4 simultaneously for 5 seconds to enter 10 Setting not saved i...

Page 16: ...lished minimum and maximum specifications 7 Use of non factory authorized parts or accessories in conjunction with the product s 8 Chemical contamination of combustion air or improper use of sanitizin...

Reviews: