


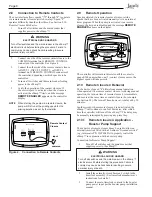


Page 11
3.5.4
Timer Overriding a Manual On
If the pump is started manually at a speed that has been
programmed with a timer, the pump will be stopped by the
timeclock at the programmed off time. A clock icon appears
on the display when the timer has assumed control of the off
time.
Section 4. Service Setup Options
The service setup menu allows the installer to set various
operating parameters, view fault history, and restore factory
defaults.
Parameters that may be modified and set in the service setup
menu include:
Priming speed and duration.
•
Minimum and maximum pump speeds.
•
"
•
" eStar speed.
Pump Freeze Protect operation.
•
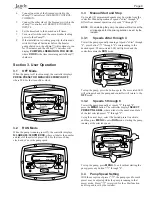
4.1
Entering Service Setup
NOTE
The ePump
TM
user interface must be in the
OFF
mode (all LED's lights must be off) before entering
the user setup mode. While in setup mode the user
interface will return back to the
OFF
mode after one
(1) minute since the last key press.
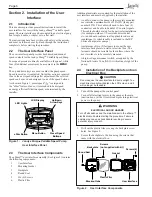
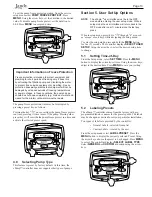
To enter the service setup menu, press and hold
MENU
, then
press and hold the "
" and preset "4" keys. Hold all three
(3) keys down for five (5) seconds. To exit, press any preset
button.
2
3
4
ePUMP
MENU
PRESS PRESET OR MENU
12:00AM PUMP IS OFF
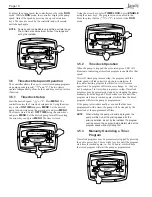
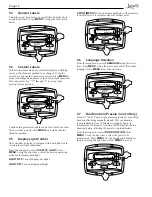
4.2
Minimum and Maximum Pump
Speeds
These speeds are considered global settings across the entire
controller, and create the range of allowable speed that may
be sent to the ePump™.
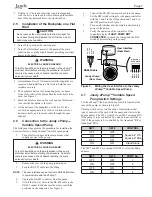
To set the minimum speed, from the service setup menu,
select
SET MIN LIMIT
using the arrow keys. Press
MENU
.
Using the arrow keys, set the minimum speed to the desired
value. Press
MENU
to accept and store.
2
3
4
SET MIN LIMIT
RPM: 600
ePUMP
MENU
To set the maximum speed, from the service setup menu,
select
SET MAX LIMIT
using the arrow keys. Press
MENU
.
Using the arrow keys, set the maximum speed to the desired
value. Press
MENU
to accept and store.
2
3
4
SET MAX LIMIT
RPM: 3450
ePUMP
MENU
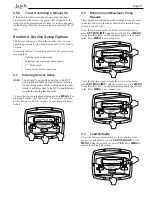
4.3 Load
Defaults
To restore factory default settings to the controller, from
the service setup menu, select
LOAD DEFAULTS
. Press
MENU
. Using the arrow keys, select
YES
. Press
MENU
to
restore factory default settings.
2
3
4
LOAD DEFAULTS
YES
ePUMP
MENU
Summary of Contents for ePump
Page 2: ......


